Witch Leveling Guide using Minions in PoE
Find out how to efficiently level up a Witch character using Minions to fight for youSummoner Witch
Leveling Guide
Updated for Patch 3.19
The Best Crafty Guides by Odealo
| Guide notes |
| October 16, 2022 -Guide created |
Witch is a very popular Class for any Minion-related build. Every Witch's Ascendancy has its own use for such builds. Generally speaking, Elementalist is a very good choice for any Build that revolves around Golems, Occultist excels at Minions that deal mostly Chaos or Cold Damage, and Necromancer is very versatile and good for every type of Minion Build without any specific specialization. When you add Forbidden Jewels to the equation, you can see that Witch is truly a Queen of Minion Builds.
All of those Builds are naturally different from each other, they opt for various game mechanics or playstyles, and try to achieve different goals. But leveling process is very similar for each of them. Most of the customization happens just after you finish the Campaign and start doing the Maps. This Guide aims to provide you with all the necessary information you need to go smoothly through the leveling process so you can enjoy your builds quicker and without any struggles.
It is important to remember that you can get up to 20 Passive Skill Refund Points for free just from doing specific Quests. Many of them come along with regular Passive Skill Point, so you will most probably do them anyway. They are very useful because there are many Passives on the Passive Tree that are not that good in your final version of the Build but can help you a lot during the leveling. It is especially true if your Build uses a lot of Cluster Jewels that are simply inaccessible until you have higher levels, or when you plan on using Energy Shield as your main form of defense, in which case taking some maximum Life Passives is very much recommended as without late-game items your Energy Shield will be pretty low.
Another thing to note is that even though most Minion Skill Gems have a "Spell" Tag, they do not benefit from Spell Damage modifiers. Minions are their own entities and they only benefit from modifiers that precisely say about boosting your Minions. The best ways of increasing your Minion's Damage are increasing their Gem levels, using many Auras, and weakening foes by casting Curses on them.
You can also check our other Path of Exile builds right over here Odealo's Crafty Guides - Full List
1. Important Skills
There are many Minions in the game that you can play around. Most of them come from regular Skill Gems, but some are restricted to specific Unique Items, such as Aarakali's Fang or Dancing Dervish. Many of them require some proper scaling to be fully functional. Minion's survivability is especially the problem during leveling, as you typically won't have all the Minion's Defense Passives or proper Links for every setup. For that reason, we recommend leveling with specific Minions and making the transition to your final version of the build once you reach Maps, or at least the Bloody Aqueducts in Act 8 as it is a very popular location to farm. Summoners are notorious for the number of Skills they have at their disposal but don't feel obliged to use every one of them.
The very first Minion Skill you can get is Raise Zombie. With this skill, you can use a corpse to summon Zombies that fight for you until it dies. The maximum limit of Zombies increases with Gem Levels. Because they are rather weak and not very durable, most players use them as personal meat shields that protect them from enemies. They are pretty useful in that regard, but if you find yourself re-summoning them too often, you can skip using them until later stages of the game.
The next Skill you get is Summon Raging Spirits, also known as SRS. You summon aggressive fiery Spirits that attack nearby enemies. They deal very good Damage but are limited by the short Duration and low Life pool, so you will need to constantly re-summon them during fights. You can have up to 20 Spirits at once. It's one of the Skills you can use to carry you to the end-game.
As your Guard Skill, we recommend using the Steelskin. It doesn't need Armour Rating to be effective and stops Bleeding Damage during its duration. You can buy it from Nessa after completing the Quest in Mud Flats.
Alongside SRS, you will also get an Animate Weapon Skill Gem. It is a very interesting Skill, but due to its nature, it is rather clunky to use when leveling. If you plan on using them in your final Build, you can keep the Skill Gem in your secondary Weapon slot so it still gains Levels as your progress through the campaign.
Summon Skeleton is another interesting Minion Skill. They are very slow but deal good Damage versus a single target, especially the Vaal version of this Skill which summons a huge army of Skeletons. You can have only a few of them, so they are preferably used as supplementary Damage sources when fighting tough enemies. Their low durability gets more and more noticeable as you progress through the campaign, so you can eventually stop using them later on.
Absolution is another Minion Skill that can carry you through the campaign. You can obtain this Skill by unlocking Caverns of Wrath in Act 1. It works more like a regular Spell, except that by killing the enemy or when Hitting a Rare or Unique monster with it, you summon a Sentinel of Absolution which casts a copy of that skill. You can have up to 3 Sentinels and it's really easy to keep them all summoned. They deal tremendously high Damage but cover a rather small area with their Spells.
Getting to Caverns of Wrath will also grant you access to the Offering Spells. You can use them to consume Corpses to get a temporary buff for your Minions, and you can have only one Offering at once. Generally, it is recommended to use the Flesh Offering as it offers the most Damage to your Minions.
In Act 2 you unlock another set of very useful abilities. The first of them is Herald of Purity. It increases your Damage a bit, but that is not why we are using it. with this Herald, you can summon Sentinels of Purity in a similar fashion to Absolution, except you don't need to cast specific Spells. Those Sentinels use their default Attacks and sometimes a more powerful Area Melee Attack. They are immune to Damage, so you do not need to worry about that. Boosting them with Support Gems increases the Mana Reservation of this Skill. Use it only if you are using Absolution, as other Minions won't trigger the Sentinels.
The second important Skill you can get in this Act is Summon Skitterbots. Those 2 little robots will apply Shock and Chill to nearby Enemies. Shock increases the Damage they take, while Chill slows their Action Speed.
Another very powerful tool you get here is Convocation. It is an Instant Spell that recalls all your existing Minions to your current location and restores part of their Health. Great to keep them close to you as sometimes Minions will try to attack very far-away enemies, also helps with their survivability.
The last Skill that you unlock in Act 2 is Desecrate. It is a very important Skill for every summoner as it creates the corpses you can use for your other Skills, like Offering or Raise Zombie. It requires a lot of Dexterity, but you don't need to level it up as Corpse Levels are not important.
In the next Act, you get access to Raise Spectre and Animate Guardian. While those Minions are very powerful and every build can make use of them to support their main Minions, it is recommended to skill using them during leveling due to their poor survivability. You can however put the Skill Gems into your secondary pair of Weapons to keep leveling them as your progress through the Campaign so you can start using them at any time again.
Act 3 also offers you Curse and Aura Skills. Your Curse of choice should depend on the Minions you are using. Elemental Weakness or specific Elemental Curse are good if you are using Elemental Minions such as SRS or Absolution. If you use pure Physical Minions, then you should use the Vulnerability Curse. You can also use Punishment as it increases Damage of every type, on enemies who have less than 50% of their Life.
Aura also depends on your current setup. We recommend getting one defensive Aura and replacing one of the offensive Mana Reservation Skills you were running so far, such as Summon Skitterbots or Herald of Purity. Determination is a very strong defensive tool as it grants you a flat Armour Rating, but getting Elemental Resistances capped, and complete Ailment Immunity from Purity of Elements is also very good.
There you will also unlock Summon Reaper. It is a very specific Minion, one of those that require your whole Build to be made around it. You can give it a try to see if you like it, but even if you do plan on using it later on it's usually better to stick to Absolution or Raging Spirits until you get more levels.
Act 4 is the last one with new Spells. Here you will get Carrion Golem. It is a Golem that strengthens your Minions instead of you, unlike other types of Golems, and deals a moderate amount of Damage on its own. As with every other Golem Skill, you can bind it to your Left Mouse and cast it only if you press Shift Key. It is an important trick because Summoners tend to have an overload of Skills to use on their Skill Bar.
|
|

3. Skill Gems
Your Setups will progressively evolve as you unlock new Skills and Support Gems through the campaign. We recommend getting Tabula Rasa as it is a very helpful item for every leveling character. Its White Sockets allow you to freely change the setups according to your liking. Of course, it is a hard item to get on your first playthrough, you can complete the campaign using only the 4-links or even 3-links in extreme situations.
Suggested leveling Gem setups:
Act 1: When you first arrive in town, you can take either Freezing Pulse or Raise Zombie. Freezing Pulse is recommended as Zombies are quite slow at this stage of the game. You can drop them as soon as you unlock Summon Raging Spirits. You should complete the Quest on Tidal Island to get your first Quicksilver Flask and unlock some useful Support Gems. You don't need to kill Merveil to unlock the final Gems of this Act, you only need to enter the Cavern of Wrath. Once you unlock Absolution, you can choose to transition to that Skill or stick to using Summon Raging Spirits.
| Act 1 Summon Raging Spirit setup | |
 |
Summon Raging Spirit - summons Spirit that automatically attacks nearby enemies with a Melee Attack. You can have up to 20 Spirits at once. |
 |
Combustion Support - increases the Fire Damage of your Flame Wall. |
 |
Minion Damage Support - grants more Damage for your Minions but lowers their Life |
 |
Added Lightning Damage Support - adds a flat amount of Lightning Damage to your Spirits' Attacks |
 |
Summon Phantasms Support - your Minions have a chance to summon other Minions when attacking monsters. |
 |
Melee Splash Support - Spirit's Attack will Hit all enemies near their main target |
| Act 1 Raise Zombie setup | |
 |
Raise Zombie - consume a corpse to create a Zombie. They use Melee Attacks and are rather slow. They do mediocre Damage and protect you from the danger |
|
Added Lightning Damage Support - adds a bit of Lightning Damage to your Zombies |
|
Minion Damage Support - increases the Damage of your Zombies but makes them less durable |
| Act 1 Summon Skeleton setup | |
 |
Summon Skeletons - summons Skeleton Warriors to fight for you for a short duration. They deal high Damage but are very slow. Get a Vaal version for an additional burst of Damage |
|
Added Lightning Damage Support - Skeletons will deal additional Lightning Damage with their Attacks |
|
Minion Damage Support - increases Damage at the cost of lowering their Life |
| Act 1 Absolution setup | |
 |
Absolution - strike the enemies in a circular area. When Hitting a Rare or Unique Enemy, or landing a killing blow, summons Sentinels that mimic this Spell. You can have up to 3 Sentinels at once. |
|
Minion Damage Support - increases Damage of your Sentinels. |
 |
Added Cold Damage Support - adds a bit of Cold Damage for you and your Minions |
|
Added Lightning Damage Support - provides additional Lightning Damage for you and your Minions |
Act 2:Head to the Chambers of Sins to unlock Active Skills first, and then complete the Quest in The Weaver's Chambers secondly to get new Support Gems that require level 18 to use.
| Act 2 Summon Raging Spirit setup | |
|
Summon Raging Spirit - summons Spirit that automatically attacks nearby enemies with a Melee Attack. You can have up to 20 Spirits at once. |
 |
Melee Physical Damage Support - increases the Physical Damage of your Minions, which is later converted into Fire Damage |
|
Minion Damage Support - grants more Damage for your Minions but lowers their Life |
 |
Minion Speed Support - increases Movement and Attack Speed of your Minions. You can also use the Predator Support instead |
 |
Elemental Focus Support - increases Elemental Damage of your Minions. SRS converts 100% of Physical Damage to Fire Damage by default. |
|
Melee Splash Support - Spirit's Attack will Hit all enemies near their main target |
| Act 2 Absolution setup | |
|
Absolution - strike the enemies in a circular area. When Hitting a Rare or Unique Enemy, or landing a killing blow, summons Sentinels that mimic this Spell. You can have up to 3 Sentinels at once. |
|
Minion Damage Support - increases Damage of your Sentinels. |
 |
Controlled Destruction Support - reduces Critical Strike Chance but significantly increases the Damage |
|
Added Lightning Damage Support - provides additional Lightning Damage for you and your Minions |
|
Elemental Focus Support - disables Shocks or other Ailments but gives a lot of Damage in return |
 |
Predator Support - by marking an enemy, you can focus fire on a single enemy and increase the Damage against it |
| Act 2 Zombie setup | |
|
Raise Zombie - consume a corpse to create a Zombie. They use Melee Attacks and are rather slow. They do mediocre Damage and protect you from the danger |
 |
Minion Life Support - boosts the Life of your Zombies to make them more durable and offset the penalty from Minion Damage Support |
|
Minion Damage Support - increases the Damage of your Zombies but makes them less durable |
|
Melee Physical Damage Support - increases Physical Damage dealt by the Zombies |
| Act 1 Summon Skeleton setup | |
|
Summon Skeletons - summons Skeleton Warriors to fight for you for a short duration. They deal high Damage but are very slow. Get a Vaal version for an additional burst of Damage |
|
Melee Physical Damage Support - Skeletons deal purely Physical Damage |
|
Minion Damage Support - increases Damage at the cost of lowering their Life |
|
Predator Support - command your Skeletons to attack the single enemy with increased effectiveness |
Act 3: To get new Support Gems in this Act you will have to do A Fixture of Fate Quest. If you have completed Lilly Roth's Quest on a different character, you can buy Gems from her in your Hideout without doing it on your new toon. They are very useful for your Raise Zombies Setup, but not that important for your main Minion Setup
| Act 3 Raise Zombie setup | |
|
Raise Zombie - consume a corpse to create a Zombie. They use Melee Attacks and are rather slow. They do mediocre Damage and protect you from the danger |
|
Minion Life Support - boosts the Life of your Zombies to make them more durable |
 |
Feeding Frenzy Support - grants a chance to gain the Feeding Frenzy Buff, which boosts the Damage of all your Minions |
 |
Meat Shield Support - your Zombies can protect you better by Taunting enemies and taking less Damage |
Act 4: In this Act, you will get Carrion Golem and some very strong Support Gems.
| Act 4 Summon Raging Spirit setup | |
|
Summon Raging Spirit - summons Spirit that automatically attacks nearby enemies with a Melee Attack. You can have up to 20 Spirits at once. |
|
Melee Physical Damage Support - increases the Physical Damage of your Minions, which is later converted into Fire Damage |
|
Minion Damage Support - grants more Damage for your Minions but lowers their Life |
 |
Multistrike Support - Minions repeat their Attacks, with more Damage for each repeat |
|
Elemental Focus Support - increases Elemental Damage of your Minions. SRS converts 100% of Physical Damage to Fire Damage by default. |
|
Melee Splash Support - Spirit's Attack will Hit all enemies near their main target |
| Act 4 Absolution setup | |
|
Absolution - strike the enemies in a circular area. When Hitting a Rare or Unique Enemy, or landing a killing blow, summons Sentinels that mimic this Spell. You can have up to 3 Sentinels at once. |
|
Minion Damage Support - increases Damage of your Sentinels. |
|
Controlled Destruction Support - reduces Critical Strike Chance but significantly increases the Damage |
|
Added Lightning Damage Support - provides additional Lightning Damage for you and your Minions |
|
Elemental Focus Support - disables Shocks or other Ailments but gives a lot of Damage in return |
 |
Spell Echo Support - makes linked spell gems repeat themselves after the initial cast with increased Cast Speed and no additional Mana Cost |
| Aura setup | |
 |
Determination - grants you a big amount of flat Armour Rating. Very important during leveling. |
 |
Grace - similarly to the previous aura, but this time it gives you an Evasion Rating. Use one of them depending on your preferences |
 |
Clarity - gives you a solid amount of Mana Regeneration. Try to keep it at a low level to avoid big Reservation Cost |
 |
Vitality - just like Clarity, only this one gives you Life Regeneration. |
 |
Herald of Purity- summons Minions when you Hit or Kill enemies. Works very well with Absolution, but not that much with other Minions |
 |
Summon Skitterbots - summons 2 robots that Chill and Shock all nearby enemies by a fixed amount |
| Utility Skills | |
 |
Flame Dash - a blink skill that helps you move around faster. Available in Act 1 |
 |
Elemental Weakness - use this Curse if your Minions deal primarily Elemental Damage. Available in Act 3 |
 |
Vulnerability - this Curse, on the other hand, increases Physical Damage taken by the enemies. Available in Act 3 |
 |
Convocation - use this Spell to instantly resummon all your active Minions to your location and heal them a bit. Available in Act 2 |
 |
Flesh Offering - consumes corpses to grant your Minions temporary buff to their Attack, Cast and Movement Speed. Available in Act 1 |
 |
Desecrate - summons corpses that can be used by your other Skills. Available in Act 2 |
 |
Steelskin - a Guard Skill that forms a protective barrier to protect your Life. |
|
|
4. Gear
You can level up using only the gear you find during the Campaign with no problems. In fact, Summoners are famous for being exceptionally good at doing just that because of how strong Minions are in the early game. But if you supplement yourself with a few Unique Items, you will complete all Acts in a timely manner.
The best Item you can possibly get for smooth leveling is Tabula Rasa Unique Armour. Having 6-link at level 1 is a tremendous help, as it grants you and your Minions more power and customization. Another important piece of Gear you can get is a Rare Wands with "+1 to Level of all Physical Spell Skill Gems" as almost every Minion Skill Gem has a "Physical" Gem Tag. You can get such Wands at a very low level, as this Mod has no level Requirements at all.
It is important to get as much Movement Speed bonus as you can get. The faster you run, the faster you will be done with the Campaign. Having good Boots can save you a lot of time, and the best Unique Boots you can get are actually available straight at level 1. Another important source of Movement Speed is your Flasks Setup. Having 2 or 3 Quicksilver Flasks will allow you to constantly have one active. You can also use Silver Flask to get Onslaught Buff, which will grant you another 20% Movement Speed. This flask, however, has less uptime than Quicksilver Due to higher Charge cost. Try to get 20% Quality on every flask to prolong their Duration and get some useful Magic Modifiers that will allow you to use them more.
During leveling, you should only care about getting high Elemental Resistances. Having maximum Life on your gear helps for sure, but it is not as impactful. Armour bases are also quite useful, but you should focus on getting proper links for your Skills first. Because you are using mostly Blue Skill Gems, you will have greater chances to gain such Sockets on Intelligence-related items. You can craft additional Resistances on your Rare gear by using Crafting Bench, low-level Crafts are very cheap and effective.
You can also use Essences you will find on your way to craft some useful Rare Gear. The Essence of Anger, Wrath, and Hatred will guarantee at least one Elemental Resistances on your Armour pieces, while The Essence of Rage and Sorrow can provide you with lacking Attributes when used on Rings. Using higher level Essence will provide better stats, but also yield higher level requirements on crafted Item.
 Tabula Rasa - this is the best Armour you can get at level 1. Having 6-linked White Sockets allows you to customize your build freely. You can get Corrupted Implicits for relevant Gem Tags, but it is slightly more expensive. Tabula Rasa - this is the best Armour you can get at level 1. Having 6-linked White Sockets allows you to customize your build freely. You can get Corrupted Implicits for relevant Gem Tags, but it is slightly more expensive. |
|
| Item has no level requirement and Energy Shield (Hidden) Item has 6 White Sockets and is fully linked (Hidden) Example of corrupted implicit: +2 to Level of Socketed Duration Gems |
|
 Goldrim - best Helmet for leveling, also available at level 1. Provides a lot of Elemental Resistances Goldrim - best Helmet for leveling, also available at level 1. Provides a lot of Elemental Resistances |
|
| +(30-50) to Evasion Rating 10% increased Rarity of Items found +(30-40)% to all Elemental Resistances Reflects 4 Physical Damage to Melee Attackers Level Requirement reduced by 100 (Hidden) |
|
 Le Heup of All - Damage from this Ring doesn't affect your Minions, but it still provides a lot of Attributes and Elemental Resistances for you. Le Heup of All - Damage from this Ring doesn't affect your Minions, but it still provides a lot of Attributes and Elemental Resistances for you. |
|
| Adds 1 to 4 Physical Damage to Attacks +(10-30) to all Attributes (10-30)% increased Damage (10-30)% increased Rarity of Items found +(10-30)% to all Elemental Resistances |
|
 Praxis - if you have problems with Mana or want to keep your Clarity on lower levels you can use this Ring Praxis - if you have problems with Mana or want to keep your Clarity on lower levels you can use this Ring |
|
| +(20-30) to maximum Mana +(30-60) to maximum Mana Regenerate (3-6) Mana per second -(8-4) to Total Mana Cost of Skills 8% of Damage taken Recouped as Mana |
|
 Kikazaru - this is also useful for your Mana Regeneration, but also provides some Life Regeneration and Attributes. Kikazaru - this is also useful for your Mana Regeneration, but also provides some Life Regeneration and Attributes. |
|
| +(20-30)% to Lightning Resistance +(10-15) to all Attributes (20-40)% increased Mana Regeneration Rate 60% reduced Effect of Curses on you Regenerate 3 Life per second per Level |
|
 Astramentis - this Amulet solves all your problems with Attribute Requirements Astramentis - this Amulet solves all your problems with Attribute Requirements |
|
| +(10-16) to all Attributes +(80-100) to all Attributes -4 Physical Damage taken from Attack Hits |
|
| Trigger Socketed Curse Skill when you cast a Curse Skill, with a 0.25 second Cooldown +(50-90) to maximum Energy Shield 0.2% of Spell Damage Leeched as Energy Shield for each Curse on Enemy You can apply an additional Curse Curse Skills have (10-20)% increased Cast Speed |
|
 Perandus Blazon - its a very good Belt if you lack Attributes, it also prolongs the Duration of your Flasks Perandus Blazon - its a very good Belt if you lack Attributes, it also prolongs the Duration of your Flasks |
|
| (15-25)% increased Stun and Block Recovery +(20-30) to all Attributes (6-8)% increased Quantity of Items found +20% to Fire Resistance 20% increased Flask Effect Duration -2 Physical Damage taken from Attack Hits |
|
 Karui Ward - this Amulet can help you a lot with Attributes, it also has a bonus for your Movement Speed Karui Ward - this Amulet can help you a lot with Attributes, it also has a bonus for your Movement Speed |
|
|
+(20-30) to Dexterity |
|
 String of Servitude - with proper roll this Belt can give you a lot of Elemental Resistances String of Servitude - with proper roll this Belt can give you a lot of Elemental Resistances |
|
| <(1-2) Random corrupted implicit modifiers> Implicit Modifier magnitudes are tripled Level Requirement reduced by 100 (Hidden) |
|
 Rare Wand - try to get one with "+1 to Level of all Physical Spell Skill Gems". They are pretty common, available since level 1, and it is the only modifier that can benefit your Minions at low levels. At higher levels, you can get modifiers to increase Minion Damage or their Attack and Cast Speed Rare Wand - try to get one with "+1 to Level of all Physical Spell Skill Gems". They are pretty common, available since level 1, and it is the only modifier that can benefit your Minions at low levels. At higher levels, you can get modifiers to increase Minion Damage or their Attack and Cast Speed |
|
|
Mandatory Affixes: |
|
 Seven-League Step - this is an absolute winner when it comes to Movement Speed. They are quite expensive, but you can simply resell them when you are done with leveling. Can be worn at level 1 Seven-League Step - this is an absolute winner when it comes to Movement Speed. They are quite expensive, but you can simply resell them when you are done with leveling. Can be worn at level 1 |
|
| 50% increased Movement Speed Level Requirement reduced by 100 (Hidden) |
|
 Wanderlust - not as potent, but still good. They offer decent Movement Speed and you Cannot be Frozen when you use them. Also available at level 1. Wanderlust - not as potent, but still good. They offer decent Movement Speed and you Cannot be Frozen when you use them. Also available at level 1. |
|
| +5 to Dexterity +(10-20) to maximum Energy Shield (20-40)% increased Mana Regeneration Rate 20% increased Movement Speed Cannot be Frozen |
|
|
Stat priorities on Rare Items:
|
|
Suggested Flasks:
|
|
    |
|
|
5. Passive Skills
To successfully create the Passive Tree for a Build, you have to consider most of the Passive Clusters for a given build, choose a few of them, and make an optimal path to allocate most of them in the least amount of Passive Skill Points spent. You have to think about every aspect of the Build: the Damage, Life or Energy Shield, way of mitigating incoming Damage, Attributes, Cluster Jewels, etc. Every Build is a bit different, but they often share some similarities in their choices. Below you can find a list of the most efficient and powerful passives for a Summoner.

| S TIER | |
|---|---|
| The best and most efficient Passives in the Passive Tree. You will want to take them on almost every build. | |
 |
This Passive Cluster gives the most Minion Damage out of all Passives in the game. In most cases, you will even want to grab the Small Passives leading to the Spiritual Aid Notable just because of how efficient they are, |
 |
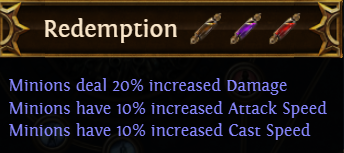
This Aura Cluster is placed very close to the Redemption Notable. Auras are very powerful, you want to fit as many of them as possible into your Build. |
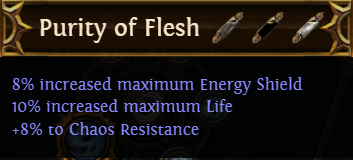 |
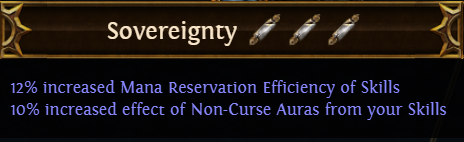
This Notable is connected to the same traveling Node as the Sovereignty. It offers very good maximum Life bonuses, as well as Chaos Resistances which are quite hard to obtain. |
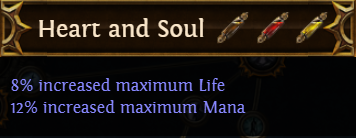 |
Another good defensive Notable. It grants maximum Life and Mana, and you can grab it at the very beginning of your Passive Tree progression. |
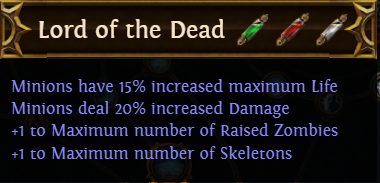 |
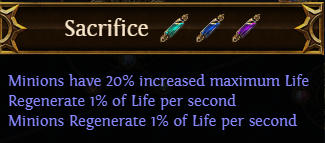
This Notable is very strong even if you don't use Zombies or Skeletons in your Build. Also, it's very close to the Witch's starting point. |
| A TIER | |
| Those are also very good Passives, just not as universal as previous ones | |
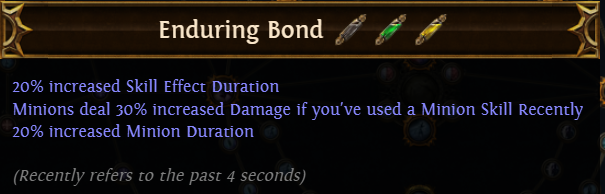 |
This is one of the best Passives for non-permanent Minions. It increases their Duration and rewards you for using Minion Skill frequently |
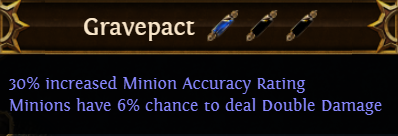 |
Double Damage is one of the best Damage modifiers in the game, and its source is really scarce. Accuracy Rating is very useful for Attack-based Minions. |
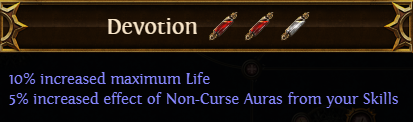 |
Grants a decent amount of maximum Life and improves the effects of your Auras, which is a rare stat outside Aura Clusters |
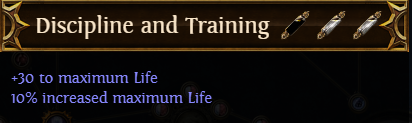 |
It's one of the best maximum Life Passives in the entire Passive Tree. It adds tons of maximum Life and lies in a very convenient location, nearby the Templar starting point. |
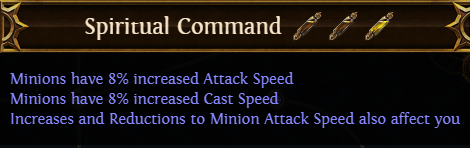 |
The modifiers it grants to your Minions are not amazing, but not bad either. The main selling point of this Notable is increasing your Attack and Cast Speed which is huge Quality of Life upgrade. |
 |
Defensive Notables are also important for your Minions, especially since the latest Patch. This Notable grants quite good Stats and is in very close proximity to the previous Notable. |
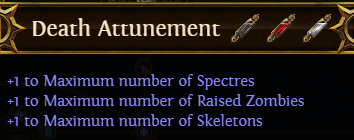 |
This is a must-have Notable if you plan on using Spectres in your Build. Various Utility Spectres and Meatshield Zombies are a great addition to every Minion Build. |
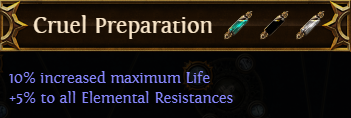 |
Grants good maximum Life and some Elemental Resistances. Especially useful during leveling to help you with your Resistances |
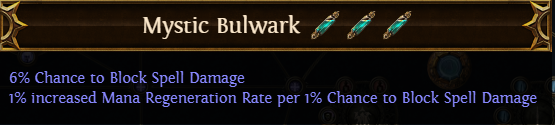 |
In many cases, you will want to unlock the Jewel Socket nearby this Notable. For extra 2 Passive Skill Points, you can get a decent amount of unconditional Spell Block Chance. |
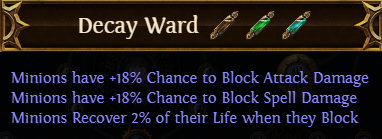 |
This Cluster paired with Bone Offering will put your Minions almost at the Block Chance Cap for Spells and Attacks. |
| B TIER | |
| Passives that belong to this Tier fulfill their specific purpose | |
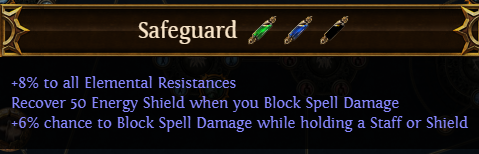
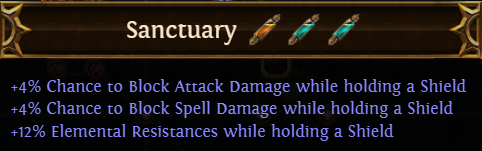 |
It's a very good Cluster if you are using Shields. Provides Block for both Attack and Spells, Elemental Resistances, and gives access to a strong Shield Mastery |
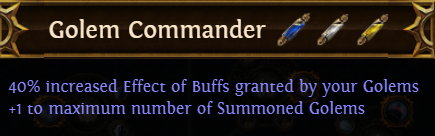 |
Increases the limit of summoned Golems and increases their Buff Effect. Very good for Golemancer Builds, but not that useful for any other type of Summoner. |
 |
It's a great Notable if you want to improve your Clear Speed. Due to its location on the Passive tree, it's a good idea to Anoint in on your Amulet. |
 |
Newly added Notable to make Critical Minions more viable. This route still seems underwhelming, but it might change in the future. |
 |
Another very potent Block Chance Notable. It also provides Elemental Resistances and some Energy Shield Recovery. |
| Masteries Priority |
|
If you have any other build requests please leave that in the comments below. We are always open to suggestions and constructive feedback.
Pictures used in this article are the intellectual property of Grinding Gear Games.
