Witch Leveling Guide using Cold DoT in PoE
One of the best and most efficient routes you can take when leveling up a Witch characterCold DoT Witch
Leveling Guide
Updated for Patch 3.19
The Best Crafty Guides by Odealo
| Guide notes |
| October 16, 2022 -Guide created |
Cold Damage over Time is quite unique archetype introduced to Path of Exile. There are many ways to build a character around this mechanic, with different Defences layers and expectations about the end-game capabilities. Even though those Builds vary a lot from each other, leveling process is very similar for all of them. Occultist is the most popular choice of Ascendancy for such Builds, but Elementalist is a fairly viable option too.
This Guide aims to help you with the progression from the first Act to the very end of the Campaign, regardless of how your final Build might look like. Most of the customization and build-defining features happen around level 70, but feel free to experiment on your way there. Just by doing Quests along the way, you can get up to 20 Passive Skill Refund Points, and most of them are included in regular Passive Skill Point Quests, so you want to complete them anyway. There are many Passive Skills that are fairly useful, just not optimal for your final build. Such Passves like additional Elemental Resistances, Attributes, or Mana Regeneration, are usually very close to your Skill Tree patching and can be a great help during leveling. Witch Builds are often specialized into Energy Shield as their main Defense, either by picking up Chaos Inoculation or Reserving their Life for additional Auras. This means picking up Maximum Life on Passive Tree would be a waste, but it is very helpful if you do so during the Campaign. During the leveling, you will have very low amounts of Energy Shield, while your base Life will increase with every new Level.
You can also check our other Path of Exile builds right over here Odealo's Crafty Guides - Full List
1. Important Skills
When creating a Build with Cold Damage over Time as the main theme in mind, you can choose among a few particular Skills. They all have their own strengths and weaknesses, or different playstyles, but they all are very much viable in the end-game. Some skills however are just better than others in the early game. We recommend leveling up by using Wintertide Brand as your main Skill and Vortex as a secondary supplement of damage.
Wintertide Brand is the first Skill you will get access to that belongs to the Cold DoT Skill archetype. It is a Brand Skill, that deals increasingly more Damage for each Stage it gains. When full Stages are reached, it releases a big wave that deals maximum DoT damage to all nearby enemies. It is a very strong Skill that has both good clear speed and very strong single-target Damage. By default, you can have up to 3 Active Brands at once, and 2 of them Attached to the same Enemy. Getting more Cast Speed accelerates the rate of gaining Stages, and casting Brands themself. You will be rewarded with this Skill Gem for entering the Caverns of Wrath in Act 1.
From the same Quest, you will also be awarded a Creeping Frost Skill Gem. By casting an icy projectile, you will create a Chilling Area at the impact. This Area will slowly move towards the closest enemy. It's also a strong Skill and you can freely check if you like it better than Wintertide Brand, but we find it lackluster without proper support available later in the game.
In the next Act, you will gain access to the Cold Snap. This Skill has a Cooldown that can be bypassed by spending Frenzy Charge. Conveniently enough, monsters killed in a Chilling Area made by this Skill have a high chance to grant you a Frenzy Charge. This Skill suffers from slow Cast Speed and rather limited Area coverage at the lower levels.
In Act 3 you will get a very powerful Skill called Vortex. It is an Instant Skill with a short Cooldown, that leaves the Chilling Area underneath you when used, and you can also use Frostbolt to get higher Area coverage as it will explode at their location instead. It is a very desirable Skill to use either as a supplementary damage bonus or even a main damaging ability due to being an instant cast. For leveling purposes, we recommend the first option as the Cooldown is quite noticeable early on.
Exposure is a very important tool for every Elemental build out there. It lowers the enemy' Elemental Resistance to their corresponding Element by a fixed amount. The best Skill to apply Cold Exposure is the Frost Bomb available in early Act 1. It creates an orb that explodes after a short duration and applies Exposure as well as a Debuff that reduced Life and Energy Shield regeneration on the enemy.
The best Curse for such builds is Frostbite. It lowers Cold Resistance and gives a solid chance to Freeze enemies with your Cold Damage. Note that you can Freeze only with Hits. If you get a source of additional Curse on enemies, you can use Elemental Weakness to shred the Cold Resistances even further.
There are many powerful Auras to boost your Damage, but for smooth leveling, we recommend using the Defensive Aura instead. Most likely you will have enough Damage to quickly kill monsters anyway, but Armour or Evasion is quite hard to come by if you don't pay attention to every single Item you drop. Determination or Grace are very strong Auras available in Act 3 and you should pick one depending on your final build.
Steelskin and Stone Golem are very useful skills to boost your defense even further at a very little cost. They are especially important when you decide to do Lord's Labirynth for your Ascendancy Points. Steelskin provides an absorbing shield, while Stone Golem grants you a healthy amount of Health Regeneration.
To move around more swiftly, you should use Flame Dash. It is a very potent Travel Skill available in Act 1. It has long range and short cooldown on charges. You can store up to 3 uses, and the first cast is instant.
|
|

3. Skill Gems
With every new Act, you will unlock new, more potent Support Skills so your setup will change accordingly. To avoid any problems with different socket colors, we recommend using a Tabula Rasa Unique Armour. It is a very small expense and will save you a lot of time. You can skip this option and use only the found Gear with no problems, In that case, you should keep eye on Intelligence-based Items, as they tend to have mostly Blue Sockets. When using a 6-link, you can optionally choose to put 2 Active Skills with 4 Support Gems in it.
New Skill Gems are unlocked by doing specific Quests during the Campaign, either as direct Quest Reward or indirectly by unlocking the possibility to buy it from Vendor, most of them are on the way to the next Act anyway, but Library one in Act 3 requires extra effort. You will gain access to every Gem regardless of your Class in Act 6 by doing Lilly Roth's Quest. Doing so will also unlock her shop in your Hideout for every new Character you make in the same League.
Suggested leveling Gem setups:
Act 1: Once you arrive in Town, talk to Tarkleigh to get Freezing Pulse Skill Gem. It is a solid Skill that will serve you well until you get access to Wintertide Brand at the end of Act 1.
In this Act, you will gain access to the following Skills: Freezing Pulse, Wintertide Brand, Steelskin, Flame Dash, Clarity, Frostbomb
| Freezing Pulse setup | |
 |
Freezing Pulse - Shots a cold projectile that pierces through all enemies. Damage decreases with distance |
| Act 1 Support Gems | |
 |
Arcane Surge Support - spending Mana will grant you a Buff that increases your Damage and Mana Regeneration |
 |
Added Lightning Damage Support - adds Lightning Damage to your Freezing Pulse |
 |
Added Cold Damage Support - adds Cold Damage to your Freezing Pulse |
| Wintertide Brand setup | |
 |
Wintertide Brand - attaches a Brand to the enemy that deals increased Cold Damage over Time for each Stage it gains. You can have 2 brands Attached to one enemy |
| Act 1 Support Gems | |
|
Arcane Surge Support - by spending enough Mana you get a Buff that boosts your Damage and Mana Regeneration |
 |
Efficacy Support - increases the Damage and Duration of your Brand |
| Act 2 Support Gems | |
 |
Controlled Destruction Support - increases the Damage and lowers the Critical Strike Chance |
 |
Elemental Focus Support - disables the Chill effect but adds a big amount of Damage |
 |
Faster Casting Support - increases the Casting Speed of the Brand. It also boosts gaining Stages by that Skill |
| Act 3 Support Gems | |
 |
Inspiration Support - spending Mana grants you Inspiration Chagres, which boosts your Elemental Damage |
 |
Hypothermia Support - increases Cold Damage over Time dealt by supported Skills |
 |
Swift Affliction Support - increases Damage over Time but lowers the Duration |
| Remove: Faster Casting Support, Arcane Surge Support, Elemental Focus Support | |
Vortex is available in Act 3 as a reward for killing Commander Gravicius. You can use it in a separate 4-link setup or as a double 5-link with Wintertide Brand.
| Vortex setup | |
 |
Vortex - creates a damaging Chill Area at your location. It's an instant Skill with a short Cooldown |
| Act 3 Support Gems | |
|
Swift Affliction Support - reduces the duration of Vortex but increases the Damage it deals |
|
Controlled Destruction Support - increases the Damage at the cost of reducing Critical Strike Chance |
|
Elemental Focus Support - adds a lot of Damage but disables Chill effect |
| Act 4 Support Gems | |
| Bonechill Support - increases the Cold Damage enemy takes from every source proportionally to the Chill effect. | |
| Remove: Elemental Focus Support | |
In Act 1 you will unlock very useful Utility Skills, while Act 3 will give you access to powerful Auras and Curses.
| Aura setup | |
 |
Determination - this Aura grants you a Flat amount of Armour Rating. It is important to have at least one defensive aura during leveling. |
 |
Grace - just as Determination, except this one grants Evasion Rating. Choose one depending on your final build. |
 |
Clarity - this Aura is available in Act 1. It grants a flat Mana Regeneration value. Try to keep it at a low level, just enough to cover your mana needs. |
 |
Vitality - works the same way as Clarity, but this time it grants you Life Regeneration. Higher levels grant more Regeneration but cause higher Mana Reservation |
 |
Malevolence - if you prefer more Damage, you can use this Aura instead. It grants a boost to the Damage and Duration of your DoTs. |
| Utility Skills | |
 |
Flame Dash - quickly teleports you in a short distance. You can store up to 3 uses. |
 |
Frostbite - this Curse lowers enemies' Cold Resistances and gives chance to Freeze with your Hits. |
 |
Elemental Weakness - use this when you get a source of additional Curse allowed on the enemy. It lowers all Elemental Resistances. |
 |
Frost Bomb - inflicts Cold Exposure and reduces Life Regeneration. Especially useful in a fight with Oak in Act 2. |
 |
Steelskin - use this Skill to lower the Damage you take for a short duration |
|
|
4. Gear
Leveling is a very smooth process for a Cold Damage over Time user. The Skills are fairly strong on their own and do not need any extras for the Campaign. Your Damage mostly comes straightly from Gem Levels and Support Gems. For that reason, the best Unique Armour you can get is Tabula Rasa. It is really cheap and saves you a lot of time. Alternatively, just use any 4-link item with matching Socket Colours. Having proper Links is more important than any modifiers on the Item. If you got your Links sorted out, it's time to talk about the Weapon. The best leveling wands you can get is a simple Rare Item with just one modifier: "+1 to Level of all Cold Spell Skill Gems". Other useful modifiers, like Spell Damage or Cold Damage, or even Cold Damage over Time Multiplier, are of course very welcome, but not as important. You can find such a Wand on the Market for a few Chaos Orbs with ease, or with a bit of Luck find it yourself in Act 1 as it is a pretty common modifier.
Maximum Life on your Gear is a nice thing to have, but it is not important, most of it will come from your Levels themself. Armor or Evasion Rating should be covered by your Auras. That leaves only one form of Defense you will need to get on your Rare Items: Elemental Resistances. You should aim to have at least 60% Resistance of each Element, excluding Chaos. To help with that, you should use Essences found during the Campaign, and the Crafting Bench in your hideout. Use the low-tier Crafts, as they are cheap and effective, while high tiers will also raise the Required Level to wear an Item.
Proper Flask Setup makes Leveling much quicker and easier. Try to get 2 or 3 Quicksilver Flasks so you can have at least one active at all times. Granite Flask is especially useful once you step into Act 5, as there is a very noticeable spike in Physical Damage dealt by the enemies. You can swap one Quicksilver Flask for a Silver Flask, which will grant you Onslaught Buff for an additional 20% Movement Speed bonus. 20% Quality on each Flask is an easy way to prolong their Duration.
 Tabula Rasa - it is a 6-link Armour that you can wear at level 1 and provides nothing else except raw firepower. You can get a Corrupted Implicit for additional levels to your Main Skills. Tabula Rasa - it is a 6-link Armour that you can wear at level 1 and provides nothing else except raw firepower. You can get a Corrupted Implicit for additional levels to your Main Skills. |
|
| Item has no level requirement and Energy Shield (Hidden) Item has 6 White Sockets and is fully linked (Hidden) Example of corrupted implicit: +2 to Level of Socketed Duration Gems |
|
 Goldrim - this helmet is packed with Elemental Resistances. Also can be worn at level 1. Goldrim - this helmet is packed with Elemental Resistances. Also can be worn at level 1. |
|
| +(30-50) to Evasion Rating 10% increased Rarity of Items found +(30-40)% to all Elemental Resistances Reflects 4 Physical Damage to Melee Attackers Level Requirement reduced by 100 (Hidden) |
|
 Le Heup of All - great all-around Ring. Provides Damage, Attributes, and Elemental Resistances. Le Heup of All - great all-around Ring. Provides Damage, Attributes, and Elemental Resistances. |
|
| Adds 1 to 4 Physical Damage to Attacks +(10-30) to all Attributes (10-30)% increased Damage (10-30)% increased Rarity of Items found +(10-30)% to all Elemental Resistances |
|
 Praxis - this Rings pretty much solves all your Mana problems during the Campaign if you get high Rolls on its modifiers. Praxis - this Rings pretty much solves all your Mana problems during the Campaign if you get high Rolls on its modifiers. |
|
| +(20-30) to maximum Mana +(30-60) to maximum Mana Regenerate (3-6) Mana per second -(8-4) to Total Mana Cost of Skills 8% of Damage taken Recouped as Mana |
|
 Death Rush - Adrenaline granted by this Ring gives you 100% increased Damage and 20% Movement Speed for a short duration. Usually requires level 30, but with proper Corrupted Implicit, can be worn at level 1, nevertheless, that is quite an expensive luxury. Death Rush - Adrenaline granted by this Ring gives you 100% increased Damage and 20% Movement Speed for a short duration. Usually requires level 30, but with proper Corrupted Implicit, can be worn at level 1, nevertheless, that is quite an expensive luxury. |
|
| +(17-23)% to Chaos Resistance Recover (3-5)% of Life on Kill Gain Adrenaline for (1-3) seconds on kill |
|
 Kikazaru - it provides good Life and Mana Regeneration, on top of having Attributes and some Elemental Resistances Kikazaru - it provides good Life and Mana Regeneration, on top of having Attributes and some Elemental Resistances |
|
| +(20-30)% to Lightning Resistance +(10-15) to all Attributes (20-40)% increased Mana Regeneration Rate 60% reduced Effect of Curses on you Regenerate 3 Life per second per Level |
|
 Astramentis - with this Amulet you won't need to worry about getting Attributes on your other pieces of Gear. Astramentis - with this Amulet you won't need to worry about getting Attributes on your other pieces of Gear. |
|
| +(10-16) to all Attributes +(80-100) to all Attributes -4 Physical Damage taken from Attack Hits |
|
 Doedre's Tenure - give a lot of Damage for your Spells, but slightly reduce Cast Speed. Aim for the lowest reduction as it can be quite annoying. Doedre's Tenure - give a lot of Damage for your Spells, but slightly reduce Cast Speed. Aim for the lowest reduction as it can be quite annoying. |
|
| +(20-50) to Intelligence 100% increased Spell Damage (25-15)% reduced Cast Speed |
|
 Perandus Blazon - this Belt offers a decent amount of Attributes and makes your Flasks last longer Perandus Blazon - this Belt offers a decent amount of Attributes and makes your Flasks last longer |
|
| (15-25)% increased Stun and Block Recovery +(20-30) to all Attributes (6-8)% increased Quantity of Items found +20% to Fire Resistance 20% increased Flask Effect Duration -2 Physical Damage taken from Attack Hits |
|
 Karui Ward - even though we don't use projectiles, this Amulet is very good because it grants useful Attributes and Movement Speed Karui Ward - even though we don't use projectiles, this Amulet is very good because it grants useful Attributes and Movement Speed |
|
|
+(20-30) to Dexterity |
|
 String of Servitude - this Belt can give you a lot of Elemental Resistances if it has proper Implicit String of Servitude - this Belt can give you a lot of Elemental Resistances if it has proper Implicit |
|
| <(1-2) Random corrupted implicit modifiers> Implicit Modifier magnitudes are tripled Level Requirement reduced by 100 (Hidden) Desired Implicit: (42-48)% to All Elemental Resistances |
|
 Rare Wand - Wands with "+1 to Level of all Cold Spell Skill Gems" modifier will give you the most Damage and are very cheap to obtain. Other than that, look for increases to Cold or Spell Damage. Rare Wand - Wands with "+1 to Level of all Cold Spell Skill Gems" modifier will give you the most Damage and are very cheap to obtain. Other than that, look for increases to Cold or Spell Damage. |
|
|
Mandatory Affixes: |
|
 Seven-League Step - best Boots you can wear for the entire Campaign. They give a massive bonus to Movement Speed. Avoid Labirynth's Enchant on them, as it will increase the required level to use. Seven-League Step - best Boots you can wear for the entire Campaign. They give a massive bonus to Movement Speed. Avoid Labirynth's Enchant on them, as it will increase the required level to use. |
|
| 50% increased Movement Speed Level Requirement reduced by 100 (Hidden) |
|
 Wanderlust - cheap and effective boots. Available since level 1, they grant a decent amount of Movement Speed and Immunity to Freeze Wanderlust - cheap and effective boots. Available since level 1, they grant a decent amount of Movement Speed and Immunity to Freeze |
|
| +5 to Dexterity +(10-20) to maximum Energy Shield (20-40)% increased Mana Regeneration Rate 20% increased Movement Speed Cannot be Frozen |
|
|
Stat priorities on Rare Items:
|
|
Suggested Flasks:
|
|
    |
|
|
5. Passives
Passive Tree in Path of Exile looks scary and complex at the first sight, but it's quite simple once you get used to it. You don't need to remember every single Passive in the Tree in order to make a good build, just the general idea is good enough. To plan a Build, you have to consider which Passives are a must for your Build and which are optional. Your decisions will greatly affect your Damage, Defensive Layers, future Gear choice, and other resources. You will also have to adapt to your budget, Cluster Jewels are often very strong, but also cost a lot.

| S TIER | |
|---|---|
| Those are one of the best Passives for Cold DoT Builds. Brand Passives are very strong, which is why it's recommended to level up with Wintertide Brand and eventually refund them later. | |
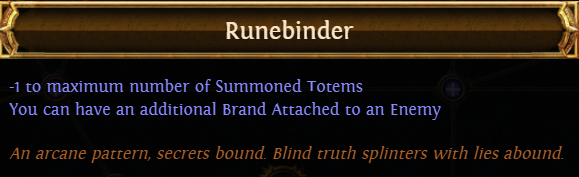 |
This is the best Keystone for any Build that uses Brands as their main source of Damage. By default, you can attach up to 2 Wintertide Brands to an Enemy. This Keystone does NOT increase the maximum number of summoned Brands. |
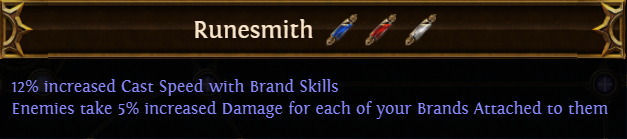 |
This Brand Cluster is placed right next to the Runebinder Keystone. Paired together, it will increase Damage taken by an Enemy by up to 15% which is a huge boost. |
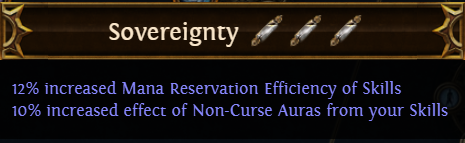 |
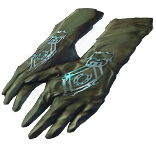
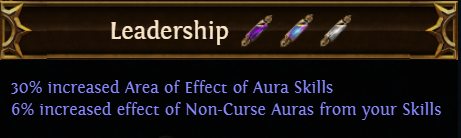
A very powerful Aura Notable that provides both Mana Reservation Efficiency and the Effect of your Auras. |
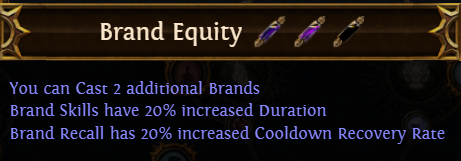 |
Another very important Notable for your Brands. It raises the limit of summoned Brands, up to a maximum of 5. Brand Duration is also important to ensure it has enough time to get all 20 Stages. |
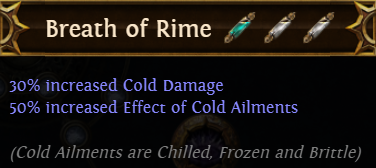 |
Very powerful Passive for all types of Cold Damage over Time Skills. Increasing your Chill Effect is amazing for both offense and defense, as it will increase your Bonechill Support effectiveness. |
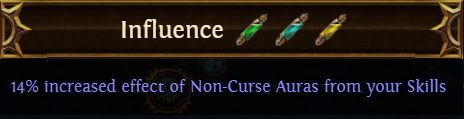 |
Second Aura Notable. Pure Aura Effects Passives tend to be stronger towards the end game, as it's quite hard to use them all during the leveling process. |
| A TIER | |
| These Passives are also very strong, just not as Build defining as previous ones. | |
 |
Good generic Damage over Time Multiplier, and has amazing Mastery to decrease Damage over Time you take |
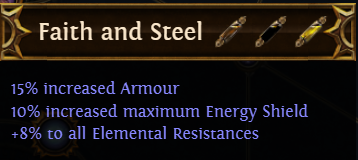 |
Very good Defensive Passive, increases both Armour and Energy Shield while also granting you Elemental Resistances |
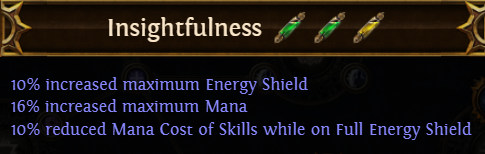 |
Increases your Energy Shield and your Mana, also decreases your Mana Cost most of the time. Increasing your Mana will automatically increase its Regeneration rate. |
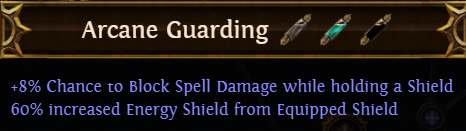 |
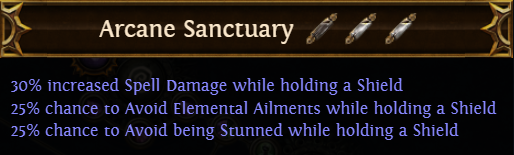
Gives you Spell Block Chance and increases your Energy Shield gained from Shield, which is often your second strongest source of Energy Shield. |
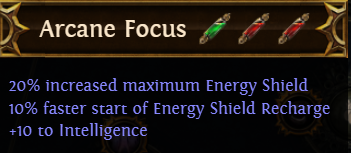 |
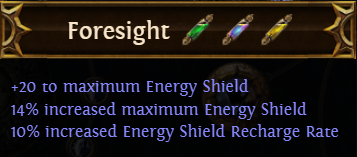
Increases your Energy Shield and shortens the time for Energy Shield Recharge to start working. |
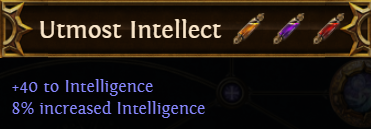 |
Intelligence is a very important Attribute for Energy Shield users. Every 5 points increase your Energy Shield by 1%. It also adds base Mana. |
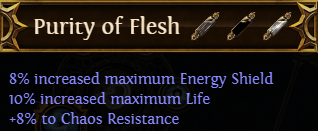 |
A hybrid Notable, meaning it adds maximum Life as well as Energy Shield. It also boost your Chaos Resistances |
 |
Increases the number of Curses you can apply to a single enemy by 1. It is placed very close to the Influence Notable. |
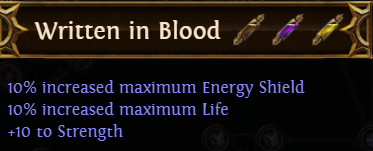 |
It's a great Notable to take early during leveling to improve your maximum Life, and it's a generally good Passive. |
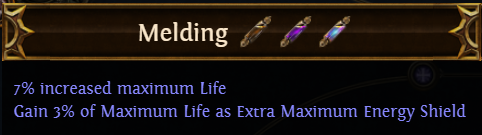 |
Another great hybrid Notable to take early to improve your maximum Life. Use the Energy Within Jewel to convert the Life increases into pure Energy Shield Passive. |
| B TIER | |
| Passives in this Tier are a bit Build Specific due to their character and placement on the Passive Tree | |
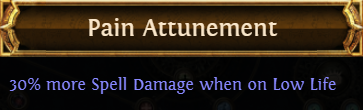 |
This Keystone grants an enormous amount of Spell Damage but requires an appropriate setup to work. |
 |
Chaos Inoculation is the polar opposite of the previous Keystone but also requires a specific setup to make it work. Those Builds usually have less Damage but are much more tanky due to the high amount of Energy Shield. |
 |
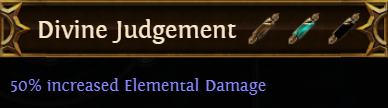
Avoidances are quite hard to acquire, and this Notable comes with the Spell Damage increase on top of that. |
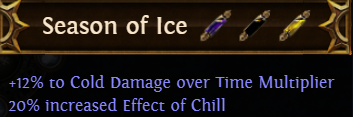 |
This Passive grants a fairly high amount of Cold Damage over Time Multiplier and some Chill Effect increase. |
 |
One of the highest amounts of increased Damage on the entire Passive Tree, but unfortunately reaching it requires many Passive Points, so it's not always worth it. |
 |
This Notable and the small Passives around it grant a lot of Energy Shield, but just like the previous Notable, is quite far away from your usual pathing. |
 |
It's the weakest out of all Aura Passives, but still good if you path nearby anyway. |
| Masteries Priority |
|
If you have any other build requests please leave that in the comments below. We are always open to suggestions and constructive feedback.
Pictures used in this article are the intellectual property of Grinding Gear Games.
