Scion Leveling Guide for PoE with Bows
Complete Leveling Guide for Scion using Caustic Arrow and Ballista Totems to deal Damage over TimeScion Leveling Guide
Caustic Arrow version
Updated for Patch 3.20
The Best Crafty Guides by Odealo
| Guide notes |
| March 27, 2023 -Guide created |
Scion (later Ascendant) is the most unique character in the game. The Ascendancy Skill Tree you're presented with is very distinct - you can pick two Ascendancies from other characters condensed and summarized, gaining multiple bonuses that the particular ascendancy is most known for. In most cases, it's better to be more specialized, but if you don't value any explicit virtues of other characters, but you'd like to have more wiggle room across the tree, and more points to spend, then it is in fact a pick without parallel.
This guide will cover all the basics for leveling with a Caustic Arrow. With just the right Suppor Gems and some unique items, you should be able to finish all the acts in no time. It's a Chaos Damage over Time build that uses a Bow, and thanks to the overabundance of passives that enhance exactly this type of damage on the right side of the Passive Skill tree, you won't have to spend many points. Caustic Arrow doesn't require Accuracy to create the Caustic Ground, so that's one less stat to worry about. The Caustic Ground is the main source of damage, and despite it being a Chaos Damage over Time skill, it's not Poison - it's not caused by a Hit, it's its own thing. For boss fights, you will deploy Ballista Totems, which should significantly improve your single-target damage. To increase durability, you will need only high Elemental Resistances, Maximum Life, and some evasion. Replenish your Life with Life Flasks. It's also valuable to seek modifiers for increased movement speed. Equip good Boots, have a Quicksilver Flask up at all times, make use of Onslaught and Haste buffs, and use mobility skills like Dash or Flame Dash. To move even faster you can choose the Raider Ascendancy first, but that's completely optional. Transitioning to another Ascendant build, be it Heartbound Loop, Spark, or Aura-stacker build, you will need to re-specialize and revert many changes on your Passive Skill Tree, there's no way around it. Nonetheless, it's one of the fastest, and cheapest ways to level up (it may not be the case at the league start, but we generally don't recommend starting a league with Scion).
You can also check our other Path of Exile builds right over here Odealo's Crafty Guides - Full List
1. Important Skills
Caustic Arrow is available at level 1 and you can use it up to red maps or whenever you'll be able to equip all the items for the build you actually want to run. The best place to socket your main setup is Tabula Rasa, it should not be expensive, and the extra Support Gems you'll be able to use make all the difference. Your other setup with Ballista Totems should be linked to a Shrapnel Ballista, it's one Gem that does not require extra Support Gems, which is not needed here since you're not supposed to have that much Attack Speed to make it worth linking with Focused Ballista Support. It will actually deal Poison Damage, that's the most efficient route since you already invested in DoT. Remember to use the Despair Curse, a movement Skill, and Auras for passive bonuses.
Caustic Arrow shall be used from the beginning. You're only interested in the Caustic Ground aspect of this skill, which doesn't require you to Hit an enemy. Attack Speed is also unimportant, as these ground effects cannot be layered. This Attack will also be used by a Mirage Archer so that you won't have to stop and attack each time you see a pack of enemies. Why not use Toxic Rain? Its damage is too reliant on Attack Speed, Area of Effect, and the number of Projectiles which as a Scion we're not really equipped to handle as much as other classes.
Shrapnel Ballista can be used as soon as level 4. It's an additional source of damage. At first, you'll be able to summon two of them to aid you during boss fights not only for more DPS but also to take some hits instead of your character doing so. Shrapnel Ballista has a short range but it's able to shotgun enemies, meaning many of its Projectiles can Hit one enemy, afflicting many stacks of Poison and dealing significant damage against bosses, especially the large ones like Kitava. It deals purely Physical Damage which inflicts Poison and Bleeding for more DoT.
For Mana-reserving Skills use Purity of Elements and Herald of Agony. Herald Skills can be acquired in act 2, the one you're supposed to get summons a Crawler and improves your Poison Damage and Chance to Pison. It's valuable with Shrapnel Ballista, but against bosses, even your Causit Arrow will deal some meaningful Poison Damage. The Purity of Elements improves your Elemental Resistances and completely protects you from Elemental Ailments like Freeze or Ignite. If you have taken Charisma you could be able to fit another Aura - we recommend Haste for simply more Movement and Attack Speed. If you can't fit it, use Vaal Haste and cast it occasionally.
For mobility use Dash or Flame Dash if you have enough Intelligence. For a Curse pick Despair and apply it manually. It lowers Chaos Resistance. Withering Step can be set up as your movement key to instantly use it when it's off-cooldown. It grats Elusive, Phasing, and applies Withered on enemies, which would make you faster and deal more Damage. You may not want to use it as it shares a cooldown with other Blink Skills for faster movement. If that's an issue, replace it with Phase Run. Steelskin can be linked with CwDT to be triggered automatically after taking damage. It's a Guard Spell that mitigates incoming damage and stops Bleeding. If you want to use a Golem, pick Flame Goelm for more Damage or Chaos Golem for extra durability.
|
|

3. Setups
Tabula Rasa is the sound solution to the issues of having not enough damage or not matching sockets colors, we heavily recommend getting it. New Skill Gems are unlocked by entering a new Act and completing a quest, some of them can be granted as a reward but there is no need to pay attention to that, these are extremely cheap. In Act 6 you will be tasked by Lilly Roth to complete a quest, by doing so you're granted access to all Skill and Support Gems available for any class. It will also unlock her shop in your Hideout for every new Character you make in the same League.
Suggested leveling Gem setups:
| Caustic Arrow setup | |
 |
Caustic Arrow - An Attack that can be performed while wielding a Bow. It creates Causitc Ground which damages enemies on it dealing Chaos DoT. |
| Act 1 Support Gems | |
 |
Onslaught Support - At the very beginning you can use it to have easy access to the Onslaught buff. It quickly becomes obsolete. |
 |
Mirage Archer Support - Summons a Mirage Archer that follows your character and uses the exact same setup as the one it is linked to, but deals less damage and has reduced Attack Speed. |
 |
Void Manipulation Support - Makes you deal more Chaos Damage, but disables all Elemental Damage in this setup. |
 |
Efficacy Support - More Damage over Time and increased Skill Effect Duration. |
 |
Lesser Multiple Projectiles Support - Use it to fire two extra arrows for more Area of Effect. It slightly lowers your damage. |
| Act 2 Support Gems | |
 |
Vicious Projectiles Support - Grants more Physical and Chaos Damage over Time and lowers Attack Speed, which is not that important anyway. |
 |
Concentrated Effect Support - The puddles of Caustic Ground are smaller but deal more Damage. |
| Act 4 Support Gems | |
 |
Greater Multiple Projectiles Support - Use it instead of the Lesser version. It makes you fire even more arrows and reduces damage even more, but it's a good tradeoff. |
| An example of a final setup: Caustic Arrow, Void Manipulation, Vicious Projectiles, Concentrated Effect, Mirage Archer, Greater Multiple Projectiles. | |
| Shrapnel Ballista setup | |
 |
Shrapnel Ballista - A short-range Totem Attack that can be used with Bows. Its damage is sourced from that of your Bow so it's a good idea to get one with high added Physical or Chaos Damage. Try to place them right on top of the boss you're fighting. |
| Act 1 Support Gems | |
 |
Chance to Bleed Support - Adds Physical Damage and Chance to cause Bleeding on Hit. Bleeding's damage is based on the Physical Damage dealt, but unlike Poison, it cannot stack. |
 |
Chance to Poison Support - Adds Chaos Damage and Chance to cause Poison on Hit. Poison's damage is based on Physical and Chaos Damage dealt with Hits. |
 |
Added Fire Damage Support - Adds Fire Damage based on the Physical Damage. |
| Act 4 Support Gems | |
 |
Withering Touch Support - Adds Chaos Damage, and Chance to cause Wither debuff, which increases Chaos Damage Taken per stack, up to 15 stacks. Great against bosses. |
 |
Multiple Totems Support - You're now able to summon two more Totems, but each of them deals less damage. It's good after leveling up the Gem a few times. |
| An example of a final setup: Shrapnel Ballista, Chance to Poison, Withering Touch, Multiple Totems. | |
| Mana-reserving setup | |
 |
Herald of Agony - Increases the chance of Poisoning by 20% and makes you deal more Poison Damage which is great with Shrapnel Ballistas. |
 |
Haste - Increases your Movement and Attack Speed. If you can't afford to reserve Mana, use only the Vaal version. |
 |
Purity of Elements - Grants a lot of Elemental Resistances and complete immunity to all Elemental AIlments. |
 |
Malevolence - If you already have a lot of elemental resistances, use Malevolence instead of Purity of Elements for more Damage over Time and increased Skill Effect Duration. |
| Utility Skills | |
 |
Withering Step - Applies a few stacks of Withered debuff on enemies, grants Phasing, and Elusive buffs making your character faster. It puts your other movement skills on cooldown so you may not want to use it. You can also choose  Phase Run instead. Phase Run instead. |
 |
Dash - A simple blink-type skill to move faster and dodge attacks. Alternatively, use  Flame Dash. Flame Dash. |
 |
Steelskin - A Guard Spell that reduces incoming damage for some time and stops bleeding. You can link it to the  Cast when Damage Taken. Cast when Damage Taken. |
 |
Despair - Reduces Chaos Resistance which is the main type of damage you're dealing. |
 |
Summon Flame Golem - An optional choice for slightly increased damage. To resummon it automatically, you can link it to the Cast when Damage Taken. |
|
|
4. Gear
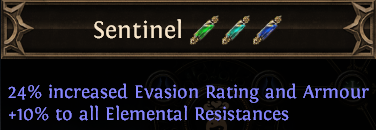
On your gear seek added Physical or Chaos Damage. Chaos Damage over Time is also valuable, but much rarer. We've listed the Unique items that are especially fitting. You can craft rare items via Essences - of Envy or Contempt. Movement Speed is quite important if you already have enough damage, it will significantly improve your performance. Keep your Maximum Life high, allocate a few clusters with Maximum Life on your Skill Tree, and get some of it on your gear pieces. Evasion Rating and Spell Suppression are not as important in the early stages.
Maximum Life on your Gear is a nice thing to have, but it is not important, most of it will come from your Levels themself. The only form of Defense you will need to get on your Rare Items is Elemental Resistances. You should aim to have at least 60% Resistance of each Element, excluding Chaos. To help with that, you should use Essences found during the Campaign, and the Crafting Bench in your hideout. Use the low-tier Crafts, as they are cheap and effective, while high tiers will also raise the Required Level to wear an Item.
Proper Flask Setup makes Leveling much quicker and easier. Try to get 2 Quicksilver Flasks so you can have at least one active. Silver Flask increases your damage and mobility. If you can't keep up with the damage you receive or the Mana you spend, use more Life and Mana Flasks. 20% Quality on each Flask is an easy way to prolong their Duration.
 Tabula Rasa - Due to the six, white, linked sockets it's the single best, and relatively cheap, body armor you can wear since level 1. Tabula Rasa - Due to the six, white, linked sockets it's the single best, and relatively cheap, body armor you can wear since level 1. |
|
| Item has no level requirement and Energy Shield (Hidden) Item has 6 White Sockets and is fully linked (Hidden) |
|
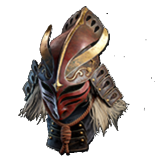
 Goldrim - A Helmet with a lot of Elemental Resistances. It too can be worn at level 1. Goldrim - A Helmet with a lot of Elemental Resistances. It too can be worn at level 1. |
|
| +(30-50) to Evasion Rating 10% increased Rarity of Items found +(30-40)% to all Elemental Resistances Reflects 4 Physical Damage to Melee Attackers Level Requirement reduced by 100 (Hidden) |
|
 Thrillsteel - The permanent Onslaught will increase your Movement and Attack Speed. Thrillsteel - The permanent Onslaught will increase your Movement and Attack Speed. |
|
| Onslaught | |
 Le Heup of All - It grants Attributes, Resistances, and Damage. One of the best leveling Rings. Le Heup of All - It grants Attributes, Resistances, and Damage. One of the best leveling Rings. |
|
| Adds 1 to 4 Physical Damage to Attacks +(10-30) to all Attributes (10-30)% increased Damage (10-30)% increased Rarity of Items found +(10-30)% to all Elemental Resistances |
|
 Blackheart - Adds tons of extra Chaos Damage to Attacks and can be worn at level 1. Blackheart - Adds tons of extra Chaos Damage to Attacks and can be worn at level 1. |
|
| Adds 1 to 4 Physical Damage to Attacks Adds (10-15) to (20-25) Chaos Damage to Attacks Regenerate (10-15) Life per second 10% chance to Cause Monsters to Flee |
|
 Rigwald's Crest - Level 20 Ring you can use to summon Wolves on Kill. These are quite good. Rigwald's Crest - Level 20 Ring you can use to summon Wolves on Kill. These are quite good. |
|
| +(12-16)% to Fire and Cold Resistances Trigger Level 10 Summon Spectral Wolf on Kill (20-30)% increased Mana Regeneration Rate |
|
 Thief's Torment - Level 30 Ring with tons of various utility bonuses. You won't be able to wear a second Ring. Thief's Torment - Level 30 Ring with tons of various utility bonuses. You won't be able to wear a second Ring. |
|
| +(8-10)% to all Elemental Resistances (10-16)% increased Quantity of Items found Can't use other Rings +(25-40)% to all Elemental Resistances Gain (40-60) Life per Enemy Hit with Attacks Gain 30 Mana per Enemy Hit with Attacks 50% reduced Effect of Curses on you |
|
 Astramentis - If in need of extra Attributes use this Amulet. Astramentis - If in need of extra Attributes use this Amulet. |
|
| +(10-16) to all Attributes +(80-100) to all Attributes -4 Physical Damage taken from Attack Hits |
|
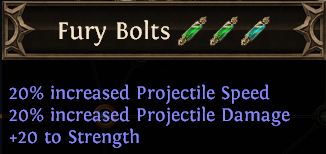
 Karui Ward - An excellent Amulet for any build attacking with projectiles. It increases Movement Speed, Projectile Speed and Damage, Accuracy, and grants Attributes. Karui Ward - An excellent Amulet for any build attacking with projectiles. It increases Movement Speed, Projectile Speed and Damage, Accuracy, and grants Attributes. |
|
| +(20-30) to Dexterity +(20-30) to Strength +100 to Accuracy Rating 30% increased Projectile Speed 10% increased Movement Speed 30% increased Projectile Damage |
|
 String of Servitude - This Belt, which can be worn at level 1, may be the best source of Elemental Resistances with the right Implicit. String of Servitude - This Belt, which can be worn at level 1, may be the best source of Elemental Resistances with the right Implicit. |
|
| <(1-2) Random corrupted implicit modifiers> Implicit Modifier magnitudes are tripled Level Requirement reduced by 100 (Hidden) Desired Implicit: (42-48)% to All Elemental Resistances |
|
 Meginord's Girdle - Adds a significant amount of Physical Damage to Attacks, a lot of Strength, some Cold Resistance, Maximum Life, and Flask Life Recovery Rate. Meginord's Girdle - Adds a significant amount of Physical Damage to Attacks, a lot of Strength, some Cold Resistance, Maximum Life, and Flask Life Recovery Rate. |
|
| +(25-35) to Strength +25 to Strength Adds 10 to 20 Physical Damage to Attacks 10% increased maximum Life +(10-20)% to Cold Resistance 25% increased Flask Life Recovery rate |
|
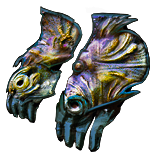 Lochtonial Caress - You can wear these at level 1 for more Attack Speed and a chance for Charges on Kill. Lochtonial Caress - You can wear these at level 1 for more Attack Speed and a chance for Charges on Kill. |
|
| (10-15)% increased Attack Speed (10-15)% increased Cast Speed (15-10)% reduced maximum Mana (10-15)% chance to gain a Power, Frenzy or Endurance Charge on Kill Conduit |
|
 Seven-League Step - The fastest boots in the game. Heavily recommended. Seven-League Step - The fastest boots in the game. Heavily recommended. |
|
| 50% increased Movement Speed Level Requirement reduced by 100 (Hidden) |
|
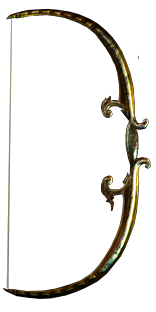
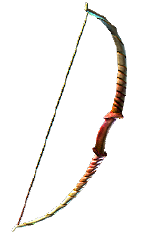 Quill Rain - At level 5 you can start wielding this Bow. It has quite good Physical Damage and Attack Speed but lowers your damage. Quill Rain - At level 5 you can start wielding this Bow. It has quite good Physical Damage and Attack Speed but lowers your damage. |
|
| +(10-20) to Dexterity 100% increased Physical Damage 100% increased Attack Speed Grants 2 Mana per Enemy Hit (50-100)% increased Projectile Speed +(25-50) to Accuracy Rating 30% less Damage |
|
 Lioneye's Glare - At level 66 you can use this Bow which has the highest Physical DPS out of all Unique Bows. A good rare may outclass it. Lioneye's Glare - At level 66 you can use this Bow which has the highest Physical DPS out of all Unique Bows. A good rare may outclass it. |
|
| (20-24)% increased Elemental Damage with Attack Skills (180-200)% increased Physical Damage Adds (7-14) to (24-34) Physical Damage (10-20)% increased Attack Speed +(80-100) to maximum Mana Hits can't be Evaded Far Shot |
|
 Drillneck - Level 36 Quiver that adds Maximum Life and Physical Damage. It's good with Caustic Arrow due to increased Damage against pierced enemies. Drillneck - Level 36 Quiver that adds Maximum Life and Physical Damage. It's good with Caustic Arrow due to increased Damage against pierced enemies. |
|
| Arrows Pierce an additional Target (8-12)% increased Attack Speed +350 to Evasion Rating +(40-50) to maximum Life (10-14) to (19-24) Added Physical Damage with Bow Attacks Arrows deal 50% increased Damage with Hits and Ailments to Targets they Pierce |
|
|
Stat priorities on Rare Items:
|
|
Suggested Flasks:
|
|
    |
5. Passive Skills
To successfully create the Passive Tree for a Build, you have to consider most of the Passive Clusters for a given build, choose a few of them, and make an optimal path to allocate most of them in the least amount of Passive Skill Points spent. S-tier Passives are great in most cases, and A-tier ones are more specific - these might suit you only in specific circumstances or under other conditions. B is a tier with less useful passives that are to be picked later, or not at all. If you're using Frenzy Charges, go for the nodes for extra Maximum Frenzy Charges. Jewel Sockets are good in the late game. We recommend Resolute Technique, you won't deal Critical Strikes, not during leveling phase. Point Blank is also good if you plan to kill bosses at a close distance.

| S TIER | |
|---|---|
| The best and most efficient Passives in the Passive Tree. You will want to take them on almost every build. | |
 |
Thick Skin is picked only for its bonus to Maximum Life. |
 |
Pathing to it from the center would grant you significantly more Elemental Resistances. |
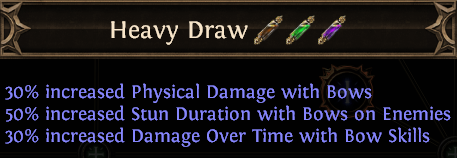 |
Increases Physical Damage and Damage over Time with Bows. |
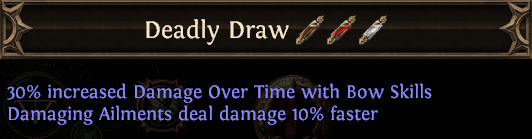 |
Increases Damage over Time and improves damage dealt by Poison. |
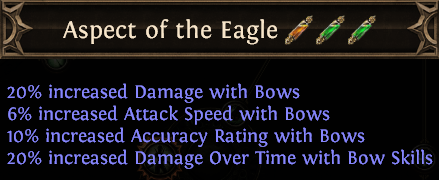 |
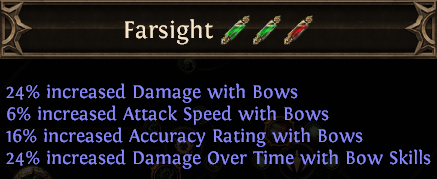
Great Bow passive. increases Damage, Attack Speed, DoT, and Accuracy. |
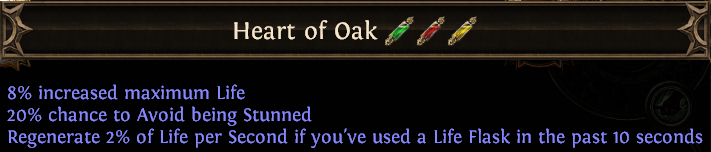 |
Allocate it for an increased Maximum Life and Life regeneration after using a Flask. |
| Movement Speed, Damage with Bows, Evasion, and DoT are all extremely good. | |
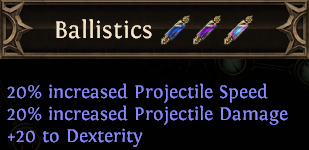 |
Ballistic is used for more Damage and Dexterity. |
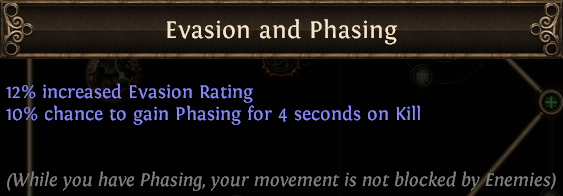 |
A small node that grants you a chance for Phasing buff on kill. |
 |
Increased Damage, Attacks Speed, Accuracy, and DoT with Bows. |
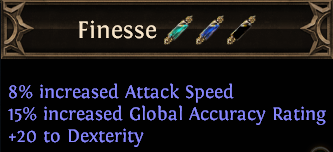 |
Supplies you with Attack Speed, Accuracy, and Dexterity. |
| A TIER | |
| Those are also very good Passives, just not as universal as previous ones | |
 |
Toxic Strikes notable grants an extra 15% chance to Poison and increased Poison Damage. It's very good for Ballista Totems. |
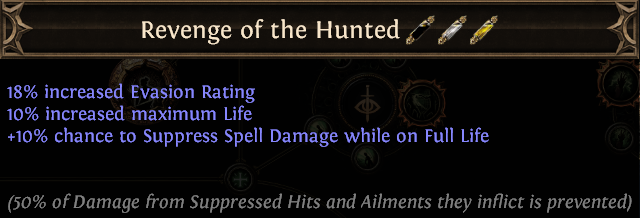 |
Used for Maximum Life, Evasion, and Chance to Suppress Spell Damage. |
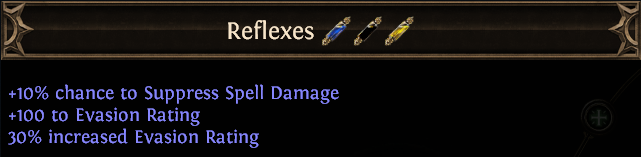 |
Its only purpose is to increase Evasion Rating and Suppression Chance. |
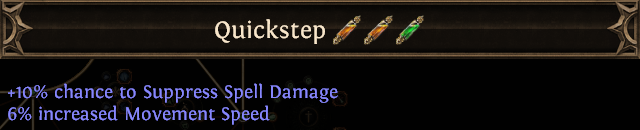 |
Quickstep increases Movement Speed and Suppression Chance. |
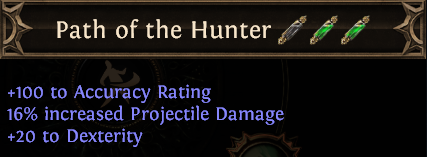 |
You should start pathing from this point too. It grants Accuracy, Damage, and Dexterity. |
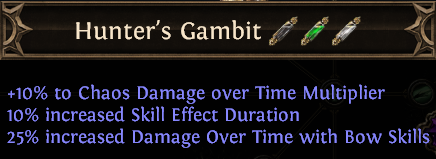 |
Extremely powerful notable, but it's a bit far from the rest of your allocated skill points. |
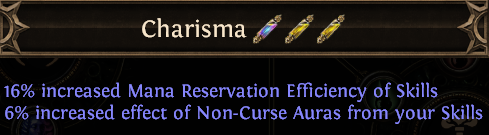 |
If you want to fit in more Auras, pick Charisma. |
| B TIER | |
| Passives that belong to this Tier fulfill their specific purpose | |
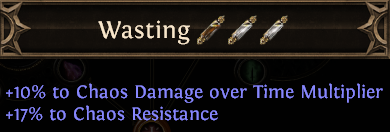 |
Pathing up from Charisma, you're able to allocate Wasting for Chaos Damage and Chas Resistance. |
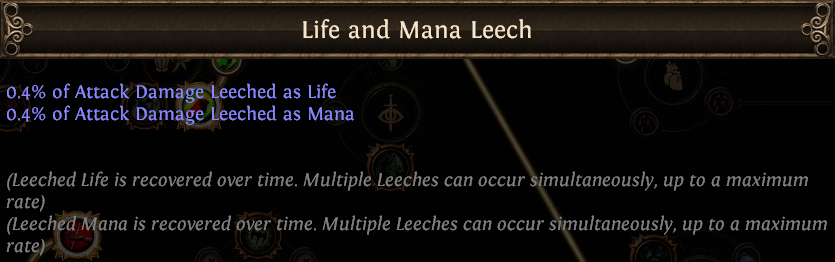 |
A small node that would grant you Life and Mana Leech, usually enough to sustain long fights. |
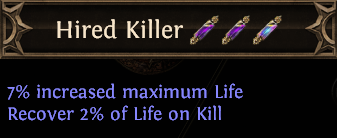 |
Modest bonus to Maximum Life, and Life on kill. Allocate it if you run out of Life during mapping. |
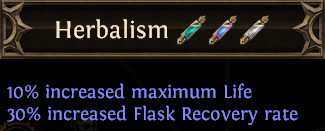 |
Increased Maximum Life and increased Flask Recovery Rate. Pick it up if you lack durability. |
 |
Has a chance to grant you the Onslaught buff on kill and increases its effect. Use if you have no other source of this buff. |
 |
More Strength and Damage, but it's a bit out of the way. |
 |
Attack Damage and Movement Speed are quite decent. |
| Masteries Priority |
|
|
|
If you have any other build requests please leave that in the comments below. We are always open to suggestions and constructive feedback.
Pictures used in this article are the intellectual property of Grinding Gear Games.
