
Witch Leveling Guide using Ignite in PoE
Find out how to efficiently level up a Witch character based on Fire DoT SpellsIgnite Witch
Leveling Guide
Updated for Patch 3.19
The Best Crafty Guides by Odealo
| Guide notes |
| October 16, 2022 -Guide created |
Leveling an Ignite Build is a very easy and enjoyable task. There are many different versions of such Builds, with different Damage setups, individual defensive layers approaches, and various goals they try to achieve. But as different as they might be, the leveling process is usually very similar for each of them. There is no definitive best way of completing the campaign, as everyone has their own definition of "the best", but in this guide, we will try to provide you with all the useful pieces of information to help you progress through the acts with your build.
The first thing we'd like to mention is that you can get up to 20 Passive Skill Refund Points from doing the Quests alone. Most of them are included in regular Passive Skill Point Quests, so you will get them without any extra effort. This is important because many times during leveling you will have some useful Passive Skills very close to your Skill Tree patching that are not particularly optimal for your final build, but can be really useful to you during your journey. Such Passives consist of Elemental Resistances, Attributes, or some minor Damage modifiers. It is especially important for Energy Shield Builds to invest into some maximum Life clusters, as they simply cannot reach good Energy Shield values without proper end-game items.
Another important piece of information is that regular Spell or Attack Damage modifiers do not affect Ignite Damage, only the generic Fire, Elemental, or Burning Damage modifiers work with it. That is the case because Ignite is based on the Base value of the Hit that inflicts the Ailment, so raising Gem Levels or adding Flat Damage will improve your base Ignite Damage.
1. Important Skills
Usually, as an Ignite Build you can start using your end-game Skill of choice right away when you gain access to that Skill Gem. At first, you can lack a bit of Ignite Chance, or the Damage won't be as strong as expected, but it always should be good enough for the campaign. It is especially easy on Elementalist, as you can get Master of Flames in your first Labirynth, granting you a 100% chance to Ignite with every Hit and a solid Damage bonus, but every Ascendancy can be made into Ignite Build and level as such.
However, there are 2 particular Skills that usually outperform any other Skill during the campaign in terms of pure Damage. Those Skills are Flame Wall and Fire Trap. Flame Wall is one of the first Skills you can get, you will be rewarded with the Skill Gem after opening The Submerged Passage in Act 1. As the name suggests, it creates a fiery Wall that burns any enemy standing inside of it and applies additional Damage over Time effect to everyone who even barely passes through it. You can also apply that DoT effect by shooting a projectile through it, and doing so will also add some Fire Damage to the Projectile Hit (remember our intro about Adding Damage to the base Ignite?). Flame Wall by itself has no Hit component, so it cannot Ignite.
You can get the Fire Trap by reaching The Cavern of Wrath at the end of Act 1, but you will have to buy it from Nessa, as she doesn't offer it as a quest reward. It is a Trap Skill that explodes and leaves Burning Ground when triggered by the enemy. The explosion can cause Ignite on the enemy.
During the campaign, you don't need to fully clear the area, you only need to find the entrance to the next location. Both of those Skills work very well with that playstyle, as you can throw Traps and Walls as you run through the monsters, and they will burn to the death while you keep running ahead. You only need to stop to fight the bosses or to refill all your Quicksilver Flask charges.
Another important Skill is Flammability Curse. It is a pretty simple Spell, it lowers enemy Fire Resistance and increases your chances to Ignite against the target. Use it to take down enemies faster, especially the Bosses and Rare monsters with dangerous Archnemesis modifiers. The curse lasts about 10 seconds, so a single cast might not be enough in some situations.
If you are not using Fire Trap or already transferred to your end-game Skill, it is important to use Flame Surge on tough opponents. If you Hit Ignited enemy with this Skill, you will create a Burning Ground that lasts for 4 seconds and deals a quarter of the Ignite Damage every second. Burning Ground from this Skill, Flame Dash or Fire Trap doesn't stack.
Another very useful mechanic is Exposure. It lowers the enemy's Elemental Resistances by a fixed amount. You can get it from various sources at higher levels, such as Cluster Jewels or Implicits on the Gloves, but in the early game, you are pretty much limited to 2 skills: Scorching Ray and Wave of Conviction. You can get Scorching Ray before your fight with Merveil in Act 1, but to apply Exposure with that Skill you will have to cast it on a single enemy for a pretty long time. Wave of Conviction is available in Act 2 after you recover Baleful Gem from Chamber of Sins. Make sure it always deals mostly Fire Damage, to apply the correct type of Exposure.
Exposure becomes really important if you acquire Mastermind of Discord Ascendency Notable.
Auras are a very important aspect of every build. During leveling, you don't really have the necessary tools to play around with Mana Reservation Efficiency. For that reason, we recommend using only one major Aura and the Clarity to get enough mana regeneration to cast your skills without the constant use of Mana Flask. As tempting as it may be to use Malevolence or Anger to get more Damage, we suggest using a Defensive Aura. You will have plenty of Damage anyway. Depending on your build, you might choose to use Determination or Grace. In some cases, you might be able to run both of them at once and still have enough Mana to use your Skills. They put however pretty high strain on your Attribute Requirements. Mana Reservation of Clarity increases with every level, so try to keep it on a low level.
Lastly, Steelskin is the best guard Skill you can use during leveling. It scales directly with Gem Levels and makes you immune to Bleeding. It doesn't remove them but gives you the opportunity to heal up. You can get it from Nessa in Act 1.
|
|

3. Skill Gems
There are many Setups as you unlock new Active and Support Gems as you progress through the campaign. Getting the Tabula Rasa is tremendously helpful as you can easily swap gems without worrying about the colors. You can put both Flame Wall and Fire Trap in one setup to have 2 five-link setups as they share most of the Support Gems. Later on, it is better to use a fire Trap as your only six-link, and the flame wall will be strong enough to clear weak monsters anyway. If you don't like the Fire Trap, you can use any Spell of your choice with suggested Support Gems but change Trap and Mine Damage Support for Cruelty Support Gem.
Suggested leveling Gem setups:
Act 1: As your first Spells, take Freezing Pulse and Flame Wall to deal with enemies. You can swap Freezing Pulse to Fire Trap when you reach Caverns of Wrath.
| Act 1 Flame Wall setup | |
 |
Flame Wall - puts a wall of flames on the ground. Enemies that pass through, or stand inside of it, take Fire Damage. You can have up to 3 Walls at the same time. |
 |
Combustion Support - increases the Fire Damage of your Flame Wall. |
 |
Arcane Surge Support - spending Mana grants you an Arcane Surge buff for a short duration. It grants you more Damage and Mana Regeneration |
 |
Efficacy Support - increases Damage and Duration of your Flame Wall |
| Act 1 Freezing Pulse setup | |
 |
Freezing Pulse - one of the first Skills you get in Act 1. It deals good Damage and can be used to apply Flame Wall secondary debuff on the enemies. |
|
Arcane Surge Support - Arcane Surge Damage buff applies to both Flame Wall and Freezing Pulse. |
 |
Added Lightning Support - it simply adds Lightning Damage to your Spells |
 |
Onslaught Support - grants a chance to gain the Onslaught buff, which increases your Movement and Cast Speed |
| Act 1 Fire Trap setup | |
 |
Fire Trap - throws a Trap on the ground, which explodes and creates Burning Ground when triggered by a nearby enemy |
|
Combustion Support - increases Fire Damage dealt by Fire Trap |
|
Efficacy Support - increases the Duration and Damage of Burning Ground created by Fire Trap |
|
Added lightning damage - adds a bit of Lightning Damage to your fire Trap's explosion |
Act 2: You will get access to new Support Gems after completing the Sharp and Cruel Quest. Use Elemental Focus Support as Ignite is still too weak to rely on it. Combustion is still useful as it gives more Fire Damage and there are not many other Support Gems you could use.
| Act 2 Flame Wall setup | |
|
Flame Wall - puts a wall of flames on the ground. Enemies that pass through, or stand inside of it, take Fire Damage. You can have up to 3 Walls at the same time. |
 |
Elemental Focus Support - it grants More Damage but disables Ignites, which doesn't affect Flame Wall anyway |
 |
Controlled Destruction Support - boosts the Damage of your Flame Wall. That skill cannot inflict Critical Strike either way |
|
Efficacy Support - increases Damage and Duration of your Flame Wall |
 |
Swift Affliction Support - increases Damage over Time but lowers the Duration of your Flame Wall |
| Act 2 Fire Trap setup | |
|
Fire Trap - throws a Trap on the ground, which explodes and creates Burning Ground when triggered by a nearby enemy |
 |
Trap and Mine Damage Support - improves the Damage of your Fire Trap but reduces the Throw Speed a bit. If you use non-trap Skill, use Cruelty Support instead |
|
Controlled Destruction Support - reduces Critical Strike Chance but boosts Damage significantly |
|
Efficacy Support - grants more Damage and Duration for the Burning Ground effect. |
|
Elemental Focus Support - disables Ignite, but adds a lot of Damage for your Fire Trap |
|
Swift Affliction Support - increases Damage of the Burning Ground at the cost of lowering the Duration |
Act 3: You will get new Supports Skills when you complete A Fixture of Fate Quest. You can also buy them from Lilly Roth in your hideout if you completed her quest on a different character in your current League. It is a good time to focus more on Fire Trap and less on Flame Wall.
| Act 3 Flame Wall setup | |
|
Flame Wall - puts a wall of flames on the ground. Enemies that pass through, or stand inside of it, take Fire Damage. You can have up to 3 Walls at the same time. |
|
Elemental Focus Support - it grants More Damage but disables Ignites, which doesn't affect Flame Wall anyway |
|
Controlled Destruction Support - boosts the Damage of your Flame Wall. That skill cannot inflict Critical Strike either way |
|
Efficacy Support - increases Damage and Duration of your Flame Wall |
| Act 3 Fire Trap setup | |
|
Fire Trap - throws a Trap on the ground, which explodes and creates Burning Ground when triggered by a nearby enemy |
|
Trap and Mine Damage Support - improves the Damage of your Fire Trap but reduces the Throw Speed a bit. If you use non-trap Skill, use Cruelty Support instead |
 |
Inspiration Support - spending Mana grants you Inspiration charges, which boost your Elemental Damage. |
|
Efficacy Support - grants more Damage and Duration for the Ignite and Burning Ground effect. |
 |
Burning Damage Support - simply increases any Burning Damage you deal |
|
Swift Affliction Support - increases Damage of your DoTs at the cost of lowering their Duration |
Act 4: There are no new supports for Flame Wall. After unlocking Belly of the Beast, you can get Ignite proliferation support gem for your fire trap which will improve your clear significantly. You can use this setup until you finish the campaign.
| Act 4 Fire Trap setup | |
|
Fire Trap - throws a Trap on the ground, which explodes and creates Burning Ground when triggered by a nearby enemy |
|
Trap and Mine Damage Support - improves the Damage of your Fire Trap but reduces the Throw Speed a bit. If you use non-trap Skill, use Cruelty Support instead |
|
Inspiration Support - spending Mana grants you Inspiration charges, which boost your Elemental Damage. |
 |
Ignite Proliferation Support - boosts your Ignite Damage and spreads it to nearby enemies. |
|
Burning Damage Support - simply increases any Burning Damage you deal |
|
Swift Affliction Support - increases Damage of your DoTs at the cost of lowering their Duration |
| Aura setup | |
 |
Determination - Grants a lot of flat Armour Rating and boosts it even further. This is your only significant source of Armour during Leveling. |
 |
Grace - Similar to Determination, but for Evasion Rating. Choose one of those Aura depending on your Build |
 |
Clarity - grants Mana Regeneration so you can spam your abilities freely. Try to keep it on a low level |
 |
Vitality - just like Clarity, but provides Life Regeneration instead. It is not as important as other auras, but greatly helps when completing the Labirynth |
 |
Malevolence - if you prefer Damage over Defense, use this Aura. It boosts the Damage and Duration of your DoT Effects. |
 |
Herald of Ash - before Act 3 you can use this Herald for a little bit of Damage. It doesn't affect Ignite. |
| Utility Skills | |
 |
Flame Dash - basic Movement Skill to help you move around |
 |
Flammability - this will lower enemy Fire Resistances and increases your chances to inflict Ignite |
 |
Flame Surge - when used against the Ignited enemy, it will create Burning Ground based on said Ignite. |
 |
Wave of Conviction - applies Exposure depending on the type of Damage it deals the most |
|
|
4. Gear
One of the most important leveling items is Unique Armour called Tabula Rasa. You can use that item at level 1, it has 6-links of White Sockets and nothing else. It might be hard to get on the first day of the new League, but at any other point, it is pretty cheap. Another important factor to speed up your leveling process is Movement Speed. Getting good Boots and other sources of Movement Speed can save you a lot of time in the long run.
Getting more Maximum Life on your Gear is not that important yet. Most of it will come from your Passive Tree and gaining higher levels. It is important however to get high Elemental Resistances and some Armour or Evasion Rating. The Experience penalty for dying is not that bad when leveling, but re-running the whole location after death slows you down significantly. It is especially noticeable in Act 5 and Act 6, as there is a very high spike in Monster's Damage.
Many players tend to ignore their Flask setup at the early stages of the game, but that is a huge mistake. With just a few Orb of Alteration, you can get some pretty useful modifiers on your flasks. Remember to make them 20% Quality before turning them into Magic Flasks, as Glassblower's Baubles are more effective on Normal Quality Items. They don't need to be ideal, but every bit helps.
 Tabula Rasa - Simply the best Item you can get for leveling. White Sockets mean you can put Gems with any Colour in them. You can get a Corrupted one with +2 levels of relevant Skill Gem Tag, like AoE or Duration Tabula Rasa - Simply the best Item you can get for leveling. White Sockets mean you can put Gems with any Colour in them. You can get a Corrupted one with +2 levels of relevant Skill Gem Tag, like AoE or Duration |
|
| Item has no level requirement and Energy Shield (Hidden) Item has 6 White Sockets and is fully linked (Hidden) Example of corrupted implicit: +2 to Level of Socketed Duration Gems |
|
 Goldrim - this Helmet gives you a lot of Elemental Resistances. Can be worn at level 1 Goldrim - this Helmet gives you a lot of Elemental Resistances. Can be worn at level 1 |
|
| +(30-50) to Evasion Rating 10% increased Rarity of Items found +(30-40)% to all Elemental Resistances Reflects 4 Physical Damage to Melee Attackers Level Requirement reduced by 100 (Hidden) |
|
 Le Heup of All - very versatile Ring, goes well with every build. Le Heup of All - very versatile Ring, goes well with every build. |
|
| Adds 1 to 4 Physical Damage to Attacks +(10-30) to all Attributes (10-30)% increased Damage (10-30)% increased Rarity of Items found +(10-30)% to all Elemental Resistances |
|
 Pyre - grants a solid amount of Elemental Resistances and a very high amount of Burning Damage. Pyre - grants a solid amount of Elemental Resistances and a very high amount of Burning Damage. |
|
| +(20-30)% to Cold Resistance +(25-35)% to Fire Resistance (60-80)% increased Burning Damage 40% of Cold Damage Converted to Fire Damage 10% increased Light Radius Ignited Enemies Killed by your Hits are destroyed |
|
 Berek's Respite - provides a good amount of Fire Damage for your Skills and spreads Ignites from killed Enemies. Berek's Respite - provides a good amount of Fire Damage for your Skills and spreads Ignites from killed Enemies. |
|
| +(12-16)% to Fire and Lightning Resistances Adds (20-25) to (30-50) Fire Damage to Spells and Attacks (25-30)% increased Lightning Damage +(30-40) to maximum Mana When you Kill a Shocked Enemy, inflict an equivalent Shock on each nearby Enemy When you Kill an Ignited Enemy, inflict an equivalent Ignite on each nearby Enemy |
|
 Praxis - this Ring will solve all of your Mana problems Praxis - this Ring will solve all of your Mana problems |
|
| +(20-30) to maximum Mana +(30-60) to maximum Mana Regenerate (3-6) Mana per second -(8-4) to Total Mana Cost of Skills 8% of Damage taken Recouped as Mana |
|
 Astramentis - if you don't want to bother with missing Attributes, you can simply wear this Amulet to solve that problem once and for all. Astramentis - if you don't want to bother with missing Attributes, you can simply wear this Amulet to solve that problem once and for all. |
|
| +(10-16) to all Attributes +(80-100) to all Attributes -4 Physical Damage taken from Attack Hits |
|
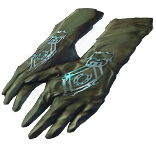 Doedre's Tenure - this pair of Gloves provides an insanely high bonus to Spell Damage. It doesn't affect Ignite Damage but will improve Flame Wall and Fire Trap Damage over Time Effects. Doedre's Tenure - this pair of Gloves provides an insanely high bonus to Spell Damage. It doesn't affect Ignite Damage but will improve Flame Wall and Fire Trap Damage over Time Effects. |
|
| +(20-50) to Intelligence 100% increased Spell Damage (25-15)% reduced Cast Speed |
|
 Perandus Blazon - good Belt if you need Attributes, increasing the Duration of your Flasks is also very good. Perandus Blazon - good Belt if you need Attributes, increasing the Duration of your Flasks is also very good. |
|
| (15-25)% increased Stun and Block Recovery +(20-30) to all Attributes (6-8)% increased Quantity of Items found +20% to Fire Resistance 20% increased Flask Effect Duration -2 Physical Damage taken from Attack Hits |
|
 Karui Ward - this amulet doesn't provide any Damage, but grants useful Attributes and a Movement Speed bonus Karui Ward - this amulet doesn't provide any Damage, but grants useful Attributes and a Movement Speed bonus |
|
|
+(20-30) to Dexterity |
|
 String of Servitude - with correct Implicit, this belt provides a massive amount of Elemental Resistances. String of Servitude - with correct Implicit, this belt provides a massive amount of Elemental Resistances. |
|
| <(1-2) Random corrupted implicit modifiers> Implicit Modifier magnitudes are tripled Level Requirement reduced by 100 (Hidden) |
|
 Rare Wand or Sceptre- weapons with "+1 to Level of all Fire Spell Skill Gems" will be enough to carry you through the whole campaign. You can have some Damage bonuses on them but it will increase the required level. Rare Wand or Sceptre- weapons with "+1 to Level of all Fire Spell Skill Gems" will be enough to carry you through the whole campaign. You can have some Damage bonuses on them but it will increase the required level. |
|
|
+1 to Level of all Fire Spell Skill Gems |
|
 Seven-League Step - those boots give an amazing amount of Movement Speed to speed up your leveling. They are quite expensive, but you can simply sell them after completing the campaign to get your money back Seven-League Step - those boots give an amazing amount of Movement Speed to speed up your leveling. They are quite expensive, but you can simply sell them after completing the campaign to get your money back |
|
| 50% increased Movement Speed Level Requirement reduced by 100 (Hidden) |
|
 Wanderlust - another good pair of Boots for your leveling. They do not give as much Movement Speed, but grant Immunity to be Frozen and some Mana Regeneration Wanderlust - another good pair of Boots for your leveling. They do not give as much Movement Speed, but grant Immunity to be Frozen and some Mana Regeneration |
|
| +5 to Dexterity +(10-20) to maximum Energy Shield (20-40)% increased Mana Regeneration Rate 20% increased Movement Speed Cannot be Frozen |
|
|
Stat priorities on Rare Items:
|
|
Suggested Flasks:
|
|
    |
|
|
5. Passives
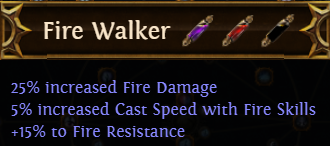
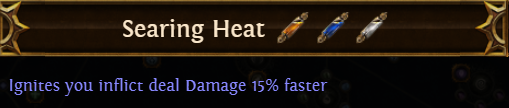
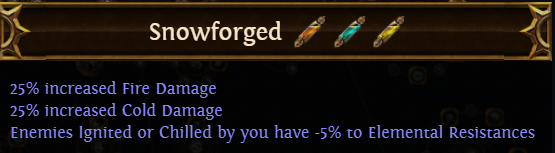
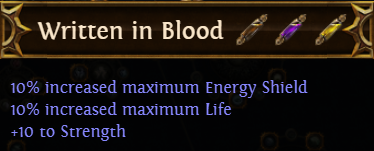
To create a successful Build that uses Fire Damage over Time as its main source of Damage, you will have to allocate Passives that increase that kind of Damage, give some form of defense, such as Life or Energy Shield, and boost your Auras, as you should always use at least few of them. There are way more useful Passives in the Tree than you can actually allocate, so you have to pick them carefully. Optimizing the Passive Tree pathway is one of the first fine-tunings you will make in Path of Exile. Cluster Jewels, as well as regular Jewels, are very powerful for scaling Ignite Damage, so make sure you will have enough Points for them too!
As a side note, a 1% Fire Damage over Time Multiplier gives more Damage than a 1% Increased Fire Damage modifier, however Passives that grant that modifiers usually have lower values. At some point, getting the Damage Increase modifiers will give you better results overall.

| S TIER | |
|---|---|
| There are a few very powerful Passives that almost every Ignite Build can use. | |
 |
Elemental Overload is one of the best improvements you can get for Ignite Build. It grants more Damage than most of the Support Gems, but having 100% uptime may be a bit tricky |
 |
Best Damage Passive on the Passive Tree. You don't have to choose between DoT Multiplier and Damage Increase, with this Passive you will have them both! |
 |
Generic Damage over Time Multiplier gives exactly the same amount of Damage as Fire DoT Multiplier, however, this Passive also grants access to very good Mastery choice |
 |
Very good Passive to improve your maximum Life, and it also gives you some Elemental Resistances |
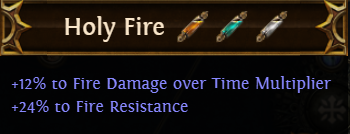 |
Grants a decent amount of Fire DoT Multiplier, and Fire Resistances which is very useful to offset the penalty from Fire Mastery |
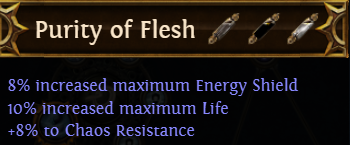 |
This Notable gives a lot of maximum Life and Energy Shield, and very much-needed Chaos Resistances. |
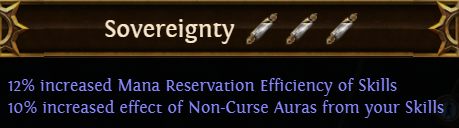 |
One of the best Aura Notables on the Passive Tree, it also has many great Nodes nearby it. |
| A TIER | |
| Some Passives are also very good, but you will have to consider their Passive Point Cost. | |
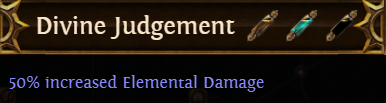 |
One of the best sources of Elemental Damage on the whole Passive Tree. |
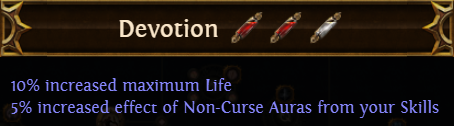 |
Grants a decent amount of maximum Life and increases the effects of your Auras |
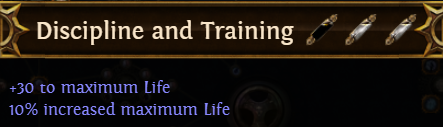 |
This Notable grants a very impressive amount of maximum Life due to the percentage increase and Flat amount of it. |
 |
Grants a bit of Elemental Damage, all Elemental Resistances, and a chance to Ignite. It's also a convenient pathway to the previous Notable |
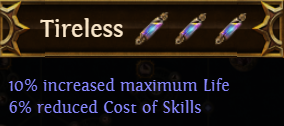 |
Grants a good amount of maximum Life and reduces the Cost of Skills. Note that it affects every type of Cost, not only the usual Mana Cost. |
 |
This Notable improves your maximum Life and Mana, and is placed very close to the Witch starting point. |
 |
Another Notable that lies very close to the Witch's starting point. Cast Speed doesn't affect Ignite Damage directly but smoothens the gameplay overall. |
 |
Dealing Damage faster is quite unique modifier, it doesn't increase the total Damage of the Ignite, but increases its Damage per Second. |
 |
Reducing the Elemental Resistances of enemies is a very potent way to increase your Elemental Damage. You can reduce the Resistances to negative values. |
 |
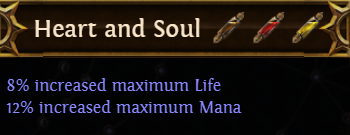
It's a very good hybrid Passive that increases both your maximum Life and energy Shield. It also adds a bit of Strength |
| B TIER | |
| Passives in this Tier are Build specific or should be replaced with Cluster Jewels later on. | |
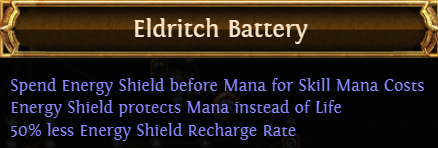 |
This Keystone is very popular, as it allows you to freely Reserve 100% of your Mana and still be able to Cast your Spells. It's often replaced by the Devouring Diadem Unique Helmet later on, but that's not the only possibility to utilize this Keystone. |
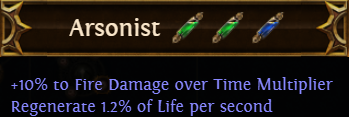 |
This Notable grants a bit of Fire Dot Multiplier and some Life Regeneration. It's a good pick until you can equip Cluster Jewels |
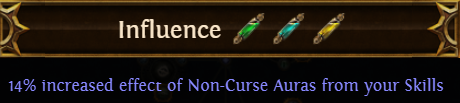 |
That Aura's Passive improves the effect of your Auras significantly but doesn't allow you to use more Auras on its own. |
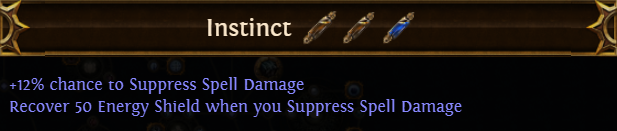 |
Spell Suppression is a very strong layer of Defense, but reaching the cap with just your Gear is very hard to do. |
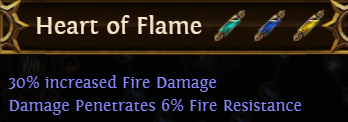 |
Grants a decent amount of increased Fire Damage. Penetration doesn't affect DoTs. Use it before transitioning to Cluster Jewels. |
| Masteries Priority |
|
If you have any other build requests please leave that in the comments below. We are always open to suggestions and constructive feedback.
Pictures used in this article are the intellectual property of Grinding Gear Games.
