Duelist Leveling Guide with Melee/Impale in PoE
One of the best and most efficient routes you can take when leveling up a Duelist with Melee skillsDuelist Leveling Guide
Melee/Impale version
Updated for Patch 3.19
The Best Crafty Guides by Odealo
| Guide notes |
| November 5, 2022 -Guide created |
Among many Attack-type builds, Duelists' are one of the most appealing ones, especially for Melee enthusiasts. Slayer is a class specialized in quickly killing bosses, staying alive by leeching life from his enemies, or performing exceptionally well in crowded areas full of enemies. Champion is very efficient with Armour, Evasion, and overall Hit Damage mitigation due to the Fortify, Adrenaline, and Taunt mechanics. He's also suited to deal Physical Damage via Impale and can make very good use of Auras. Gladiator can utilize Block Chance and Bleeding mechanics the most efficiently. That makes these ascendancies very good picks for nearly any type of content in the game.
Although Attack Skills are very diverse, there are certain ones that are extremely efficient for leveling. Splitting Steel is the fastest way to get through all ten acts. It won't require any specific or unique items and it lays the groundwork for virtually any Attack build later on, with no need to revert many (if any) changes on your passive skill tree. Due to it being a Projectile Attack, not a Melee one, there will be some caveats to pay attention to which we will mention in due time. You can safely switch to your destined Skill during yellow or even red maps around level 80, and at this point, all items should be available for you to wield/wear. During the leveling process forage items with Physical Damage modifiers, your weapon will be especially important here. There are a lot of Attack-related Physical Damage nodes at the bottom of the passive skill tree, right outside Duelist's starting location. Start with the most fundamental stats such as the aforementioned Physical Damage, and for defenses opt for Maximum Life and Elemental Resistances, which should be capped at 75% at all times. During Act 3 you'll be given an opportunity to specialize in Impale via Impale Support Gem - by far the most propitious game mechanics for all Physical Attack builds. Get the 100% Chance to Impale on Hit, it's especially good with Splitting Steel Skill. Your performance can be then boosted by Totem or Banner Skills.
You can also check our other Path of Exile builds right over here Odealo's Crafty Guides - Full List
1. Important Skills
We recommend leveling up only with Splitting Steel. You can obviously use other Attacks such as Cleave, Cyclone, or Flicker Strike if you prefer to do so, it won't even alter the gear setup in any way as all of these Skills make use of a Melee Weapon. We will include a separate setup here for the Melee Skill of your choice, even if it won't be very different from the Splitting Steel one.
Splitting Steel can be picked up from Tarkleigh after killing Hillock during the first minute of the game. This ability consists of two Skills, one is used to fire a Projectile, and the second one is Call of Steel. You might notice some Steel Shards around your character, these are consumed after using the Attack and can be replenished by casting Call of Steel. Be sure that you always have Steel Shards, with these your Attacks are enhanced - you deal more Damage and the Projectile is getting split to damage nearby enemies aiming for them automatically, even if you miss the initial Hit. That's what makes this Skill so good, you don't even have to aim. If you've Impaled an enemy, using Call of Steel will damage them dealing more damage the more times they've been Impaled. We recommend using Call of Steel and Splitting Steel in an altering fashion to always have Shards up and ready.
For Mana-reserving Skills we recommend Pride, Precision, and Dread Banner. It will grant you more Damage, Accuracy - needed to actually land the Hits, and improvements to the Impale mechanics. These three Auras combined shouldn't reserve all of your Mana, but that depends on Precision as it requires more Mana the higher level it is. After no longer being able to accommodate these Auras, simply allocate Champion of the Cause and Bannerman notables on your skill tree. Precision is available at level 8 in Act 1, Pride and Dread Banner can be acquired after completing the first Quest in Act 3. In Act 2 you can briefly use Herald of Ash as your Mana-reserving spell, it's excellent in this very early stage of the game.
During boss fights you mind find yourself in need of more DPS. Deploy the Ancestral Protector Totem which will get you more Attack Speed. You can get it as soon as level 1. Another Skill granting you more Attack Speed (and Life Leech) is Blood Rage, but it comes at a cost of slowly losing your Life. Be careful with it, it drains your Life faster the higher the Gem Level of this skill is.
For a Curse use Sniper's Mark, it increases Projectile Damage, but if you're using a Melee Attack, switch it for Vulnerability. Curses are available in act 3.
|
|

3. Setups
You will need only red and green sockets on your gear. Be sure to avoid gear pieces with Energy Shield as these are often skewed to roll more blue sockets. Tabula Rasa is the sound solution to any of these issues. New Skill Gems are unlocked by entering a new Act and completing a quest, some of them can be granted as a reward but there is no need to pay attention to that, these are extremely cheap. In Act 6 you will be tasked by Lilly Roth to complete a quest, by doing so you're granted access to all Skill and Support Gems available for any class. It will also unlock her shop in your Hideout for every new Character you make in the same League.
Suggested leveling Gem setups:
| Splitting Steel setup | |
 |
Splitting Steel - Splitting Steel will be used as a primary damage source, during the first two acts aim for mixed Fire and Physical Damage, later specializing only in Physical type. |
| Act 1 Support Gems | |
 |
Added Fire Damage Support - Adds Fire Damage as a percentage of your Physical one. |
 |
Onslaught Support - Onslaught grants 20% increased movement and Attack Speed, it's a big bonus to damage and mobility. |
 |
Maim Support - Maimed enemies receive more Physical Damage and are slower. |
 |
Chance to Bleed Support - It not only increases the chance to cause Bleeding but also adds Physical Damage to Attacks (Bleed Damage is based only on Physical Damage). |
| Act 2 Support Gems | |
 |
Vicious Projectiles Support - Use it for much more Physical Damage with Projectiles, but slightly reduced Attack Speed. |
 |
Point Blank Support - Standing close to the target makes you deal much more damage with Projectiles, which you should do after socketing this Gem. |
 |
Faster Attacks Support - It simply increases your Attack Speed. Give up the Onslaught Support Gem - use Flask or Thrillsteel to gain this buff instead. |
| Act 3 Support Gems | |
 |
Impale Support - Replace the Added Fire Damage Support with this Gem for more Impale chance and effectiveness. It's only good with Physical Damage. At this point start using  Pride and Pride and  Dread Banner. Dread Banner. |
| Act 4 Support Gems | |
 |
Brutality Support - Brutality is one of the best Support Gems you can get - it grants more Physical Damage, but makes you unable to deal any other type of damage with a linked Attack. Switch it with Point Blank Support - you can get Point Blank in form of a Keystone so you don't have to waste a socket. |
If you really don't want to use Splitting Steel, you can alternatively pick a Melee Attack, it would make you slower as Hitting with Melee Attacks require closing the distance between you and the opponent, but it opens some new possibilities for a setup. Keep in mind that Splitting Steel has a built-in 60% Chance to Impale on Hit, other Attacks don't, and it will be needed later to get the required 100% for a noticeable damage bonus. For a Strike Skill, we recommend Boneshatter, alternatively use Cyclone, but it's not a very good idea to start with it as soon as you're able to.
| Boneshatter setup | |
 |
Boneshatter - Boneshatter is available at level 28, before that you can use Heavy Strike as it's very similar. It's one of the best Strike Skills but using it causes you to deal Physical Damage to yourself via Trauma stacks - counter it with Armour and Life Leech. You can also use Heavy Strike as it's very similar. It's one of the best Strike Skills but using it causes you to deal Physical Damage to yourself via Trauma stacks - counter it with Armour and Life Leech. You can also use  Cyclone in its place. Cyclone in its place. |
| Act 1 Support Gems | |
 |
Ruthless Support - Every third Attack becomes Ruthless, these deal much more Damage with Hits and Bleeding. Can't be used with Cyclone. |
 |
Ancestral Call Support - It's a mandatory Gem to use during leveling with Strike Skills, it creates apparitions that Hit more enemies alongside you, making progressing through maps with multiple enemies bearable. It can be later replaced with a gloves modifier or the Tribal Fury notable. Can't be used with Cyclone. |
|
Added Fire Damage Support |
|
Maim Support |
|
Chance to Bleed Support |
|
Onslaught Support |
| Act 2 Support Gems | |
|
Faster Attacks Support |
 |
Melee Physical Damage Support - One of the best and simples upgrades to your damage, it lowers your Attack Speed in exchange for more Damage. |
 |
Close Combat Support - If you're using a Sword or an Axe, it's the recommended Support Gem. |
| Act 3 Support Gems | |
|
Impale Support |
 |
Fortify Support - Your Hits Fortify and deal more Damage with Hits and Ailments. Don't use it if you're a Champion with Fortitude, obviously. |
| Act 4 Support Gems | |
|
Brutality Support |
 |
Multistrike Support - Multistrike makes your Attack deal less damage but repeats them two more times with much more Attack Speed which results in more DPS. It won't generate more Trauma for Boneshatter. Can't be used with Cyclone. |
| Aura setup | |
 |
Determination - Use it for an additional and increased Armour, it's more useful further into the game and when using Boneshatter. |
 |
Grace - Grace offers an additional and increased Evasion Rating for a chance to evade Attacks, it can be useful in the later stages of the game. |
 |
Precision - Precision is used for additional Accuracy, that is chance to Hit, and Critical Strike Chance, which is very useful in the late game. |
|
Pride - Pride increases the Physical Damage taken by nearby enemies, which is doubled after four seconds. |
 |
Herald of Ash - During Act 2 you can use it to deal more damage and cause enemies to "explode" on death. It loses its value after specializing in Physical Damage and Impale. |
 |
War Banner - War Banner increases your Accuracy and physical damage taken by nearby enemies. It's good if you need Accuracy with an already maxed-out Impale Chance. |
|
Dread Banner - It's the better Banner for the Impale-oriented Splitting Steel. It increases the efficiency of Impale, Accuracy, and Chance to Impale. |
| Utility Skills | |
 |
Leap Slam - Leap Slam is a great mobility Skill that allows you to jump over ledges and rocks, very useful during labyrinth trials. Link it with Faster Attacks and  Lifetap Support if you can. Lifetap Support if you can. |
 |
Sniper's Mark - A Mark-Curse that increases the damage received from Projectiles, making it great with Splitting Steel. Link it with  Mark On Hit Support to cast it automatically. Mark On Hit Support to cast it automatically. |
 |
Vulnerability - The general-purpose Curse for Physical Damage builds which is also great for Bleeding, which makes it useful at early stages when it's of any substance. Use it instead of Sniper's Mark if you're not using Splitting Steel. |
 |
Molten Shell - one of the best Guard Spells in the Game, it prevents incoming damage and grows stronger the more Armour you have. |
 |
Ancestral Protector - This Totem simply grants more Attack Speed for as long as it stays up. If you're using a Melee Attack (not Splitting Steel), you can use  Ancestral Warchief Totem too for more Melee Damage, and link them both to the Ancestral Warchief Totem too for more Melee Damage, and link them both to the  Multiple Totems Support to have both at the same time. Multiple Totems Support to have both at the same time. |
 |
Blood Rage - It drains your Life in exchange for Life Leech, Frenzy Charges on Kill, and Attack Speed. You might not want to use it as it puts you in a vulnerable position after not Hitting anything for too long. |
|
|
4. Gear
You can start with some powerful items even at level 1, but their absence won't impair your performance too much. Physical Damage is the core damage source at any stage of the game. First, you can add and convert some of the Physical Damage to Fire, but shortly after that focus exclusively on Physical Damage. Attack Speed is quite important too. During Act 3 you should have a 100% Chance to Impale with Attacks, it's achievable by Impale Support Gem and/or passives on a skill tree. Unique weapons can be very good, especially Swords, we've listed the best ones down below. Do not pursue Critical Strike early on, it's not very effective at the early stages, but becomes much more important at level 80 and above.
Maximum Life on your Gear is a nice thing to have, but it is not important, most of it will come from your Levels themself. Armor or Evasion Rating should be covered by your Auras. That leaves only one form of Defense you will need to get on your Rare Items: Elemental Resistances. You should aim to have at least 60% Resistance of each Element, excluding Chaos. To help with that, you should use Essences found during the Campaign, and the Crafting Bench in your hideout. Use the low-tier Crafts, as they are cheap and effective, while high tiers will also raise the Required Level to wear an Item.
Proper Flask Setup makes Leveling much quicker and easier. Try to get 2 or 3 Quicksilver Flasks so you can have at least one active at all times. Granite Flask is especially useful once you step into Act 5, as there is a very noticeable spike in Physical Damage dealt by the enemies. Lion's Roar Granite Flask can be used as soon as level 27 and is suitable for most of the end-game builds. 20% Quality on each Flask is an easy way to prolong their Duration.
 Tabula Rasa - Has six white and linked sockets, the best Body Armour for leveling. Tabula Rasa - Has six white and linked sockets, the best Body Armour for leveling. |
|
| Item has no level requirement and Energy Shield (Hidden) Item has 6 White Sockets and is fully linked (Hidden) |
|
 Goldrim - Helmet abundant with Elemental Resistances which are very important. Goldrim - Helmet abundant with Elemental Resistances which are very important. |
|
| +(30-50) to Evasion Rating 10% increased Rarity of Items found +(30-40)% to all Elemental Resistances Reflects 4 Physical Damage to Melee Attackers Level Requirement reduced by 100 (Hidden) |
|
 Thrillsteel - This helmet grants you an Onslaught for more Attack and Movement Speed. You won't need to use Silver Flask or allocate Graceful Assault with it. Thrillsteel - This helmet grants you an Onslaught for more Attack and Movement Speed. You won't need to use Silver Flask or allocate Graceful Assault with it. |
|
| Onslaught | |
 Le Heup of All - This Ring can be used for increased Damage, Attributes, Resistances, and added Physical Damage. Le Heup of All - This Ring can be used for increased Damage, Attributes, Resistances, and added Physical Damage. |
|
| Adds 1 to 4 Physical Damage to Attacks +(10-30) to all Attributes (10-30)% increased Damage (10-30)% increased Rarity of Items found +(10-30)% to all Elemental Resistances |
|
 Praxis - Praxis reduces the Mana Cost of Skills which for Attacks means cutting the cost in half or making them free. Praxis - Praxis reduces the Mana Cost of Skills which for Attacks means cutting the cost in half or making them free. |
|
| +(20-30) to maximum Mana +(30-60) to maximum Mana Regenerate (3-6) Mana per second -(8-4) to Total Mana Cost of Skills 8% of Damage taken Recouped as Mana |
|
 Death Rush - Adrenaline granted by this Ring gives you 100% increased Damage and 20% Movement Speed, massively boosting your leveling pace. Death Rush - Adrenaline granted by this Ring gives you 100% increased Damage and 20% Movement Speed, massively boosting your leveling pace. |
|
| +(17-23)% to Chaos Resistance Recover (3-5)% of Life on Kill Gain Adrenaline for (1-3) seconds on kill |
|
 Astramentis - With this Amulet, you won't need to worry about getting Attributes on your other pieces of Gear or skill tree. Astramentis - With this Amulet, you won't need to worry about getting Attributes on your other pieces of Gear or skill tree. |
|
| +(10-16) to all Attributes +(80-100) to all Attributes -4 Physical Damage taken from Attack Hits |
|
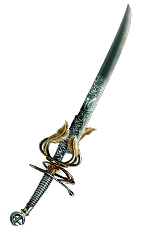
 Redbeak - One of the cheapest and most widely used swords for level 1 attack-based builds. Redbeak - One of the cheapest and most widely used swords for level 1 attack-based builds. |
|
| 40% increased Global Accuracy Rating 100% increased Damage when on Low Life 50% increased Physical Damage Adds 2 to 6 Physical Damage 10% increased Attack Speed +(20-30) to maximum Life Gain 2 Life per Enemy Hit by Attacks |
|
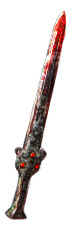
 Oni-Goroshi - 6-linked Sword that can be used from level 1. Best weapon for leveling if you don't mind its trite voice lines. Oni-Goroshi - 6-linked Sword that can be used from level 1. Best weapon for leveling if you don't mind its trite voice lines. |
|
| Uses both hand slots (70-90)% increased Critical Strike Chance Adds 2 to 3 Physical Damage to Attacks per Level Gain Her Embrace for 3 seconds when you Ignite an Enemy While in Her Embrace, take 0.5% of your total Maximum Life and Energy Shield as Fire Damage per second per Level Item has 6 Sockets and is fully linked (Hidden) |
|
 Ichimonji - Level 58 Sword with great overall stats for a Physical Attack Damage builds. Ichimonji - Level 58 Sword with great overall stats for a Physical Attack Damage builds. |
|
| (80-95)% increased Physical Damage Adds (5-10) to (13-20) Physical Damage (20-25)% increased Attack Speed 10% increased Effect of Buffs on you 10% increased Mana Reservation Efficiency of Skills Allies' Aura Buffs do not affect you Your Aura Buffs do not affect allies |
|
 Karui Ward - The best Amulet to use alongside Projectile Attacks Karui Ward - The best Amulet to use alongside Projectile Attacks |
|
| +(20-30) to Dexterity +(20-30) to Strength +100 to Accuracy Rating 30% increased Projectile Speed 10% increased Movement Speed 30% increased Projectile Damage |
|
 Daresso's Salute - If you're on full life most of the time (for example by avoiding damage, over-leeching, or having some Energy Shield) this is definitely an Amulet to consider. Daresso's Salute - If you're on full life most of the time (for example by avoiding damage, over-leeching, or having some Energy Shield) this is definitely an Amulet to consider. |
|
| +(16-24) to Strength and Dexterity 50% reduced maximum Energy Shield +(30-40)% to Fire Resistance +(30-40)% to Cold Resistance 10% increased Movement Speed when on Full Life +2 to Melee Strike Range 60% increased Melee Damage when on Full Life |
|
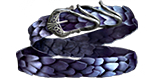
 String of Servitude - This Belt can give you a lot of Elemental Resistances if it has proper Implicit String of Servitude - This Belt can give you a lot of Elemental Resistances if it has proper Implicit |
|
| <(1-2) Random corrupted implicit modifiers> Implicit Modifier magnitudes are tripled Level Requirement reduced by 100 (Hidden) Desired Implicit: (42-48)% to All Elemental Resistances |
|
 Meginord's Girdle - At level 8 you're able to equip Meginord's Girdle which is overall a great Belt for Attack Builds Meginord's Girdle - At level 8 you're able to equip Meginord's Girdle which is overall a great Belt for Attack Builds |
|
| +(25-35) to Strength +25 to Strength Adds 10 to 20 Physical Damage to Attacks 10% increased maximum Life +(10-20)% to Cold Resistance 25% increased Flask Life Recovery rate |
|
 Wurm's Molt - At level 41 you can start using this Belt for Attributes, Resistances, Maximum Life, and to Leech Mana and Life Wurm's Molt - At level 41 you can start using this Belt for Attributes, Resistances, Maximum Life, and to Leech Mana and Life |
|
| +(25-40) to maximum Life +(20-30) to Strength +(20-30) to Intelligence +(20-30)% to Cold Resistance 2% of Physical Attack Damage Leeched as Life 2% of Physical Attack Damage Leeched as Mana (500-1000)% increased total Recovery per second from Life Leech (500-1000)% increased total Recovery per second from Mana Leech |
|
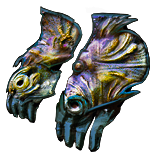 Lochtonial Caress - Available at level 1 these Gloves can provide you with Attack Speed and Charges on kill Lochtonial Caress - Available at level 1 these Gloves can provide you with Attack Speed and Charges on kill |
|
| (10-15)% increased Attack Speed (10-15)% increased Cast Speed (15-10)% reduced maximum Mana (10-15)% chance to gain a Power, Frenzy or Endurance Charge on Kill Conduit |
|
 Seven-League Step - The best Boots you can wear for the entire Campaign. They give a massive bonus to Movement Speed Seven-League Step - The best Boots you can wear for the entire Campaign. They give a massive bonus to Movement Speed |
|
| 50% increased Movement Speed Level Requirement reduced by 100 (Hidden) |
|
 Wanderlust - Cheap and effective boots. Available since level 1, they grant a decent amount of Movement Speed and Immunity to Freeze Wanderlust - Cheap and effective boots. Available since level 1, they grant a decent amount of Movement Speed and Immunity to Freeze |
|
| +5 to Dexterity +(10-20) to maximum Energy Shield (20-40)% increased Mana Regeneration Rate 20% increased Movement Speed Cannot be Frozen |
|
 Lord of Steel - There are three variants of this Jewel, and all of them are used to enhance the Call of Steel Skill in various ways. You can have only one - we recommend the one with increased Use Speed so as to not slow you down. Lord of Steel - There are three variants of this Jewel, and all of them are used to enhance the Call of Steel Skill in various ways. You can have only one - we recommend the one with increased Use Speed so as to not slow you down. |
|
| Impale Damage dealt to Enemies Impaled by you Overwhelms 10% Physical Damage Reduction Call of Steel has (80-100)% increased Use Speed Call of Steel causes (20-25)% increased Reflected Damage |
|
|
Stat priorities on Rare Items:
|
|
Suggested Flasks:
|
|
     |
5. Passive Skills
To successfully create the Passive Tree for a Build, you have to consider most of the Passive Clusters for a given build, choose a few of them, and make an optimal path to allocate most of them in the least amount of Passive Skill Points spent. Here, we showcased the best nodes for a sword-wielding Duelist with a focus on Splitting Steel. Maximum Life, Damage, Resistances, and other very important stats like Attack Speed, Chance to Impale, or Accuracy will have to be taken into account. If you have Lord of Steel Jewel, head imminently for Jewel Socket and put it in.

| S TIER | |
|---|---|
| The best and most efficient Passives in the Passive Tree. You will want to take them on almost every build. | |
 |
The first Notable you will allocate. It has all the useful stats like Attack Speed, Accuracy Rating, Dexterity, and indirect movement speed bonus. |
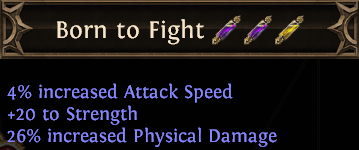 |
Attack Speed, Strength, and a big bonus to Physical Damage are all great. It can be found near Marauder's starting location. |
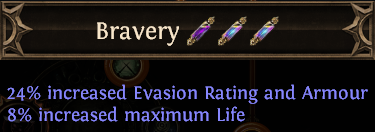 |
Bravery increases Maximum Life, Evasion, and Armour. It's really close to Art of the Gladiator - it costs only two points to allocate, which is a great price. |
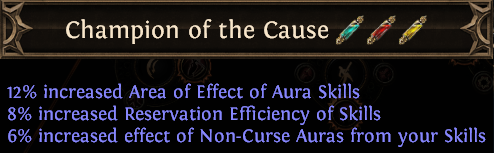 |
Nearly all builds make use of a Notable which increases Mana Reservation Efficiency. Here it is Champion of the Cause. You can also pick up the Bannerman Notable right next to it if you're using Banners. |
 |
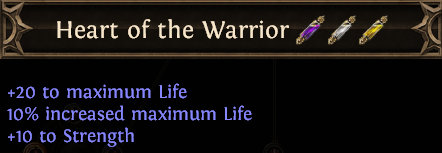
A very powerful Notable for Maximum Life. You're going to allocate it if you're planning to take Iron Grip, which you should if you're using Splitting Steel. |
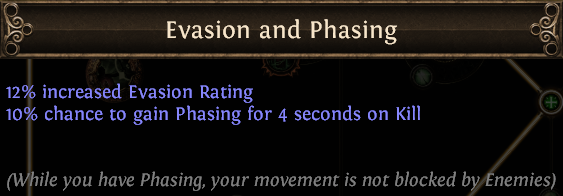 |
A small node right next to Precise Technique Keystone. It is used for the powerful Phasing buff. A 10% chance to gain it on kill is enough. |
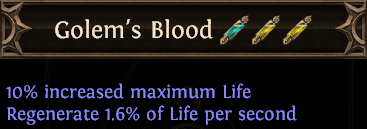 |
It is commonly picked in most of Duelist's builds for its proximity to the frequently used routes and a big bonus to Maximum Life. |
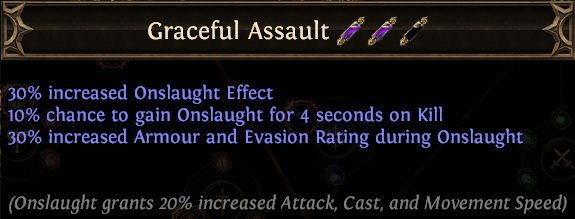 |
Pathing to Graceful Assualt is a good way to upgrade your Onslaught Effect, and have a 10% chance to gain this buff on kill. |
 |
One of the best Notables in the entire skill tree for more Maximum Life. |
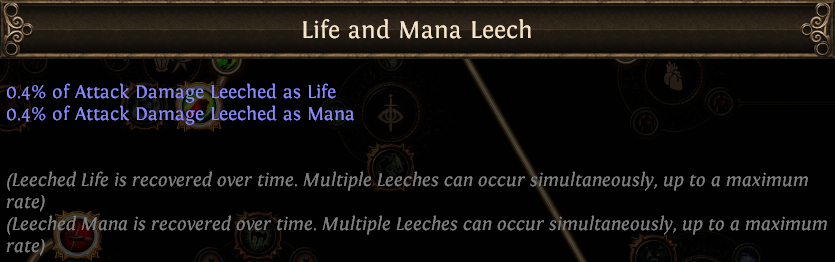 |
A small node that is used to Leech Life and Mana. It might not seem like a lot, but it's usually enough to allow you to carelessly spam your Attacks with no need for Mana Flasks. |
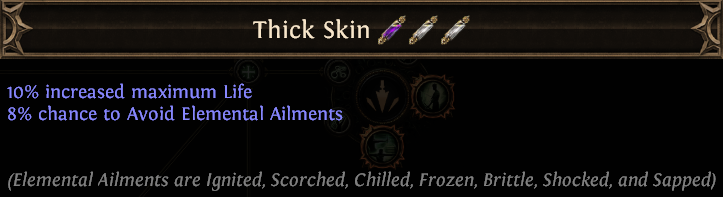 |
Thick Skin is a part of a Life Cluster with four nodes for more Maximum Life and a chance to avoid Elemental Ailments. |
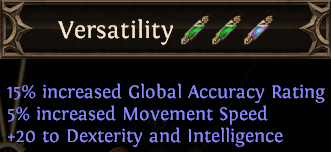 |
Versatility is located near Marauder's starting location, surrounded by other great passives. Its bonuses are certainly desirable. |
| A TIER | |
| Those are also very good Passives, just not as universal as previous ones | |
 |
If you're using Splitting Steel with Imaple Support, you won't need to allocate any Impale-related nodes, but if you don't, this is one you can use. It also unlocks a very good mastery. |
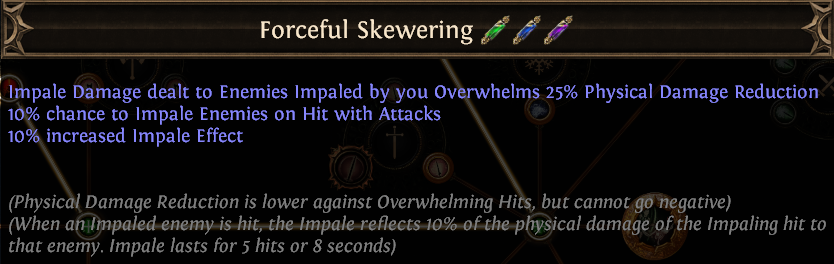 |
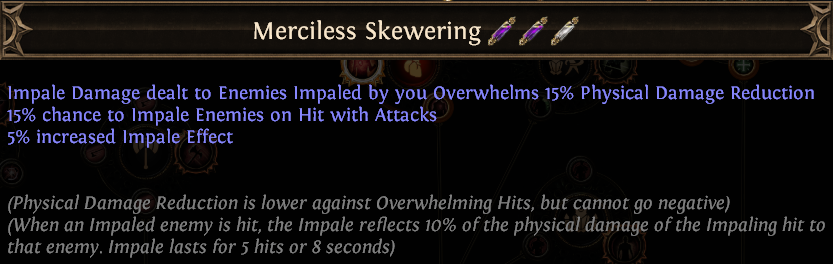
Much like the Notable mentioned above, this one's role is very similar. You can pick Merciless or Forceful Skewering if you're short on a 100% Chance to Impale. |
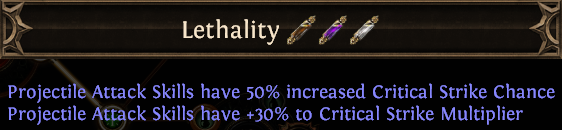 |
Lethality is the best Notable for general Critical Damage with Projectiles, meaning it will be useful only in the later stages of the game. |
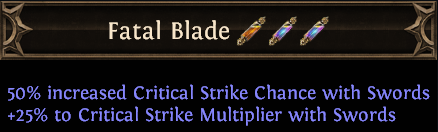 |
Another great node for Critical Strikes, this one can be used by Sword wielders. |
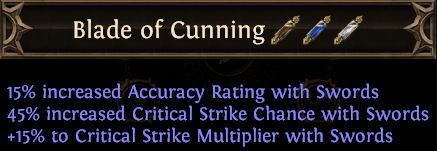 |
Blade of Cunning is again, a great passive for Critical Damage with Swords, and it also grants bonus Accuracy. |
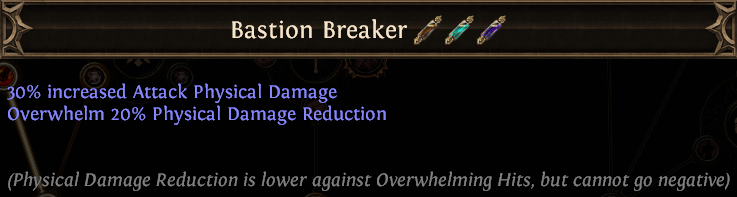 |
Bastion Breaker increases Physical Damage directly, and by reducing Physical Damage mitigation of your opponents. |
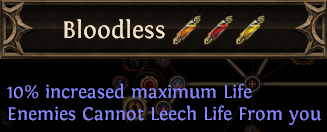 |
Bloodless is one of the Notables brimming with Maximum Life, its cluster is also full of small nodes worth picking up. |
 |
Yet another Notable for more Maximum Life, these are really good. |
 |
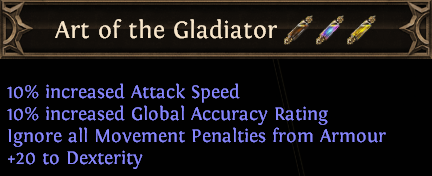
Splitting Steel is a Projectile Skill, so taking this Notable, which is right next to Art of the Gladiator, is a good idea. |
| B TIER | |
| Passives that belong to this Tier fulfill their specific purpose | |
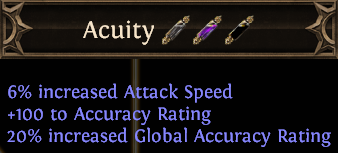 |
You can allocate it if you struggle with Accuracy Rating, or for its mastery. |
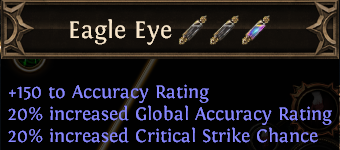 |
Eagle Eye is very similar to Acuity, but it's closer to your starting location and grants small bonuses to Critical Strikes instead of Attack Speed. |
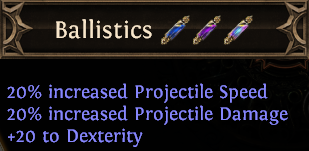 |
Ballistic would be a great Notable for Splitting Steel, but it's quite a long way from your pathway. |
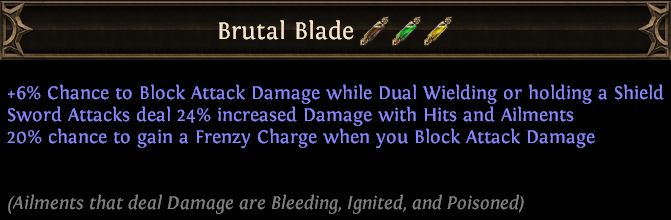 |
Brutal Blade from the large Sword cluster gets you some damage, Block Chance, and Frenzy Charges on Block. It's not a very efficient way to get more Block Chance, nor to generate Frenzy Charges. |
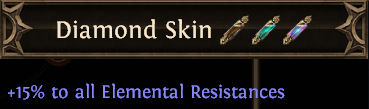 |
If you need Elemental Resistances you can head for Diamond Skin, it's right next to Warrior's Blood, and doing so would grant you 60% total Elemental Resistances by spending only two passive points. |
 |
Attack Speed, Accuracy, and a bit of Dexterity are great, but the node is located next to Ranger's starting location which is somewhat far from your route. |
 |
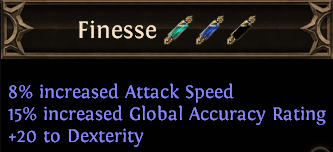
Maximum Life with other minor bonuses is great, but as Finesse, it requires spending a few extra points to get there. |
 |
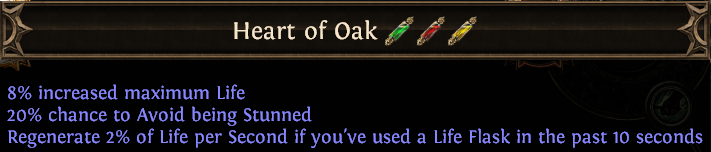
Primal Spirit is right next to Heart of Oak and Finesse, and it can be allocated if you're already there. It helps with Mana sustain and grants Intelligence. |
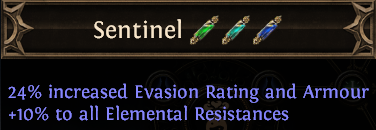 |
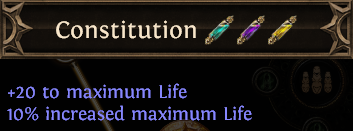
You can go for Sentinel if you've gone for Constitution already - it would cost you only two points to gain Elemental Resistances, Armour, and Evasion. |
 |
Soul of Steel is useful much later in the game, at the point where increasing Maximum Elemental Resistances makes a big difference, but it can be picked up for its Armour mastery. |
 |
It is a very similar case to Soul of Steel - you can pick it - it won't cost you a lot of points, but don't rush it. |
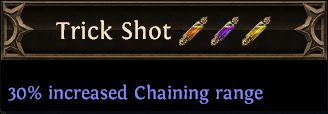 |
If you're using Splitting Steel, and you can make it Chain (for example, by using Chain Support), you can allocate Trick Shot for a slightly improved clear speed. |
| Masteries Priority |
|
|
|
If you have any other build requests please leave that in the comments below. We are always open to suggestions and constructive feedback.
Pictures used in this article are the intellectual property of Grinding Gear Games.
