Marauder Leveling Guide for PoE
Complete Leveling Guide for Marauder using Two-Handers and Melee SkillsMarauder Leveling Guide
2-handed weapon version
Updated for Patch 3.19
The Best Crafty Guides by Odealo
| Guide notes |
| December 28, 2022 -Guide created |
Marauder is a strong pick that has always been popular among all Attack-based builds. Berserker is an extremely powerful class that enhances Rage, Warcry, and overall Attack Damage mechanics which results in a lot of damage. Chieftain is an equally good class for when you want to play a Physical-to-Fire conversion Attack build. It's quite tanky, and great with Slam-type Attacks, or Attack Totems. Juggernaut is a tank that mitigates Physical Damage and has quite good Life Regeneration, it also synergizes very well with Endurance Charges.
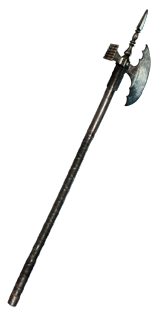
This guide will cover all the basics for leveling with a Marauder that uses a two-handed Weapon Attack. It's the most popular weapon type due to its damage and no need for a shield, at least not that early into the game. For an Attack, we've selected Boneshatter, and Slam attacks like Sunder or Ground Slam, but you can use any other attack you're accustomed to, it hardly matters. In the section below we will cover all upsides and downsides of each Skill so that you can choose the one you like the most. We also heavily recommend using a 2-handed Axe as there are a lot of passives that would improve this particular type of weapon in the bottom-left corner of the Passive Skill Tree. The type of damage you will deal is purely Physical, or Fire. That depends mostly on your Ascendancy - Chieftain is the class for Fire Damage. The Weapon will be very important - remember to use vendor recipes for increased Physical Damage, or buy some of the Unique Axes we will recommend later. Due to being Melee, you're required to stay a bit closer to the enemies which slows your clear speed and makes you more vulnerable in most boss fights, that's why movement speed is very important - use decent Boots, Quicksilver Flask, and Onslaught buff whenever you can. Art of the Gladiator and Versatility notables are also very good. At first, you will take the Resolute Technique Keystone to always Hit and not to worry about Accuracy Rating, Critical Strike is good after level 70 or so. Your defenses are Armour, Maximum Life, Life Leech, and Endurance Charges in some cases. This technique can carry you to red maps.
You can also check our other Path of Exile builds right over here Odealo's Crafty Guides - Full List
1. Important Skills
What we recommend to start with is Ground Slam that you can choose after defeating Hillock, but you can pick Molten Strike too. Ground Slam is better against multiple enemies, but Molten Strike is also quite good if you connect it with Ancestral Call Support. At level 28 you can start using Earthquake or Boneshatter. Once again - one is a Slam and the other is a Strike, so pick whatever you're more comfortable with. If you want to pick a Chieftain, convert all your damage to Fire, otherwise, we recommend opting for Physical Damage only with Berserker and Juggernaut.
Boneshatter is a short-range Strike Attack that is very similar to the default Attack, it's no good in its base form so to upgrade it you will need to link Ancestral Call Support to it and allocate Tribal Fury with the Mastery to target enemies further away. Boneshatter scales great with Attack Speed, as with each hit it grants a Trauma stack that makes you deal more and more Damage, but damages your character as well. With damage high enough you will be able to Stun, which would create an AoE effect improving clear speed. It's a great choice for a Berserker or Juggernaut, but as a Berserker, you will be more vulnerable to self-inflicted damage, so be sure that you can Leech Life. Here we recommend going full Physical Damage, but with Avatar of Fire and Chieftain's Ngamahu Keystones you can easily convert 100% of this Physical Damage to Fire. Still, Chieftain is not the recommended class for Boneshatter.
Earthquake is a basic Slam Attack that creates an Earthquake dealing AoE Damage around the character. It has a few phases making it perfect for stationary bosses. If you don't like this effect and prefer instant damage, use Sunder, or Ground Slam for a wider angle but shorter range. These Attacks are very simple and perfectly suited to be used alongside Warcries to Exert Attacks and make them more powerful. Here you also don't have to worry too much about Impale Chance, it's not very good with Slams.
For Mana-reserving Skills definitely use Herald of Purity for more Physical Damage (it can be later converted to Fire). War Banner is great with overall Physical Damage, but Dread Banner could improve your Chance to Impale (Impale is also good only with Physical Damage) and its effect. If you're a Chieftain that deals Fire Damage, pick Herald of Ash instead. Anger is too expensive, use much cheaper Blood and Sand or Flesh and Stone. To make the enemies near you take increased Physical Damage, use Pride. War Banner can be acquired in act 1, Herald Skills in act 2, Pride, and Dread Banner in act 3.
Other Skills that can improve your performance are Ancestral Totems for more Damage and Attacks Speed, Blood Rage for Life Leech and Attack Speed, and Leap Slam for mobility. For a Guard Spell, you can use Molten Shell or Steelskin. Vulnerability would be the best Curse for Physical Damage-dealers, but Flammability is good for when you deal Fire Damage. If you can generate Rage, start using the Berserk Skill. These are all available through acts 1 to 4.
|
|

3. Setups
You will need only red and green sockets on your gear. Be sure to avoid gear pieces with Energy Shield as these are often skewed to roll more blue sockets. Tabula Rasa is the sound solution to any of these issues. New Skill Gems are unlocked by entering a new Act and completing a quest, some of them can be granted as a reward but there is no need to pay attention to that, these are extremely cheap. In Act 6 you will be tasked by Lilly Roth to complete a quest, by doing so you're granted access to all Skill and Support Gems available for any class. It will also unlock her shop in your Hideout for every new Character you make in the same League.
Suggested leveling Gem setups:
| Boneshatter setup | |
 |
Boneshatter - Strike Attack that grows stronger the faster you Attack, making it perfect for Berserker with Rage and Blitz. |
| Act 1 Support Gems | |
 |
Onslaught Support - Use it to gain an Onslaught buff for more Attack and Movement Speed, it quickly becomes obsolete as this buff is quite easy to get. |
 |
Maim Support - Grants more Physical Damage and Maims enemies reducing their Movement Speed, and Physical Damage taken, |
 |
Chance to Bleed Support - Adds some base Damage to your Attacks, improves your chance to cause Bleeding, and Bleeding Damage. It's only good early on as Bleeding is not your main damage source. |
 |
Ancestral Call Support - Very important Gem, it makes your clear speed bearable by allowing your Strike skills to target extra enemies. You might abandon it much later after gaining this effect from other sources and swapping it during one-on-one boss fights. |
 |
Ruthless Support - One of the most powerful Support Gems that you will use indefinitely, it makes every third Attack much more devastating. |
 |
Lifetap Support - If you struggle with Mana sustain use Lifetap, it also grants more Damage, but not much. |
 |
Added Fire Damage Support - The best choice for Chieftains, it takes a portion of Physical Damage and adds it as extra Fire, which is a lot, since you will convert 100% of Physical Damage to Fire. For Physical Damage dealers, it's useless. |
| Act 2 Support Gems | |
 |
Melee Physical Damage Support - Its name summarizes what it does perfectly. It's one of the best Support Gems. It lowers your Attack Speed slightly. |
 |
Close Combat Support - If you're using a Sword or an Axe, which we suggest, implement Close Combat Support for more Melee Damage and Attack Speed. |
 |
Faster Attacks Support - Your Attacks are faster. |
 |
Rage Support - If you're a Berserker with Crave the Slaughter and increased maximum Rage, you can choose this Gem for more flat Damage, particularly good if you can't find a good weapon. |
 |
Elemental Damage with Attacks Support - It's only good if you're a Chieftain that converts Damage to Fire, it grants more Elemental Damage. |
| Act 3 Support Gems | |
 |
Impale Support - Impale can be good if you're short on 100% Chance to Impale and to increase its effect, but many Support Gems presented here are better. |
 |
Fortify Support - Grants more Damage and Fortifies you. While Fortified you take less Damage from Hits, which is good. |
| Act 4 Support Gems | |
 |
Brutality Support - Another very good Support Gem that makes you unable to deal any other type of damage but Physical. It grants more Physical Damage. |
An example of a final setup for a Physical Damage dealer: Boneshatter, Brutality, Ruthless, Melee Physical Damage, Close Combat, and Fortify. Note that only two sockets should be green, the rest are red. These colors can be achieved easily on an Axe or Body Armor with Armour or Armour mixed with Evasion. If you're a Chieftain, use Added Fire Damage and Elemental Damage with Attacks instead of Brutality and Close Combat or Fortify.
| Earthquake setup | |
 |
Earthquake - Slam attack that deals Physical damage around your character. It has a few phases, but if you want to deliver damage instantly, you're free to use other Slam-type Attacks. |
| Act 1 Support Gems | |
|
Ruthless Support |
|
Added Fire Damage Support |
|
Maim Support |
|
Chance to Bleed Support |
|
Onslaught Support |
| Act 2 Support Gems | |
|
Rage Support |
|
Elemental Damage with Attacks Support |
|
Melee Physical Damage Support |
|
Close Combat Support |
| Act 3 Support Gems | |
 |
Pulverise Support - Pulverise is one of the best Support Gems for AoE Attacks, it increases the Area of Effect and Area Damage, but lowers Attack Speed. |
|
Fortify Support |
 |
Less Duration Support - It's good with Earthquake - grants more Damage and lowers the Duration so that the aftershock is released sooner. |
| Act 4 Support Gems | |
|
Brutality Support |
 |
Fist of War Support - It's one of the best Support Gems for low-attack speed Slams, such as this one. Every 2 or so seconds your next Attack is Ancestrally Boosted dealing more damage and having increased AoE. |
This Slam setup is what we'd recommend for Chieftains, but since most Slams deals base Physical Damage, it is also suitable for Berserkers and Juggernauts. An example of a final setup for a Physical Damage dealer: Earthquake, Brutality, Fist of War, Melee Physical Damage, Less Duration, and Pulverise. In the Fire Damage version, swap Brutality with Elemental Damage with Attacks. If the Attack Speed is too low, get rid of Melee Physical Damage Support.
| Aura setup | |
 |
Determination - It is very popular, and you should definitely start using it around acts 6 to 10. It grants more Armour to mitigate incoming Physical Damage. |
 |
Herald of Purity - The minions it creates are not important, but the buff for more Physical Damage is. Even if you're dealing converted Fire Damage it's still good. |
 |
Blood and Sand - It's great but only for Slam Attacks as it grants more Area Damage or Area of Effect at the cost of the other. |
 |
Flesh and Stone - You can use a Sand Stance to protect yourself against projectiles and take less damage, or a Blood Stance to make nearby enemies Maimed and deal more damage. |
 |
Pride - Nearby enemies receive more Physical Damage, and if exposed to this Aura for longer than 4 seconds, this effect is doubled. Obligatory for Physical Damage dealers. |
 |
Herald of Ash - A very popular Herald Skill for Physical to Fire conversion builds, it adds a portion of Physical Damage as Extra Fire Damage. It also helps with clearing as slain enemies "explode" on death. |
 |
War Banner - Increases your Accuracy Rating and makes nearby enemies more vulnerable to Physical Damage. |
 |
Dread Banner - Reduces the Accuracy of nearby enemies, grants an additional 20% chance to Impale, and increases the effect of Impale. |
| Ancestral Totems setup | |
 |
Ancestral Protector - After placing this Totem it grants you a buff for more Attacks Speed for as long as it stays alive. |
 |
Ancestral Warchief - This Totem works similarly, but instead of Attack Speed, it grants more Melee Damage. |
 |
Multiple Totems Support - Allows you to place both of these totems at the same time, normally the limit of Totems is 1. You can start using it in act 4. |
|
Maim Support - If you're a Physical Damage dealer use Maim so that the maimed enemies will receive more Physical Damage. If you're dealing Fire Damage, replace it with |
| Utility Skills | |
 |
Leap Slam - One of the best mobility skills that you can use. Link it with Faster Attacks and Lifetap Support if you can. |
 |
Vulnerability - The general-purpose Curse for Physical Damage builds - cursed enemies take increased Physical Damage. If you're dealing Fire Damage, use  Flammability instead. It reduces Fire Resistance. Flammability instead. It reduces Fire Resistance. |
 |
Molten Shell - It prevents incoming damage and grows stronger the more Armour you have. You can replace it with  Steelskin before you start using it with Determination Aura for more Armour. We recommend linking it with Steelskin before you start using it with Determination Aura for more Armour. We recommend linking it with  Cast when Damage Taken, and using a Warcry as your movement key. Cast when Damage Taken, and using a Warcry as your movement key. |
 |
Blood Rage - It drains your Life in exchange for Life Leech, Frenzy Charges on kill, and Attack Speed. It's great with Boneshatter but forces you to hit enemies often to not lose Life. |
 |
Berserk - If you have Rage you can spend it on this Skill, it grants you bonuses similar to that of Rage and additionally makes you more durable for a short time. |
 |
Enduring Cry - Use it to quickly regenerate Life and gain Endurance Charges. If you're using a Strike Skill, such as Boneshatter, we recommend picking  Ancestral Cry instead, to enhance your next Strikes. If you're using Slam Attacks to deal Fire Damage, consider using Ancestral Cry instead, to enhance your next Strikes. If you're using Slam Attacks to deal Fire Damage, consider using  Infernal Cry. Use only one Warcry - with Call to Arms Keystone these have shared cooldown. Infernal Cry. Use only one Warcry - with Call to Arms Keystone these have shared cooldown. |
|
|
4. Gear
Physical Attack Damage is always your top priority, so be sure that you have a good weapon. We recommend checking for a new one each time you enter a new act, use Essences, or vendor recipes to get the highest numbers. The higher the Item level, the higher tiers of modifiers it can roll, which means more damage. Even if you deal Fire Damage, it's still converted from Physical. Besides that, look for Maximum Life and Elemental Resistances, nothing else is really as important. Movement Speed on boots will be of use. Armour will come from Determination and inherent items' modifiers. That's basically it.
Maximum Life on your Gear is a nice thing to have, but it is not important, most of it will come from your Levels themself. Armor or Evasion Rating should be covered by your Auras. That leaves only one form of Defense you will need to get on your Rare Items: Elemental Resistances. You should aim to have at least 60% Resistance of each Element, excluding Chaos. To help with that, you should use Essences found during the Campaign, and the Crafting Bench in your hideout. Use the low-tier Crafts, as they are cheap and effective, while high tiers will also raise the Required Level to wear an Item.
Proper Flask Setup makes Leveling much quicker and easier. Try to get 2 Quicksilver Flasks so you can have at least one active. Silver Flask increases your damage and mobility. Granite Flask is especially useful once you step into Act 5, as there is a very noticeable spike in Physical Damage dealt by the enemies. Lion's Roar Granite Flask can be used as soon as level 27 and is suitable for most of the end-game builds, but only if you're dealing Physical Damage. 20% Quality on each Flask is an easy way to prolong their Duration.
 Tabula Rasa - The best leveling Body Armour, it has six, white, and linked sockets. Tabula Rasa - The best leveling Body Armour, it has six, white, and linked sockets. |
|
| Item has no level requirement and Energy Shield (Hidden) Item has 6 White Sockets and is fully linked (Hidden) |
|
 Goldrim - is used mostly for its Elemental Resistances, up to 120% in total. Goldrim - is used mostly for its Elemental Resistances, up to 120% in total. |
|
| +(30-50) to Evasion Rating 10% increased Rarity of Items found +(30-40)% to all Elemental Resistances Reflects 4 Physical Damage to Melee Attackers Level Requirement reduced by 100 (Hidden) |
|
 Thrillsteel - Early on you can use it for permanent Onslaught buff, but it quickly becomes obsolete. Thrillsteel - Early on you can use it for permanent Onslaught buff, but it quickly becomes obsolete. |
|
| Onslaught | |
 Le Heup of All - Another Item for a lot of Resistances. It also grants Damage and Attributes. Le Heup of All - Another Item for a lot of Resistances. It also grants Damage and Attributes. |
|
| Adds 1 to 4 Physical Damage to Attacks +(10-30) to all Attributes (10-30)% increased Damage (10-30)% increased Rarity of Items found +(10-30)% to all Elemental Resistances |
|
 Blackheart - You can equip it at level one, it adds tons of damage to your attacks, but don't combine it with Brutality Support Gem. Blackheart - You can equip it at level one, it adds tons of damage to your attacks, but don't combine it with Brutality Support Gem. |
|
| Adds 1 to 4 Physical Damage to Attacks Adds (10-15) to (20-25) Chaos Damage to Attacks Regenerate (10-15) Life per second 10% chance to Cause Monsters to Flee |
|
 Death Rush - It's used for Chaos Resistance, Life on Kill, and a powerful Adrenaline buff which is great for melee characters. Death Rush - It's used for Chaos Resistance, Life on Kill, and a powerful Adrenaline buff which is great for melee characters. |
|
| +(17-23)% to Chaos Resistance Recover (3-5)% of Life on Kill Gain Adrenaline for (1-3) seconds on kill |
|
 Astramentis - Adds tons of Attributes, which probably won't be needed, but it's good to keep it in mind. Astramentis - Adds tons of Attributes, which probably won't be needed, but it's good to keep it in mind. |
|
| +(10-16) to all Attributes +(80-100) to all Attributes -4 Physical Damage taken from Attack Hits |
|
 Carnage Heart - Overall great Amulet with a lot of Attributes, Resistances, Life Leech, and Damage. Carnage Heart - Overall great Amulet with a lot of Attributes, Resistances, Life Leech, and Damage. |
|
| +(10-16) to all Attributes +(20-40) to all Attributes +(10-20)% to all Elemental Resistances (1.2-2)% of Physical Attack Damage Leeched as Life 50% increased total Recovery per second from Life Leech (30-40)% increased Damage while Leeching Extra gore |
|
 The Ignomon - It's good early on as it adds Fire Damage to Attacks and Fire Resistance. Due to the Blind and Evasion, you're also less likely to be hit. The Ignomon - It's good early on as it adds Fire Damage to Attacks and Fire Resistance. Due to the Blind and Evasion, you're also less likely to be hit. |
|
| (12-20)% increased Rarity of Items found 20% increased Light Radius Adds (18-24) to (32-40) Fire Damage to Attacks +(100-150) to Accuracy Rating +(100-150) to Evasion Rating +20% to Fire Resistance Nearby Enemies are Blinded |
|
 String of Servitude - You can wear it at level one, and with the right implicit for extra Elemental Resistances, it is very good. String of Servitude - You can wear it at level one, and with the right implicit for extra Elemental Resistances, it is very good. |
|
| <(1-2) Random corrupted implicit modifiers> Implicit Modifier magnitudes are tripled Level Requirement reduced by 100 (Hidden) Desired Implicit: (42-48)% to All Elemental Resistances |
|
 Meginord's Girdle - At level 8 you can start wearing this Belt for added Damage, more Maximum Life, Strength, and Cold Resistance. Meginord's Girdle - At level 8 you can start wearing this Belt for added Damage, more Maximum Life, Strength, and Cold Resistance. |
|
| +(25-35) to Strength +25 to Strength Adds 10 to 20 Physical Damage to Attacks 10% increased maximum Life +(10-20)% to Cold Resistance 25% increased Flask Life Recovery rate |
|
 Wurm's Molt - At level 41 we recommend switching to this Belt if you need Life and Mana Leech on top of Cold Resistance and Attributes. Wurm's Molt - At level 41 we recommend switching to this Belt if you need Life and Mana Leech on top of Cold Resistance and Attributes. |
|
| +(25-40) to maximum Life +(20-30) to Strength +(20-30) to Intelligence +(20-30)% to Cold Resistance 2% of Physical Attack Damage Leeched as Life 2% of Physical Attack Damage Leeched as Mana (500-1000)% increased total Recovery per second from Life Leech (500-1000)% increased total Recovery per second from Mana Leech |
|
 Lochtonial Caress - Available at level 1 Lochtonial Caress could be useful due to the Charges gained on Kill. Lochtonial Caress - Available at level 1 Lochtonial Caress could be useful due to the Charges gained on Kill. |
|
| (10-15)% increased Attack Speed (10-15)% increased Cast Speed (15-10)% reduced maximum Mana (10-15)% chance to gain a Power, Frenzy or Endurance Charge on Kill Conduit |
|
 Seven-League Step - The fastest boots in the game, but besides movement speed, these have nothing else to offer. Seven-League Step - The fastest boots in the game, but besides movement speed, these have nothing else to offer. |
|
| 50% increased Movement Speed Level Requirement reduced by 100 (Hidden) |
|
 Wanderlust - Decent movement speed combined with Freeze immunity make these an appealing option. Wanderlust - Decent movement speed combined with Freeze immunity make these an appealing option. |
|
| +5 to Dexterity +(10-20) to maximum Energy Shield (20-40)% increased Mana Regeneration Rate 20% increased Movement Speed Cannot be Frozen |
|
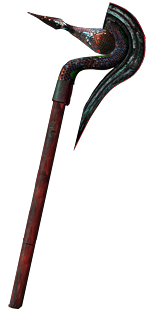
 Wideswing - At level 18 we recommend Wideswing Ax for more Damage, Mana on Kill, and Increased Area of Effect for socketed Gems. Wideswing - At level 18 we recommend Wideswing Ax for more Damage, Mana on Kill, and Increased Area of Effect for socketed Gems. |
|
| Socketed Gems are Supported by Level 20 Increased Area of Effect +10 to Strength (120-160)% increased Physical Damage +10 Mana gained on Kill +(120-150) to Accuracy Rating +2 to Weapon Range |
|
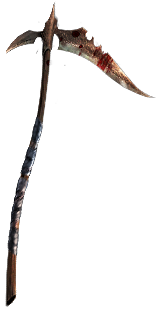
 Reaper's Pursuit - Later, at level 33 you can upgrade your weapon. This one makes the Resolute Technique obsolete as Hits can't be evaded. Reaper's Pursuit - Later, at level 33 you can upgrade your weapon. This one makes the Resolute Technique obsolete as Hits can't be evaded. |
|
| (100-125)% increased Physical Damage (30-40)% increased Rarity of Items found +10 Life gained on Kill 15% increased Movement Speed when on Full Life Culling Strike Hits can't be Evaded |
|
 The Blood Reaper - Level 45 Weapon with a lot of Maximum Life, Life Leech, and Damage. We recommend using Lifetap Support Gems as your Skills will be more expensive with this weapon. The Blood Reaper - Level 45 Weapon with a lot of Maximum Life, Life Leech, and Damage. We recommend using Lifetap Support Gems as your Skills will be more expensive with this weapon. |
|
| (180-200)% increased Physical Damage +100 to maximum Life Regenerate 20 Life per second 1% of Physical Attack Damage Leeched as Life 50% increased Mana Cost of Skills 50% chance to cause Bleeding on Hit |
|
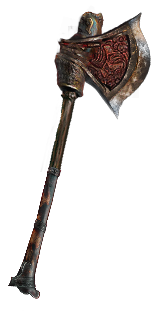 Kaom's Primacy - At level 58 you can wield this Axe. It has high base damage, Life on kill, generates some Rage, and is very good for Physical to Fire conversion Attacks. Kaom's Primacy - At level 58 you can wield this Axe. It has high base damage, Life on kill, generates some Rage, and is very good for Physical to Fire conversion Attacks. |
|
| (100-140)% increased Physical Damage +20 Life gained on Kill +(150-250) to Accuracy Rating Culling Strike Gain 1 Rage on Critical Hit with attacks, no more than once every 0.5 seconds Gain 1% of Physical Damage as Extra Fire Damage per 1 Rage |
|
|
Stat priorities on Rare Items:
|
|
Suggested Flasks:
|
|
     |
5. Passive Skills
To successfully create the Passive Tree for a Build, you have to consider most of the Passive Clusters for a given build, choose a few of them, and make an optimal path to allocate most of them in the least amount of Passive Skill Points spent. Here, we showcased the best Passives that a two-hand Axe-wielding Marauder can get. S-tier Passives are great in most cases, and A-tier ones are more specific - these might suit only a specific type of build, restricted to Physical, Fire, or Projectile Attacks. B is a tier with less useful passives that are to be picked later, or not at all. If you're using Endurance Charges, go for the nodes for extra Maximum Endurance Charges. Jewel Sockets are good in the late game. We allocated Resolute Technique, you won't deal Critical Strikes, not during leveling phase.

| S TIER | |
|---|---|
| The best and most efficient Passives in the Passive Tree. You will want to take them on almost every build. | |
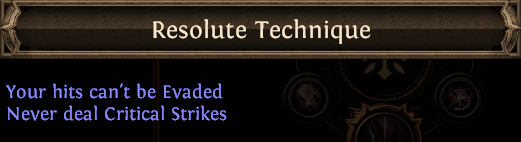 |
This Keystone makes you unable to deal Critical Strikes, but in turn, you cannot miss. It's a great deal early in the game when your Critical Chance is extremely low. Pick is as early as you can. |
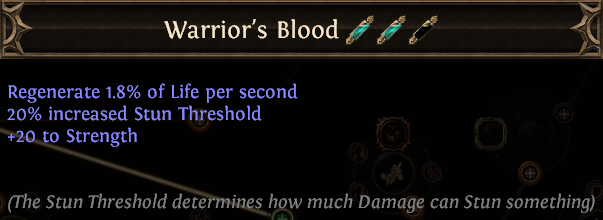 |
Warrior's Blood will be most likely the first notable to allocate, it grants a lot of good minor improvements. |
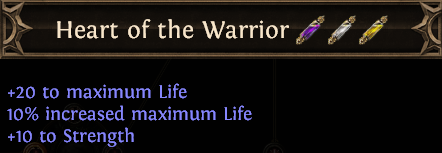 |
Tons of Maximum Life and Strength. |
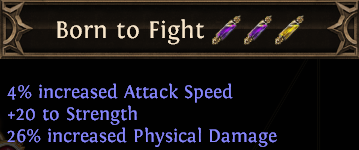 |
Attack Speed, Strength, and Physical Damage, all of it is good. |
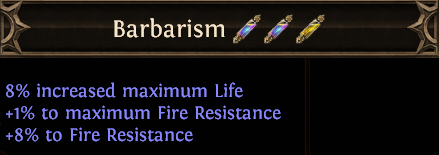 |
Barbarism grants Maximum Life, Fire Resistance, and Maximum Fire Resistance. |
 |
Juggernaut is used for Armour and Maximum Life, it also unlocks the Armour Mastery. |
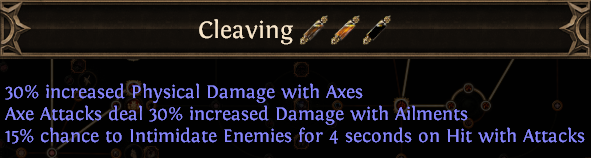 |
The top Notable in the big Axe Cluster - improves Axe Damage and Intimidates enemies, so that they take more Damage. |
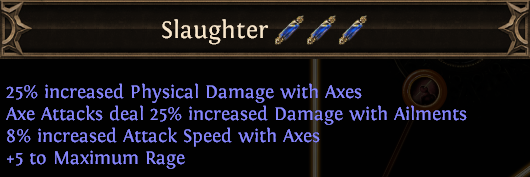 |
Slaughter, which is in the same cluster as Cleaving, is similar. It increases Axe Damage, Attack Speed, and Maximum Rage. |
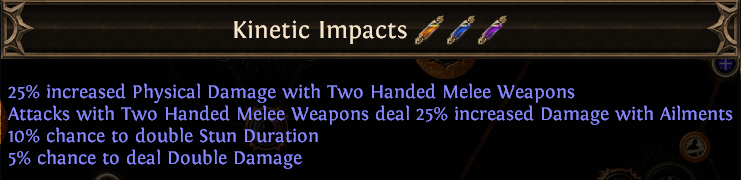 |
Powerful 2-hand Notable on a Cluster that you should have easy access to. |
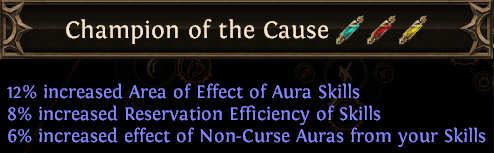 |
It becomes mandatory in act 2 or 3, with this Notable you can fit more Auras in the build. |
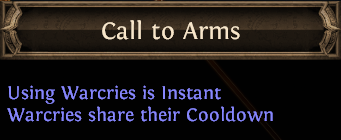 |
A Keystone that makes Warciries instant, it increases your mobility. It's good if you're using only one Warcry. |
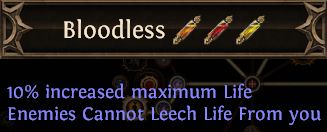 |
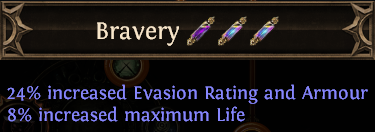
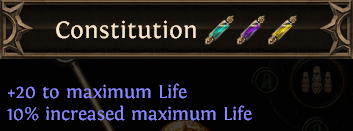
Bloodless simply increases your Maximum Life by 10%, it's what matters here. |
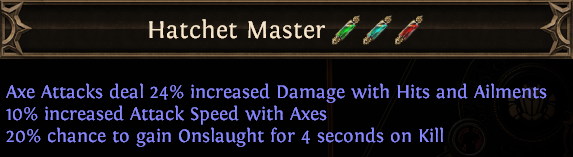 |
Hatchet Master is slightly off the main route, but it's one of the most powerful Axe notables, and there is not a lot of them. |
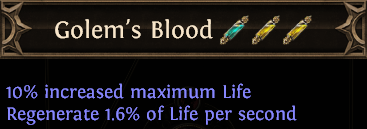 |
Golem's Blood increases Maximum Life and Regenerates a portion of it every second. |
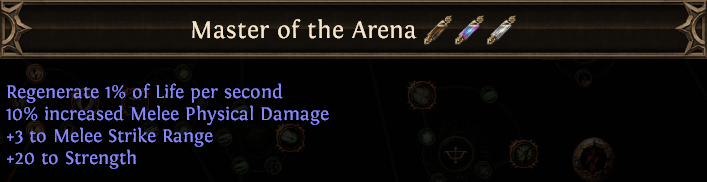 |
One of the three powerful Notables right outside Duelist's starting location. It grants Damage, Strike Range, Life Regeneration, and Strength. |
 |
Increases Armour, Evasion, and Maximum Life. |
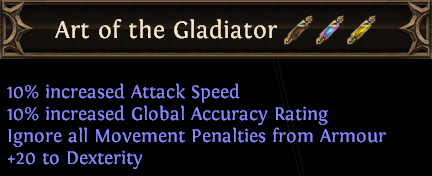 |
Attack Speed, Dexterity, and indirect movement speed bonus are all extremely beneficial for your character. |
| A TIER | |
| Those are also very good Passives, just not as universal as previous ones | |
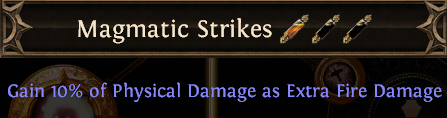 |
First, let's go over the best Fire-oriented passives. Magmatic Strikes grant Extra Physical Damage as Fire Damage, good with conversion. Right next to it is Avatar of Fire Keystone which you should pick too. |
 |
Lava Lash makes your Attacks Penetrate Fire Resistance and increase Fire Attack Damage, it is also great for Chieftain. |
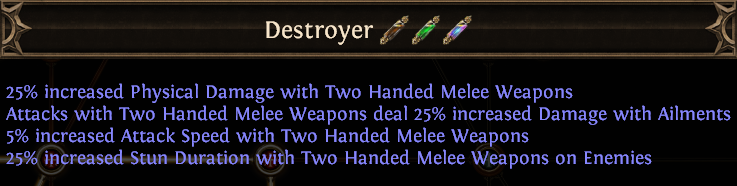 |
Destroyer is right next to Master of the Arena, it has a lot of good qualities for all characters with a 2-hand weapon. |
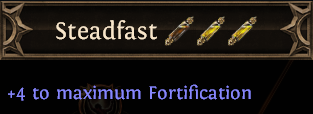 |
Steadfast is next to Call to Arms. It's great if you're not using Fortify Support, as allocating it unlocks a Mastery for Fortify on Hit. |
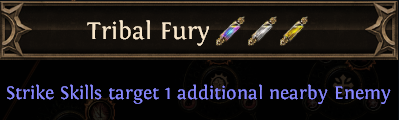 |
If you plan to use Strike Skill, head for Tribal Fury. |
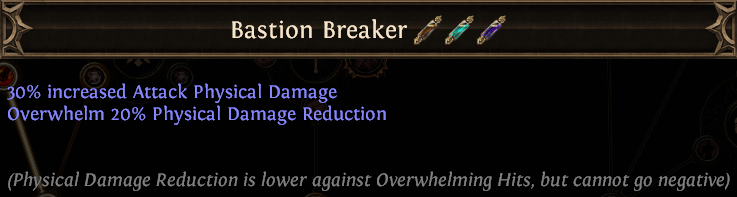 |
Bastion Breaker is good with Physical Damage only, it makes you deal more Physical Damage. |
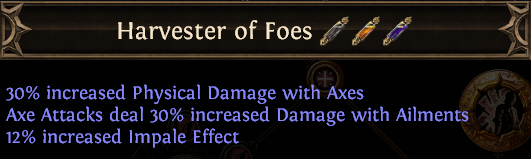 |
Another Axe Mastery. This one is good only for Physical Damage dealers, as it increases Impale Effect. |
 |
Provides you with a lot of Maximum Life, but it's a bit far from your route. Go for it if you also want to pick the adjacent Berserking. |
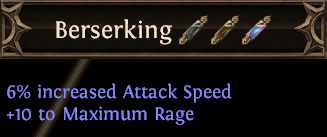 |
+10 to Maximum Rage is a lot, it also gets you some Attack Speed. |
| B TIER | |
| Passives that belong to this Tier fulfill their specific purpose | |
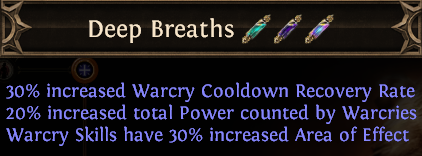 |
Increases the Cooldown Recovery and Power of Warcries. |
 |
Another two-hand Notable for Damage, Attack Speed, and Strength. |
 |
Increases Melee Strike Range and Area of Effect. Good with Strike Skills. |
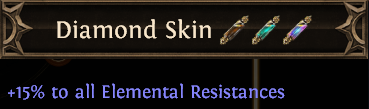 |
If you need some more Elemental Resistances, go for it. |
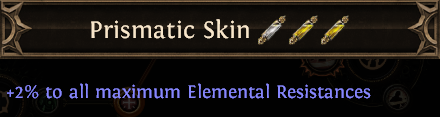 |
Prismatic Skin offers Maximum Elemental Resistances. It's good in the late game and makes the character much more durable. |
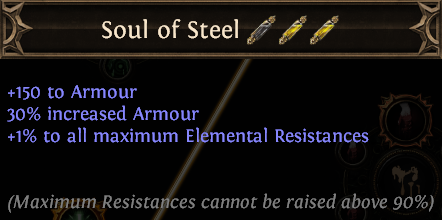 |
Use it for more Armour and Maximum Elemental Resistances. Good in the late game as well. |
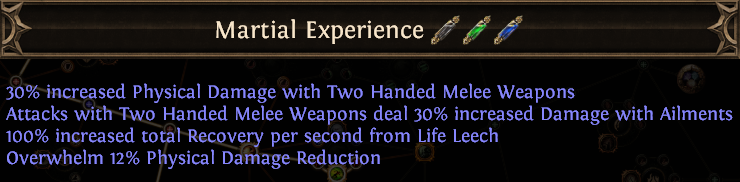 |
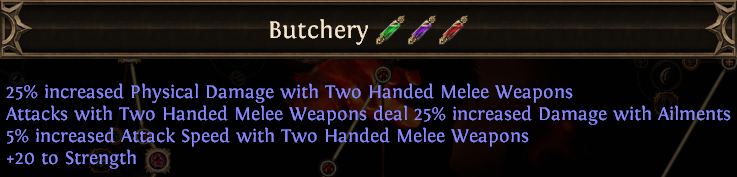
Good for Physical Damage dealers. It improves Damage with 2-hand weapons. |
 |
The right notable in the big 2-hand cluster at the bottom of the Skill tree. Increases Damage, Stun Duration, and Attack Speed. |
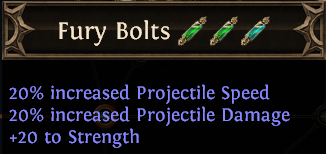 |
Fury Bolts notable is good only with some kind of Projectile Attack from Molten Strike. |
| Masteries Priority |
|
|
|
If you have any other build requests please leave that in the comments below. We are always open to suggestions and constructive feedback.
Pictures used in this article are the intellectual property of Grinding Gear Games.
