Shadow Leveling Guide using Traps in PoE
Leveling up using Traps is one of the easiest way to level up your Shadow character - find out how to do it properlyTraps
Shadow Leveling Guide
Updated for Patch 3.19
The Best Crafty Guides by Odealo
| Guide notes |
| November 12, 2022 -Guide created |
Traps allow you to cast Spells by proxy, much like Totems, but the difference lies in the way in which it occurs. Totems cast Spells continuously, while Traps do it once. You also place more Traps at the same time and stack them up for a big damage burst once an enemy enters their activation range. Traps can be connected to basically any non-channeling Spell in the game via Trap Support, but most players use the pre-made traps to save a socket. Seismic Trap, Explosive Trap, and Ice Trap are some of the most popular choices for Saboteurs.
This Guide aims to help you with the progression from the first Act up until yellow or red maps, at this point you'll be able to transition into the final stage of any desired build. Traps are some of the best tools to do so, especially when used by Saboteur, one of Shadow's ascendancies. It has many Keystones dedicated solely to improving Traps' Damage, Throwing Speed, AoE, and Cooldown Recovery Rate. What's even better, the passive skill tree is abundant with nodes and clusters serving the same purpose, and almost all of them are located very close to Shadow's Starting location. The build requires no unique items, whilst the rare ones are common and soundly priced. It's one of, if not the most popular build archetype for the league starter builds. The definition of Traps might sound like a clunky and unwieldy archetype, and to some extent it is. Nevertheless, Traps are not as bad as their specification sounds, you can throw them around at the same speed as you'd Cast any Spell and move forward. It creates a short window of opportunity for enemies close by to Hit you, but this issue can be mitigated by Born in the Shadows Keystone combined with Auras and Skills for a high Evasion Rating, making you exceptionally safe in the process.
1. Important Skills
There are a few options to choose from and a few more variables to consider when picking the right Starting Skill. All of the Traps presented here can be used indefinitely, there is no need to switch between them, and each one has its own merits. Explosive Trap is the first Trap available, it deals mixed Fire and Physical Damage. At level 12 you're free to switch to Lightning Trap. Level 28 grants you the ability to use an Ice Trap or Seismic Trap - the two most popular choices in recent years.
Explosive Trap deals Physical Damage, half of which is converted to Fire. It can be used with Added Fire Damage Support which is also available at level 1 and is very fitting. It deals relatively low damage on its own, but the initial Explosion is followed by a number of smaller ones with result in satisfying damage. It's good for dealing with bosses. With some additional Skills, it will grow stronger as it has the advantage of dealing converted damage. If your future plan is to use a Fire-oriented Trap, using an Explosive Trap to level up first is definitely the best course of action.
Use it with Herald of Ash for a vastly improved clear speed and damage. To improve your Fire Damage use a Flammability Curse, and a Wave of Conviction to cause Exposure, supported by Combustion to penetrate even more Fire Resistance.
Lightning Trap is an alternative choice that distinguishes itself by its very large Area of Effect, upon activating it fires multiple Projectiles in all directions which are able to Hit opponents far away. It's the best option if your priority is fast clearing, but keep in mind that it's really good only after getting an extra Pierce for these Projectiles. Lighting Trap also has the Vaal variant which can be used in addition to the Lightning Spire Trap at level 28. These are stationary spires that deal Lighting Damage around them, it's the same damage type as the Lightning Trap and so it will be as effective as your main setup. It fixes the otherwise poor single-target damage.
Use it with Wrath Aura for more Lightning Damage, Conductivity Curse, and Hydrosphere to reduce the Lightning Resistance of your enemies.
Ice Trap is one of the best Traps due to its Cold Damage which is able to Freeze and Chill, that is a very reliable safety feature that renders this Trap the best choice in a long run. It's a well-rounded Trap with a medium-sized Area of Effect, which can be upgraded by improving the Throwing Speed or linking it with Cluster Traps Support Gem. Starting on the right side of the passive skill tree is very helpful in this scenario due to the abundance of Cold-related nodes located there.
To deal more Cold Damage we suggest using Hatred Aura. Frostbite Curse and Frost Bomb are used to reduce Cold Resistance substantially.
Seismic Trap is the most popular choice despite the recent nerf it has received. It's a Duration Trap that continuously deals damage to all the targets around it with powerful Physical Hits. It has very poor clear speed, that's why it's always used alongside Exanguinate Spell turned into a Trap via Trap Support. With two setups like this, you're well-equipped to deal with any type of content in the most optimized manner. You can then very easily grab some Spell Poison nodes on a passive skill tree and equip specific unique items for mixed damage build that melts bosses with its ramping-up Poison and added Chaos Damage.
Herald of Agony should be used to gain an additional chance to Poison, and for a Curse, it's for the best to pick Despair - it's great with Poison Damage. Also, make sure to have a source of Withered debuff.
During the leveling process, you will need to, at some point, gather more defensive features. The most common solution is to gain Evasion via Grace Aura and Defiance Banner, which also grants Armour. It synergizes well with Born in the Shadows Keystone which Blinds Enemies. The second Aura to be used is Determination for more and increased Armour. Skitterbots are nearly-mandatory Skill due to the damage and utility bonuses. The above-mentioned Aura and Herald Skills for specific builds should fit in here too. Having just three expensive Auras up at all times would be extremely hindering as even with Charisma and Influence notables you're left with almost nothing to cast your Spells with. Get more Mana Reservation Efficiency from items or make a choice to get rid of some Mana-reserving Spells. Remember that you can get a discount on most of the Auras and Skitterbots from certain Masteries.
You're also supposed to use a Movement ability, which can be Dash, Flame Dash, or Frostblink. A Guard Spell - Steelskin, or Molten Shell if you're using Determination Aura. One of the Spell setups should be linked to the Arcane Surge Support to grant you the buff for more Spell Damage and Mana Regeneration. We recommend linking a Spell that causes an Exposure with Hextouch Support, Curse, and Arcane Surge Support. Bear Trap is another skill that should be used in all of the Trap Builds - it increases Trap Damage and reduced the Movement Speed of enemies.
|
|

3. Setups
With every new Act, you will unlock new, more potent Support Skills so your setup will change accordingly. Keep in mind that different setups require different Colours. Fire Damage is associated with red, so if you're playing Explosive Trap, seek items with Armour to have a much higher chance for red sockets, where you can put your red Support Gems. The majority of your sockets will be however green, so the items with Evasion are always suitable. Remember that some of the Support Gem used early on can, and often should be later swapped for more potent ones. Multiple Traps Support is worse than Cluster Traps Support, but it's available earlier. We have presented four setups for four different builds - Explosive Trap, Lightning Trap, Ice Trap, and Seismic Trap with Exsanguinate. You're interested most likely in only one of these.
New Skill Gems are unlocked by doing specific Quests during the Campaign, either as direct Quest Reward or indirectly by unlocking the possibility to buy it from Vendor, most of them are on the way to the next Act anyway, but Library one in Act 3 requires extra effort. You will gain access to every Gem regardless of your Class in Act 6 by doing Lilly Roth's Quest. Doing so will also unlock her shop in your Hideout for every new Character you make in the same league.
Suggested leveling Gem setups:
Act 1: Once you arrive in Town, talk to Tarkleigh to get Freezing Pulse Skill Gem. It is a solid Skill that will serve you well until you get access to Wintertide Brand at the end of Act 1.
In this Act, you will gain access to the following Skills: Freezing Pulse, Wintertide Brand, Steelskin, Flame Dash, Clarity, Frostbomb
| Explosive Trap setup | |
 |
Explosive Trap - Start with Explosive Trap. It deals Physical Damage, half of which is converted to Fire, and the other 40% can be converted via Fire Mastery. It creates multiple small explosions. |
| Act 1 Support Gems | |
 |
Swift Assembly Support - grants you a chance to throw more Traps, with a single Skill use. |
 |
Multiple Traps Support - Makes you throw two more Traps and allows for more Traps to be placed at the same time. It lowers your damage. |
 |
Added Fire Damage Support - Adds Physical Damage as Extra Fire Damage to your Explosive Trap, it is great in conversion builds like this one. |
| Act 2 Support Gems | |
 |
Trap and Mine Damage Support - An obligatory Support Gem in every Trap build, it grants more Damage and lowers Throwing Speed. |
| Advanced Traps Support - Vastly improved Throwing Speed, Skill Effect Duration, and Cooldown Recovery Rate for Traps. | |
| Act 3 Support Gems | |
 |
Inspiration Support - Increases Elemental Damage and Critical Strike Chance, but lowers Mana Cost of Skills. |
 |
Fire Penetration Support - Damage penetrates more Fire Resistance. Use only if you deal almost exclusively Fire Damage. |
| Act 4 Support Gems | |
 |
Cluster Traps Support - It's similar to Multiple Traps Support but more effective, it allows for more Traps to be placed. |
| Remove: Multiple Traps Support, Advanced Traps Support, Cluster Traps Support or Inspiration Support | |
| Lightning Trap setup | |
 |
Lightning Trap - One of the Traps you can start using at level 12 to deal Lightning Damage with Traps. It fires Projectiles dealing Lightning Damage. |
| Act 1 Support Gems | |
|
Swift Assembly Support |
|
Multiple Traps Support |
 |
Added Lightning Damage Support - It simply adds Lightning Damage to the linked ability. |
| Act 2 Support Gems | |
|
Trap and Mine Damage Support |
| Advanced Traps Support | |
| Act 3 Support Gems | |
|
Inspiration Support |
 |
Lightning Penetration Support - Damage penetrates a big portion of Lightning Resistance resulting in more Damage. |
| Act 4 Support Gems | |
|
Cluster Traps Support |
| Remove: Multiple Traps Support, Advanced Traps Support, Cluster Traps Support or Inspiration Support | |
| Ice Trap setup | |
 |
Ice Trap - Ice Trap is one of the simplest and most efficient Traps. It explodes a few times dealing Cold Damage. Requires Level 28. |
| Act 1 Support Gems | |
|
Swift Assembly Support |
|
Multiple Traps Support |
 |
Added Cold Damage Support - Adds Cold Damage to your Spell Hits. |
| Act 2 Support Gems | |
|
Trap and Mine Damage Support |
| Advanced Traps Support | |
| Act 3 Support Gems | |
|
Inspiration Support |
 |
Hypothermia Support - Grants more Damage against Chilled Enemies. |
 |
Charged Traps Support - Grants Power and Frenzy Charges with bonuses for more Throwing Speed and Critical Damage. Use only if your Critical Strike Chance is somewhat high. |
| Act 4 Support Gems | |
|
Cluster Traps Support |
| Remove: Multiple Traps Support, Advanced Traps Support, Cluster Traps Support or Inspiration Support | |
| Seismic Trap setup | |
 |
Seismic Trap - Seismic Trap is one of the best choices. It continuously deals Physical Damage to its surrounding targets. This setup is used only for Single Target Damage, it should be used alongside Exsanguinate Trap. Here, it will cause Poison to deal Chaos Damage, but only after level 69. Before that, it's used only for its Physical Damage. |
| Act 1 Support Gems | |
|
Swift Assembly Support |
 |
Lifetap Support - Skill cost Life instead of Mana, it's great since almost all of your Mana will be reserved. It also grants more Damage. |
| Act 2 Support Gems | |
|
Trap and Mine Damage Support |
| Advanced Traps Support | |
| Act 3 Support Gems | |
|
Charged Traps Support |
| Act 4 Support Gems | |
 |
Brutality Support - More Physical Damage. It disables all other types of Damage, so don't use it if you can apply Poison. |
 |
Unbound Ailments Support - If you can cause Poison use this Support Gem for more Poison Damage. |
 |
Void Manipulation Support - If you can cause Poison, and you don't deal any Elemental Damage with this setup, use this Support Gem for more Poison and Chaos Damage. |
| Remove: Swift Assembly Support, Charged Traps Support, Brutality Support | |
| Exsanguinate Trap setup | |
 |
Exsanguinate - A Spell that deals Physical Damage and Physical DOT via Tendrils, these are extremely fast and can Chain. It's used here for killing smaller enemies, use it alongside Seismic Trap which is mentioned above. |
 |
Trap Support - It's the most important Support Gem, it turns this Spell to be cast as a Trap. It can be found on Deerstalker Unique Boots allowing for a 5-link setup. |
 |
Chain Support - Exsanguinate Chains on Hit, reaching more enemies. |
|
Cluster Traps Support |
|
Trap and Mine Damage Support |
| Aura setup | |
 |
Determination - You can use Determination for more and increased Armour, but it is not a common choice. |
 |
Grace - Grace is the most popular defensive Aura for Trap builds, it grants more and increases Evasion Rating. |
 |
Clarity - You can use Clarity for a faster Mana Regeneration Rate, |
 |
Summon Skitterbots - The most important Aura, it grants more Damage and summons two Minions that Chill and Shock. |
 |
Defiance Banner - Use it to increase your Armour and Evasion. It reduces the Critical Strike Chance for nearby enemies. |
 |
Herald of Agony - Use it only if you're dealing Poison Damage with Seismic Trap, it increases Poison Chance and Poison Damage. |
 |
Hatred - Use it only with Ice Trap. It massively increases your Cold Damage. |
 |
Herald of Ash - It is excellent with Explosive Trap, grants more Damage, and increases clear speed. |
 |
Wrath - Wrath is great with Lightning Trap, it grants more Lightning Damage. |
| Utility Skills | |
 |
Flame Dash - Simple movement ability that stores three charges, used to teleport |
 |
Frost Bomb - Applies Cold Exposure and reduces Life Regeneration for enemies it Hits. Use with Ice Trap. |
 |
Wave of Conviction - Applies Elemental Exposure to reduce Fire or Lightning Resistance - use with Explosive or Lightning Trap. |
 |
Steelskin - A Guard Spell that mitigates a portion of incoming damage and stops Bleeding. If you have a lot of Armour, use  Molten Shell instead. Molten Shell instead. |
 |
Bear Trap - Bear Trap can be used in every setup, it slows down the enemy and makes it more vulnerable to Trap Damage. |
 |
Withering Step - You can use the Withering Step to move faster, gain Phasing, Elusive, and apply WIthered debuff for more Chaos Damage. |
 |
Flammability - Use with Explosive Trap. It reduces the Fire Resistance of your enemies. |
 |
Conductivity - Use with Lightning Trap. It reduces the Lightning Resistance of your enemies. |
 |
Frostbite - Use with Ice Trap. It reduces the Cold Resistance of your enemies. |
 |
Despair - Use with Seismic Trap when dealing Chaos Damage. It reduces the Chaos Resistance of your enemies and increases the DOT they receive. |
|
|
4. Gear
Traps are a lot like any other Spell builds so when searching for rare items, seek mostly bonuses to your Spell, Elemental, Physical, or Chaos Damage. A lot of these can be found on regular Rare Wands, Daggers, or Scepters. Trap Throwing Speed is uncommon and you won't need it that much. For defenses, seek Maximum Life and Elemental Resistances at first, then get more Evasion Rating. You might also want to invest heavily in Spell Suppression Chance, Armour, and maybe even Energy Shield. You won't need any Unique Items, but Tabula Rasa would be extremely beneficial, it'd get you more damage right from the start.
Maximum Life on your Gear is a nice thing to have, but it is not important, most of it will come from your Levels themself. Armor or Evasion Rating should be covered by your Auras. That leaves only one form of Defense you will need to get on your Rare Items: Elemental Resistances. You should aim to have at least 60% Resistance of each Element, excluding Chaos. To help with that, you should use Essences found during the Campaign, and the Crafting Bench in your hideout. Use the low-tier Crafts, as they are cheap and effective, while high tiers will also raise the Required Level to wear an Item.
Proper Flask Setup makes Leveling much quicker and easier. Try to get 2 or 3 Quicksilver Flasks so you can have at least one active at all times. Granite Flask is especially useful once you step into Act 5, as there is a very noticeable spike in Physical Damage dealt by the enemies, but you can also use Jade Flask to try to avoid this damage. Remember that you can use Mana Flask if you struggle with Mana Regeneration. Atziri's Promise is great with almost any build, just be sure that you're not using Brutality Support alongside it.
 Tabula Rasa - Use this Armour for six, white, linked sockets. Tabula Rasa - Use this Armour for six, white, linked sockets. |
|
| Item has no level requirement and Energy Shield (Hidden) Item has 6 White Sockets and is fully linked (Hidden) |
|
 Goldrim - It grants a lot of Elemental Resistances. These are very important. Goldrim - It grants a lot of Elemental Resistances. These are very important. |
|
| +(30-50) to Evasion Rating 10% increased Rarity of Items found +(30-40)% to all Elemental Resistances Reflects 4 Physical Damage to Melee Attackers Level Requirement reduced by 100 (Hidden) |
|
 Le Heup of All - Can be used for Elemental Resistances, Attributes, and extra Damage. Le Heup of All - Can be used for Elemental Resistances, Attributes, and extra Damage. |
|
| Adds 1 to 4 Physical Damage to Attacks +(10-30) to all Attributes (10-30)% increased Damage (10-30)% increased Rarity of Items found +(10-30)% to all Elemental Resistances |
|
 Praxis - Reduces Mana Cost of Skills, increases Maximum Mana, and Mana Regeneration rate. Praxis - Reduces Mana Cost of Skills, increases Maximum Mana, and Mana Regeneration rate. |
|
| +(20-30) to maximum Mana +(30-60) to maximum Mana Regenerate (3-6) Mana per second -(8-4) to Total Mana Cost of Skills 8% of Damage taken Recouped as Mana |
|
 Ming's Heart - An extremely good Ring for Seismic Trap, it improves your Damage and Chaos Resistance but reduces Maximum Life and ES. Ming's Heart - An extremely good Ring for Seismic Trap, it improves your Damage and Chaos Resistance but reduces Maximum Life and ES. |
|
| +(17-23)% to Chaos Resistance 25% reduced maximum Energy Shield 25% reduced maximum Life +(40-50)% to Chaos Resistance Gain (40-60)% of Physical Damage as Extra Chaos Damage |
|
 Astramentis - Grants a lot of Attributes which are often needed to equip Items and level up Gems. Astramentis - Grants a lot of Attributes which are often needed to equip Items and level up Gems. |
|
| +(10-16) to all Attributes +(80-100) to all Attributes -4 Physical Damage taken from Attack Hits |
|
 Atziri's Foible - Another great piece of jewelry for when you struggle with Mana sustain. Atziri's Foible - Another great piece of jewelry for when you struggle with Mana sustain. |
|
| (20-30)% increased Mana Regeneration Rate +100 to maximum Mana (16-24)% increased maximum Mana (80-100)% increased Mana Regeneration Rate Items and Gems have 25% reduced Attribute Requirements |
|
 Doedre's Tenure - Gives a lot of Damage to your Spells, but slightly reduces Cast Speed. It won't affect Trap Throwing Speed. Doedre's Tenure - Gives a lot of Damage to your Spells, but slightly reduces Cast Speed. It won't affect Trap Throwing Speed. |
|
| +(20-50) to Intelligence 100% increased Spell Damage (25-15)% reduced Cast Speed |
|
 String of Servitude - this Belt can give you a lot of Elemental Resistances if it has a proper Implicit modifier. String of Servitude - this Belt can give you a lot of Elemental Resistances if it has a proper Implicit modifier. |
|
| <(1-2) Random corrupted implicit modifiers> Implicit Modifier magnitudes are tripled Level Requirement reduced by 100 (Hidden) Desired Implicit: (42-48)% to All Elemental Resistances |
|
 Ashcaller -The best Fire-oriented Weapon, it adds a lot of Fire Damage and covers enemies in Ash for even more Fire Damage. Use it with an Explosive Trap. Ashcaller -The best Fire-oriented Weapon, it adds a lot of Fire Damage and covers enemies in Ash for even more Fire Damage. Use it with an Explosive Trap. |
|
| (18-22)% increased Spell Damage 25% chance to Trigger Level 10 Summon Raging Spirit on Kill Adds (20-24) to (38-46) Fire Damage Adds (20-24) to (38-46) Fire Damage to Spells 10% chance to Cover Enemies in Ash on Hit |
|
 Seven-League Step - These Boots increase your Movement Speed by 50%, that's a lot. Seven-League Step - These Boots increase your Movement Speed by 50%, that's a lot. |
|
| 50% increased Movement Speed Level Requirement reduced by 100 (Hidden) |
|
 Wanderlust - You can equip Wanderlust Boots for extra ES, Mana Regeneration, Movement Speed, and Freeze immunity. Wanderlust - You can equip Wanderlust Boots for extra ES, Mana Regeneration, Movement Speed, and Freeze immunity. |
|
| +5 to Dexterity +(10-20) to maximum Energy Shield (20-40)% increased Mana Regeneration Rate 20% increased Movement Speed Cannot be Frozen |
|
 Deerstalker - If you're using a secondary Trap setup, like Exsanguinate, these boots are the best option, it fits a fifth Support Gems there. Deerstalker - If you're using a secondary Trap setup, like Exsanguinate, these boots are the best option, it fits a fifth Support Gems there. |
|
| Socketed Gems are Supported by Level 15 Trap (160-200)% increased Evasion Rating 15% increased Movement Speed (14-18)% increased Trap Throwing Speed 15% increased Movement Speed for 9 seconds on Throwing a Trap |
|
 Coated Shrapnel - Use it for an extra chance to Poison and extra Damage, it's good with Seismic Trap. Coated Shrapnel - Use it for an extra chance to Poison and extra Damage, it's good with Seismic Trap. |
|
| Traps and Mines have a 25% chance to Poison on Hit Passive Skills in Radius also grant: Traps and Mines deal (2-3) to (4-6) added Physical Damage |
|
|
Stat priorities on Rare Items:
|
|
Suggested Flasks:
|
|
    |
|
|
5. Passive Skills
The Passive Skill Tree is the most intimidating part of the game for new players, the game offers little to no guidance on how to allocate passives properly. Fortunately, it is rather easy to create a skill tree for Traps. You can highlight the passives with "trap" in them and just go there. Besides Trap nodes, you will also need to seek Maximum Life, Evasion Rating, and Spell Suppression - the core defensive layers every Saboteur should have. If you've chosen Seismic Trap with Chaos Damage, your passive skill tree will differ from that of Elemental-Damage-oriented trapper - Shadow's starting location is full of Chaos Damage and less so with Elemental Damage, but that's not an issue. Elemental Damage Traps are suited for Critical Strikes instead. Remember that Traps are Spells (mostly) and will benefit only from Spell modifiers.
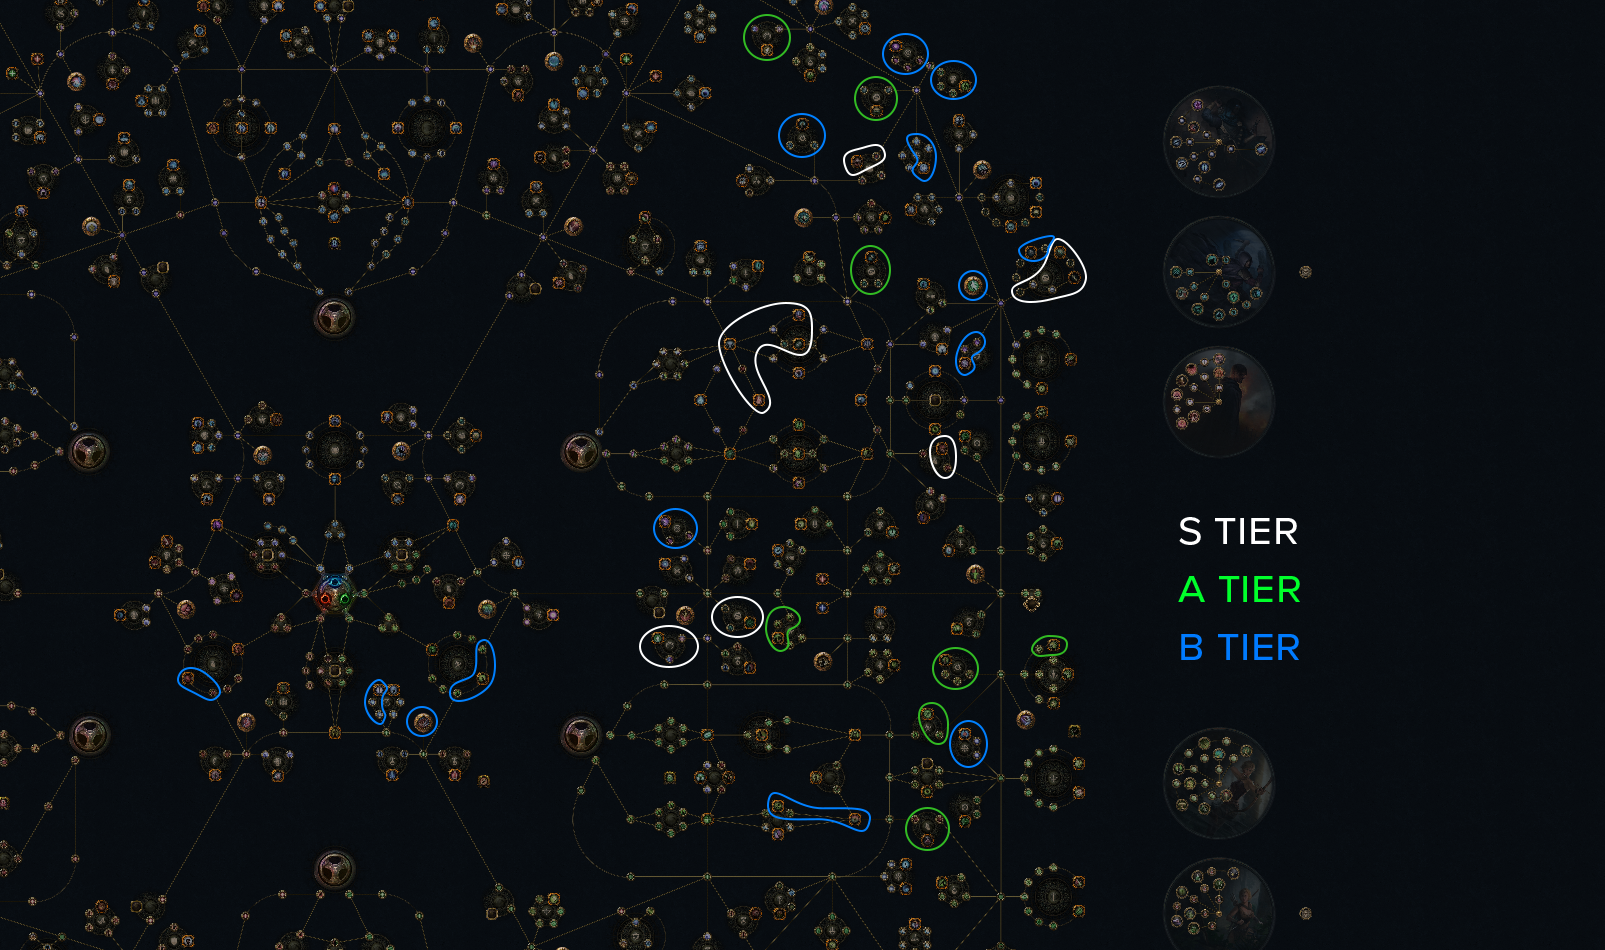
| S TIER | |
|---|---|
| The best and most efficient Passives in the Passive Tree. You will want to take them on almost every build. | |
 |
It's probably the first notable you will allocate, it grants damage and some Attributes. |
 |
Increased Maximum Life, Life on kill, and Strength. It's all very good, especially at the start. |
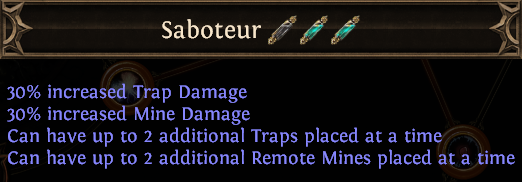 |
The mandatory notable passive for any Saboteur, it's also very close to the Shadow's starting location. |
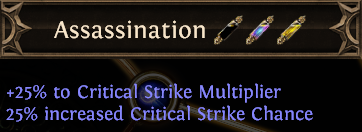 |
Critical Strike is not very important in the early stages of the game, but it only costs two points to allocate it. |
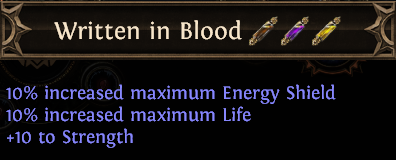 |
Increased Maximum Life, Energy Shield, and extra Strength are all of use. |
 |
The first notable in the large Trap cluster on the right side of the skill tree. It enhances Critical Strikes and generates Power Charges. |
 |
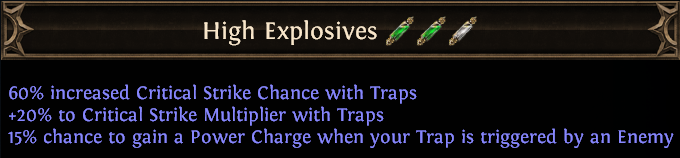
Another notable in the same Trap cluster, this one increases the Area of Effect, Damage, and Trigger AoE. |
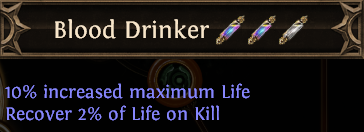 |
The third notable granting more Maximum Life, its bonus for Life recovery on Kill is extremely good and makes a noticeable difference. |
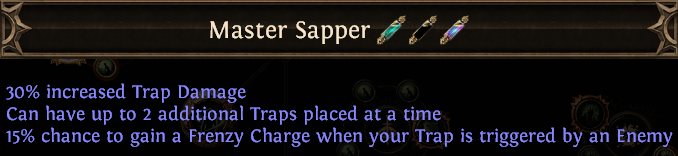 |
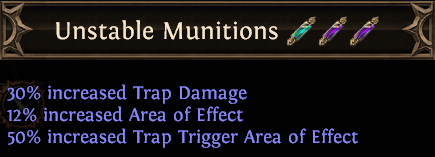
One of the best Trap nodes - increases Damage, allows to place more Traps, and generated Frenzy Charges. |
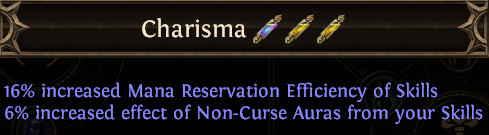 |
Every build needs one or two Mana Reservation Efficiency notables to fit more Auras. Here it is Charisma, the best one. |
| A TIER | |
| Those are also very good Passives, just not as universal as previous ones | |
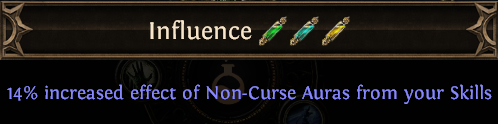 |
Influence increases the effect of your Auras. It is good on its own, but the small nodes leading to it can also get you increased Reservation Efficiency. It's great if you have many high-level Auras. |
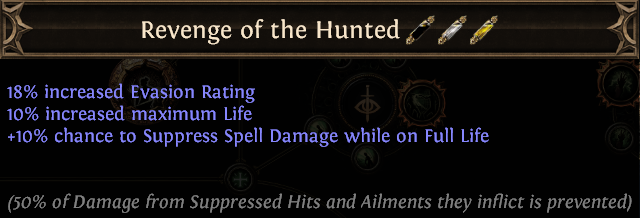 |
This one increases Evasion Rating and Maximum Life by a lot, and also grants a 10% extra Spell Suppression Chance. |
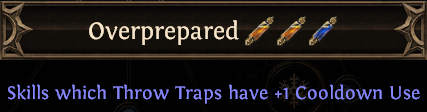 |
Some traps store limited uses - if you're using such a Trap, get this passive for an extra Cooldown use. |
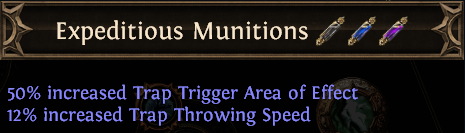 |
A fine node to enhance the effectiveness of Traps - their Throwing Speed and Trigger AoE. |
 |
Spell Suppression node. Pathing to it grants an extra 39% chance to Suppress Spell Damage, this number should later reach 100%. |
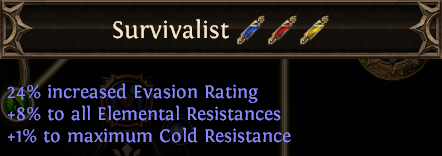 |
Elemental Resistances, Evasion Rating, and Maximum Cold Resistance is all useful. |
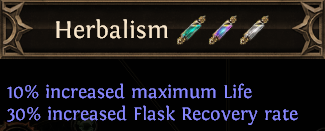 |
Pick Herbalism for the big bonus to Maximum Life and Flask Recovery Rate. |
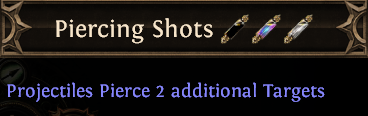 |
If you're using Lightning Trap it is mandatory notable to allocate, and it won't even cost you a lot of points. |
| B TIER | |
| Passives that belong to this Tier fulfill their specific purpose | |
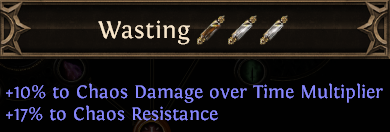 |
If you're using Seismic Trap that deals primarily Poison Damage - allocate Wasting. |
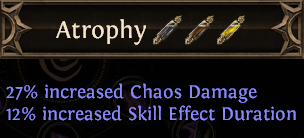 |
Atrophy is again, only good with Chaos-Damage-oriented Seismic Trap, and especially great with Ming's Heart. |
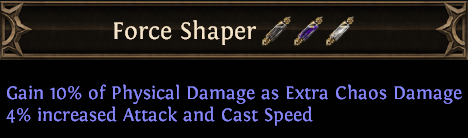 |
Another Physical/Chaos Damage node you can use with Seismic Trap, but it's not as good as the two previous ones. |
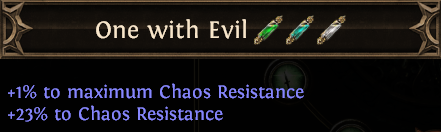 |
If you lack Chaos Resistance allocate One with Evil. Very useful in acts 7 and 8. |
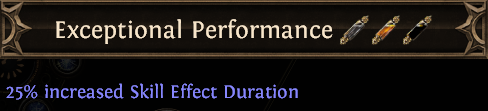 |
Exceptional Performance is only useful with Duration Traps - Seismic Trap or Lightning Spire. |
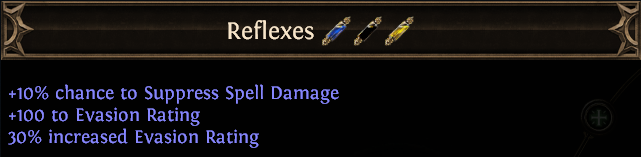 |
Reflexes notable is located too far from your main route unless you're also headed for Exceptional Performance. It provides you with tons of Evasion and some Spell Suppression Chance. |
 |
One of the best Notables for Maximum Life, but it's again too far away to allocate in most cases. |
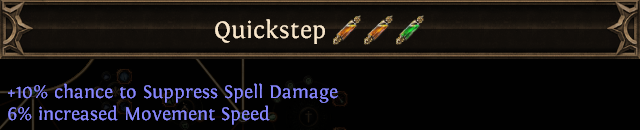 |
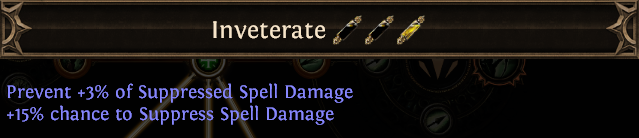
Extra 10% Chance to Suppress Spell Damage and a 6% increased Movement Speed. |
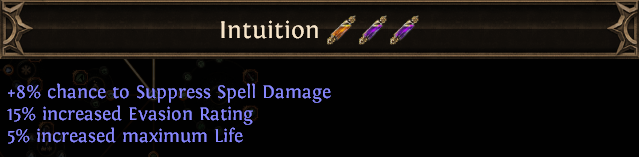 |
Intuition stands between Herbalism and Quickstep. It grants a Chance to Suppress Spell Damage, Maximum Life, and Evasion Rating. |
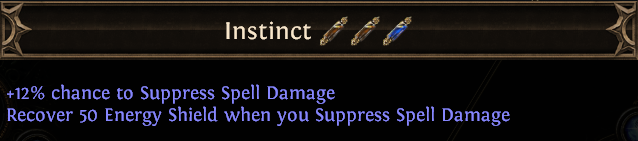 |
Yet another notable for more Spell Suppression Chance, and Energy Shield Recovery. Picking it might be excessive. |
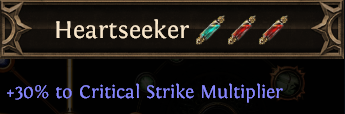 |
If your Critical Strike Chance is high, allocate Heartseeker for an extra Critical Multiplier. |
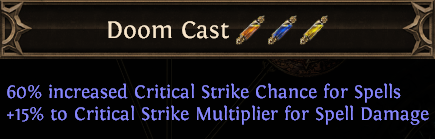 |
Very similar to Heartseeker, but this one also gets you an increased Critical Strike Chance. |
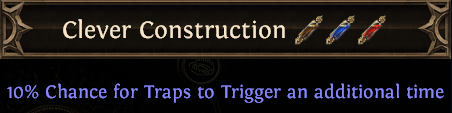 |
The third Notable to be found in the large Trap Cluster, it is good if you throw a lot of Traps already. |
| Masteries Priority |
|
|
|
If you have any other build requests please leave that in the comments below. We are always open to suggestions and constructive feedback.
Pictures used in this article are the intellectual property of Grinding Gear Games.
