WoW Classic Hunter Starter Build and Leveling Guide
Check out our recommended Leveling/Starter build for the Hunter in WoW ClassicHunter Leveling Guide
for WoW Classic

|
If you are planning on joining the World of Warcraft Classic adventure make sure to check out our other related Guides below:
And Starter builds/Leveling Guides for all other character classes: |
|
 Rogue Leveling Guide Rogue Leveling Guide |
 Druid Leveling Guide Druid Leveling Guide |
 Paladin Leveling Guide Paladin Leveling Guide |
 Priest Leveling Guide Priest Leveling Guide |
 Mage Leveling Guide Mage Leveling Guide |
 Shaman Leveling Guide Shaman Leveling Guide |
 Warrior Leveling Guide Warrior Leveling Guide |
 Warlock Leveling Guide Warlock Leveling Guide |
| Or if you are done with the leveling process make sure to check our Best WoW Classic Builds for level 60 characters! | |
|
|

Hunter Class Overview
Hunters are ranged damage-dealers that rely on their loyal Pets when it comes to keeping their enemies at a safe distance. As a Class, they are easy to play and surprisingly difficult to master, as there are a lot of things that a good Hunter must learn and finetune (micromanaging Pets, Stutter Stepping, playing around Hunter's main weakness in PvP - a Dead Zone, etc.). Their high Damage output and good sustain, combined with their Pet companions, let them progress through levels at a pace unmatched by any other Class and even solo level-appropriate Elite Mobs without too much of a problem.
Hunters Excel in both Open World and Battleground PvP thanks to their high Damage output, surprisingly potent Crowd Control options, very high Range, and a Pat that can harass their Targets and be very annoying to deal with efficiently. Their main weakness in PvP is the so-called Dead Zone, which is an area around the Hunter between his minimal Ranged Attack and maximum Melee Attack ranges - between 8 and 5 yards around him (which means that Hunter can't attack Targets that are within that area). The Dead Zone can be exploited by experienced enemy Spell Casters and make Hunter's life rather miserable (but exploiting it well takes a lot of skill and is by no means easy). Their End-Game PvE DPS, while not the highest, is good enough to secure them spots in Raids when combined with their kiting and CC abilities that are simply necessary for some encounters.
This guide will aid you and your Hunter on your journey to level 60; it will help you choose a Race, present you with an optimal leveling Talent build, point you towards Dungeons and Quests that award worthwhile Ranged Weapons, provide some tips & tricks, and more.
Hunter's Strengths and Weaknesses
 Pros Pros |
 Cons Cons |
| Good Mobility thanks to Aspect of the Cheetah and movement speed increasing Talents. Hunter can also boost the mobility of his group thanks to the Aspect of the Pack |
Taming a pet will not scale its level (if you tame a level 5 Beast as a level 60, it will remain at level5) |
| Personal Tank in the form of a loyal Pet makes Hunter very self-sufficient |
You will be forced to abandon old and Tame new pets as you progress through levels because they level up slower than you |
| Good self-Sustain, and high Damage potential |
Pets require food to stay happy and might abandon you if you neglect them |
| Quick to level thanks to mobility, good sustain, and a Pet |
A dead zone between 5yd and 8yd from the Hunter (distance between minimum Ranged Attack Range and maximum Melee Swing Range) can be exploited by experienced enemies in PvP |
| A versatile toolkit (Feign Death, Traps, Flare, and more) that comes in handy in both PvP and PvE |
Ranged Weapons require ammo, and a Quiver/Ammo Pouch uses up an inventory slot |
| One of the least Gear-Dependant Classes |
|
| Strong in Open World PvP (high range and great mobility make Hunter very annoying to deal with) |
Statistics Priority
|
|
|
|
|
|
|
|
|
|
|
Leveling stat priority: Agility ⇒ Intellect ⇒ Stamina = Spirit ⇒⇒ Strenght Note: Items with "Of the Falcon" Suffix are great for Hunters, as they provide both Agility and Intellect. "Of the Monkey" (Stamina and Agility) and "Of the Wolf" (Agility and Spirit) are strong second choices and you should Need on those, while in a group, as well. "Of the Eagle" (Stamina and Intellect) and "Of the Owl" (Intellect and Spirit) Items are quite serviceable as well. |
The Best Hunter Races for Both Factions
Each Race has unique traits and abilities, some of which greatly benefit a Hunter, other - not so much. More competitive Players might even want to choose their Faction based on Racial traits of one of its member Races. We will take a closer look at all Races that can choose the path of a Hunter and determine which are the best for PvP and PvE.
Note: Please remember that a good Player will make all races work well, and a bad player will not get any better thanks to a Race choice. In other words - pick your Race and your Faction as you please, because after all, Fun is the most important aspect of the Game.
 Alliance Races |
| PvP and PvE |
|
Dwarf's Stoneform helps you keep your Distance from Targets, and the bonus to Skill with Guns is nice, but it is nowhere near as important as bonuses to Melee Weapons are for Melee Classes, while Night Elf's Dodge bonus and Shadowmeld have very limited impact, especially in PvE. All this makes Alliance Hunter Race choice rather simple, as Dwarf's racials are clearly better than Night Elf's for both PvE and PvP (although Shadowmeld enables some sneaky plays in PvP). If you want extra survivability, reliability, and a bit extra DPS (when using Guns, and good Guns are somewhat rare) pick a Dwarf. If you want to Ambush unsuspecting Players in Open World and Battlegrounds or have a quite reliable escaping tool (if you build up enough distance over your pursuers, drop Combat, and put some terrain between them and yourself, Shadowmeld can allow you to hide very effectively), pick a Night Elf. Recommended choice: Dwarf Second choice: Night Elf |
 Horde Races |
| PvP |
|
Orc's ability to resist all Stun effect 25% of the time secures him the first place, and his 5% pet Damage bonus is a nice addition. Tauren's War Stomp adds a powerful Crowd Control option to Hunter's toolkit, provides him with an extra pseudo-interrupt and lets him escape from melee range more reliably. 5% increased Health boosts survivability a bit, and the Nature Resistance lowers Damage taken from Rogue's Poisons and some Elemental Shaman spells. Troll, with his Berserking and Bow Specialisation abilities, is a more offensive option and his power-level is very comparable to Tauren's, so the choice between these two is up to Player's preference and should depend only on one's playstyle. Recommended choice: Orc Second choice: Tauren or Troll |
| PvE |
|
Troll's Bow specialization, while not as impactful as Melee Weapon specializations are for other Classes, provides a nice DPS bonus, and the Berserking is the only Offensive Racial Cooldown, that affects Ranged Attacks, available for the Horde as Orc's Blood Fury increases Melee Attack Power only. Orc and his 5% extra damage done by Pets is the second-best choice (if only Blood Fury worked on Ranged Attack Power...). It is also worth to remember, when picking an Orc over a Troll, that in Classic pets take full Damage from AoE spells and abilities, which means that they die on a regular basis in Raids and Dungeons. This limits Orc's viability as a Hunter in PvE even further. But. Orc's Stun resistance can randomly save your skin in some sticky situations (don't rely on it though). Tauren's Racials are the least impactful overall when it comes to rolling as a Hunter. Recommended choice: Troll Second choice: Orc |
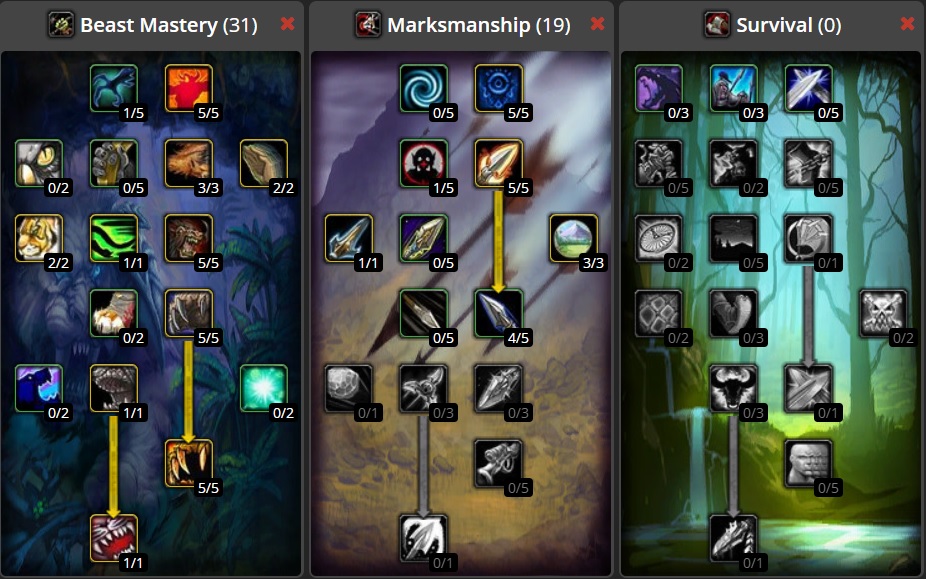
Talent Build and Talent Allocation Order
Optimal Talent allocation is essential for smooth leveling. Here, we will describe the most optimal leveling spec and lead you through the Talent Trees level-by-level.
|
Talent allocation for a Leveling Hunter (10-59) You will want to start with the Beast Mastery Tree and make your way up to the very top of it:
At this point, it is time to switch to the Marksmanship Tree:
|
| After reaching Level 60, you should visit a Class Trainer, reset your Talent Points and spec into an End-Game Build. |
Ranged Weapon Progression
A lot of Hunter's Damage comes directly from his Ranged Weapon, which means that it is the most important piece of his Gear. There are three kinds of Ranged Weapons that can be used by Hunters: Bows, Guns, and Crossbows. Here, we will focus on Bows, as they are the most common and easiest to get. Guns are also quite viable (especially if you level up Engineering quickly and craft yourself some Rifles), but they are rarer and upgrading them consistently can be problematic. If you are a Troll Hunter this is great news, however, if you roll as a Dwarf, you might think that you lose out, thankfully Gun Specialisation is not that impactful, especially when leveling. When it comes to Crossbows... let us just say that you might not see a single Crossbow before achieving level 60 (there are a total of 19 different Crossbows in Classic, while there are 101 different Bows and 85 different Guns). The other reason behind us focusing on Bows is the fact, that you need to raise your Weapon Skills, which makes switching between Ranged Weapon types problematic.
It goes without saying that you should aim to upgrade your Ranged Weapon as often as possible because it will speed up your leveling process and make experience grinds much more enjoyable (at least for the next few levels after getting an upgrade). Below, we present you a shortlist of Ranged Weapons that you should try and get during your leveling journey.
Note1: Listed Ranged Weapons are not organized in a strict order and you don't have to go for every single one of them. The list is meant to be a raw guideline for Hunter's Weapon progression.
Note2: There are a lot more Ranged Weapons than those described. We have mentioned just the easy-to-get and quite essential upgrades. BoE Wands were excluded from the list, as there is a lot of RNG involved in getting them.
| Horde and Alliance Bow Progression |
|
 Hornwood Recurve Bow |
|
 Ashwood Bow |
|
 Hickory Shortbow |
|
 Laminated Recurve Bow |
|
 Reinforced Bow |
|
 Cliffrunner’s Aim |
|
 Raptor's End |
|
 Master Hunter's Bow |
|
 Massive Longbow |
|
 Thornflinger |
|
 Riphook |
|
Rotations
Your rotation will greatly depend on your level and will get gradually more complex as you progress through content and get access to more tools.
Let us look at basic DPS rotations for different level ranges:
| Very Early Levels (Below level 10) |
|
At the beginning of your journey, your rotation will change rapidly as you will gain access to new abilities very quickly. You should try to implement every new ability to your rotation.
Hunter's Mark ⇒ Auto Shot (Strafe away from your Target between Auto Shots) ⇒ Concussive Shot* (Continue Strafing, but stop for Auto Shots - Attak Timer addon will make this easier) ⇒ Serpent Sting** ⇒ Arcane Shot*** * From level 8 forward You can use Raptor Strike to finish off enemies that got into melee Range (but this should not happen too often if you kite them well) |
| Levels 10 - 49 |
|
You should do your Pet Quest Chain immediately after reaching Level 10. After that, you should create a Macro that will combine your Hunter's Mark with your Pet's Attack Command (this will make grinding a bit less click-intensive and increase your control over your Pet). Basic Single-Target rotation: Hunter's Mark ⇒ Auto Shot ⇒ Serpent Sting ⇒ (Arcane Shot ⇒ Multi-Shot)* * Repeat this sequence if a situation requires it or if you want to eliminate your Target more quickly, otherwise take advantage of the 5-Second Rule and finish off your Target with Auto Shots. You should implement your Offensive Cooldowns into your rotation as soon as they become available to you:
** These should be used at the start of Combat, immediately after your initial Hunter's Mark + Auto Shot sequence to maximize their effects. Note: Do not forget about your defensive and utility Spells. Use Freezing Trap, Concussive Shot, Feign Death, and Intimidation if the situation demands it. |
| Levels 50 - 59 |
|
If you follow our Talent Allocation Order, you will gain access to the Aimed Shot ability at level 50. This will alter your Basic Rotation a bit and make it look as follows from this point forward: Hunter's Mark ⇒ Aimed Shot ⇒ Serpent Sting ⇒ (Arcane Shot ⇒ Multi-Shot)*
* These should be used at the start of Combat, immediately after your initial Hunter's Mark + Aimed Shot sequence to maximize their effects. |
Professions
 First Aid |
| First Aid is a must-have, get it as soon as possible and skill it up as you progress through levels. You should get enough Cloths from your regular leveling routine, but if you lack some, don't be afraid to grind them out (you will have to do some grinding from time to time anyway). First Aid will greatly increase your leveling efficiency because bandaging up with a level-appropriate bandage is much faster than eating. Moreover, Bandages can be used to Heal your Pet quickly and efficiently. They can also be utilized in a combination with Freezing Trap as a strong Combat Heal (Just remember to call off your pet beforehand and do not use Serpent Sting or the Trap will brake almost instantly). The Freezing effect lasts longer than Bandage channeling, so you will be able to take full advantage of its effect. |
 + +  Engineering + Mining |
|
Engineering provides various useful (and sometimes quite dangerous) gadgets from its earliest levels, but the best Engi items come into play in the End-Game. During leveling, Engineering will provide you with some much-needed utility in a form of Grenades that will be very useful as additional source of AoE Damage and CC, and will be irreplaceable in Open World PvP (well-aimed Grenade can interrupt Spellcasting or stop fleeing opponent dead in his tracks and allow you to finish him off easily, even is he is a Druid that would be otherwise hard to pin down). It is also a source of quite solid Ranged Weapons, Rifle Ammunition (and you may need a lot of it), Scopes and Googles that come in very handy for a leveling Hunter. If you like World PvP and/or want to Develop your End-Game Raiding profession as you level up, pick this combination. Mining is necessary here as it will provide you with materials for Engineering (you can also sell Bars on the Auction House if you need some additional Gold). |
|
If you want to know more about all professions available in WoW Classic, please check out our WoW Classic Professions Guide. |
Tips and Tricks for Hunter leveling
|
|
|
|
|
|
|
|
|
|
|
|
|
|
|
|
|
|
END NOTE Leveling process in the Classic World of Warcraft is different from leveling in the current game versions. This Guide should help you to prepare yourself for that legendary Vanilla Experience and allow you to progress through levels efficiently and with a good amount of fun. We hope that you have found this Guide useful and informative. If we have missed a piece of information that is important to you, please let us know! Please do note that this is an early version of our guide, and we will be happy to receive constructive criticism, that will help us improve it, so leave your suggestions in the comments section below. |
Pictures used in this article are the intellectual property of Blizzard Entertainment Inc.
