Warrior PvE Tank Builds
Odealo's Pocket Guide for WoW Classic

You can find all our Pocket Guides for other World of Warcraft classes right here: Best WoW Classic Builds
If you have just started leveling your Warrior, you may want to check out our Warrior leveling Guide first
| Changelog |
- Added Phase 2 BiS Equipment
- Added Phase 3 BiS Equipment
- Reviewed Talent Builds, Consumables, and Rotations
|
Overview
Solid Tank is the backbone of any Raid. The Tank allows DPS players to squeeze as much DPS out of their characters as possible by generating enough Threat to keep the Boss busy. The Tank soaks up punishment so that other players can have fun. The Tank saves (or at least tries to save) players who mess up and aggro something that they shouldn't. It is the Tank who keeps the Raid going forward and there is no better tank than a Warrior.
Warriors excel at Tanking thanks to their ability to generate a lot of Threat without sacrificing their ability to withstand heavy punishment dished out by enraged Bosses. Even without a complete set of dedicated Gear, they can take the tanking role and perform it at the highest level. They just require a slightly more dedicated build to do that. Moreover, their toolkit allows them to react to threats and abrupt incidents better than other Classes can which makes them excellent at fixing other players' mistakes. When geared up, built offensively, and stacked with World Buffs and Consumables, Warrior Tanks generate unbelievably high amounts of Threat, survive Boss's attacks, and are topping DPS charts in the process, which makes them perfect for speedrunning and speed-clearing content.
If you want to be a Tank in WoW Classic, you can't go wrong with a Warrior. The only thing that might hold you back is the leveling, but a difficult journey is what forges the best tanks...
 Pros Pros |
 Cons Cons |
| Supports a great mix of offensive and defensive playstyles |
Offensive Warrior Tank builds can be unforgiving |
| Can Tank with a Dual-Wield build if set-up properly |
Fury Tank builds are expensive to run because of the number of Consumables that they require |
| Offensive variants of Warrior Tank builds can generate unbelievable amounts of Threat |
Leveling a Warrior to level 60 is a great challenge in and of itself |
| Shield Block ability allows Warrior Tanks to push Boss's Crits and Crushing Blows off the Damage Table without the need for stacking Defense |
Gearing up is challenging because of the strong competition (Warriors are everywhere) |
| Great Tanking and Utility toolkits |
|
The Best Race Choice
Note: Here, we will point you only towards the best PvE Warrior Tank Race. If you'd like to know more about other race picks, please check our WoW Classic Beginners Guide, where we dive deep into all available Warrior's race choices for both factions.

Alliance |
For an offensive style of Tanking, Human takes a significant lead, thanks to his Weapon Specializations. 5 extra Skills in both Swords and Maces allow him to deal more Damage which translates to more Threat. If one values defenses over offensive capabilities, Night Elf with his 1% extra dodge might be an interesting option. |

Horde |
Horde's Races are better suited for Tanking than the Alliance's ones and the best Horde Race for Tanking is Troll. He is able to generate Rage more effectively when the situation demands it, thanks to His Attack Spead increasing Racial Cooldown (this is where Berserking really shines and shows its true potential). |
The Best Professions Choice
There is only one profession that makes a real impact in Raids and it is Engineering (Alchemy is also a decent option, but you can buy Flasks, Elixirs, and Potions from other players, which makes it much less impactful. You might want to still consider it if you'd like your professions to earn you Gold, however). It gives you access to a range of powerful explosives that deal high AoE Damage, which positively affects your Threat generation (in fact, Goblin Sapper Charge is arguably the best AoE Threat generator in Classic). On top of that, Engi lets you create and use Gnomish Battle Chicken Trinket that summons a Guardian Chicken that fights at your side and has a chance on hit to cast a "Battle Squawk" which boosts Melee attack speed of all Party members by 5%, making it a must-have in every competitive group. The fact that Engineering is also considered the best PvP profession is an added benefit to its power in the PvE environment.
At the start, you should pick Mining to supplement your Engineering Skill, you can always switch it to another profession of your liking later on.
Note: If you want to know more about all available professions and secondary skills, please check our detailed WoW Classic Professions Guide.
Statistics Priority
- Weapon Stats - Warrior's DPS and Threat generation depends primarily on his Weapons. Weapon DPS, Attack Speed, and Damage Range are what makes the biggest difference when it comes to keeping Boss's attention.
|
- Weapon Skill - Increases your chance to Hit, decreases enemy's chance to Block, Dodge, and Parry, and counteracts Glancing Blow Penalty. You should aim to get 308 Weapon Skill (if you pick Orc/Human, all you'll need is 3 additional points).
|
- Hit Chance - Increases your chance to Hit a Target, which positively affects your DPS and, because of that, Threat generation.
|
- Critical Strike - Gives you a chance to deal additional (critical) Damage with all your attacks. It also increases the uptime of the Dual Wield Tank's Flurry.
|
- Agility - Increases Critical Strike chance, providing offense-oriented tanks with higher Flurry uptimes and generally increasing their DPS and Threat generation. Agility also affects Warrior's Dodge chance and Armor which makes it great for both offense and defense.
|
- Attack Power/Strength - Increases Damage dealt to enemies. Warrior's Strength to Damage proportion is calculated as follows: 1 Str = 2 AP, and 14 AP = 1 Weapon DPS (so, 7 Str = 1 Weapon DPS). Strength also increases Warrior's Block chance which makes it good for both defense and offense (if he is using a Shield).
|
- Stamina - Increases the Warrior's health pool. This is a primary statistic for defense-oriented Tanks as stacking it allows them to survive heavy punishment.
|
- Armor - Reduces Damage taken from physical attacks (it does not affect spell resistances). This is what makes Tanks survive heavy blows to their face; it should not be overlooked, especially if you plan on running the Sword & Board build.
|
- Defense - Decreases enemy's chance to land a Crushing Blow, Critical Strike or a Hit on the Warrior, which increases his survivability.
|
- Dodge/Parry - So-called avoidance stats. They let Warrior avoid Damage completely.
|
- Block - Increases Warrior's chance to block an attack with a Shield. Blocked attacks deal less Damage (damage reduction depends on the Block Value).
|
|
Statistic Priority for Threat-oriented Tanks:
Weapon Stats ⇒ Weapon Skill ⇒ Hit Chance ⇒ Critical Chance ⇒ Agility ⇒ Attack Power/Strength
Statistic Priority for Survivability-oriented Tanks:
Stamina ⇒ Armor ⇒ Dodge/Parry ⇒ Defense ⇒ Agility ⇒ Strength ⇒ Block
|
The Best Talent Builds
Proper Talent allocation is essential for maximizing Threat generation and Survivability. Here, we will describe the most optimal specs and lead you through the Talent Trees level-by-level to explain some of the choices.
There are two main PvE Warrior Tank Talent Builds to choose from:
- Sword & Board Warrior PvE Tank Build - This Build is what you might call the "Standard" Warrior Tank Build. It focuses on maximizing survivability by securing almost every available defensive Talent. The Build is suited especially for brand new Warrior Tanks as it is much more forgiving than the second option and does not require "good" gear. These two aspects make it great for learning the Tanking mechanics of Classic.
- Dual Wield Warrior PvE Tank Build - Fury/Protection Hybrid that allows you to dish out massive amounts of Damage (and, because of that, Threat) while providing you with just bare-bones defensive options. This Build requires Consumables stacking, acquiring World Buffs, and very good Gear to compensate for the lack of defenses and, most of the time, a shield (if you plan on using this build, you should be prepared to swap your Off-Hand Weapon for a Shield at a moment's notice). In order to work, this Build requires a lot of preparation on The Tank's side and a solid group of DPSers and Healers watching his back. It is not recommended (to say the least) for Raid progression, as it was not designed for it. It was designed for Speed-clearing and Speedrunning through content that is already on farm. It is also a great option for 5-mans that do not require a defensively built Tank. Because of the very strong similarity to the DPS Fury Builds, this Tank variant utilizes standard Fury Rotation in Combat (with defensive/Taunt abilities weaved in as needed).
|
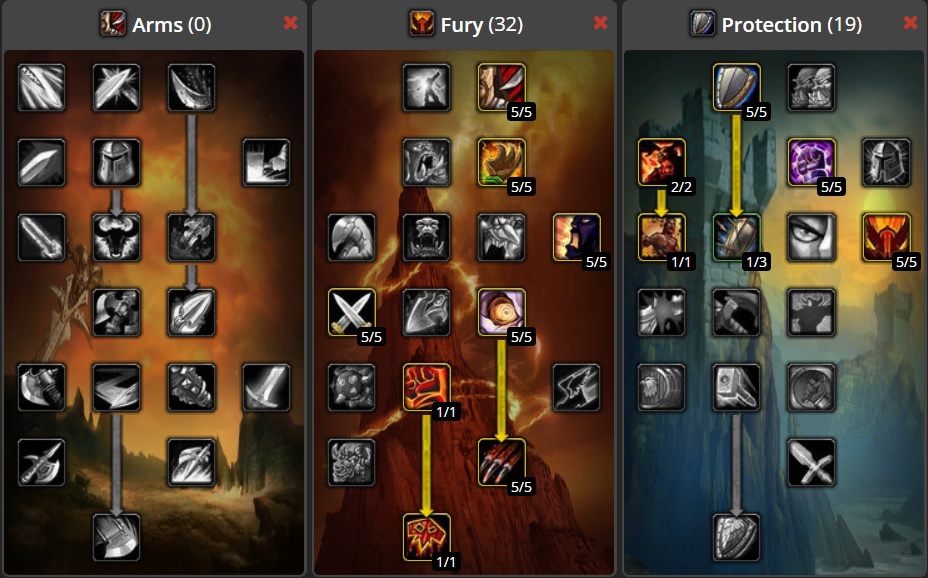
Sword & Board Warrior PvE Tank Build

Arms Tree:
- 5/5 Deflection - Parried Attacks deal no Damage.
- 5/5 Tactical Mastery - As a Warrior, you are changing stances to use some of your Stance-specific abilities. This Talent singlehandedly enables Stance-Dancing which makes it essential for most of Warrior Builds.
- 1/1 Anger Management - This talent might surprise you because it has a property that is not shown in the tooltip. It generates 1 point of Rage every 3 seconds, making it one of the strongest Warrior Talents. It also synergizes well with Bloodrage, allowing you to stack on Rage before combat starts.
Fury Tree:
- 5/5 Cruelty - Simple Critical-Chance-boosting Talent. It allows you to generate more Threat by dealing more damage. Win-win.
Protection Tree:
- 5/5 Shield Specialization - This Talent boosts your defense (by increasing block chance) and offense (by making you generate Rage each time you Block an attack) and versatile Talents tend to be solid choices.
- 5/5 Anticipation - Gives you 10 additional Defense. This will help you compensate for lackluster Gear and/or missing Consumables. If your Gear is already decent and solid Consumables are not a problem, you might want to put these Talent points into Improved Revenge, Improved Taunt, and Improved Shield Wall instead.
- 2/2 Improved Bloodrage - 5 additional Rage from your Bloodrage ability lets you start encounters with a solid Rage pool, especially when combined with Anger Management from the Arms Tree.
- 5/5 Toughness - 10% extra Armor value from items considerably improves your mitigation, especially when you have a Shield equipped.
- 1/1 Last Stand - Very strong defensive Cooldown that allows you to face-Tank attacks of enraged Bosses. It synergizes strongly with your Stamina and Health-increasing consumables.
- 1/3 Improved Shield Block - 1 Point here is enough to make your Shield Block ability block an additional Attack which is enough.
- 5/5 Defiance - Signature Protection Talent. It makes you generate 15% more Threat while in Defensive Stance.
- 3/3 Improved Sunder Armor - It is your job as a Warrior Tank to apply Sunder Armor stacks to the Target and this Talent allows you to save 15 Rage in the process.
- 1/2 Improved Taunt - 1 Point in Improved Taunt is enough to make the Taunt ability work well in tandem with the Mocking Blow (it enables you to use the Taunt ⇒ Mocking Blow ⇒ Taunt sequence without ever losing enemy's attention, which enables you to effectively Tank 2 Targets at once).
- 1/1 Concussion Blow - 5-second Stun on a 45-second Cooldown. Great for controlling adds. If your group's DPS is high enough, it enables you to Stun one Target, forget about it (it should die before the Stun fades) and start generating Threat on a second Target.
- 5/5 One-Handed Weapon Specialization - Extra Damage from your 1H Weapon = extra Threat generation.
- 1/1 Shield Slam - Solid offensive ability that doubles up as a soft Taunt (it generates a high amount of Threat) and a dispell.
|
|
Dual Wield Warrior PvE Tank Build
Fury Tree:
- 5/5 Cruelty.
- 5/5 Unbridled Wrath - Gives you a chance of generating a bonus Rage point after landing a melee hit. Signature Talent of all Dual-Wield Builds (it works with both your Weapons)
- 5/5 Improved Battle Shout - Makes your Battle Shout 25% better which allows you to deal more damage and generate more threat.
- 5/5 Dual Wield Specialization - This decreases Off-Hand weapon Damage penalty, making it deal 62,5% damage instead of standard 50% which is great for DPS and Threat generation.
- 5/5 Enrage - Talent that DPS Fury players are forced to take and Dual Wield Tanks love. It gives you a massive 25% melee Damage bonus for 12 swings after a mob crits you. As a Tank, you are attacked constantly and with this build mobs will crit you which makes Enrage trigger very often. DPS and Threat that this Talent can provide are unbelievable.
- 1/1 Death Wish - Strong offensive Cooldown that also lowers your defenses. Finding the right moment to use it might be challenging and using it in a bad one is destined to end up badly. It is great for fights like Onyxia, where Fear immunity comes in very handy.
- 5/5 Flurry - If you have a decent Critical Strike chance, this will significantly boost your performance. After gearing up in higher Raid Tiers, you'll be able to maintain Flurry at all times which will skyrocket your Threat generation and DPS.
- 1/1 Bloodthirst - Powerful instant ability on a short Cooldown and a strong DPS contributor with a very minor Health regen effect attached. This is one of your main Rotation abilities (yes, as a Dual Wield Tank, you will be using a standard Dual Wield Fury Rotation).
Protection Tree:
- 5/5 Shield Specialization - While focused on Dual Wielding, you are still a Tank and a Tank should know how to handle a Shield.
- 2/2 Improved Bloodrage.
- 5/5 Toughness.
- 1/1 Last Stand.
- 1/3 Improved Shield Block - This Talent comes in handy when you are forced to swap weapons into a defensive setup.
- 5/5 Defiance - This is where this Talent really shines - it turns the Dual Wield Warrior Tank into an undisputed king of Threat.
|
Where to get Pre-Raid/Raid BiS Gear
In order to maximize your Survivability and Threat generation, you should aim to assemble the best possible Gear. This applies to both Pre-Raid and each of the Raid Tiers/Phases. Also, remember that it is the armament that gives the highest boost, so you should start by getting the best warrior weapon available. Below, we present you the BiS (Best-in-slot) list for all equipment slots.
Note1: The list will be updated with new items concurrently with the introduction of new Raids/Phases, so remember to visit this page after the new Raid opens for an update on what current best Warrior Tank items in each lot are.
Note2: The list is comprised of two sets of items:
- Offensive - Items that are the best at increasing Warrior's Threat generation (marked as "O"
- Defensive - Items that are the best at mitigating incoming Damage (marked as "D")
Items without markings are "general purpose" pieces.
| The Best Warrior Tank Items |
| Weapon (MH) |
- Pre-Raid - Ironfoe (Drop from Emperor Dagran Thaurissan, Blackrock Depths) / Mirah's Song (Quest Reward from "Kirtonos the Herald", Scholomance)
- Phase 1 - Perdition's Blade (Drop from Ragnaros, Molten Core) / Quel'Serrar (Reward from "The Forging of Quel'Serrar", Obtained from Foror's Compendium of Dragon Slaying) / Thunderfury, Blessed Blade of the Windseeker (Quest Reward from Rise, Thunderfury, Molten Core) / Quel'serrar (Quest Reward from "The Forging of Quel'Serrar, Dire Maul)
- Phase 2 - Thunderfury, Blessed Blade of the Windseeker / Quel'serrar / Grand Marshal's Swiftblade/Grand Marshal's Dirk (Rank 14 PvP Reward)
- Phase 3 - Thunderfury, Blessed Blade of the Windseeker Quel'serrar / Grand Marshal's Swiftblade/Grand Marshal's Dirk
- Phase 4 - TBA
- Phase 5 - TBA
- Phase 6 - TBA
|
| Shield |
- Pre-Raid - Draconian Deflector (Drop from General Drakkisath, Upper Blackrock Spire) / Skullflame Shield (BoE World Drop)
- Phase 1 - Drillborer Disk (Drop from Garr, Molten Core) / Draconian Deflector
- Phase 2 - Grand Marshal's Aegis (Rank 14 PvP Reward)
- Phase 3 - Grand Marshal's Aegis / Elementium Reinforced Bulwark (Drop from Chromaggus, Blackwing Lair)
- Phase 4 - TBA
- Phase 5 - TBA
- Phase 6 - TBA
|
| Weapon (OH) |
- Pre-Raid - Felstriker / Dal'Rend's Tribal Guardian (Both drop from Warchief Rend Blackhand, Upper Blackrock Spire)
- Phase 1 - Mirah's Song (Quest Reward from "Kirtonos the Herald", Scholomance) / Core Hound Tooth (Contained in Cache of the Firelord, Molten Core)
- Phase 2 - Grand Marshal's Longsword/Grand Marshal's Dirk/Grand Marshal's Handaxe (Rank 14 PvP Reward)
- Phase 3 - Grand Marshal's Longsword/Grand Marshal's Dirk/Grand Marshal's Handaxe / Maladath, Runed Blade of the Black Flight (Drop from Broodlord Lashlayer, Blackwing Lair)
- Phase 4 - TBA
- Phase 5 - TBA
- Phase 6 - TBA
|
| Ranged |
- Pre-Raid - Blackcrow (Drop from Shadow Hunter Vosh'gajin, Lower Blackrock Spire) / Satyr's Bow (Drop from Zevrim Thornhoof, Dire Maul East)
- Phase 1 - Blastershot Launcher (Drop from Golemagg the Incinerator, Molten Core)
- Phase 2 - Blastershot Launcher
- Phase 3 - Blastershot Launcher / Dragonbreath Hand Cannon (Drop from Ebonroc, Blackwing Lair)
- Phase 4 - TBA
- Phase 5 - TBA
- Phase 6 - TBA
|
| Trinket 1 |
- Pre-Raid - Hand of Justice (Drop from Emperor Dagran Thaurissan, Blackrock Depths)
- Phase 1 - Hand of Justice
- Phase 2 - Hand of Justice
- Phase 3 - Drake Fang Talisman (Drop from Ebonroc, Blackwing Lair) / Styleen's Impending Scarab (Drop from Flamegor, Blackwing Lair) / Lifegiving Gem (Drop from Broodlord Lashlayer, Blackwing Lair)
- Phase 4 - TBA
- Phase 5 - TBA
- Phase 6 - TBA
|
| Trinket 2 |
- Pre-Raid - Blackhand's Breadth (Quest Reward from "For the Horde!" / "General Drakkisath's Demise", Upper Blackrock Spire) / Mark of the Chosen (Quest Reward from "The Pariah's Instructions, Maraudon)
- Phase 1 - Mark of the Chosen / Blackhand's Breadth
- Phase 2 - Mark of the Chosen / Blackhand's Breadth
- Phase 3 - Drake Fang Talisman / Styleen's Impending Scarab / Lifegiving Gem
- Phase 4 - TBA
- Phase 5 - TBA
- Phase 6 - TBA
|
| Neck |
- Pre-Raid - Mark of Fordring(O) (Quest Reward from "In Dreams", Western Plaguelands) / Medallion of Grand Marshal Morris(D) (BoE World Drop)
- Phase 1 - Onyxia Tooth Pendant(O) (Quest Reward from "For All To See" / "Celebrating Good Times", Onyxia's Lair)
- Phase 2 - Onyxia Tooth Pendant
- Phase 3 - Onyxia Tooth Pendant / Master Dragonslayer's Medallion (Quest reward from "The Lord of Blackrock" / "The Lord of Blackrock", Blackwing Lair)
- Phase 4 - TBA
- Phase 5 - TBA
- Phase 6 - TBA
|
| Ring 1 |
- Pre-Raid - Blackstone Ring (Drop from Princess Theradras, Maraudon) / Myrmidon's Signet (BoE World Drop)
- Phase 1 - Myrmidon's Signet / Blackstone Ring
- Phase 2 - Don Julio's Band (Alterac Valley Reputation Reward - Exalted)
- Phase 3 - Don Julio's Band / Circle of Applied Force (Drop from Flamegor, Blackwing Lair)
- Phase 4 - TBA
- Phase 5 - TBA
- Phase 6 - TBA
|
| Ring 2 |
- Pre-Raid - Painweaver Band (Drop from General Drakkisath, Upper Blackrock Spire) / Tarnished Elven Ring (Contained in Gordok Tribute, Dire Maul)
- Phase 1 - Band of Accuria (Drop from Ragnaros, Molten Core) / Tarnished Elven Ring
- Phase 2 - Band of Accuria
- Phase 3 - Band of Accuria / Circle of Applied Force
- Phase 4 - TBA
- Phase 5 - TBA
- Phase 6 - TBA
|
| Head |
- Pre-Raid - Lionheart Helm(O) (Created by Blacksmithing) / Golem Skull Helm(D) (Drop from Phalanx, Blackrock Depths)
- Phase 1 - Lionheart Helm(O) / Helm of Wrath(D) (Drop from Onyxia, Onyxia's Lair)
- Phase 2 - Helm of Wrath / Field Marshal's Plate Helm (Rank 13 PvP Reward)
- Phase 3 - Helm of Wrath / Field Marshal's Plate Helm / Helm of Endless Rage (Drop from Vaelestrasz the Corrupt, Blackwing Lair)
- Phase 4 - TBA
- Phase 5 - TBA
- Phase 6 - TBA
|
| Chest |
- Pre-Raid - Savage Gladiator Chain(O) (Drop from Gorosh the Dervish, Blackrock Depths) / Ornate Adamantium Breastplate(D) (Quest Reward from "In Dreams", Western Plaguelands)
- Phase 1 - Savage Gladiator Chain(O) / Breastplate of Might(D) (Drop from Goleemagg the Incinerator, Molten Core)
- Phase 2 - Savage Gladiator Chain / Breastplate of Might / Field Marshal's Plate Armor 9Rank 13 PvP Reward)
- Phase 3 - Field Marshal's Plate Armor / Breastplate of Wrath (Drop from Nefarian, Blackwing Lair)
- Phase 4 - TBA
- Phase 5 - TBA
- Phase 6 - TBA
|
| Legs |
- Pre-Raid - Cloudkeeper Legplates(O) (BoE World Drop) / Warmaster Legguards(D) (Drop from Warchief Rend Blackhand, Upper Blackrock Spire)
- Phase 1 - Legplates of Might(D) (Drop from Magmadar, Molten Core) / Legplates of Wrath(O) (Drop from Ragnaros, Molten Core)
- Phase 2 - Legplates of Wrath / Knight-Captain's Plate Leggings (Rank 8 PvP Reward) / Marshal's Plate Legguards (Rank 12 PvP Reward)
- Phase 3 - Legplates of Wrath / Knight-Captain's Plate Leggings / Marshal's Plate Legguards
- Phase 4 - TBA
- Phase 5 - TBA
- Phase 6 - TBA
|
| Gloves |
- Pre-Raid - Voorne's Vice Grips(O) (Quest Reward from "Warlord's Command" / "Maxwell's Mission", Lower Blackrock Spire) ) / Boneclenched Gauntlets(D) (Drop from Ras Frostwhisper, Scholomance))
- Phase 1 - Aged Core Leather Gloves(O) (Drop from Magmadar, Molten Core) / Gauntlets of Might(D) (Drop from Lucifron, Molten Core)
- Phase 2 - Gauntlets of Might / Marshal's Plate Gauntlets (Rank 12 PvP Reward)
- Phase 3 - Gauntlets of Might / Marshal's Plate Gauntlets / Gauntlets of Wrath (Drop from Ebonroc, Flamegor, and Firemaw, Blackwing Lair)
- Phase 4 - TBA
- Phase 5 - TBA
- Phase 6 - TBA
|
| Boots |
- Pre-Raid - Bloodmail Boots(O) (Drop from Side Bosses, Scholomance) / Ribsteel Footguards (Drop from Urok Doomhowl, Lower Blackrock Spire)
- Phase 1 - Sabatons of Might(D) (Drop from Gehennas, Molten Core)
- Phase 2 - Marshal's Plate Boots (Rank 12 PvP Reward)
- Phase 3 - Marshal's Plate Boots / Chromatic Boots (Drop from Chromaggus, Blackwing Lair) / Sabatons of Wrath (Drop from Broodlord Lashlayer, Blackwing Lair)
- Phase 4 - TBA
- Phase 5 - TBA
- Phase 6 - TBA
|
| Shoulders |
- Pre-Raid - Spaulders of Valor(D) (Drop from Warchief Rend Blackhand, Upper Blackrock Spire) / Stockade Pauldrons(D) (BoE World Drop)
- Phase 1 - Spaulders of Valor(D) / Pauldrons of Might(D) (Drop from Sulfuron Harbinger, Molten Core)
- Phase 2 - Field Marshal's Plate Shoulderguards (Rank 13 PvP Reward)
- Phase 3 - Field Marshal's Plate Shoulderguards / Drake Talon Pauldrons (Drop from Ebonroc, Flamegor, and Firemaw, Blackwing Lair)
- Phase 4 - TBA
- Phase 5 - TBA
- Phase 6 - TBA
|
| Wrists |
- Pre-Raid - Bracers of Valor(D) (BoE Trash Drop, Blackrock Spire) / Fel Hardened Bracers (Drop from Lord Hel'nurath, Dire Maul West)
- Phase 1 - Wristguards of True Flight(O) Contained in Cache of the Firelord, Molten Core) / Bracers of Might(D) (BoE Trash Drop, Molten Core)
- Phase 2 - Berserker Bracers (Warsong Gulch Reputation Reward - Exalted)
- Phase 3 - Berserker Bracers / Bracers of Wrath (Drop from Razorgore the Untamed, Blackwing Lair)
- Phase 4 - TBA
- Phase 5 - TBA
- Phase 6 - TBA
|
| Belt |
- Pre-Raid - Brigam Girdle(O) (Drop from General Drakkisath, Upper Blackrock Spire) / Handcrafted Mastersmith Girdle (Drop from Goraluk Anvilcrack, Upper Blackrock Spire)
- Phase 1 - Onslaught Girdle(O) (Drop from Ragnaros, Molten Core) / Belt of Might(D) BoE Trash Drop, Molten Core)
- Phase 2 - Onslaught Girdle / Belt of Might
- Phase 3 - Onslaught Girdle / Belt of Might / Waistband of Wrath (Drop from Vaelestrasz the Corrupt, Blackwing Lair)
- Phase 4 - TBA
- Phase 5 - TBA
- Phase 6 - TBA
|
| Back |
- Pre-Raid - Stoneskin Gargoyle Cape (Drop from Stonespine, Stratholme) / Redoubt Cloak(D) (Contained in Gordok Tribute, Dire Maul)
- Phase 1 - Dragon's Blood Cape(D) (Drop from Ragnaros, Molten Core) / Cloak of the Shrouded Mists(O) (Drop from Ragnaros, Molten Core)
- Phase 2 - Dragon's Blood Cape / Cloak of the Shrouded Mists
- Phase 3 - Dragon's Blood Cape / Cloak of the Shrouded Mists
- Phase 4 - TBA
- Phase 5 - TBA
- Phase 6 - TBA
|
The Best Enchants and Consumables
Proper enchants and consumables will greatly increase your Damage output. While getting enchants is a one-time-deal, farming consumables might be a real chore, but it is still worth it as numbers clearly show.
Rotations
In Classic, Warriors don't have a strict rotation and use a priority list instead. This means that they don't have a build-up phase and can swap Targets quickly without losing DPS/TPS.
Note1: Your Rotation will depend on the Build/Weapons you are currently using. Rotation used by Dual Wield Tanks to generate Threat is almost exactly the same as the rotation of a standard Fury Warrior; you just have to pay more attention to what is happening to your character (you don't want to get killed, obviously), while Standard Tank's rotation is exactly what you might expect from a defensive character.
Note2: You should use Defensive Stance as your main stance to maximize Threat generation and defenses.
Dual Wield Tank Priority List for maximum Single-Target Threat generation:
- Execute if Target below 20% Health
|
 |
- Bloodthirst on Cooldown
|
 |
- Whirlwind on Cooldown
|
 |
- Heroic Strike to dump excess Rage
|
 |
- Hamstring to dump excess Rage
|
 |
- Stack Sunder Armor to full if it is about to fade
|
 |
| Dual Wield Tank Priority List for maximum Multi-Target Threat generation: |
- Whirlwind on Cooldown
|
|
- Execute on priority Target if it is below 20% Health
|
|
- Bloodthirst on Cooldown
|
|
- Cleave to dumb excess Rage
|
 |
- Hamstring to dump excess Rage
|
|
| Priority List when you have a Shield equipped: |
- Shield Block on Cooldown if you are Tanking enemy that is using physical attacks
|
 |
- Bloodrage on Cooldown if your current Health allows it
|
 |
- Apply and Maintain Sunder Armor stacks
|
|
- Maintain Battle Shout
|
 |
- Revenge whenever available
|
 |
- Shield Slam/Bloodthirst (if Talented) as the main Threat and Damage source
|
 / / |
- Sunder Armor as a Threat generator
|
|
- Heroic Strike to dump excess Rage
|
|
Tips and Tricks for aspiring Warrior Tank Raiders
- If you want to generate more Threat and withstand more Damage than your competition, Stack Consumables. Spending some additional Gold or a few extra hours grinding might secure you a spot in a Raid. Raid leaders prefer dedicated and well-prepared players.
|
- Use Macros. You should add a /startattack macro to all your offensive abilities. Other macros, like /cancelaura "x", Weapon/Shield Swaps (/equip "WeaponName") and even mouseovers (/cast [target=mouseover, exists] AbilityName; AbilityName) are worth considering as well.
|
- Pool your Rage. Always having enough Rage for the key abilities (like Shield Block, for example) is paramount for your survival and success as a Tank.
|
- Collect and use Resistance Gear and Resistance Consumables (Greater Fire Protection Potion, for example). This will make you much more resilient against Bosses that use magic/elemental attacks.
|
- Always try to improve. Get an addon that tracks your performance and try to optimize your equipment and rotation.
|
|
END NOTE
This Guide should help you to prepare yourself for that legendary Vanilla Raiding Experience and allow you to progress through Raid Tiers efficiently and with a good amount of fun.
We hope that you have found this guide useful and informative. If we have missed a piece of information that is important to you, please let us know!
Please do note that this is an early version of our guide, and we will be happy to receive constructive criticism, that will help us improve it, so leave your suggestions in the comments section below.
|
Pictures used in this article are the intellectual property of Blizzard Entertainment Inc.