Games Marketplace - Odealo
0.00 25 (Click on the icon to view details)

Articles

The Best Shaman PvE Healer Build for WoW Classic

The Best Shaman PvE Healer Build for WoW Classic

Complete Healer Guide for Restoration Shaman in World of Warcraft Classic

Restoration Shaman PvE Builds
Odealo's Pocket Guide

Shaman

You can find all our Pocket Guides for other WoW Classic Classes builds right here: Best WoW Classic Builds

If you have just started leveling your Shaman, you may want to check out our Shaman leveling Guide first

Changelog
  • Added Phase 2 BiS Equipment
  • Added Phase 3 BiS Equipment
  • Reviewed Talent Builds, Consumables, and Rotations


Overview

Restoration Shamans are arguably the most flexible support/healing spec in WoW Classic. Thanks to the fact that the Shaman class was developed as a hybrid (Tank, Caster DPS, and a Healer in one), they have access to a wide range of interesting Talents, abilities, and traits. For one, they can equip shields and cloth, leather, or mail armor, which makes them more flexible when gearing up. On top of that, they can use a Class-specific themed group of ground-based buffs called Totems. With these, they can provide various damage-increasing buffs (Grace of Air Totem, Windfury Totem, and Strength of Earth Totem), help their group with top-level utility (Tremor Totem, Poison Cleansing Totem),  or help with group's sustain and longevity (Mana Tide Totem, Stoneskin Totem, Windwall Totem). If this wasn't enough, they also have access to the only cost-effective "Group Healing" ability of Classic in the form of Chain Heal; an ability that heals 3 friendly characters with every cast (if targeted at a group member, it will bounce between other group members only, which makes it somewhat predictable and provides reliable Raid-wide heals if Resto Shamans are spread evenly between Raid groups). All of this sounds already incredible and we didn't even mention Shaman's non-Totem utility abilities... they have access to the best interrupt in the game in a form of the Earth Shock (it's regarded as the best because it has the shortest cooldown of just 6 seconds), Purge that removes magic effects from the Target (this is great for both PvE and PvP as it can be used to dispell buffs and other powerful magic-based effects), and Frost Shock that can be used to permanently slow an enemy (Frost Shock's slow effect is longer than its cooldown). If there is one thing that slows Resto Shamans down, it is their low sustain. They can run out of mana very quickly if they don't manage it properly (downranking spells, understanding how mana regeneration works, and stocking up on consumables is necessary when rolling a Resto Shaman).

Restoration Shamans are, by far, the most welcomed healers on the horde side and the fact that Totem buffs only affect the Shaman's main group makes them even more popular in Raids (each group needs a Shaman because everyone wants those buffs and utility).

 Pros  Cons
 Great utility  Can experience severe sustain problems (very mana-hungry)
 Very strong support tools  No Hard CC makes accidental aggro pulls even deadlier than usual (on adds, Bosses don't care about CC)
 Totems are very versatile; there is one for pretty much every possible situation  Complicated, with a high skill ceiling and a lot of abilities for many different situations
 The best AoE Healing capabilities in Classic, thanks to the Chain Heal ability  Lackluster defensive tools
 Good mobility, especially when outdoors  


The Best Race Choice

Note: Here, we will point you only towards the best PvE Restoration Shaman Race. If you'd like to know more about other race picks, please check our WoW Classic Beginners Guide, where we dive deep into all available Shaman's race choices.

Horde
Horde
Out of the three Horde races that can choose the path of a Shaman, Troll is the only one with a Racial that directly affects Resto's gameplay. His Berserking provides a 10-second long casting speed buff based on caster's current health once every 3 minutes. This will give you just 10% haste most of the time, which is not that great, but in back-to-the-wall situations, the buff can reach a whopping 30%, which can be the difference between a wipe and a close call successful attempt.


The Best Professions Choice

Despite the fact that Healers do not benefit from Engineering as much as DPS Classes, we still recommend it as the optimal choice, especially if you plan on using the melee group variant of the Resto build. Engi lets you create and use Gnomish Battle Chicken Trinket that summons a Guardian Chicken that fights at your side and has a chance on hit to cast a "Battle Squawk" which boosts Melee attack speed of all Party members by 5%, making it a must-have in all melee groups. On top of that, the power of Goblin Saper Charge just can't be underestimated in Raid vs Raid encounters at Dungeon entrances. The fact that Engineering is also considered the best PvP profession is an added benefit to its power in the PvE/Raiding environment.

At the start, you should pick Mining to supplement your Engineering Skill, you can always switch it to another profession of your liking later on.

Note1: If you are not a min-maxer, or you want to use your professions for moneymaking, Gathering Professions, Alchemy, and Tailoring are all interesting alternatives.

Note2: If you want to know more about all available professions and secondary skills, please check our detailed WoW Classic Professions Guide.


Statistics Priority

  1. Mp5 (Mana per 5 seconds) - Regenerates X mana every 5 seconds. This effect continues while casting, which makes it much better than Spirit when it comes to the sustain that it provides.
  1. Intellect - Increases your total Mana Pool and provides you with additional Spell Critical Chance (59,2 Int = 1% Spell Critical Strike Chance). This statistic synergizes with Resto's Ancestral Healing Talent, and a higher mana pool helps with Sustain by quite a bit.
  1. Healing Power - Increases your Healing done with Healing Spells. The healing bonus from Healing Power is calculated differently for different Spells and their Ranks, but in general, this is a very beneficial statistic for Resto Shamans.
  1. Spell Crit - Increases your chance to land a Critical Strike with your Spells. Criticals made with healing spells tend to overheal your targets which is wasteful, but Spell Crit gets better if you are down-ranking your spells a lot. This statistic strongly synergizes with Resto's Ancestral Healing Talent.
  1. Stamina - Increases your total health pool. This statistic, even though it does not affect your Raid performance, should not be overlooked as it is the only thing that separates living Shamans from dead ones. It will help you survive your mistakes and make some aspects of Raiding more forgiving.
  1. Spirit -  Increases your mana regeneration while not casting (5-second rule).

Statistic Priority for a Restoration Shaman:

Mp5 =/ Intellect =/ Healing Power =/  Spell Crit Stamina ⇒⇒ Spirit 

Note: Mp5, Intellect, Healing Power, and Spell Critical are all very beneficial statistics for Restoration Shamans and you should aim to have as much of them in your gear as possible. Stamina, while not as valuable, is also good to have. Spirit, on the other hand, does not contribute nearly as much.


The Best Talent Builds

Proper Talent allocation is essential for maximizing your Healing Per Second (HPS) and/or utility that you bring to the Raid. Here, we will describe the most optimal specs and lead you through the Talent Trees level-by-level to explain some choices.

There are two standard healing-oriented PvE Restoration Shaman Builds to choose from:

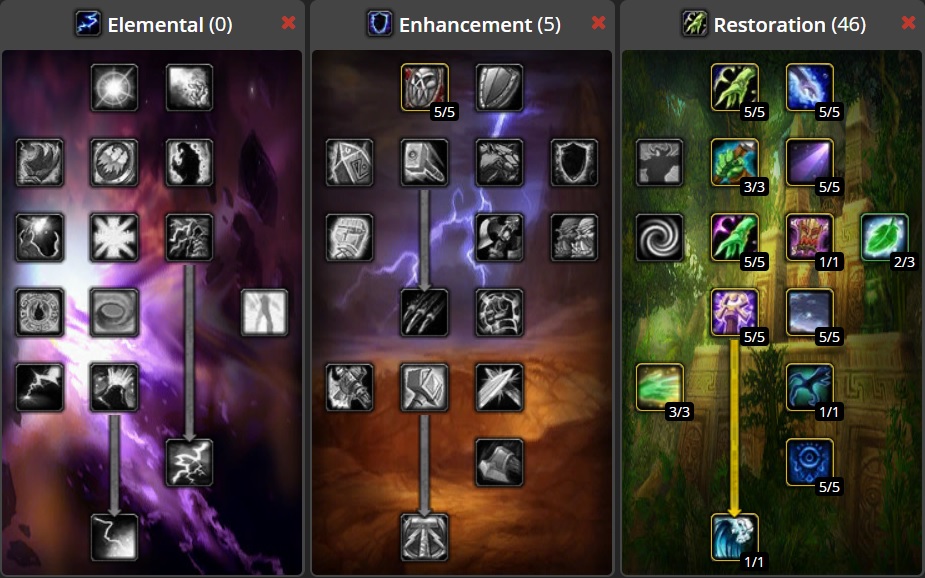
  • Pure Restoration Shaman Build - Build that focuses on maximizing Resto Shaman's healing output at the cost of lower Totem utility. Foregoing Enhancement Talents, like Enhancing Totems and Guardian Totems, frees up 7 Talent points that are then used in the Restoration Tree to boost build's HPS by securing Tidal Mastery and reduce its threat generation by picking up Healing Grace. Shamans running this build will most likely stay away from mele range and stick with ranged groups.
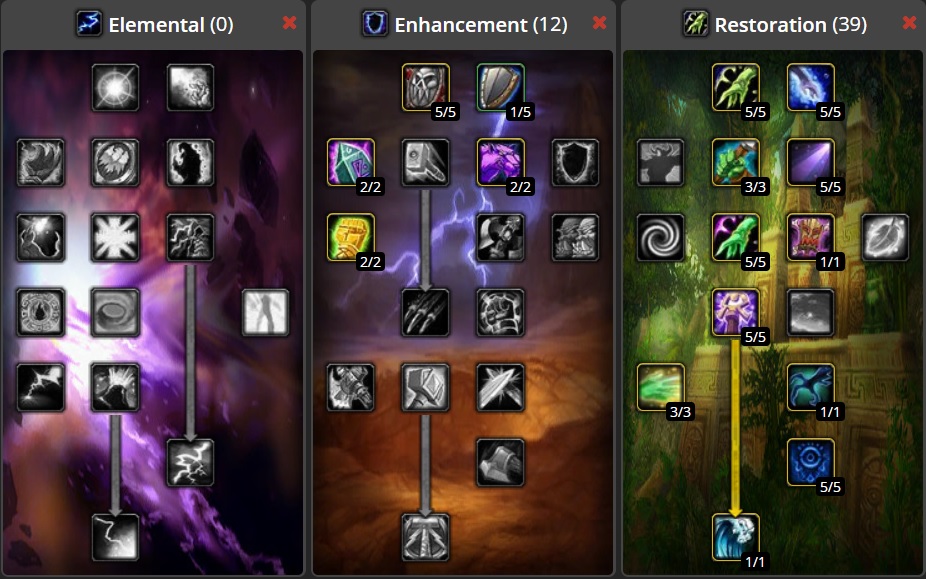
  • Melee Support Restoration Shaman Build - Build that secures Enhancing Totems and Guardian Totems from the Enhancement Tree at the cost of higher threat generation and lower critical chance. This variant provides some extra Damage for melee DPS groups, so Shamans running it will be most likely standing in the melee range.

Pure Restoration Shaman Build
Talent allocation for Pure Restoration Shaman Build

Enhancement Tree:

  • 5/5 Ancestral Knowledge - There are no other options for these 5 points as all remaining 46 are dedicated to the Restoration Tree already; 5% extra mana will help a bit with your Sustain.

Restoration Tree:

  • 5/5 Improved Healing Wave - Increases your HPS by a significant amount and allows you to be a bit more liberal with your heals by reducing Healing Wave's cast time by half a second.
  • 5/5 Tidal Focus - Makes your Healing spells more efficient which helps with your sustain.
  • 3/3 Ancestral Healing - Your Healing spells now provide your Targets with 25% extra armor for 15s after they crit them. This effect is especially good on Tanks in physical damage-heavy encounters.
  • 5/5 Totemic Focus - 25% mana cost reduction on all your Totems is huge for your overall sustain if you are Totem Twisting to provide your group with maximum benefits of Windfury and Grace of Air Totems.
  • 5/5 Healing Focus - Provides you with a 70% chance to avoid pushback caused by damage taken while casting a healing spell. This seemingly PvP Talent comes in handy in surprisingly many PvE encounters (all that feature AoE damage and/or add waves essentially).
  • 1/1 Totemic Mastery - Increases the area of influence of your Totems that affect friendlies to 30 yards; this makes your support Totems much more effective by allowing them to affect allies that are further away.
  • 2/3 Healing Grace - Your Healing spells generate 10% less threat. This minimizes your chances to accidentally pull aggro.
  • 5/5 Restorative Totems - Boosts effects of your Healing Stream and Mana Spring Totems by 25%, making them much more effective.
  • 5/5 Spiritual Healing - makes your healing spells 10% better.
  • 5/5 Tidal Mastery - 5% extra Critical Chance on your healing spells. This strongly synergizes with the Ancestral Healing Talent. On top of that, this Talent makes you more effective during your solo adventures as it works on Lightning Spells as well.
  • 3/3 Healing Way - This largely improves your Tank-healing capabilities as it effectively makes a large portion of your Healing Wave casts up to 18% Stronger if you cast them on the same Target. You should use Rank 1 Healing Wave to stack this effect up to 3 quickly in order to get maximum benefits.
  • 1/1 Nature's Swiftness - Emergency Cooldown that allows you to Heal your Target instantly once every 3 minutes. This will allow you to keep a critically injured teammate alive and avoid a wipe from time to time.
  • 5/5 Purification - Makes your Healing Spells 10% stronger.
  • 1/1 Mana Tide Totem - Very powerful group-wide mana restoration tool that allows your group members to maximize their damage output without worrying too much about their mana levels (if it happens to not be on its long, 5-minute cooldown).

Melee Support Restoration Shaman Build
Talent allocation for Melee Support Restoration Shaman Build

Enhancement Tree:

  • 5/5 Ancestral Knowledge
  • 1/5 Shield Specialization - This point is up for debate; you can pick Improved Lightning Shield or even Thundering Strikes instead.
  • 2/2 Guardian Totems - Makes your Stoneskin, Windwall, and Grounding Totems more effective, which increases your group's defenses by a bit.
  • 2/2 Improved Ghost Wolf - Reduces casting time of your Ghost Wolf ability to 1 second. It makes you much more mobile, but only outdoors. You can swap this for Improved Lightning Shield, Shield Specialization, or even Thundering Strikes if you like.
  • 2/2 Enhancing Totems - Makes your Grace of Air and Strength of Air Totems 15% more effective, making you desirable in melee groups that benefit from those Totems.

Restoration Tree:

  • 5/5 Improved Healing Wave
  • 5/5 Tidal Focus
  • 3/3 Ancestral Healing
  • 5/5 Totemic Focus
  • 5/5 Healing Focus. 
  • 1/1 Totemic Mastery. 
  • 5/5 Restorative Totems. 
  • 5/5 Spiritual Healing. 
  • 3/3 Healing Way. 
  • 1/1 Nature's Swiftness. 
  • 5/5 Purification. 
  • 1/1 Mana Tide Totem. 


Where to get Pre-Raid/Raid BiS Gear

In order to maximize your HPS and Sustain, you should aim to assemble the best possible Gear. This applies to both Pre-Raid and each of the Raid Tiers/Phases.

Note1: The list will be updated with new items concurrently with the introduction of new Raids/Phases, so remember to visit this page after a new Raid opens for an update on what current best Restoration Shaman items in each lot are.

The Best Restoration Shaman Items
Main Hand
  • Pre-Raid - The Hammer of Grace (Contained in Chest of The Seven, Blackrock Depths)
  • Phase 1 - Aurastone Hammer (drop from Garr, Molten Core)
  • Phase 2 - High Warlord's Battle Mace (Rank 14 PvP Reward) / Aurastone Hammer 
  • Phase 3 - Claw of Chromaggus (Drop from Chromaggus, Blackwing Lair) / Lokamir il Romathis (Drop from Nefarian, Blackwing Lair) / High Warlord's Battle Mace 
  • Phase 4 - TBA
  • Phase 5 - TBA
  • Phase 6 - TBA
Off-Hand
  • Pre-Raid - Brightly Glowing Stone (Drop from King Gordok, Dire Maul)
  • Phase 1 - Malistar's Defender (drop from Ragnaros, Molten Core)
  • Phase 2 - Malistar's Defender / High Warlord's Tome of Mending (Rank 14 PvP Reward) Lei of the Lifebrionger (Alterac Valley Reputation Reward - Exalted) 
  • Phase 3 - Red Dragonscale Protector (Drop from Vaelestrasz the Corrupt, Blackwing Lair) High Warlord's Tome of Mending / Lei of the Lifebrionger 
  • Phase 4 - TBA
  • Phase 5 - TBA
  • Phase 6 - TBA
Two-Hand
  • Phase 2 - Amberseal Keeper (Drop from Lord Kazzak, Blasted Lands World Boss) / High Warlord's War Staff (Rank 14 PvP Reward) 
  • Phase 3 - Staff of the Shadow Flame (Drop from Nefarian, Blackwing Lair) / Amberseal Keeper / High Warlord's War Staff 
  • Phase 4 - TBA
  • Phase 5 - TBA
  • Phase 6 - TBA
Trinket 1
  • Pre-Raid - Second Wind  (Golem Lord Argelmach, Blackrock Depths) / Mindtap Talisman (drop from Magister Kalendris, Dire Maul West)
  • Phase 1 - Mindtap Talisman / Second Wind
  • Phase 2 - Second Wind 
  • Phase 3 - Rejuvenating Gem (Drop from Firemaw, Flamegor, and Ebonroc, Blackwing Lair) 
  • Phase 4 - TBA
  • Phase 5 - TBA
  • Phase 6 - TBA
Trinket 2
  • Pre-Raid - Mindtap Talisman (not unique, you can equip two)
  • Phase 1 - Shard of the Scale (drop from Onyxia, Onyxia's Lair)
  • Phase 2 - Shard of the Scale 
  • Phase 3 - Shard of the Scale 
  • Phase 4 - TBA
  • Phase 5 - TBA
  • Phase 6 - TBA
Neck
  • Pre-Raid - Animated Chain Necklace (Drop from Ramstein the Gorger, Stratcholme)
  • Phase 1 - Animated Chain Necklace / Choker of the Fire Lord (Drop from Ragnaros, Molten Core) 
  • Phase 2 - Animated Chain Necklace / Choker of the Fire Lord 
  • Phase 3 - Pendant of the Fallen Dragon (Drop from Vaelestrasz the Corrupt, Blackwing Lair) Animated Chain Necklace / Choker of the Fire Lord 
  • Phase 4 - TBA
  • Phase 5 - TBA
  • Phase 6 - TBA
Ring 1
  • Pre-Raid - Fordring's Seal (Quest Reward from "AllianceHordeIn Dreams", Western Plaguelands; Tirion Fordring Chain)
  • Phase 1 - Cauterizing Band (contained in Cashe of the Firelord, Molten Core)
  • Phase 2 - Cauterizing Band 
  • Phase 3 - Cauterizing Band 
  • Phase 4 - TBA 
  • Phase 5 - TBA
  • Phase 6 - TBA
Ring 2
  • Pre-Raid - Mark of the Dragon Lord (drop from Overlord Wyrmthalak, Upper Blackrock Spire) Rosewine Circle (drop from Urok Doomhowl, Lower Blackrock Spire)
  • Phase 1 - Cauterizing Band (not unique, you can equip two)
  • Phase 2 - Cauterizing Band
  • Phase 3 - Pure Elementium Band (Drop from Nefarian, Blackwing Lair) 
  • Phase 4 - TBA
  • Phase 5 - TBA
  • Phase 6 - TBA
Head
  • Pre-Raid - Insightful Hood (drop from Cho'Rush the Observer, Dire Maul North)
  • Phase 1 - Earthfury Helmet (drop from Garr, Molten Core) / Helmet of Ten Storms (drop from Onyxia, Onyxia's Lair)
  • Phase 2 - Crystal Adorned Crown 9Drop from Azuregos, Azshara World Boss) Earthfury Helmet* / Helmet of Ten Storms**
  • Phase 3 - Crystal Adorned Crown / Earthfury Helmet* / Helmet of Ten Storms**
  • Phase 4 - TBA
  • Phase 5 - TBA
  • Phase 6 - TBA
Chest
  • Pre-Raid -  Robes of the Exalted (drop from Baron Rivendare, Stratcholme)
  • Phase 1 - Robes of the Exalted / Earthfury Vestments* (drop from Golemagg the Incinerator, Molten Core)
  • Phase 2 - Robes of the Exalted / Earthfury Vestments*
  • Phase 3 - Breastplate of Ten Storms** (Drop from Nefarian, Blackwing Lair) Robes of the Exalted / Earthfury Vestments*
  • Phase 4 - TBA
  • Phase 5 - TBA
  • Phase 6 - TBA
Legs
  • Pre-Raid - Padre's Trousers (drop from Illyanna Ravenoak, Dire Maul West)
  • Phase 1 - Earthfury Legguards* (drop from Magmadar, Molten Core) / Salamander Scale Pants (drop from multiple Bosses, Molten Core)
  • Phase 2 - Earthfury Legguards* 
  • Phase 3 - Empowered Leggings (Drop from Chromaggus, Blackwing Lair) / Legplates of Ten Storms** (Drop from Ragnaros, Molten Core) Earthfury Legguards* 
  • Phase 4 - TBA
  • Phase 5 - TBA
  • Phase 6 - TBA
Gloves
  • Pre-Raid - Harmonious Gauntlets (drop from King Gordok, Dire Maul North)
  • Phase 1 - Harmonious Gauntlets / Earthfury Gauntlets* (drop from Gehennas, Molten Core)
  • Phase 2 - Harmonious Gauntlets / Earthfury Gauntlets* 
  • Phase 3 - Gauntlets of Ten Storms** (Drop from Firemaw, Flamegor, and Ebonroc, Blackwing Lair) Harmonious Gauntlets / Earthfury Gauntlets* 
  • Phase 4 - TBA
  • Phase 5 - TBA
  • Phase 6 - TBA
Boots
  • Pre-Raid - Omnicast Boots (drop from Golem Lord Ardelmach, Blackrock Depths)
  • Phase 1 - Verdant Footpads (drop from Stonespine, Stratcholme) Earthfury Boots* (drop from Lucifron, Molten Core)
  • Phase 2 - Earthfury Boots* 
  • Phase 3 - Greaves of Ten Storms** (Drop from Broodlord Lashlayer, Blackwing Lair) / Boots of Pure Thought (Trash Drop, Blackwing Lair) Earthfury Boots* 
  • Phase 4 - TBA
  • Phase 5 - TBA
  • Phase 6 - TBA
Shoulders
  • Pre-Raid - Royal Cap Spaulders  (drop from Jandice Barov, Scholomance)
  • Phase 1 - Wild Growth Spaulders (drop from Majordomo Executus, Molten Core) / Earthfury Epaulets* (drop from Baron Geddon, Molten Core)
  • Phase 2 - Wild Growth Spaulders / Earthfury Epaulets* 
  • Phase 3 - Epaulets of Ten Storms** (Drop from Chromaggus, Blackwing Lair) / Wild Growth Spaulders / Earthfury Epaulets
  • Phase 4 - TBA
  • Phase 5 - TBA
  • Phase 6 - TBA
Wrists
  • Pre-Raid - Loomguard Armbraces (drop from Kirtonos the Herald, Scholomance)
  • Phase 1 - Loomguard Armbraces / Earthfury Bracers* (BoE drop from Trash mobs, Molten Core)
  • Phase 2 - Loomguard Armbraces / Earthfury Bracers*
  • Phase 3 - Bracers of Ten Storms** (Drop from Razorgore the Untamed, Blackwing Lair) Loomguard Armbraces / Earthfury Bracers*
  • Phase 4 - TBA
  • Phase 5 - TBA
  • Phase 6 - TBA
Belt
  • Pre-Raid - Sash of Mercy (BoE world drop, can be bought on AH) / Whipvine Cord (drop from Alzzin the Wildshaper, Dire Maul East)
  • Phase 1 - Sash of Mercy / Earthfury Belt* (BoE drop from Trash mobs, Molten Core)
  • Phase 2 - Earthfury Belt* 
  • Phase 3 - Belt of Ten Storms** (Drop from Vaelestrasz the Corrupt, Blackwing Lair) / Earthfury Belt* 
  • Phase 4 - TBA
  • Phase 5 - TBA
  • Phase 6 - TBA
Back
  • Pre-Raid - Hide of the Wild (Created by Leatherworking, the pattern is contained in Knot Thimblejack's Cache, Dire Maul North) / Archivist Cape of Healing (drop from Archivist Galford, Stratcholme; note: The item has a Random Enchantment)
  • Phase 1 - Hide of the Wild / Archivist Cape of Healing
  • Phase 2 - Hide of the Wild / Archivist Cape of Healing
  • Phase 3 - Shroud of Pure Thought (Drop from Flamegor, Blackwing Lair) 
  • Phase 4 - TBA
  • Phase 5 - TBA
  • Phase 6 - TBA

*The Earthfury Set Items become Best in Slot when you unlock the (8) Set bonus (which means that you have to collect the whole Set).

**This becomes Best in Slot after collecting at least 3 "The Ten Storms" Set pieces. 


The Best Enchants and Consumables

Proper enchants and consumables will greatly increase your Raid performance. While getting enchants is a one-time-deal, farming consumables might be a real chore, but it is still worth it as numbers clearly show.

The Best Enchants
Weapon (1H) Enchant Weapon - Healing Power (+ 55 Healing Power)
Shield Enchant Shield - Greater Stamina (+ 7 Stamina)
Head Lesser Arcanum of Voracity (+8 Intellect, available from Libram of Voracity Quest in Burning Steppes)
Chest Enchant Chest - Greater Stats (+4 to all stats)
Legs Lesser Arcanum of Voracity (+8 Intellect, available from Libram of Voracity Quest in Burning Steppes)
Hands Enchant Gloves - Riding Skill (Minor Raiding Speed Increase)
Feet Enchant Boots - Minor Speed (+8% Run Speed)
Shoulders Chromatic Mantle of the Dawn (+5 to all Resistances)
Wrists Enchant Bracer - Greater Intellect (+7 Intellect)
Back Enchant Cloak - Greater Resistance  (+5 to all Resistances)

The Best Consumables
Flask of Distilled Wisdom
+2000 maximum Mana for 2 hours; effect persists through death. Created by Alchemy. The recipe can be dropped from Balnazzar, Stratcholme. 
Major Mana Potion
Major Mana Potion
Restores 1350 to 2250 Mana. Created by Alchemy. Recipe drops from various high-level mobs, elites, and Bosses.
Elixir of Greater Intellect
+25 Intellect for 1 hour. Created by Alchemy.
Demonic Rune
Demonic Rune
Restores 1356 mana at the cost of 862 life. Drop from Demons in Azshara, Felwood, and Blasted Lands (Satyrs and Fel Guards).
Juju Guile
Juju Guile
+30 Intellect for 30 minutes. Reward from a reputable Quest available from NPC Witch Doctor Mau'ari, Everlook, Winterspring.
Cerebral Cortex Compound
+25 Intellect for 1 hour. Obtained from "Infallible Mind" repeatable Quest, Blasted Lands
Mageblood Potion
Mageblood Potion
+12 Mp5 for 1 hour. Created by Alchemy. The recipe can be bought from Rin'wosho the Trader, located in north Stranglethorn Vale
Nightfin Soup
Nightfin Soup
It provides 8 mana per 5 seconds for 10 minutes. Created by Cooking.


Restoration Shaman's Spells and Downranking

In Classic, Healers do not follow any rotation as their gameplay is based purely on responding to different Raid situations and keeping everybody alive. 

Understanding your spells, knowing what they do, and when to use them is the key to your success as a Resto Shaman. This is why we will shortly describe all of Resto Shaman's major spells, specify when you should use them, and tell you a word or two about the Downranking and why it is very important.

Downranking

Downranking is a method of conserving Mana by using lower ranks of spells. Using this method is flat out necessary to not run out of mana before combat ends. You should memorize how much Health different Ranks of your spells restore and use them accordingly in order to preserve resources.

Note: Higher Rank of any spell is always more cost-effective than lower Rank, but Healing Power changes the math significantly and makes lower Rank spells more cost-effective than their higher Rank counterparts.

Note2: Lowest Ranks of spells have a much lower Healing Power coefficient than higher Ranks do (they receive much less benefit from your Healing Power statistic). This means that you don't usually want to use Spell Ranks lower than 3 (unless Rank 1 or Rank 2 is enough to top your Target on Health).

Main Resto Shaman's Spells and when to use them:
Chain Heal - The most cost-effective Healing Spell in Resto Shaman's arsenal. It should be downranked to heal light group damage in order to save mana. Chain Heal
Healing Wave - Slow-to-cast, but powerful Single-Target Heal. It is mana-efficient, but using it on a non-Tank player will most likely result in overhealing - this is why you should downrank it. Healing Wave
Lesser Healing Wave - Fast-to-cast, but inefficient healing spell. Us this as a quick emergency Heal. Lesser Healing Wave
Earth Shock - Shaman's instant-cast interrupt. Use Rank 1 to efficiently counter the enemy's spells. Earth Shock
Frost Shock - Instant-cast ability with slowing effect. Use Rank 1 if all you need is its effect. Frost Shock
Purge - Removes beneficial spells from an enemy. Mostly useful in PvP, but some mobs can also be dispelled (Mage's Detect Magic might be necessary to discover enemy's buffs) Purge
Cure Poison/Poison Cleansing Totem - These remove poison effects from friendly Targets. Use them accordingly Cure Poison Poison Cleansing Totem
Cure Disease/Disease Cleansing Totem - These remove disease effects from friendly Targets. Use them accordingly Cure Disease / Disease Cleansing Totem
Windfury Totem - Enhances weapons of Shaman's group members, this should be maintained for the whole encounter duration Windfury Totem
Grace of Air Totem - Increases the Agility of Shaman's group members. This can be swapped with Windfury Totem for the maximum benefit (so-called Totem Twisting - Windfury effect lasts 10 seconds, so you can place Windfury Totem once every 10s and immediately swap it with the Grace of Air) Grace of Air Totem
Mana Spring Totem - Restores a moderate amount of mana to Shaman's group members. Use this if needed. Mana Spring Totem
Mana Tide Totem - Restores a high amount of mana to Shaman's group members. Use this if needed or when asked for specifically. Mana Tide Totem
Strength of Earth Totem -  Increases the Strength of Shaman's group members. Use this when in a group with melee damage dealers. Strength of Earth Totem
Earthbind Totem - Slows down nearby enemies. Commonly used for kiting purposes in Raids. Earthbind Totem
Tremor Totem - Fear, Charm, and Sleep effects removal. Use it if needed (you want to place it before the Fear phase happens, but remember that its effect triggers every 5 seconds, starting from the moment it is placed. Proper timing is paramount!) Tremor Totem
Spell Priorities:
  1. Lesser Healing Wave if Target is about to die (shortest casting time)
  2. Dispell negative effects
  3. Manage your Totem Buffs
  4. Maintain Healing Way and Ancestral Healing effects on your main healing Target (Tank usually)
  5. Chain Heal to keep your group topped on Health
  6. Healing Wave as a Single-Target heal


Tips and Tricks for aspiring Restoration Shaman Raiders

  1. If you want to do more Healing, sustain yourself throughout encounters better, and stand out from your Raid competition, Stack Consumables. Spending some additional Gold or a few extra hours grinding might secure you a spot in a Raid, as Raid leaders prefer dedicated and well-prepared players.
  1. Use Totem Twisting technique (keep your Grace of Air/Tranquil Air Totem Active and swap it with Windfury Totem for a second once every 10 seconds - Cast Windfury Totem immediately followed by Grace/Tranquil) to maximize your group's damage output during burst phases (if you have the mana for it).
  1. Time your Totem usage. Totems that dispell harmful effects (Disease Cleansing Totem, Poison Cleansing Totem, Tremor Totem) trigger once every 5 seconds, starting immediately after being placed; they should be dropped as close to 5 seconds before the harmful effect comes to play as possible (but always before the 5-second mark). This will ensure that harmful effects are dispelled immediately after they come into play.
  1. Downrank your Spells.  As mentioned in the previous paragraph, Downranking is the key to your success as a Healer as it allows you to preserve your resources for when you actually need them.
  1. Don't Cast spells if you don't have to. Try to obey the 5-second rule and take advantage of your Spirit-based mana regeneration whenever possible.
  1. Always try to improve. Get an addon that tracks your performance and try to optimize your equipment and rotation.


END NOTE

This Guide should help you to prepare yourself for that legendary Vanilla  Raiding Experience and allow you to progress through Raid Tiers efficiently and with a good amount of fun.

We hope that you have found this guide useful and informative.  If we have missed a piece of information that is important to you, please let us know! 

Please do note that this is an early version of our guide, and we will be happy to receive constructive criticism, that will help us improve it, so leave your suggestions in the comments section below.

Pictures used in this article are the intellectual property of Blizzard Entertainment Inc.