Games Marketplace - Odealo
0.00 25 (Click on the icon to view details)

Articles

The Best PvE Hunter Build for WoW Classic

The Best PvE Hunter Build for WoW Classic

Complete Hunter DPS Guide for WoW Classic

Hunter PvE DPS Builds
Odealo's Pocket Guide

Hunter

You can find all our Pocket Guides for other WoW Classic Classes builds right here: Best WoW Classic Builds

If you have just started leveling your Hunter, you may want to check out our Hunter leveling Guide first

Changelog
  • Added Phase 2 BiS Equipment
  • Added Phase 3 BiS Equipment
  • Reviewed Talent Builds, Consumables, and Rotations


Overview

Hunter, the indisputable king of farming and power leveling, is very versatile in the End-Game. Thanks to a wide range of utility abilities, high movement speed, loyal animal companion, and the ability to deal decent Damage while not fully geared, He performs very well in the initial End-Game Dungeons and Raids of Classic. Moreover, last Talent from the Marksmanship Tree, the Trueshot Aura, allows Hunter to provide a good DPS boost to all physical damage dealers present in his group (it also makes it beneficial to spread Hunters evenly between melee DPS Raid groups). One of the main advantages that Hunter has over other Classes is his ability to deal solid damage from a very long range. This ability, combined with good mobility, decent armor, versatile toolkit, and above-average Health pool makes the Class easy-to-play, but also deceptively hard-to-master. These traits also make the Hunter an ideal Class for encounter-specific tasks, like kiting and picking off adds from a distance.

Sadly, Hunter is not without some quite severe problems. He does not scale with gear as well as other Physical Damage dealers do - Hunter gets outpaced by Rogues and Warriors in lather Phases of the game when it comes to DPS. On top of that, one of Hunter's main advantages - his loyal Pet, also proves to be one of his main limiting factors. A large portion of His DPS comes directly from it, which means that is the Pet dies, Hunter's Damage output visibly decreases. This forces Hunter players to micromanage their Pets to keep them alive, which can be problematic as Pets suffer full Damage from enemy's AoE attacks. Lastly, Hunter is an Agility-based Class, which means that he shares many BiS gear pieces with Rogues and Warriors. This makes gearing up rather difficult (Rogues, Warriors, and other Hunters can make up over a half of a 40-man Raid...) Luckily, Hunter's utility stays strong throughout all WoW Classic Phases, so there is always a place for few Hunters in every Raid.

 Pros  Cons
 Leveling up as a Hunter is a formality  Completes for Gear with Rogues and Warriors
 Good Damage output in early Raids  Scales with gear worse than other competing Classes, which means that his DPS falls of in later Raids, compared to other Damage dealers
 Pet  Pet requires micromanagement
 Great Utility  Lack of self-healing
 Solid Crowd Control  Hunter-specific mechanics, like Pet feeding and ammunition, limit inventory space and force additional expenses
 Easy-to-learn  Hard-to-master
 Good Mobility  The Dead Zone (not as big of an issue in PvE, luckily)


The Best Race Choice

Note: Here, we will point you only towards the best PvE DPS Hunter Race. If you'd like to know more about other race picks, please check our WoW Classic Beginners Guide, where we dive deep into all available Hunter's race choices for both factions.

Alliance
Alliance

The Dwarf is a clear winner on the Alliance side. His Stoneform is quite powerful in PvE setting as it increases survivability and allows you to quickly remove any annoying or deadly Disease, Poison, and Bleed effects applied to you. However, Gun Specialization, while quite good on paper, does not make much of a difference because you will be using Bows, most of the time, anyway (and Ranged Attack mechanics make all ranged weapon specializations much less impactful than their melee counterparts).

Horde
Horde
For a pure PvE character, Troll is the clear winner on Horde's side. Unlike Dwarf's Gun Specialization, Troll's Bow Specialization actually makes some impact (mainly, it increases your Critical Chance with Bows by a little bit). On top of that, Berserking is the only Offensive Racial Cooldown available for the Horde that impacts Hunter's DPS (Blood Fury increases Melee Attack Power only). It is worth noting that you can't go wrong with an Orc either; you will lose some DPS (Pet Damage bonus is nice, but pets tend to die on you), but Orc's Stun Resist racial is overpowered in any setting.

The Best Professions Choice

There is only one profession that makes a real impact in Raids and it is Engineering (Alchemy is also a decent option, but you can buy Flasks, Elixirs, and Potions from other players, which makes it much less impactful). It gives you access to powerful explosives that increase your AoE and Single-Target DPS. On top of that, it lets you create and use a wide range of powerful, yet a bit unreliable and dangerous gadgets that can be useful in very many situations. Moreover, Scopes and Ammunition crafted via Engineering are your bread and butter (Engineering lets you craft bullets only, but that is not a problem as you can trade in Thorium Shells and receive Thorium Headed Arrows in exchange). The fact that Engineering is also considered the best PvP profession is an added benefit to its power in the PvE environment.

At the start, you should pick Mining to supplement your Engineering Skill, you can always switch it to another profession of your liking later on (keeping Mining will allow you to save a lot of money, however).

Note: If you want to know more about all available professions and secondary skills, please check our detailed WoW Classic Professions Guide.

Statistics Priority

  1. Hit Rating -  Increases your chance to Hit your Target. At level 60, with a Weapon Skill of 300, you have a 5% chance to miss with a special attack against a Target of equal level. Against level 63 Boss, who has 315 Defense skill, you need 9% Hit Rating to never miss a special attack. This means that getting 9% Hit Rating is paramount for a Raiding Hunter and should be your first goal when gearing up. If you've chosen the MM/SV Build, the magic number is 6% Hit Chance.
  1. Critical Strike - Increases your chance to deal bonus (critical) damage with all your attacks. Crit is a powerful stat for any Hunter and should be prioritized after you get the Hit Cap.
  1. Agility - Increases your Ranged Attack Power by 2 AP (and Melee Attack Power by 1 AP) per 1 Agility (at all levels), offers a small increase to your Dodge chance, and increases Critical Strike chance by 1% per 53 Agility (at level 60). This is Hunter's main primary statistic. It also scales well with buffs, which means that you get more value from your Agility in a Raid setting.
  1. Attack Power - Increases your Damage done. All Hunter's attacks and offensive abilities scale with Attack Power, but this statistic should not be prioritized over Agility as 1 point of Agility is worth from ~2,5 to ~3 points of AP (depending on your current buffs).
  1. Stamina - Increases your survivability by providing you with extra Health. This statistic does not affect your DPS directly but allows you to survive incoming Damage for longer (and dead Hunter deals 0 Damage).
  1. Intellect - Increases your total Mana Pool and provides you with additional Spell Critical Chance. Hunter's DPS abilities, used in his standard rotation,  do not count as "Spells", so all this statistic provides is increased mana pool. This statistic should not be prioritized, but it shouldn't be overlooked either; some Intellect is needed to ensure that you don't run out of mana during a fight.

Statistic Priority for a Raiding Hunter:

Hit Cap Critical Chance Agility  Attack Power Stamina Intellect

Note: Strength is of close to 0 value for Hunters because it affects Melee Attack Power only and Spirit is a stat that affects your out-of-combat regeneration which has no impact on Hunter's DPS if you don't run out of mana mid-combat (if you do, 5-second rule kicks in and higher Spirit allows you to regen your mana faster, but this shouldn't happen; just use Major Mana Potions and Demonic Runes if needed).


The Best Talent Builds

Proper Talent allocation is essential for maximizing Damage output. Here, we will describe the most optimal Hunter PvE DPS specs and lead you through the Talent Trees level-by-level to explain some choices.

There are two main PvE Talent Builds for Hunters to choose from:

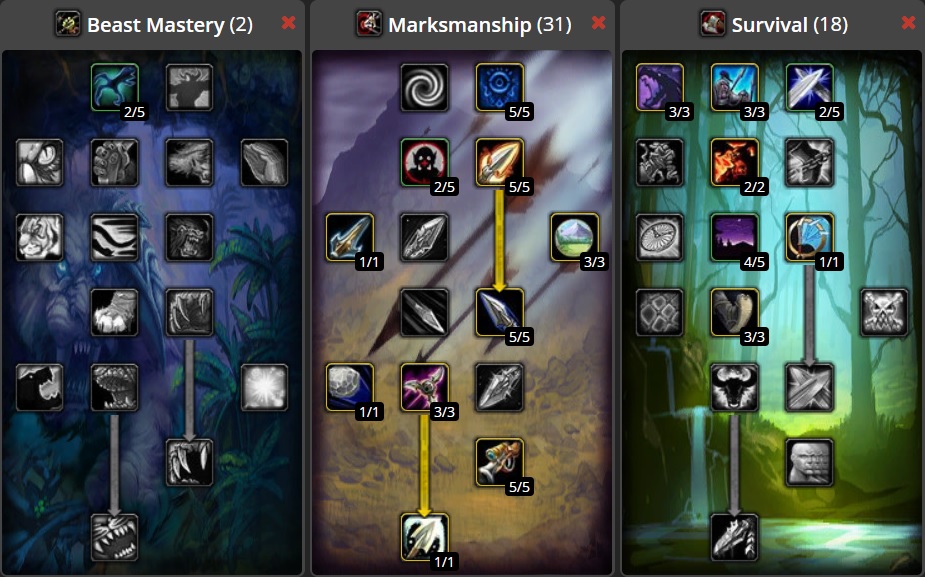
  • Marksmanship/Survival (MM/SV) - Great build for Hunters who have just started their level 60 adventure. Instead of going up the Beastmastery tree after getting MM's Trueshot Aura, this build opts to go for the Surefooted Talent, from the Survival Tree, that provides an additional 3% Hit Chance, which makes achieving hit cap much easier. On top of that, the build is a bit more forgiving (you are more likely to survive mistakes if you use this Build over the second option) as it provides you with some extra Health and a decent defensive tool in the form of Deterrence.
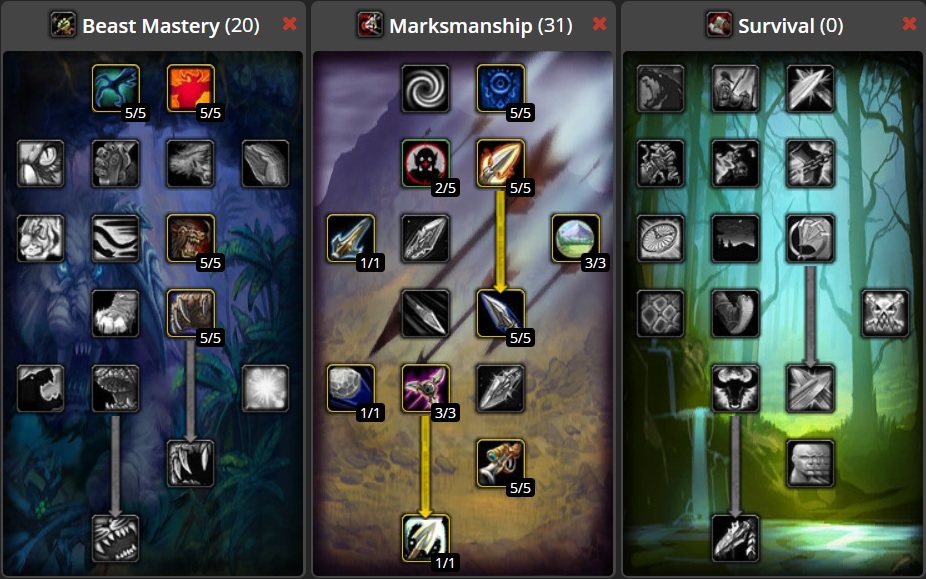
  • Beast Mastery/Marksmanship (BM/MM) - Hunter Build with the highest DPS potential, not suited for new Hunter players because it heavily relies on Pet micromanagement. If you want to make the most out of this Talent setup, you have to keep your pet alive and make sure that its uptime (the time when it attacks the boss) is as high a possible. You should use this build if you have 9% Hit Chance from Items and know how to optimally micromanage your pet.

MM/SV Hunter PvE DPS Build
Talent allocation MM/SV Hunter PvE DPS Build

Beast Mastery Tree:

  • 2/5 Improved Aspect of the Hawk - You will have Aspect of the Hawk active almost all the time while in combat, so this is a free DPS boost. Note: If you have 9% Hit Chance from items, you should put 5 Talent points here at the expense of Surefooted.

Marksmanship Tree:

  • 5/5 Efficiency - Makes your Stings and Shots 10% cheaper which improves your sustain by quite a bit.
  • 2/5 Improved Hunter's Mark - You take this mainly for occasional Solo/5-man Dungeon play as there will be a Hunter designated for putting 5 points into this Talent in very Raid (or at least there should be...)
  • 5/5 Lethal Shots.
  • 1/1 Aimed hot - Hard-Hitting ability on a rather long, 3-second cast and short 6-second Cooldown. One of your main sources of Damage.
  • 3/3 Hawk Eye - Increases your maximum range by 6 yards. This minimizes your downtime by allowing you to attack from further away and makes you better at kiting (again, you can aggro mobs from further away).
  • 5/5 Mortal Shots - Your Ranged Weapon Critical Strikes now deal 230% instead of 200% Damage.
  • 1/1 Scatter Shot - Short-Range CC ability. Great in situations when you accidentally pull aggro on an add; also useful for kiting.
  • 3/3 Barrage - Improves your Volley and Multi-Shot abilities by 15%, increasing your AoE and Cleave damage respectively.
  • 5/5 Ranged Weapon Specialization - 5 Talent points for 5% more ranged damage dealt; a bargain.
  • 1/1 Trueshot Aura - Once activated, it increases the Attack Power of all group members within 45 yards. Note: its Attack Power and not Ranged Attack Power, which means that it affects DPS of Rogues and Warriors as well. This ability increases Hunter's viability in Raids and secures him a spot in melee groups.

Survival Tree: 

  • 3/3 Monster Slaying - Makes you better at killing Beasts, Dragonkin and Giants, and these are common enemy types in Raids.
  • 3/3 Humanoid Slaying - Makes you better at killing Humanoids. A bit less useful than Monster Slaying, but quite good nonetheless.
  • 2/5 Deflection - 2% extra Parry chance. Treat these two points liberally; you can assign them to Entrapment or Improved Wing Clip instead - all three of these Talents have a minor impact and are heavily RNG-dependent, but you have to spend 2 points somewhere to unlock the third tier of Survival Talents.
  • 2/2 Savage Strikes - Provides you with 20% additional Critical Strike Chance on your Mongoose Bite and Raptor Strike abilities. Melee Hunter FTW (actually, this can be useful if you are forced into melee).
  • 4/5 Survivalist - 8% more Health. It makes you more likely to survive mistakes and Raid mechanics that force you to take a hit.
  • 1/1 Deterrence - 25% extra Parry and Dodge chance for 10 seconds on a 5-minute Cooldown. This can save your life, so it is nice to have (if you don't like it, you can take 2% extra health from Survivalist instead).
  • 3/3 Surefooted - Provides you with 3% extra Hit Chance. Great Talent if you are still Gearing up or your Hit Chance is lacking. After achieving 9% Hit Chance from Items, you should transfer these 3 points into Improved Aspect of the Hawk.

BM/MM Hunter PvE DPS Build
Talent allocation for BM/MM Hunter PvE DPS Build

Beast Mastery Tree:

  • 5/5 Improved Aspect of the Hawk - 5% chance of increasing your Ranged Attack Speed by 30% for 12 seconds.
  • 5/5 Endurance Training - Makes your pet more durable by increasing its Health by 15%. Your overall DPS depends on your pet, so this Talent is very solid (it makes your pet much less likely to die and dead pets deal no damage). If you have problems with keeping your pet alive, you can move 2 points from this into Improved Revive Pet; doing this will save you some time, mana and being shouted at for slacking by Raid leader after an encounter in which your pet has died.
  • 5/5 Unleashed Fury - One of the reasons why you should master pet micromanagement. This Talent provides a 20% increase in your Pet's Damage.
  • 5/5 Ferocity - Another reason to learn pet micromanagement. This gives your pet 15% additional Critical Strike Chance.

Marksmanship Tree:

  • 5/5 Efficiency
  • 2/5 Improved Hunter's Mark
  • 5/5 Lethal Shots.
  • 1/1 Aimed hot
  • 3/3 Hawk Eye. 
  • 5/5 Mortal Shots. 
  • 1/1 Scatter Shot
  • 3/3 Barrage
  • 5/5 Ranged Weapon Specialization. 
  • 1/1 Trueshot Aura. 

Short Pet Compendium

Battle effectivenes of different Hunter Pet types may vary greatly. Some of them are excellent Tanks that deal low damage but can withstand severe punishment, while others are rather fragile, but excel at shredding Hunter's enemies with their fangs and claws or can do a little bit of everything. For Eng-Game group PvE content, you want one of the two latter types.

Things to remember:

  • Pet's level does not scale with yours. If you tame a level 1 Boar at level 60, you will end up with a level 1 Boar... at level 60.
  • Different Pet types require different food. Always have some of your pet's favorite food with you!
  • Pet abilities are thaught by taming beasts that already know the ability and then commanding them to use the said ability.
  • Pets can learn new abilities if they have enough Training Points. Pet Training points are gained by a pet based on its level and its loyalty (note that pets are capable of learning just a few pre-designed skills, based on their pet type).
The Best End-Game Hunter Pet types
Wolf
Wolf

Wolf's Furious Howl ability (grants 45-57 extra Damage on the next strike to all party members within 15 yards on a 10-second Cooldown) makes this pet type the best for Raiding. This is because a Wolf can stay on Passive mode in a relatively safe place and still affect the Raid's damage output.

Note: Wolves in Lower Blackrock Spire have the highest Rank of Furious Howl available early in Classic's content. You should try to tame one of them.

Boar
Boar

Boars have a high health pool which allows them to withstand damage and a charge ability that allows them to engage in combat quicker than other pet types, but their overall impact is lower than that of Wolves. 

Note: Boars are great in PvP, however.

Cat
Cat

Cats have very high offensive capabilities - they deal good damage and have high attack speed. On top of that, they have an interrupt ability, which means that they improve Hunter's utility. Sadly, they don't have any ability that would impact their performance while they stay passive, so they are suited mainly for Leveling and PvP.

Note: Broken Tooth, a rare Badlands Cat spawn has the fastest attack speed in the game, which makes him great against Caster enemies. He is Level 37 however, so leveling him up might be problematic if you don't tame him at an appropriate level.

Wind Serpent
Wind Serpent

Similarily to Wolves, Wind Serpents can affect Raid's damage output from a distance. Unlike Wolves, Serpents do not buff your allies, they breathe Lightning Bolts instead! Lightning Breath ability ignores armor, which makes it great against Bosses.

Note: Son of Hakkar is the only Wind Serpent that has access to Rank 6 of the Lightning Breath. He resides in Zul'Gurub, however, which means that he is not available in Phase 1.

Where to get Pre-Raid/Raid BiS Gear

To maximize your DPS, you should aim to assemble the best possible Gear. This applies to both Pre-Raid and each of the Raid Tiers/Phases. Also, remember that it is the ranged armament that gives you the highest DPS boost, so you should start by getting the best Hunter bow available. Below, we present you the BiS (Best-in-slot) list for all equipment slots.

Note1: The list will be updated with new items concurrently with the introduction of new Raids/Phases, so remember to visit this page after the new Raid opens for an update on what current best Hunter items in each slot are.

The Best Hunter Items
Weapon (MH)
  • Pre-Raid - Bone Slicing Hatchet (Drop from Maleki the Pallid, Stratcholme) / Dal'Rend's Sacred Charge (Drop from Warchief Rend Blackhand, Upper Blackrock Spire) 
  • Phase 1 - Brutality Blade (Drop from Garr, Molten Core)
  • Phase 2 - Brutality Blade / High Warlord's Blade/High Warlord's Cleaver (Rank 14 PvP Reward) 
  • Phase 3 - Brutality Blade / High Warlord's Blade/High Warlord's Cleaver 
  • Phase 4 - TBA
  • Phase 5 - TBA
  • Phase 6 - TBA
Weapon (OH)
  • Pre-Raid - Dal'Rend's Tribal Guardian (Drop from Warchief Rend Blackhand, Upper Blackrock Spire) / Bone Slicing Hatchet (Not unique, you can equip two)
  • Phase 1 - Core Hound Tooth (Cashe of the Firelord, Molten Core)
  • Phase 2 - Core Hound Tooth / High Warlord's Blade/High Warlord's Cleaver 
  • Phase 3 - Core Hound Tooth / High Warlord's Blade/High Warlord's Cleaver 
  • Phase 4 - TBA
  • Phase 5 - TBA
  • Phase 6 - TBA
Weapon (TH)
  • Pre-Raid - Barbarous Blade (Drop from King Gordok, Dire Maul North)
  • Phase 1 - MH + OH Dual Wield Combo is recommended / Lok'Delar, Stave of the Ancient Keepers (Quest Reward from "Ancient Petrified Leaf" Hunter Class Quest, Molten Core)
  • Phase 2 - Lok'Delar, Stave of the Ancient Keepers
  • Phase 3 - Lok'Delar, Stave of the Ancient Keepers / Ashkandi, Greatsword of the Brotherhood (Drop from Nefarian, Blackwing Lair) 
  • Phase 4 - TBA
  • Phase 5 - TBA
  • Phase 6 - TBA
Ranged
  • Pre-Raid - Dwarven Hand Cannon (BoE World Drop, can be bought on AH) / Ancient Bone Bow (Drop from various bosses, Scholomance)
  • Phase 1 - Rhok'delar, Longbow of the Ancient Keepers (Reward from Hunter Class Quest started by Ancient Petrified Leaf that is dropped by Majordomo Executus in Molten Core)
  • Phase 2 - Rhok'delar, Longbow of the Ancient Keepers 
  • Phase 3 - Rhok'delar, Longbow of the Ancient Keepers / Ashjre'thul Crossbow of Smiting (Drop from Chromaggus, Blackwing Lair) 
  • Phase 4 - TBA
  • Phase 5 - TBA
  • Phase 6 - TBA
Trinket 1
  • Pre-Raid - Royal Seal of Eldre'Thalas (Quest Reward from "HordeAllianceThe Greatest Race of Hunters", Dire Maul)
  • Phase 1 - Royal Seal of Eldre'Thalas Rune of the Guard Captain (Quest Reward from "HordeJob Opening: Guard Captain of Raventusk Village", The Hinterlands)
  • Phase 2 - Royal Seal of Eldre'Thalas 
  • Phase 3 - Royal Seal of Eldre'Thalas / Blackhand's Breadth
  • Phase 4 - TBA
  • Phase 5 - TBA
  • Phase 6 - TBA
Trinket 2
  • Pre-Raid - Blackhand's Breadth (Quest Reward from "HordeFor the Horde!" / "AllianceGeneral Drakkisath's Demise", Upper Blackrock Spire)
  • Phase 1 - Blackhand's Breadth
  • Phase 2 - Blackhand's Breadth
  • Phase 3 - Drake Fang Talisman (Drop from Ebonroc, Blackwing Lair) 
  • Phase 4 - TBA
  • Phase 5 - TBA
  • Phase 6 - TBA
Neck
  • Pre-Raid - Mark of Fordring (Quest Reward from "In Dreams", Western Plaguelands)
  • Phase 1 - Onyxia Tooth Pendant (Quest Reward from "HordeFor All To See" / "AllianceCelebrating Good Times", Onyxia's Lair)
  • Phase 2 - Onyxia Tooth Pendant
  • Phase 3 - Prestor's Talisman of Connivery (Drop from Nefarian, Blackwing Lair) 
  • Phase 4 - TBA
  • Phase 5 - TBA
  • Phase 6 - TBA
Ring 1
  • Pre-Raid - Tarnished Elven Ring (Contained in Gordok Tribute, Dire Maul) / Blackstone Ring (Drop from Princess Theradras, Maraudon)
  • Phase 1 - Quick Strike Ring (Drop from Magmadar, Garr, Baron Geddon, and Golemagg the Incinerator, Molten Core)
  • Phase 2 - Don Julio's Band (Alterac Valley Reputation Reward - Exalted) 
  • Phase 3 - Don Julio's Band / Master Dragonslayer's Ring (Quest reward from "HordeThe Lord of Blackrock" / "AllianceThe Lord of Blackrock", Blackwing Lair)
  • Phase 4 - TBA
  • Phase 5 - TBA
  • Phase 6 - TBA
Ring 2
  • Pre-Raid - Tarnished Elven Ring Painweaver Band (Drop from General Drakkisath, Upper Blackrock Spire)
  • Phase 1 - Band of Accuria (Drop from Ragnaros, Molten Core)
  • Phase 2 - Band of Accuria 
  • Phase 3 - Band of Accuria 
  • Phase 4 - TBA
  • Phase 5 - TBA
  • Phase 6 - TBA
Head
  • Pre-Raid - Blackwood Helm (Quest reward from "HordeAllianceThe Treasure of the Shen'dralar", Dire Maul) / Mask of the Unforgiven (Drop from The Unforgiven, Stratholme)
  • Phase 1 - Giantstalker's Helmet (Drop from Garr, Molten Core) / Dragonstalker's Helm (Drop from Onyxia, Onyxia's Lair)
  • Phase 2 - Field Marshal's Chain Chelm/Warlord's Chain Helmet (Rank 13 PvP Reward) / Dragonstalker's Helm
  • Phase 3 - Field Marshal's Chain Chelm/Warlord's  / Dragonstalker's HelmChain Helmet 
  • Phase 4 - TBA
  • Phase 5 - TBA
  • Phase 6 - TBA
Chest
  • Pre-Raid -  Savage Gladiator Chain (Drop fromGorosh the Dervish, Blackrock Depths)
  • Phase 1 - Giantstalker's Breastplate (Drop from Golemagg the Incinerator, Molten Core)
  • Phase 2 - Giantstalker's Breastplate / Field Marshal's Chain Breastplate/Warlord's Chain Chestpiece (Rank 13 PvP Reward) 
  • Phase 3 - Field Marshal's Chain Breastplate/Warlord's Chain Chestpiece / Dragonstalker's Breastplate (Drop from Nefarian, Blackwing Lair) 
  • Phase 4 - TBA
  • Phase 5 - TBA
  • Phase 6 - TBA
Legs
  • Pre-Raid - Devilsaur Leggings (Created by Leatherworking, Recipe can be dropped in Un'Goro Crater)
  • Phase 1 - Giantstalker's Leggings (Drop from Magmadar, Molten Core)
  • Phase 2 - Marshal's Chain Legguards/General's Chain Legguards 9Rank 12 PvP Reward) 
  • Phase 3 - Dragonstalker's Legguards (Drop from Ragnaros, Molten Core) / Marshal's Chain Legguards/General's Chain Legguards
  • Phase 4 - TBA
  • Phase 5 - TBA
  • Phase 6 - TBA
Gloves
  • Pre-Raid - Devilsaur Gauntlets (Created by Leatherworking, Recipe can be bought from NPC Nergal, Un'Goro Crater)
  • Phase 1 - Giantstalker's Gloves (Drop from Shazzrah, Molten Core)
  • Phase 2 - Giantstalker's Gloves / Marshal's Chain Grips/General's Chain Gloves (Rank 12 PvP Reward) 
  • Phase 3 - Dragonstalker's Gauntlets (Drop from Flamegor, Firemaw, and Ebonroc, Blackwing Lair) Marshal's Chain Grips/General's Chain Gloves
  • Phase 4 - TBA
  • Phase 5 - TBA
  • Phase 6 - TBA
Boots
  • Pre-Raid - Beaststalker's Boots (Drop from Nerub'enkan, Stratcholme)
  • Phase 1 - Giantstalker's Boots (Drop from Gehennas, Molten Core)
  • Phase 2 - Giantstalker's Boots / Marshal's Chain Boots/General's Chain Boots (Rank 12 PvP Reward) 
  • Phase 3 - Marshal's Chain Boots/General's Chain Boots / Dragonstalker's Greaves (Drop from Broodlord Lashlayer, Blackwing Lair) 
  • Phase 4 - TBA
  • Phase 5 - TBA
  • Phase 6 - TBA
Shoulders
  • Pre-Raid - Truestrike Shoulders (Drop from Pyroguard Emberseer, Upper Blackrock Spire)
  • Phase 1 - Giantstalker's Epaulets (Drop from Sulfuron Harbinger, Molten Core)
  • Phase 2 - Giantstalker's Epaulets / Field Marshal's Chain Spaulders/Warlord's Chain Shoulders (Rank 13 PvP Reward) 
  • Phase 3 - Dragonstalker's Spaulders (Drop from Chromaggus, Blackwing Lair) Field Marshal's Chain Spaulders/Warlord's Chain Shoulders
  • Phase 4 - TBA
  • Phase 5 - TBA
  • Phase 6 - TBA
Wrists
  • Pre-RaidBraces of the Eclipse (Drop from Prince Tortheldrin, Dire Maul West) / Deepfury Bracers (BoE World Drop, can be bought on AH)
  • Phase 1 - Giantstalker's Bracers (Trash Mobs (BoE), Molten Core)
  • Phase 2 - Giantstalker's Bracers
  • Phase 3 - Dragonstalker's Bracers (Drop from Razorgore the Untamed, Blackwing Lair) 
  • Phase 4 - TBA
  • Phase 5 - TBA
  • Phase 6 - TBA
Belt
  • Pre-Raid - Warpwood Binding (Drop from Tendris Warpwood, Dire Maul West)
  • Phase 1 - Giantstalker's Belt (Trash Mobs (BoE), Molten Core)
  • Phase 2 - Giantstalker's Belt
  • Phase 3 - Dragonstalker's Belt (Drop from Vaelestrasz the Corrupt, Blackwing Lair) 
  • Phase 4 - TBA
  • Phase 5 - TBA
  • Phase 6 - TBA
Back
  • Pre-Raid - Cape of the Black Baron (Drop from Baron Rivendare, Stratholme)
  • Phase 1 - Cape of the Shrouded Mists (Drop from Ragnaros, Molten Core)
  • Phase 2 - Cape of the Shrouded Mists / Puissant Cape (Drop from Azuregos, Azshara World Boss)
  • Phase 3 - Cape of the Shrouded Mists / Puissant Cape / Cloak of Firemaw (Drop from Firemaw, Blackwing Lair)
  • Phase 4 - TBA
  • Phase 5 - TBA
  • Phase 6 - TBA


The Best Enchants and Consumables

Proper enchants and consumables will greatly increase your Damage output. While getting enchants is a one-time-deal, farming consumables might be a real chore, but it is still worth it as numbers clearly show.

The Best Enchants
Weapon (1H) Enchant Weapon - Agility; as soon as it becomes available / Enchant Weapon - Superior Striking (+5 Weapon Damage)
Weapon (TH) Enchant Weapon - Major Intellect (+9 Intellect)
Weapon (Ranged) Enchant Weapon - Crusader (Chance to gain +125 Strength for 15 sec.) / Enchant Weapon - Agility; as soon as it becomes available
Head Lesser Arcanum of Voracity (+8 Agility, available from Libram of Voracity Quest in Burning Steppes)
Chest Enchant Chest - Greater Stats (+4 to all stats)
Legs Lesser Arcanum of Voracity (+8 Agility, available from Libram of Voracity Quest in Burning Steppes)
Hands Enchant Gloves - Greater Agility (+ 7 Agility)
Feet Enchant Boots - Enchant Boots - Greater Agility (+7 Agility)
Shoulders Chromatic Mantle of the Dawn (+5 to all Resistances)
Wrists Enchant Bracer - Minor Agility (+1 Agility)
Back Enchant Cloak - Lesser Agility (+3 Agility)

The Best Consumables
Flask of Distilled Wisdom
+2000 maximum Mana for 2 hours; effect persists through death. Created by Alchemy. The recipe can be dropped from Balnazzar, Stratcholme. 
Elixir of the Mongoose
+25 Agility and +2% Critical Strike Chance for 60 minutes. It can be bought on AH or directly from an Alchemist.
Cerebral Cortex Compound
+25 Intellect for 1 hour. Obtained from "Infallible Mind" repeatable Quest, Blasted Lands
Juju Might
Juju Might
+40 Attack Power for 10 minutes. Reward from a reputable Quest available from NPC Witch Doctor Mau'ari, Everlook, Winterspring.
Winterfall Firewater
+35 Attack Power for 20 minutes. Drop from Winterfall Furbolgs in Winterpring (this is an alternative for JuJu Might, as the effects don't stack).
Major Mana Potion
Major Mana Potion
Restores 1350 to 2250 Mana. Created by Alchemy. Recipe drops from various high-level mobs, elites, and Bosses.
Demonic Rune
Demonic Rune
Restores 1356 mana at the cost of 862 life. Drop from Demons in Azshara, Felwood, and Blasted Lands (Satyrs and Fel Guards).
Grilled Squid
Grilled Squid
+10 Agility for 10 minutes. Created by Cooking, Raw Squids can be fished, but only during Winter.
Brilliant Mana Oil
Brilliant Mana Oil

+12 Mp5 and +25 Healing Power for 30 minutes. Created by Enchanting. This is applied to a Weapon.

Note: You can also use much cheaper Lesser Mana Oil


Rotations

In Classic, Hunter's rotation revolves around maximizing Auto Shot usage. In most situations, you will want to use your Abilities between your Auto Shots, without clipping into them; if your Auto Shot is off cooldown, you should use your Ability AFTER a shot is fired.

Note: The exception from the Auto Shot rule, in some situations, is the Aimed Shot - it is actually better for you DPS if you use Aimed Shot immediately after it comes off cooldown if you have a fast Ranged Weapon Equipped (Faster than 3.00 Speed)

Please use the following Rotation for sustained Single-Target Damage output:

  1. Auto Shot
Auto Shot
  1. Cast Aimed Shot
Aimed Shot
  1. Auto Shot
Auto Shot
  1. Cast Multi-Shot
Multi-Shot
  1. Auto Shot
Auto Shot
  1. Free Global Cooldown
 
  1. Cast Aimed Shot on Cooldown (with a fast Weapon) or after your next Auto Shot (with a slow Weapon)
Aimed Shot / Auto Shot ⇒ Aimed Shot
Hunter does not have an AoE Rotation per se; In AoE situation cast Volley and continue with your Single-Target Rotation.


Tips and Tricks for aspiring Hunter Raiders

  1. If you want to deal more Damage and stand out from your Raid competition, Stack Consumables. Spending some additional Gold or a few extra hours grinding might secure you a spot in a Raid, as Raid leaders prefer dedicated and well-prepared players.
  1. You can use your Rotation's free Global Cooldown to weave in a Raptor Strike. This will require you to stand near the melee range so that you can quickly close the distance, Cast Raptor Strike and disengage from melee (remember that minimal Ranged Attack distance is 8 yards).
  1. Use Auto Shot Macro. This way, spamming your Auto Shot Hotkey will not cancel it.
    #showtooltip Auto Shot
    /cleartarget [dead]
    /targetenemy [noharm]
    /cast !Auto Shot
  1. Use the Auto Shot Timer / Weapon Swing Timer addon. It will show you when your Auto Shot will trigger and enable you to maximize your DPS by timing your abilities correctly.
  1. Always try to improve. Get an addon that tracks your performance and try to optimize your equipment and rotation.


END NOTE

This Guide should help you to prepare yourself for that legendary Vanilla Raiding Experience and allow you to progress through Raid Tiers efficiently and with a good amount of fun.

We hope that you have found this guide useful and informative.  If we have missed a piece of information that is important to you, please let us know! 

Please do note that this is an early version of our guide, and we will be happy to receive constructive criticism, that will help us improve it, so leave your suggestions in the comments section below.


Pictures used in this article are the intellectual property of Blizzard Entertainment Inc.