
Shrapnel Ballista Hierophant
A build that uses Replica Iron Commander to summon 20 Ballista Totems by stacking the Strength AttributeStrength-stacking Shrapnel Ballista
Hierophant Build
Updated for Patch 3.26
The Best Crafty Guides by Odealo
| Guide notes | |||
| July 28, 2023 -Build created June 24, 2025 -Updated for Patch 3.26 |
|||
| Build overview | |||
| Tags: [TOTEM] [RANGED] [CHAOS] [LIFE] | |||
|
Budget: Defenses: |
|
Boss DPS: AoE: |
|
You may be familiar with the Iron Commander Bow, an item that lets you place more Siege Ballistas the more Dexterity you have (for example, from our Siege Ballista Hierophant Guide). This build is in a lot of ways similar to the one using it, but here we've selected the Replica version of the aforementioned Bow instead. Now, you're able to place more Shrapnel Ballistas the more Strength you have. Shrapnel Ballistas are good against single targets, they fire multiple arrows in a cone, each Arrow capable to Hit the same enemy as the other Arrwos from the same Ballista. This is an exception as most of the skills cannot "shotgun". It is why this build is particularly good against bosses, especially if a Totem fires multiple Arrows. It is then improved by Vengeant Cascade - all the fired Projectiles will return to you hitting the enemy once again. Aim for 2000 to 3000 Strength so that you can summon around 20 of these Ballistas.
We've selected hierophant because of the Ritual of Awakening and Pursuit of Faith Keystones. With these, you can place these Totems really fast, they last longer, and you gain Mana Regeneration, Life Regeneration, and 5% more Damage per Totem, meaning you can simply gain 100% more damage with one Keystone. With notables like Surveillance and Ironwood, you can deal even more damage and gain 3000 flat Armour, as these notable passives scale up with the number of Totems as well, which is exceptionally good here. As is the case with most Strength-stacking builds, you will need Replica Alberon's Warpath boots for added Chaos Damage per Strength, Iron Will Keystone to make the Strength Attack Damage bonus apply to Spell Damage too, and Crown of Eyes to apply this increase in Spell Damage apply to Attack Damage at 150% of its value.
You can also check our other Path of Exile builds right over here Odealo's Crafty Guides - Full List
1. Gameplay
Set up your Totems, they're your only significant damage source. Don't forget to use Frenzy frequently to generate Frenzy Charges. Sniper's Mark and Ensaring Arrow will be cast automatically, which significantly improves your DPS. For a Guard Spell use Molten Shell and for Movement Skill - Flame Dash. As your Auras, choose Determination, Precision, and Purity of Elements.
|
|
|
|

2. Build's PROS & CONS
| PROS |
|
| CONS |
|
3. Leveling tips
To level up efficiently, use our Templar Leveling Guide using Totems. It is a very efficient way to level up using Spell Totems, which is the preferable and most optimal route. The build is only good around level 80 or 90.
Bandits:
Kill all three bandits and be rewarded with two additional Skill Points
Leveling Skill Trees:
31 Points Passive Tree
Head for the Ancestral Bond Keystone as shown
58 Points Passive Tree
Allocate Maximum Life, Mana Reservation Efficiency, and in our case - Fire Damage to use alongside Holy Flame Totem.
4. Final Skill Tree, Ascendancy Points, and Pantheon
Final Skill Tree:
96 Points Final Passive Tree (doesn't include Cluster Jewels)
121 Points Path of Building (PoB) link
Ascendancy points:
Preferably in that order:
- Pursuit of Faith
- Ritual of Awakening
- Conviction of Power
- Divine Guidance
Pantheon:
Major God: Soul of Solaris: 6% additional Physical Damage Reduction while there is only one nearby Enemy; 20% chance to take 50% less Area Damage from Hits
Minor God: Soul of Yugul: 50% chance to Reflect Hexes, You and your Minions take 50% reduced Reflected Damage; 30% reduced Effect of Curses on you
5. Final Gems links
| [DPS] Shrapnel Ballista setup | |
 |
Shrapnel Ballista - You will be able to place around 20 of these, each capable of hitting a single enemy with more than one projectile from a single skill use. It has a short range. |
 |
Withering Touch Support - Hits apply Wither, a stacking debuff that increases Chaos Damage taken. |
 |
Chain Support - Attack chains, which increases your clear speed. For boss fights you should replace it with Volatility Support. |
 |
Increased Critical Strikes Support - Increases your Critical Strike Chance, which results in more damage. |
 |
Void Manipulation Support - Grants more Chaos Damage, and inability to deal Elemental Damage, which you can't deal anyway. |
 |
Lifetap Support - The Skill costs Life instead of Mana and deals more damage. |
| [UTILITY] Frenzy setup | |
 |
Frenzy - Frenzy grants Frenzy Charge on Hit, but also serves multiple other functions in here. |
| Cast on Critical Strike Support - It will trigger linked Spells on Critical hit, which is often. | |
 |
Summon Ice Golem - Extra Accuracy and Critical Strike Chance while it is alive. |
 |
Greater Multiple Projectiles Support - Use to fire extra projectiles and hit more enemies. |
|
Lifetap Support |
 |
Despair - A Hex that lowers Chaos Resistance. Be sure you can apply an additional Curse via Whispers of Doom or other means. |
| [UTILITY] Mana-reserving setup | |
 |
Determination - Adds and increases Armour to reduce Physical Damage taken. |
 |
Precision - Increases Critical Strike Chance and Accuracy Rating, both are important. |
 |
Purity of Elements - Grants extra Elemental Resistances, and immunity to all Elemental Ailments. Anomalous one grants increased Resistances. |
 |
Enlighten Support - Linked Skills reserve less Mana. |
| [UTILITY] Curse setup | |
 |
Sniper's Mark - Projectiles split on impact against the marked enemy, which receives increased Projectile Damage |
 |
Mark on Hit Support - Linked Mark is applied automatically against Rare or Unique enemies. |
| [UTILITY] Ensnaring Arrow setup | |
 |
Ensnaring Arrow - Ensnares enemies so that they take increased Projectile damage and have reduced Movement Speed. |
 |
Manaforged Arrows Support - Ensnaring Arrow is cast automatically after spending a certain amount of Mana, but only if your Frenzy is NOT linked with Lifetap Support, you have to spend Mana no it, not Life. |
| [UTILITY] Molten Shell | |
 |
Molten Shell - A Guard Spell that mitigates a portion of incoming Hit Damage. it scales up with Armour. |
 |
Automation - It'll cast linked instant Spells for you. |
 |
Withering Step - Makes you fast, Elusive, and applies Withered debuff on nearby enemies. |
 |
Blood Rage - At the cost of your Life it increases your Attack Speed. |
| [MOBILITY] Flame Dash | |
 |
Flame Dash - A simple Movement Skill to dodge or move faster. It's optional. |
|
|
6. Gear Setup
It's a Strength-stacking build, so definitely focus on gathering this Attribute. Obviously, make sure that your Resistances are capped, and that you have at least positive Chaos Resistance. Try to also gain Armour and Maximum Life, maybe Life Regeneration. For more damage get Critical Strike Chance, Attack Speed, and of course Strength. Crit Multiplier is redundant as you wear Maligaro's Virtuosity. You will be wearing a lot of Unique items, only your Quiver and Jewelry will be of rare rarity, and it is mostly where you will be able to get Attributes and Resistances. Jewels will be important too, Rare as well as Unique ones. Some extra Dexterity, Intelligence, and Accuracy will probably be needed to run this build.
Our recommended items will:
- Cap your resistances at 75%
- Provide you with enough DPS and Life to start mapping
|
Stat priorities on items:
|
 (Helmet) Crown of Eyes - Crown of Eyes is a massive upgrade. The Spell Damage gained from Iron Will will be once again transformed into Attack Damage at 150% of its value. (Helmet) Crown of Eyes - Crown of Eyes is a massive upgrade. The Spell Damage gained from Iron Will will be once again transformed into Attack Damage at 150% of its value. |
|
| +(300-350) to Accuracy Rating (120-150)% increased Energy Shield -30% to Fire Resistance (0.4-0.8)% of Attack Damage Leeched as Life (0.2-0.4)% of Attack Damage Leeched as Mana Increases and Reductions to Spell Damage also apply to Attacks at 150% of their value |
|
| Helmet enchantments: Shrapnel Ballista fires an additional Arrow |
|
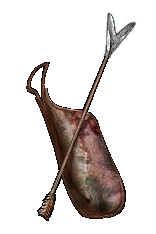
 (Weapon) Replica Iron Commander - The key to this build. It allows you to summon more Shrapnel Ballista Totems the more Strength you have. (Weapon) Replica Iron Commander - The key to this build. It allows you to summon more Shrapnel Ballista Totems the more Strength you have. |
|
| (30-50)% increased Critical Strike Chance Adds (8-12) to (16-24) Physical Damage (14-20)% increased Attack Speed (14-20)% increased Totem Life (14-20)% increased Totem Placement speed Shrapnel Ballista has +1 to maximum number of Summoned Totems per 200 Strength Adds 1 to 3 Physical Damage to Attacks per 25 Strength |
|
 (Off-hand) Rare Quiver - Quiver may be a source of offensive, as well as defensive modifiers. You can get here Maximum Life with Resistances or Critical Strike Modifiers. and of course Strength. (Off-hand) Rare Quiver - Quiver may be a source of offensive, as well as defensive modifiers. You can get here Maximum Life with Resistances or Critical Strike Modifiers. and of course Strength. |
|
| Min. requirements: +80 to maximum Life 50 Strength Optional affixes: increased Strength (Synthesised Implicit) Critical Strike Chance with Bows Elemental Resistances |
|
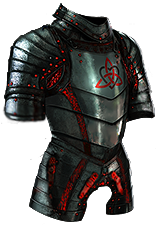 (Body Armour) The Iron Fortress - With enough Strength, The Iron Fortress provides you with a lot of Block Chance. It improves your Maximum Life, Armour, and Strength. (Body Armour) The Iron Fortress - With enough Strength, The Iron Fortress provides you with a lot of Block Chance. It improves your Maximum Life, Armour, and Strength. |
|
| +1% Chance to Block Attack Damage per 50 Strength Chance to Block Spell Damage is Unlucky +(60-120) to Strength (80-100)% increased Armour 10% reduced Movement Speed Strength's Damage Bonus instead grants 3% increased Melee Physical Damage per 10 Strength |
|
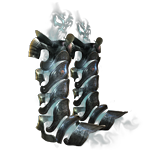 (Boots) Replica Alberon's Warpath - Another key component of the build. It adds Chaos Damage to Attack per Strength and disables any other type of damage. (Boots) Replica Alberon's Warpath - Another key component of the build. It adds Chaos Damage to Attack per Strength and disables any other type of damage. |
|
| (15-18)% increased Strength +(180-220) to Armour +(13-19)% to Chaos Resistance 25% increased Movement Speed Cannot deal non-Chaos Damage Adds 1 to 80 Chaos Damage to Attacks per 80 Strength |
|
 (Gloves) Maligaro's Virtuosity - Use these Gloves for their high and fixed Crit Multiplier, Crit Chance, Attack Speed, and Dexterity. Now keep in mind that you won't need Crit Multiplier at all. These Gloves are cheap so get a good Corrupted copy. (Gloves) Maligaro's Virtuosity - Use these Gloves for their high and fixed Crit Multiplier, Crit Chance, Attack Speed, and Dexterity. Now keep in mind that you won't need Crit Multiplier at all. These Gloves are cheap so get a good Corrupted copy. |
|
| +(20-30) to Dexterity 5% increased Attack Speed 50% increased Global Critical Strike Chance (60-80)% increased Evasion Rating Your Critical Strike Multiplier is 300% |
|
 (Belt) Rare Belt - On the Belt, get Strength, Maximum Life, and Resistances. You could also aim for the Synthesised Implicit for increased Attributes or increased Strength. (Belt) Rare Belt - On the Belt, get Strength, Maximum Life, and Resistances. You could also aim for the Synthesised Implicit for increased Attributes or increased Strength. |
|
| Min. requirements: +90 to maximum Life 60 Strength increased Strength (Synthesised Implicit) +50% to Elemental Resistances Optional affixes: Flask modifiers increased Damage increased Maximum Life |
|
 (Amulet) Eyes of the Greatwolf - Here, you could get two extremely good modifiers. The best ones are increased Attributes, Chaos Damage, Damage, or Maximum Life. (Amulet) Eyes of the Greatwolf - Here, you could get two extremely good modifiers. The best ones are increased Attributes, Chaos Damage, Damage, or Maximum Life. |
|
| <Two random talisman implicit modifiers> Implicit Modifier magnitudes are doubled Corrupted |
|
 (Amulet) Rare Amulet - An Amulet can increase your Strength with its Sythesised Implicit or Warlord's Suffix, where you can also get a modifier for increased Damage per Strength. Other than that, get flat Strength, Resistances, and Maximum Life. (Amulet) Rare Amulet - An Amulet can increase your Strength with its Sythesised Implicit or Warlord's Suffix, where you can also get a modifier for increased Damage per Strength. Other than that, get flat Strength, Resistances, and Maximum Life. |
|
| Min. requirements: +90 to Maximum Life 60 Strength Optional affixes: increased Strength (Synthesised Implicit) Attributes Global Critical Strike Chance 1% increased Damage per 15 Strength increased Attack Speed |
|
| Recommended Anointments: Vengeant Cascade |
|
 (Ring) Rare Rings - It's a simple case - accumulate as many Attributes and Resistances as you can. For Prefixes, look for Maximum Life. Buying a Cogwork Ring would be a bright idea. (Ring) Rare Rings - It's a simple case - accumulate as many Attributes and Resistances as you can. For Prefixes, look for Maximum Life. Buying a Cogwork Ring would be a bright idea. |
|
| Min. requirements: +90 to Maximum Life +50% Total Elemental Resistances 60 Strength Optional affixes: Chaos Resistance Global Critical Strike Chance Attributes |
|
 (Jewel) Rare Jewels - Here we recommend gaining Maximum Life with Strength, mixed with some other Attributes you're lacking. (Jewel) Rare Jewels - Here we recommend gaining Maximum Life with Strength, mixed with some other Attributes you're lacking. |
|
| Recommended affixes: Maximum Life Resistances Mana Reservation Efficiency Reduced Mana Cost of SKills Critical Strike Chance Attributes |
|
 (Jewel) Large Cluster Jewel - Get two of these Large Cluster Jewels with bonuses to Strength and increased small nodes' effect. You can also fit it in another attribute or Resistance here. (Jewel) Large Cluster Jewel - Get two of these Large Cluster Jewels with bonuses to Strength and increased small nodes' effect. You can also fit it in another attribute or Resistance here. |
|
| Recommended affixes: Added Small Passive Skills have 35% increased Effect Added Small Passive Skills also grant: +8 to Strength Added Small Passive Skills also grant: +4 to All Attributes |
|
 (Jewel) Medium Cluster Jewel - Here, get Ancestral Reach to increase Totem Placement Speed, Damage, and Placement Range. Sleepless Sentries notable increases Totem Duration and gives you Onslaught after placing one. (Jewel) Medium Cluster Jewel - Here, get Ancestral Reach to increase Totem Placement Speed, Damage, and Placement Range. Sleepless Sentries notable increases Totem Duration and gives you Onslaught after placing one. |
|
| Recommended affixes: 1 Added Passive Skill is Ancestral Reach 1 Added Passive Skill is Sleepless Sentries |
|
 (Jewel) Lethal Pride - Passives around this Jewel will grant extra Strength. Also, aim to enrich your notables with increased Strength. (Jewel) Lethal Pride - Passives around this Jewel will grant extra Strength. Also, aim to enrich your notables with increased Strength. |
|
| Commanded leadership over (10000-18000) warriors under (Akoya-Kaom-Rakiata) Passives in radius are Conquered by the Karui Historic |
|
 (Jewel) Split Personality - Another great opportunity to obtain more Strength. The other modifiers, besides Strength, could increase your Maximum Life or Accuracy Rating. (Jewel) Split Personality - Another great opportunity to obtain more Strength. The other modifiers, besides Strength, could increase your Maximum Life or Accuracy Rating. |
|
| This Jewel's Socket has 25% increased effect per Allocated Passive Skill between it and your Class' starting location <Two random modifiers> |
|
 (Jewel) Rain of Splinters - Extra Projectiles will massively increase your Damage, as we've established already, multiple projectiles can hit one enemy. (Jewel) Rain of Splinters - Extra Projectiles will massively increase your Damage, as we've established already, multiple projectiles can hit one enemy. |
|
| (50-30)% reduced Totem Damage Totems fire 2 additional Projectiles Corrupted |
|
 (Jewel) Emperor's Might - It is a minor improvement to your Strength for its cost, but a notable one nonetheless. (Jewel) Emperor's Might - It is a minor improvement to your Strength for its cost, but a notable one nonetheless. |
|
| 10% increased Damage 3% increased Character Size (4-6)% increased Strength |
|
  (Jewel) Forbidden Flame & Flesh - Righteous Providence seems like a great addition - it adds 50 Strength and intelligence to then boost your Crit Chance per intelligence point, which is around 200 or 300. (Jewel) Forbidden Flame & Flesh - Righteous Providence seems like a great addition - it adds 50 Strength and intelligence to then boost your Crit Chance per intelligence point, which is around 200 or 300. |
|
| Allocates <Random Ascendancy Notable> if you have the matching modifiers on Forbidden Flesh Allocates <Random Ascendancy Notable> if you have the matching modifiers on Forbidden Flame |
|
 (Jewel) Watcher's Eye - On a Watcher's Eye you may go for the Chaos Resistance from Purity of Elements, or Precision's Attack Speed/Crit Chance. (Jewel) Watcher's Eye - On a Watcher's Eye you may go for the Chaos Resistance from Purity of Elements, or Precision's Attack Speed/Crit Chance. |
|
| (4-6)% increased maximum Energy Shield (4-6)% increased maximum Life (4-6)% increased maximum Mana <Two or Three random aura modifiers> |
|
 (Flask) Dying Sun - Allows you to fire more Projectiles, which in turn results in more damage and better clear speed. It also reduces Fire Damage Taken which is often useful. (Flask) Dying Sun - Allows you to fire more Projectiles, which in turn results in more damage and better clear speed. It also reduces Fire Damage Taken which is often useful. |
|
| +50% to Fire Resistance 20% less Fire Damage taken (125-150)% increased Charges per use (60-40)% less Duration (10-20)% increased Area of Effect during Effect Skills fire 2 additional Projectiles during Effect |
|
|
Suggested Flasks:
|
|
    |
|
|
If you have any other build requests please leave that in the comments below. We are always open to suggestions and constructive feedback.
Pictures used in this article are the intellectual property of Grinding Gear Games.
