Vortex Cast on Frostbolt Saboteur Build
Vortex Cast on Frostbolts Saboteur - presumably the strongest build on OdealoVortex Cast on Frostbolt
Saboteur Build
Updated for Patch 3.22
The Best Crafty Guides by Odealo
| Guide notes |
| November 16, 2022 - Build created |
| Build overview | |||
| Tags: [CASTER] [ELEMENTAL] [LIFE] [LOW LIFE] | |||
|
Budget: Defenses: |
|
Boss DPS: AoE: |
|
Frostbolt is one of the most basic Spells in the game. It's a bubble that deals Cold Damage. It has, however, one peculiar feature - it's able to Cast Vortex (or Ice Nova) from where the Projectile currently is, consuming it in the process. Cast like this, the Vortex has less Area of Effect, but you can have five of them up at once, given there are enough Frostbolts to "detonate". It is a clear synergy that allows to magnify the initial Hit Damage of Vortex. By casting a large number of Frostbolts and managing to stack them up over a single target you can quickly deliver tons of damage, melting bosses instantly. To do so, you need to reduce the Projectile Speed of Frostbolts using the Divergent Quality Skill Gem, they're nearly stationary this way. For mapping, we would recommend swapping it for the regular Quality. The build has low Cast Speed, but you can bypass this obstacle by Casting Frostbolts while Channelling Scorching Ray and investing in Cooldown Recovery Rate instead. This Fire Spell applies a powerful Fire Exposure that synergizes with Fire Damage sourced from the Heatshiver Helmet.
Saboteur is the ascendancy we would recommend. Like Clockwork increases Cooldown Recovery Rate, Bomb Specialist grants more damage and reduces damage taken, while Explosives Expert grants tons of Crit Chance, Crit Multiplier, and Elemental Penetration. Cooldown Recovery Rate is very important in this build, it lets us cast Frostbolts with higher frequency and Cast Vortex faster as well. It's also a Crit build with a very high Critical Strike Chance and Multiplier. It's good for damage and applying Elemental Ailments more reliably. The Annihilating Light and Heatshiver on a Low Life character may sound bad in terms of defenses, but the build is surprisingly durable. It uses Petrified Blood with Life Leech, Life Recoup, and Life Regeneration to take much less Hit Damage, while also employing the Divine Flesh Keystone and The Fourth Vow Body Armour. With high Armour, it severely reduces all types of Damage, given your Chaos Resistance is capped. Born in the Shadows passive reduces the damage taken by another 15%. It has no trouble with Mana Regeneration as it uses Eldritch Battery - ES is useless with Divine Flesh anyway. It creates an opportunity to host one additional temporary Aura that is Hatred in our case.
You can also check our other Path of Exile builds right over here Odealo's Crafty Guides - Full List
1. Gameplay
Cast Scorching Ray to spawn Frosbolts and apply Fire Exposure. After some time, cast Vortex to "detonate" all the bubbles. It should Freeze bosses resulting in tons of Cold and Fire Damage. For more damage activate Vaal RF. Assassin's Mark and Elemental Weakness should be cast automatically on Stun. Select Flame Dash as the movement ability and Immortal Call for a Guard Spell. For passive Skills select Hatred, Zealotry, Determination, Vitality, Defiance Banner, and Petrified Blood.
|
|
|
|

2. Build's PROS & CONS
| PROS |
|
| CONS |
|
3. Leveling tips
Follow our Shadow Leveling Guide using Traps. You have to start as a different build, this one requires good gear to be comparable to a regular Ice Trap build. It's not a good starter, and its clear speed is also not that great. After you've gathered all the required items and Gems switch to this version around level 90.
Bandits:
When dealing with the bandits, kill all of them for two extra Passive Skill Points.
4. Final Skill Tree, Ascendancy Points, and Pantheon
Final Skill Tree:
106 Points Final Skill Tree (doesn't include Unique nor Cluster Jewels)
123 Points Path of Building (PoB) link
Ascendancy points:
Preferably in that order:
- Bomb Specialist
- Explosives Expert
- Born in the Shadows
- Like Clockwork
Pantheon:
Major God: Soul of Solaris: 6% additional Physical Damage Reduction while there is only one nearby Enemy; 20% chance to take 50% less Area Damage from Hits
Minor God: Soul of Shakari: You cannot be Poisoned while there are at least 3 Poisons on you; 50% less Duration of Poisons on You
5. Final Gems links
| [DPS] Vortex setup | |
 |
Vortex - Vortex will be cast on your Frostbolt Projectiles. It deals high initial damage which is the main focus here. The Divergent one is the best, it has an increased Cooldown Recovery Rate at the cost of Duration which we don't need anyway. Use it after releasing Frostbolts. |
 |
Empower Support - Increases the Gem level of Vortex which results in more damage. |
 |
Hypothermia Support - Use for more Cold Damage against Chilled enemies. The Divergent variant reduces Cold Resistance. |
 |
Concentrated Effect Support - Grants more Area Damage but reduces Area of Effect. |
 |
Added Cold Damage Support - Adds flat Cold Damage. Use the Awakened version for +1 to the Gem Level of Vortex. |
 |
Increased Critical Damage Support - Use it for extra Critical Strike Multiplier. |
| [UTILITY] Frostbolt and Scorching Ray setup | |
 |
Frostbolt - A Piercing Projectile that deals Cold damage. You can "detonate" it by casting Vortex. Divergent Quality is mandatory, it slows down Projectiles so that you can stack many of them over the enemy. |
 |
Scorching Ray - Use Anomalous Scorching Ray to deal low damage and Channel Frostbolts. It also applies a powerful Fire Exposure - half of the damage dealt to Frozen enemies is Fire Damage with Heastshiver. |
 |
Cast While Channelling Support - You have low Cast Speed but a high Cooldown Recovery Rate, so casting These Frostbolts with a Channeling Skill is the best option. |
 |
Power Charge on Critical Support - An Anomalous PCoC will generate Power Charges for your character. |
 |
Enhance Support - Enhance Skill Gems to lower the Projectile Speed of Frostbolt further. |
 |
Greater Multiple Projectiles Support - Allows you to fire more Projectiles to activate more Vortexes with them. |
| [UTILITY] Auras setup | |
 |
Zealotry - Zealotry increases the Critical Strike Chance for Spells and Spell Damage. Hits against Unique enemies may create Consecrated Ground. |
 |
Determination - Adds and increases Armour to mitigate Physical Hit Damage. |
 |
Petrified Blood - It's good on Low-Life builds such as this one. It's used to shift a portion of incoming Hit Damage to be taken as DoT. |
| [UTILITY] Cast when Stunned setup | |
 |
Cast when Stunned Support - Most Hits will Stun the character due to the low Stun Threshold. It will trigger linked Spells if that happens. |
 |
Elemental Weakness - Lowers all Elemental Resistances resulting in more DPS. You're dealing Cold and Fire Damage due to the Heatsiver. |
 |
Assassin's Mark - Hits against an enemy Marked with Assassin's Mark are more likely to be Critical. Such Crits have increased Crit Multiplier. |
 |
Immortal Call - Consumes Endurance Charger to significantly lower Physical and Elemental Damage taken. |
| [UTILITY] Defiance Banner | |
 |
Defiance Banner - Increases Armour and Evasion. Nearby enemies have reduced Critical Strike Chance. |
| [UTILITY] Hatred setup | |
 |
Hatred - Simply grants more Cold Damage. |
 |
Divine Blessing - Hatred is a temporary Aura that reserves no Mana. You can afford to cast it with the Eldritch Battery Keystone. |
| [MOBILITY] Flame Dash | |
 |
Flame Dash - Flame Dash is a simple mobility Spell to avoid damage and move faster. You can swap it for  Vaal Righteous Fire - it grants you more Spell Damage. Vaal Righteous Fire - it grants you more Spell Damage. |
| [UTILITY] Vitality | |
 |
Vitality - Grants some flat Life Regeneration. |
|
|
6. Gear Setup
It's a build that makes use of quite a few Unique Items, most notably Heatshiver, The Annihilating Light, The Fourth Vow, and Ashes of the Stars. They're reasonably priced, and Ashes is not mandatory, it's just way better than anything else. Some of the Unique Jewels are valuable too, but ultimately the build functions without them. The Staff reduces your Elemental Resistances by 60% so be sure to have tons of them on your Rare gear. You will also need 80% Chaos Resistance due to the Divine Flesh and Body Armour combo. Armour is important too, it's all required to make this build durable. Cast Speed is not needed. Instead, to Cast more Spells faster, seek the Cooldown Recovery Rate. For more Damage look for Crit modifiers and Elemental Penetration. Be sure you can apply all three base Elemental Ailments to benefit from the Explosives Expert passive. The Brittle effect can be acquired from Boots, Exposure - Gloves, and Scorching Ray.
Our recommended items will:
- Cap your resistances
- Give you enough DPS/Life to start mapping successfully
|
Stat priorities on items:
|
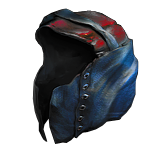 (Helmet) Heatshiver - Doubles your damage against Frozen enemies, which you can easily do with your High Damage and Crit Chance. Corrupt it for the local Reservation Cost reduction. (Helmet) Heatshiver - Doubles your damage against Frozen enemies, which you can easily do with your High Damage and Crit Chance. Corrupt it for the local Reservation Cost reduction. |
|
| (80-100)% increased Evasion Rating 60% increased Mana Regeneration Rate +(20-30)% to Fire Resistance +(20-30)% to Cold Resistance Gain 1% of Cold Damage as Extra Fire Damage per 1% Chill Effect on Enemy Gain 100% of Cold Damage as Extra Fire Damage against Frozen Enemies |
|
| Helmet enchantments: Vortex has 30% increased Cooldown Recovery Rate |
|
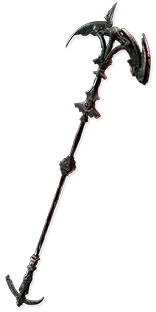 (Weapon) The Annihilating Light - Triples your Damage, but reduces Elemental Resistances. It's a big issue that has to be resolved with good Rare Items, Purity of Elements Aura, or Mageblood. (Weapon) The Annihilating Light - Triples your Damage, but reduces Elemental Resistances. It's a big issue that has to be resolved with good Rare Items, Purity of Elements Aura, or Mageblood. |
|
| +18% Chance to Block Attack Damage while wielding a Staff (70-60)% reduced Elemental Resistances Deal Triple Damage with Elemental Skills |
|
 (Body Armour) The Fourth Vow - The build has quite a lot of Armour, and with Divine Flesh half of the Elemental Damage is taken as Chaos Damage. This Chest makes Armour apply to Chaos Hit Damage improving your survivability. (Body Armour) The Fourth Vow - The build has quite a lot of Armour, and with Divine Flesh half of the Elemental Damage is taken as Chaos Damage. This Chest makes Armour apply to Chaos Hit Damage improving your survivability. |
|
| Physical Damage taken bypasses Energy Shield (150-250)% increased Armour and Energy Shield +(17-29)% to Chaos Resistance Regenerate 3% of Life per second Armour also applies to Chaos Damage taken from Hits |
|
 (Body Armour) Skin of the Lords - It's the pure glass canon option to melt bosses even faster. It's not good for regular mapping where your damage is good enough anyway. (Body Armour) Skin of the Lords - It's the pure glass canon option to melt bosses even faster. It's not good for regular mapping where your damage is good enough anyway. |
|
| Item has no level requirement and Energy Shield (Hidden) Sockets cannot be modified +2 to Level of Socketed Gems 100% increased Global Defences You can only Socket Corrupted Gems in this item Item has 6 Sockets and is fully linked (Hidden) <Random Keystone> |
|
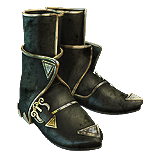 (Boots) Rare Boots - Regular Boots with Resistances, Movement Speed, and Maximum Life will be good. It can also be a source of Elemental Ailments Avoidance, which combined with Jewels or Passives may result in a 100% Chance to avoid Shock, Ignite, or Freeze (a 100% chance to Avoid Freeze can be crafted here). You should upgrade them with Eldritch Implicits for Brittle Ground and Cooldown Recovery Rate. (Boots) Rare Boots - Regular Boots with Resistances, Movement Speed, and Maximum Life will be good. It can also be a source of Elemental Ailments Avoidance, which combined with Jewels or Passives may result in a 100% Chance to avoid Shock, Ignite, or Freeze (a 100% chance to Avoid Freeze can be crafted here). You should upgrade them with Eldritch Implicits for Brittle Ground and Cooldown Recovery Rate. |
|
| Min. requirements: +50% to Elemental Resistances +50 to Maximum Life 25% increased Movement Speed Optional affixes: Attributes Chaos Resistance 100% chance to Avoid being Frozen (crafted) chance to Avoid being Shocked (Essence) increased Cooldown Recovery Rate (Shaper's Suffix) |
|
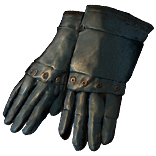 (Gloves) Rare Gloves - Gloves should grant you primarily Maximum Life and Resistances. For Eldritch Implicits seek Unnerve and Cold Exposure on Hit. (Gloves) Rare Gloves - Gloves should grant you primarily Maximum Life and Resistances. For Eldritch Implicits seek Unnerve and Cold Exposure on Hit. |
|
| Min. requirements: +70 to Maximum Life +50% to Elemental Resistances Optional affixes: Attributes Chaos Resistance |
|
 (Belt) Rare Belt - Here, again seek Resistances and Maximum Life with Strength. Focus on Elemental Resistances as The Annihilating Light makes it harder to cap them at 75%. (Belt) Rare Belt - Here, again seek Resistances and Maximum Life with Strength. Focus on Elemental Resistances as The Annihilating Light makes it harder to cap them at 75%. |
|
| Min. requirements: +80 to Maximum Life +120% Total Elemental Resistances Optional affixes: increased Maximum Life increased Cooldown Recovery Rate (Shaper's Suffix) Attributes Chaos Resistance Flask modifiers |
|
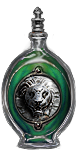
 (Belt) Mageblood - Mageblood is especially good here as it allows you to effortlessly cap all the Resistances and gain tons of Armour from Flasks. (Belt) Mageblood - Mageblood is especially good here as it allows you to effortlessly cap all the Resistances and gain tons of Armour from Flasks. |
|
| +(25-35) to Strength +(30-50) to Dexterity +(15-25)% to Fire Resistance +(15-25)% to Cold Resistance Magic Utility Flasks cannot be Used Leftmost (2-4) Magic Utility Flasks constantly apply their Flask Effects to you Magic Utility Flask Effects cannot be removed |
|
 (Amulet) Ashes of the Stars - The Extra Gem Level and Quality will significantly improve your Damage. You're using quite a few Gems with an alternate Quality that is of the essence to make this build function properly. (Amulet) Ashes of the Stars - The Extra Gem Level and Quality will significantly improve your Damage. You're using quite a few Gems with an alternate Quality that is of the essence to make this build function properly. |
|
| +(10-16) to all Attributes (5-10)% increased Experience Gain of Gems (10-20)% increased Reservation Efficiency of Skills +1 to Level of all Skill Gems +(20-30)% to Quality of all Skill Gems |
|
| Recommended Anointments: Whispers of Doom |
|
 (Ring) Rare Ring - Here you should get tons of Resistances and Life. You can also Craft the Shock-on-Focus Suffix for a big damage boost with Explosives Expert passive. (Ring) Rare Ring - Here you should get tons of Resistances and Life. You can also Craft the Shock-on-Focus Suffix for a big damage boost with Explosives Expert passive. |
|
| Min. requirements: +50 to Maximum Life +50% Total Elemental Resistances Chaos Resistance Optional affixes: Shock nearby enemies when you Focus (crafted) Adds Cold Damage against Chilled or Frozen enemies (Redeemer Prefix) Attributes |
|
 (Ring) Lori's Lantern - It's a Low Life build that needs a lot of Elemental and Chaos Resistances, making Lori's Lantern a good pick for a Ring. Damaging Hits being Unlucky is also a uniquely good and rare defensive layer. (Ring) Lori's Lantern - It's a Low Life build that needs a lot of Elemental and Chaos Resistances, making Lori's Lantern a good pick for a Ring. Damaging Hits being Unlucky is also a uniquely good and rare defensive layer. |
|
| +(8-10)% to all Elemental Resistances +10% to all Elemental Resistances (6-8)% increased Movement Speed when on Low Life 31% increased Light Radius +(20-25)% to Chaos Resistance when on Low Life Damage of Enemies Hitting you is Unlucky while you are on Low Life |
|
 (Jewel) Rare Jewels - Abyss Eye Jewels can grant you up to 50% Chance to Avoid being Shocked or Ignited, but as always prioritize Maximum Life, Resistances, and Attributes if you still lack them. Regular Jewels can increase your Crit Chance, Crit Damage, or Cold Damage. (Jewel) Rare Jewels - Abyss Eye Jewels can grant you up to 50% Chance to Avoid being Shocked or Ignited, but as always prioritize Maximum Life, Resistances, and Attributes if you still lack them. Regular Jewels can increase your Crit Chance, Crit Damage, or Cold Damage. |
|
| Recommended affixes: Attributes Resistances Maximum Life chance to Avoid being Ignited/Shocked increased Critical Strike Chance with Cold Skills increased Cold Damage |
|
 (Jewel) Large Cluster Jewel - If you can Shock, get Sadist for a massive Elemental Damage boost. Prismatic Heart is fine for the extra Elemental Resistances. For other notables select Inspired Oppression, Widespread Destruction, or Doryani's Lesson. We have used two of such Jewels. (Jewel) Large Cluster Jewel - If you can Shock, get Sadist for a massive Elemental Damage boost. Prismatic Heart is fine for the extra Elemental Resistances. For other notables select Inspired Oppression, Widespread Destruction, or Doryani's Lesson. We have used two of such Jewels. |
|
| Recommended affixes: 1 Added Passive Skill is Doryani's Lesson 1 Added Passive Skill is Prismatic Heart 1 Added Passive Skill is Sadist 1 Added Passive Skill is Inspired Oppression 1 Added Passive Skill is Widespread Destruction |
|
 (Jewel) Small Cluster Jewel - Enduring Composure generates Endurance Charges after receiving a Hit. These are good to mitigate Physical Damage and to improve Immortal Call. (Jewel) Small Cluster Jewel - Enduring Composure generates Endurance Charges after receiving a Hit. These are good to mitigate Physical Damage and to improve Immortal Call. |
|
| Recommended affixes: 1 Added Passive Skill is Enduring Composure |
|
 (Jewel) Immutable Force - Increases Stun and Block Recovery making it expire instantly. Combine it with ES mastery to base your Stun Threshold on ES rather than Life. (Jewel) Immutable Force - Increases Stun and Block Recovery making it expire instantly. Combine it with ES mastery to base your Stun Threshold on ES rather than Life. |
|
| (500-1000)% increased Stun and Block Recovery | |
 (Jewel) Bloodnotch - Recoups up to 60% of damage taken from Stunning Hits, which is most of them. It works great with Immutable Force. (Jewel) Bloodnotch - Recoups up to 60% of damage taken from Stunning Hits, which is most of them. It works great with Immutable Force. |
|
| (40-60)% of Damage taken from Stunning Hits is Recovered as Life | |
 (Jewel) Glorious Vanity - Transform your Mind over Matter into Divine Flesh with Xibaqua's Glorious Vanity. It's a must-have with The Fourth Vow but requires you to cap your Chaos Resistance. (Jewel) Glorious Vanity - Transform your Mind over Matter into Divine Flesh with Xibaqua's Glorious Vanity. It's a must-have with The Fourth Vow but requires you to cap your Chaos Resistance. |
|
| Bathed in the blood of (100-8000) sacrificed in the name of Xibaqua Passives in radius are Conquered by the Vaal Historic |
|
  (Jewel) Forbidden Flesh & Forbidden Flame - There are a good amount of passives you can go for. Polymath seems like the best option for More Damage and Life Recovery. Heartstopper, Unstable Infusion, Deadly Infusion, Mistwalker, Opportunistic, and Ambush and Assassinate are all valuable too. (Jewel) Forbidden Flesh & Forbidden Flame - There are a good amount of passives you can go for. Polymath seems like the best option for More Damage and Life Recovery. Heartstopper, Unstable Infusion, Deadly Infusion, Mistwalker, Opportunistic, and Ambush and Assassinate are all valuable too. |
|
| Allocates <<Random Ascendancy Notable>> if you have the matching modifiers on Forbidden Flesh Allocates <<Random Ascendancy Notable>> if you have the matching modifiers on Forbidden Flame |
|
 (Jewel) Watcher's Eye - Extra Armour from Determination, Elemental Damage Penetration from Zealotry and Hatred, or Extra Crit Chance from Hatred are the best mods. (Jewel) Watcher's Eye - Extra Armour from Determination, Elemental Damage Penetration from Zealotry and Hatred, or Extra Crit Chance from Hatred are the best mods. |
|
| (4-6)% increased maximum Energy Shield (4-6)% increased maximum Life (4-6)% increased maximum Mana <Two or Three random aura modifiers> |
|
 (Flask) Bottled Faith - It's a good Flask for most Crit builds. It creates a Consecrated Ground that also improves your DPS. (Flask) Bottled Faith - It's a good Flask for most Crit builds. It creates a Consecrated Ground that also improves your DPS. |
|
| 40% increased Damage Creates Consecrated Ground on Use (30-15)% reduced Duration Consecrated Ground created by this Flask has Tripled Radius Consecrated Ground created during Effect applies (7-10)% increased Damage taken to Enemies (100-150)% increased Critical Strike Chance against Enemies on Consecrated Ground during Effect |
|
|
Other suggested Flasks:
|
|
    |
|
|
If you have any other build requests please leave that in the comments below. We are always open to suggestions and constructive feedback.
Pictures used in this article are the intellectual property of Grinding Gear Games.
