
The Best Priest PvE Healer Build for WoW Classic
An in-depth guide on how to become the best Priest Healer in WoW ClassicPriest PvE Healer Builds
Odealo's Pocket Guide

You can find all our Pocket Guides for other WoW Classic Classes builds right here: Best WoW Classic Builds
If you have just started leveling your Priest, you may want to check out our Priest leveling Guide first
| Changelog |
|
Overview
Priest, with his two competitive healing/support-oriented Talent trees in the form of Discipline and Holy, is regarded as the most well-rounded healer of WoW Classic. While specced in Holy, Priest excels in both AoE and Single-Target healing without sacrificing the strength of Class's signature buffs - Divine Spirit and Power Word: Fortitude. Holy Priest is the backbone of any progressive Raid and is great for any content that requires healing (both PvP and PvE). If dedicated to the route of Discipline, Priest loses some of his healing output but gains the ability to infuse his group members with holy power. Disci's Power Infusion is one of the best DPS-oriented cooldowns in the game. It is also the reason why speed-running guilds stack Discipline Priests as their healers.
The main downside of Priests comes from their mobility or the lack of it. Their most powerful spells require casting time, which results in high HPS loss when Priests are forced to move (Renew and Power Word: Shield are typically not enough to keep teammates healthy). On top of that, despite some strong sustain-oriented Talents, priests can run out of mana surprisingly quickly without the proper management.
 Pros Pros |
 Cons Cons |
| Great Single-Target Healing |
Low mobility can turn priest into a healing turret |
| Great AoE Healing |
can experience mana sustain problems |
| Great group utility |
low damage resistance (cloth armor and low Health levels) |
| Has access to the Power Infusion, one of the strongest Talents in the game |
Has to sacrifice some of his healing output to get the Power Infusion |
| Well-rounded |
The Best Race Choice
Note: Here, we will point you only towards the best PvE Healer Priest Race. If you'd like to know more about other race picks, please check our WoW Classic Beginners Guide, where we dive deep into all available Priest's race choices for both factions.
 Alliance |
Human and Night Elf are not even close to Dwarf when it comes to the utility provided by racials. Dwarf's Fear Ward is one of the strongest PvE and PvP racials in the game (it lets you bypass some Boss mechanics, and makes you much stronger against Warlocks in PvP). Stone Form makes Dwarf more durable and allows him to remove some annoying effects from your character. And Desperate Prayer can save his life in some situations. |
 Horde |
Despite having 1 less choice, picking a Priest Race on Hodre's side is much more difficult. On paper, Troll is a better option as Berserking is the only racial that affects HPS and Hex of Weakness can be useful in 5-mans run without Warrior who has access to Mortal Strike. But. The boost provided by Berserking is very minor most of the time. On the other hand, Undead's Will of the Forsaken shines in PvE as well as in some of the PvE encounters and Cannibalize provides some additional self-healing during combat, but Devouring Plague, while powerful, wastes a debuff slot. All in all, you should pick either Race based on your preference (they are very comparable in both PvP and PvE). |
The Best Professions Choice
There are two professions that make a real impact in Raids and they are Engineering and Tailoring (Alchemy is also a decent option, but you can buy Flasks, Elixirs, and Potions from other players, which makes it much less impactful). Engi's Goblin Saper Charge is the single most powerful tool for Raid vs Raid encounters in the game (few players breaking through enemy lines and triggering their Saper Charges inside enemy's zerg is enough to wipe out the enemy a lot of the time). Moreover, Engi gadgets come in handy in many back-to-the-wall situations. The fact that Engineering is also considered the best PvP profession is an added benefit to its power in PvE and Raiding environments. Tailoring, a seemingly mediocre PvE profession, gives you access to a powerful Bind on Pickup Robe - Truefaith Vestments which is a pre-Raid and Phase 1 BiS that is great during phase Phase 2 as well. Getting this Robe will definitely raise the power level of your character during the first few Raid Tiers of Classic.
At the start, you should pick Mining to supplement your Engineering Skill, you should also stock up on Cloths instead of vendoring/selling them. After you max out Engi, you should switch Mining to Tailo, as it can be easily (and rather cheaply) leveled without a supporting profession.
Note: If you want to know more about all available professions and secondary skills, please check our detailed WoW Classic Professions Guide.
Statistics Priority
|
|
|
|
|
|
|
|
|
|
|
Statistic Priority for a Healer Priest: Healing Power ⇒ Mp5 ⇒ Spirit ⇒ Intellect ⇒Spell Crit |
The Best Talent Builds
Proper Talent allocation is essential for maximizing your Healing Per Second (HPS). Here, we will describe the most optimal specs and lead you through the Talent Trees level-by-level to explain some choices.
There are two competitive PvE Healer Priest Builds to choose from:
- Holy Priest - The all-purpose Healer build for priests. It focuses on increasing healing output by securing deep Holy Talents (Holy Specialization, Spiritual Guidance, and Spiritual Healing) without forgoing sustain provided by Discipline's Meditation and Mental Agility Talents or much-needed buffs (most notably Divine Spirit and Improved Power Word: Fortitude). If you want to focus on HPS and be well-rounded, pick this build.
- Discipline Priest - Build that sacrifices Holy's healing output in favor of the Power Infusion Talent. Priests who run this build are able to boost Raid's performance, by providing top DPS players with a powerful Cooldown. While Discipline's HPS is not as high as Holy's, the build's sustain is comparable or even better thanks to Mental Strength Talent. This build is not recommended for Raid progression as it is not meant for it and will, most likely, not provide enough HPS. It is meant for speedrunning content that is already on farm thanks to its DPS-boosting Power Infusion.
|
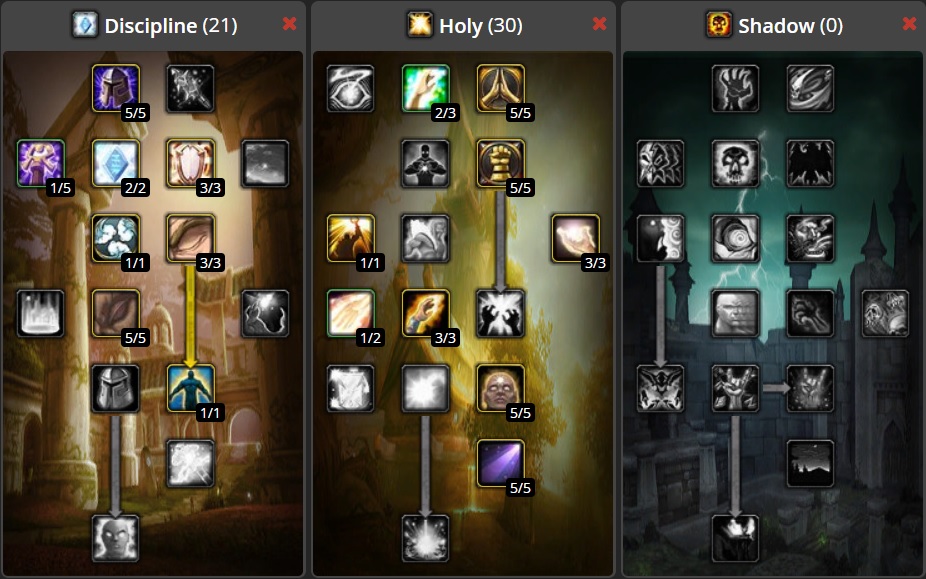
Holy Priest PvE Healer Build Discipline Tree:
Holy Tree:
Why no Lightwell? Short version: Because it's bad. Long version: It is very clunky, as it requires your teammates to click on the well if they want to be healed, which is very impractical during a Raid encounter. Moreover, taking Damage cancels the effect, so Lightwell is useless during fights with any kind of AoE damage, and it can't be used to heal tanks ever (because they get hit constantly). One of the worst abilities in the game, especially considering that it is a final Talent. |
|
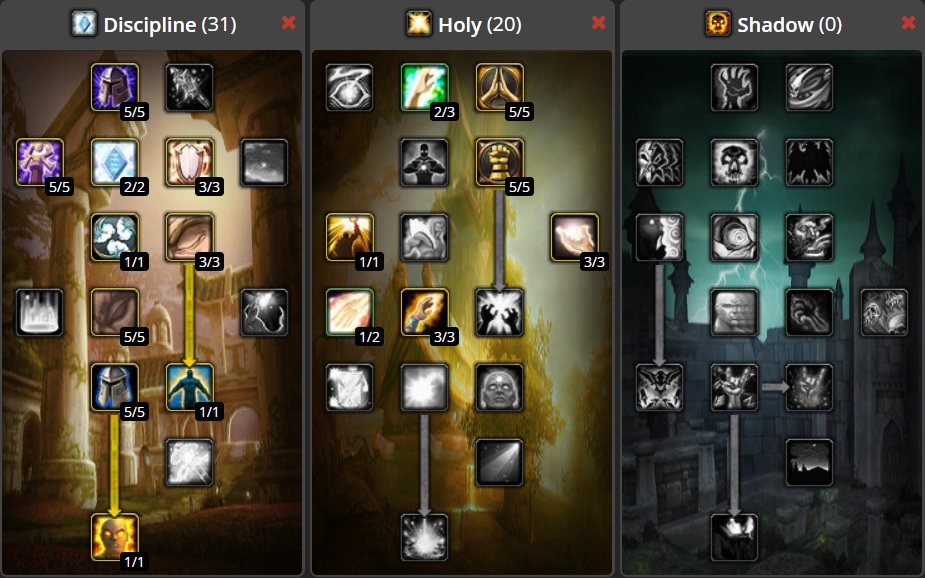
Discipline Priest PvE Healer Build Discipline Tree:
Holy Tree:
|
Where to get Pre-Raid/Raid BiS Gear
In order to maximize your HPS and Sustain, you should aim to assemble the best possible Gear. This applies to both Pre-Raid and each of the Raid Tiers/Phases.
Note1: The list will be updated with new items concurrently with the introduction of new Raids/Phases, so remember to visit this page after a new Raid opens for an update on what current best Priest items in each lot are.
| The Best Healer Priest Items | |
| Main Hand |
|
| Off-Hand |
|
| Ranged |
|
| Trinket 1 |
|
| Trinket 2 |
|
| Neck |
|
| Ring 1 |
|
| Ring 2 |
|
| Head |
|
| Chest |
|
| Legs |
|
| Gloves |
|
| Boots |
|
| Shoulders |
|
| Wrists |
|
| Belt |
|
| Back |
|
The Best Enchants and Consumables
Proper enchants and consumables will greatly increase your Raid performance. While getting enchants is a one-time-deal, farming consumables might be a real chore, but it is still worth it as numbers clearly show.
| The Best Enchants | |
| Weapon (1H) | Enchant Weapon - Healing Power (+ 55 Healing Power) |
| Weapon (TH) | Enchant Weapon - Healing Power (+ 55 Healing Power) |
| Head | Lesser Arcanum of Voracity (+8 Intellect, available from Libram of Voracity Quest in Burning Steppes) |
| Chest | Enchant Chest - Greater Stats (+4 to all stats) |
| Legs | Lesser Arcanum of Voracity (+8 Intellect, available from Libram of Voracity Quest in Burning Steppes) |
| Hands | Enchant Gloves - Riding Skill (Minor Raiding Speed Increase) |
| Feet | Enchant Boots - Minor Speed (+8% Run Speed) / Enchant Boots - Spirit (+5 Spirit) |
| Shoulders | Chromatic Mantle of the Dawn (+5 to all Resistances) |
| Wrists | Enchant Bracer - Healing Power (+24 Healing Power) |
| Back | Enchant Cloak - Greater Resistance (+5 to all Resistances) |
The Best Consumables |
|
 Flask of Distilled Wisdom |
+2000 maximum Mana for 2 hours; effect persists through death. Created by Alchemy. The recipe can be dropped from Balnazzar, Stratcholme. |
 Major Mana Potion |
Restores 1350 to 2250 Mana. Created by Alchemy. Recipe drops from various high-level mobs, elites, and Bosses. |
 Elixir of Greater Intellect |
+25 Intellect for 1 hour. Created by Alchemy. |
 Demonic Rune |
Restores 1356 mana at the cost of 862 life. Drop from Demons in Azshara, Felwood, and Blasted Lands (Satyrs and Fel Guards). |
 Juju Guile |
+30 Intellect for 30 minutes. Reward from a reputable Quest available from NPC Witch Doctor Mau'ari, Everlook, Winterspring. |
 Cerebral Cortex Compound |
+25 Intellect for 1 hour. Obtained from "Infallible Mind" repeatable Quest, Blasted Lands |
 Mageblood Potion |
+12 Mp5 for 1 hour. Created by Alchemy. The recipe can be bought from Rin'wosho the Trader, located in north Stranglethorn Vale |
 Nightfin Soup |
It provides 8 mana per 5 seconds for 10 minutes. Created by Cooking. |
 Brilliant Mana Oil |
+12 Mp5 and +25 Healing Power for 30 minutes. Created by Enchanting. This is applied to a Weapon. |
Priest's Spells and Downranking
In Classic, Healers do not follow any rotation as their gameplay is based purely on responding to different Raid situations and keeping everybody alive.
Understanding your spells, knowing what they do, and when to use them is the key to your success as a Priest healer. This is why we will shortly describe all of Priest's major spells, specify when you should use them, and tell you a word or two about the Downranking and why it is very important.
|
Downranking Downranking is a method of conserving Mana by using lower ranks of spells. Using this method is flat out necessary to not run out of mana before combat ends. You should memorize how much Health different Ranks of your spells restore and use them accordingly in order to preserve resources. Note: Higher Rank of any spell is always more cost-effective than lower Rank, but Healing Power changes the math significantly and makes lower Rank spells more cost-effective than their higher Rank counterparts. Note2: Lowest Ranks of spells have a much lower Healing Power coefficient than higher Ranks do (they receive much less benefit from your Healing Power statistic). This means that you don't usually want to use Spell Ranks lower than 3 (unless Rank 1 or Rank 2 is enough to top your Target on Health). |
|
| Priest's Spells and when to use them: | |
| Heal - Healing spell with a 3-second cast time. This is the most cost-effective healing tool Priest has access to. You will use Rank 3 of this spell, in periods when stronger or quicker spells are not needed, as it is the most mana-efficient. |  |
| Flash Heal - Quick-to-Cast (1,5s Casting time), but mana inefficient Healing spell. You should use it when your Target requires healing IMMIADETLY; use more efficient spells otherwise. Flash Heal is no downranked commonly as it is mostly used during emergencies (use Rank 7). |  |
| Greater Heal - Powerful Healing Spell with a 3-second cast time; commonly used to counter large amounts of incoming damage. Always try to time the end of your cast with Boss's attack to maximize your healing effectiveness. Use Rank 3 to counter the most powerful Boss's attacks (if Rank 3 causes overhealing, use Rank 2 instead). |  |
| Prayer of Healing - Very powerful and very costly AoE Healing Spell with a 3-second cast time. Use this to counter heavy AoE attacks, but mind your mana. |  |
| Power Word: Shield - Applies a Shield that soaks up Damage. Not very cost-effective, but it can be used to increase Target's Total Effective Health Pool or to mitigate predictable incoming damage. Power Word: Shield does not scale with gear almost at all, so you should always use the highest Rank. |  |
| Renew - Instant-cast Heal-over-time Spell. Its usefulness is rather limited, but you will want to cast it while relocating to keep your healing output up. Never downrank it. |  |
| Inner Focus - Makes your next Spell cast free and increases its Critical Chance by 25% (if the spell is capable of criting). You want to use this with your most expensive spells (max rank Greater Heal and max rank Prayer of Healing). Try not to rely on the Crit bonus as missing it might cause a wipe. |  |
| Power Infusion - Increases target's Spell Damage and Healing by 20% for 15 seconds. This spell should be treated as a DPS cooldown as it is the most effective as such. You should use it on top-performing Mages, but don't cast it without forewarning as the spell should be combined with Mage's own Cooldowns to maximize its effectiveness. |  |
Tips and Tricks for aspiring Healer Priest Raiders
|
|
|
|
|
|
|
|
END NOTE This Guide should help you to prepare yourself for that legendary Vanilla Raiding Experience and allow you to progress through Raid Tiers efficiently and with a good amount of fun. We hope that you have found this guide useful and informative. If we have missed a piece of information that is important to you, please let us know! Please do note that this is an early version of our guide, and we will be happy to receive constructive criticism, that will help us improve it, so leave your suggestions in the comments section below. |
Pictures used in this article are the intellectual property of Blizzard Entertainment Inc.
