Fulcrum Ignite Auto-Bomber Chieftan Build
The Fulcrum build for a Chieftain dealing high ignite damageFulcrum Ignite Auto-Bomber
Chieftan Build
Updated for Patch 3.22
The Best Crafty Guides by Odealo
| Guide notes |
| November 7, 2022 -Build created |
| Build Overview | |||
| Tags: [FIRE] [DOT] [LIFE] [ELEMENTAL] | |||
|
Budget: Defenses: |
|
Boss DPS: AoE: |
|
This Build for a Chieftain heavily relies on the Hinekora, Death Fury Chieftain's Passive - there's a 5% chance for one of the enemies you kill to explode, dealing 500% of their Life as Fire Damage. The most efficient way to scale up the damage, as is the case with Detonate Dead Skill, is to Ignite enemies with this enormous base Hit Fire Damage. With the Fulcrum weapon, this Ignite is being reflected back to your character. It will suffer no damage from it due to the Tasalio Passive that makes you unaffected by Ignite. The Ignite, now tied to your character, will Proliferate to nearby enemies for the next few seconds dealing millions of Damage over Time, causing more such explosions, given there are a lot of enemies around you to kill. To Proliferate Ignite use Gloves' Eldritch Implicit or allocate Fan of Flames from a Cluster Jewel. To start this chain reaction use Skills that will also take advantage of your Fire DoT setup. The most obvious choices are Fire Trap and RF. It's especially good on a Chieftain with Ramako's Passive for damage and Valako's Passive for Durability. To go faster, use Quicksilver Flask and Chill yourself. The Chill Effect will be reversed on you with Winterweave, and inflicting it is guaranteed with Frostblink combined with your weapon.
It's expected of you to reach 90% Resistance to all Elements and 200k Armour. All you need to do is get tons of Maximum Fire Resistance, all the other Elemental Resistance will tag along via Tasalio's Passive. Physical Damage reduction is capped at 90%, but a big enough Hit will not be reduced by this amount anyway. That's why Physical Damage taken as Elemental Damage is still preferable. Your Chaos Resistance should be capped at 75%. Allocate the Armour and ES Mastery to cause 10% of Armour to apply to Chaos Damage taken from Hits. It will be enough for Chaos mitigation. You should also get a pair of Forbidden Jewels and borrow Chieftain's Unbreakable, for 8% of your Armour to apply to Elemental Damage taken from Hits. With such a setup the character is very hard to kill, but it can be tankier still with the Progenesis Flask and the Defiance of Destiny Amulet. You will have a good Life Recovery with a high Life Regeneration Rate, up to 35% of Life gained each time you're about to get Hit via the aforementioned Amulet, and Life gained on Kill. You're also Curse-proof with the right Flask Suffix and Consecrated Ground from the Rational Doctrine. To reduce Critical Strike Damage, go for the Sanctum of Thought notable. The Withered debuff can be deadly, so be sure to allocate the Protection Mastery and reduce its effect on you. Poison Damage, which is one of your main concerns, can be reduced with a Shakari as the minor god.
You can also check our other Path of Exile builds right over here Odealo's Crafty Guides - Full List
1. Gameplay
The damage grows after you explode an enemy with the Hinekora Passive and will stay high for the Ignite's Duration, which is around 9 seconds. It's low otherwise, but still good enough to kill all sorts of enemies. Use Fire Trap and FR to deal damage you have control over. To deal more damage stand still to reduce enemies' Fire Resistance by 20%. Constantly dash with Frsotblink to gain Chill and Lifetap. For a Curse select Flammability and for a Gurad Spell - Molten Shell. Vaal Breach can be used to spawn more monsters if need be, there's a high chance one of them will explode. For Mana-Reserving Skills select Determination, Purity of Fire, Malevolence, and Herald of Ash.
|
|
|
|

2. Build's PROS & CONS
| PROS |
|
| CONS |
|
3. Leveling tips
Level it up as you would a typical Righteous Fire build. Get the Fire Mastery for Life Regeneration early and start using Purity of Fire with Vitality and Stone Golem to sustain RF's damage. Keep your Resistance high and gather Burning Damage on your gear. Aim to re-create the RF and Fire Trap setup as they are in the final gem setup. You can switch to the final version of the build gradually, after allocating all the necessary ascendancy passive. Your damage will be low early on so we recommend switching around level 80 to 90 where you can start running juiced maps with high monster density. To learn more about RF, check out our Righteous Fire Juggernaut guide.
Bandits:
you should kill all three Bandits for two additional Skill Points
4. Final Skill Tree, Ascendancy Points, and Pantheon
Final Skill Tree:
113 Points Final Skill Tree (doesn't include Unique or Cluster Jewels)
122 Points Path of Building (PoB) link
Ascendancy points:
Preferably in that order:
- Tasalio
- Ramako
- Valako
- Hinekora
Pantheon:
Major God: Soul of Lunaris: 1% increased Movement Speed for each nearby Enemy, up to 8%; 1% additional Physical Damage Reduction for each nearby Enemy, up to 8%
Minor God: Soul of Shakari: You cannot be Poisoned while there are at least 3 Poisons on you; 50% less Duration of Poisons on You
5. Final Gems links
| [DPS] Righteous Fire setup | |
 |
Righteous Fire - Deals Fire Damage over Time around your character, which is high enough to quickly kill the white and blue monsters. You can easily sustain this delf-inflicted damage. |
 |
Burning Damage Support - Grants more Fire Damage over Time. |
 |
Swift Affliction Support - Grants more Damage over Time, but has to be combined with Lifetap in the same setup for your RF to count as a Duration Skill. |
 |
Increased Area of Effect Support - Increases AoE for better clear speed. It's important as your character is fast and the range of RF is quite small. |
 |
Elemental Focus Support - Grants more Elemental Damage. |
 |
Lifetap Support - Grants more Damage if you have Lifetap. Level it all the way up, the global Lifetap buff will be gained from Frostblink. |
| [DPS] Fire Trap setup | |
 |
Fire Trap Strike - Fire Trap deals Fire Damage and Fire Damage over Time with its Burning Ground. It also Ignites with the initial Hit. The much more powerful Ignite from Hinekora passive will take over after it procs. |
|
Burning Damage Support |
|
Lifetap Support |
 |
Empower Support - Increases the Level of the Fire Trap Skill Gem for more damage. |
 |
Controlled Destruction Support - Grants you more Spell Damage. Fire Trap DoT scales up with Spell Damage. |
 |
Trap and Mine Damage Support - Use it for up to 50% more Trap Damage. |
| [UTILITY] Auras setup socketed in an item with +2 to Aura Gems (Corrupted) |
|
 |
Determination - Adds and increases Armour, quite crucial in this build. |
 |
Purity of Fire - Use it for Fire Resistance and Maximum Fire Resistance, which is important with The Formless Flame and the Valako passive. Level it up all the way to Gem Level 21 and socket in a proper Corrupted Unique Helmet or Boots for another 2 levels. At level 23, with a 20% increased Aura Effect (from passives only) it grants +6% Max Fire Res. |
 |
Malevolence - More Damage over Time and Increased Skill Effect Duration. |
 |
Enlighten Support - Linked Skills Reserve less Mana. |
| [MOBILITY] Frostblink setup | |
 |
Frostblink - Use it to move around quickly and to apply Chill. Reflected back to you, it will increase your Action Speed via Winterweave. |
| Bonechill Support - Frostblink's Chill Effect is increased. | |
 |
Unbound Ailments Support - Frostblink's Chill Effect is increased again and it lasts longer. |
|
Lifetap Support - Keep it at level 1 and use it often so that your RF and Fire Trap will benefit from the Lifetap buff in their setups. |
| [UTILITY] Molten Shell | |
 |
Molten Shell - In this build, it's extremely beneficial as it scales up with Armour. It absorbs 75% of up to 5000 damage taken for 3 seconds on a 4-second Cooldown. |
| [UTILITY] Herald of Ash | |
 |
Herald of Ash - It enhances your clear speed in a manner similar to Legacy of Fury Boots, and your damage.  Arctic Armour can be used instead if you want more durability while standing still. Arctic Armour can be used instead if you want more durability while standing still. |
| [UTILITY] Vaal Breach | |
 |
Vaal Breach - Opens a Breach. The builds work better the more enemies are around you, which is the main issue as there are often none in a boss room. |
| [UTILITY] Flammability | |
 |
Flammability - The Flammability Curse reduces the Fire Resistance of your enemies. |
| [UTILITY] Vitality setup use only for the +1% to max Res from the Reservation mastery, it may not be needed |
|
 |
Vitality - If you need the extra 1% Fire Resistance, use low-level Vitality to Reserve your Life. Then, allocate a proper Reservation Mastery. You should not need to do that but it's an option nonetheless. |
 |
Arrogance Support - Linked Aura reserves Life instead of Mana, |
|
|
6. Gear Setup
The process of scaling up your damage is exactly the same as in Death Wish or Detonate Dead Ignite builds, meaning you don't need much as the Explosion is a type of Secondary Damage. It scales up, most notably, with Ignite Duration. The chances of exploding an enemy with Hinekora's explosion are low so if you finally proc it, try to prolong the Ignite Duration. Get some Burning and Ignite Damage as well. You shall heavily invest in your defences as the damage comes mostly from enemies' density. For that, cap your Fire Res at 90% and get as much Fire Resistance over the cap as possible, it will increase your Armour via the Unique Helmet. Chaos Resistance is important too, the default 75% is enough, especially when combined with the Armour&ES Mastery for Armour to affect Chaos Damage taken. Life Regeneration is not important, you will get a lot of it from Fire Mastery, but still a bit useful. You will gain Life on kill, and from the Unique Amulet. We heavily recommend the Unbreakable Passive from a pair of Forbidden Jewels. Chaos Damage and DoT may be your weak spots.
Our recommended items will:
- Cap your resistances at 75%
- Provide you with enough DPS and Life to start mapping
|
Stat priorities on items:
|
 (Helmet) Rare Helmet - Use a Rare Helmet only if it's a particularly good one, as The Formless Flame will, much more likely, be better. A Rare Helmet may redirect Physical Damage to be taken as Fire, or increase your Fire Damage. (Helmet) Rare Helmet - Use a Rare Helmet only if it's a particularly good one, as The Formless Flame will, much more likely, be better. A Rare Helmet may redirect Physical Damage to be taken as Fire, or increase your Fire Damage. |
|
| Min. requirements: +80 to Maximum Life +60% to Chaos and Fire Resistance Armour Mana Reservation Efficiency Optional affixes: 8% of Physical Damage taken as Fire Damage (crafted) 7% of Physical Damage taken as Fire Damage (Eater's Implicit) Nearby Enemies take #% increased Elemental Damage Nearby Enemies have -#% to Fire Resistance |
|
 (Helmet) The Formless Flame - It massively increases your Armour with the Fire Resistance you've accumulated. Armour will mitigate Physical Damage, but also some Elemental Damage with the Unbreakable passive, and even Chaos Damage with Armour and Energy Shield Mastery. (Helmet) The Formless Flame - It massively increases your Armour with the Fire Resistance you've accumulated. Armour will mitigate Physical Damage, but also some Elemental Damage with the Unbreakable passive, and even Chaos Damage with Armour and Energy Shield Mastery. |
|
| (80-120)% increased Armour -30% to Fire Resistance -(200-100) Fire Damage taken from Hits Armour is increased by Overcapped Fire Resistance |
|
| Helmet enchantments: increased Mana Reservation Efficiency for one of your Auras |
|
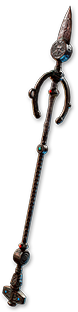 (Weapon) The Fulcrum - With Fulcrum, the Ignites you cause with Hinekora's passive (and from Fire Trap) will be reflected back to you. With Ignite Proliferation, this Ignite will also affect all nearby enemies. With Tasalio passive you will suffer no damage from these Ignites. (Weapon) The Fulcrum - With Fulcrum, the Ignites you cause with Hinekora's passive (and from Fire Trap) will be reflected back to you. With Ignite Proliferation, this Ignite will also affect all nearby enemies. With Tasalio passive you will suffer no damage from these Ignites. |
|
| +20% Chance to Block Attack Damage while wielding a Staff (140-180)% increased Physical Damage (0-50)% of Physical Damage Converted to Fire Damage (0-50)% of Physical Damage Converted to Cold Damage (0-50)% of Physical Damage Converted to Lightning Damage Elemental Ailments you inflict are Reflected to you Elemental Damage with Hits is Lucky while you are Shocked Damage Penetrates (8-10)% Elemental Resistances while you are Chilled Gain (30-40)% of Physical Damage as Extra Damage of a random Element while you are Ignited |
|
 (Body Armour) Cloak of Flame - We recommend Cloak of Flame due to the increased Ignite Duration and 40% of Physical Damage taken as Fire, which you have 90% Resistance to. Big in terms of offence and defence alike. (Body Armour) Cloak of Flame - We recommend Cloak of Flame due to the increased Ignite Duration and 40% of Physical Damage taken as Fire, which you have 90% Resistance to. Big in terms of offence and defence alike. |
|
| +(50-75)% to Fire Resistance (40-75)% increased Ignite Duration on Enemies Reflects 100 Fire Damage to Melee Attackers 40% of Physical Damage taken as Fire Damage |
|
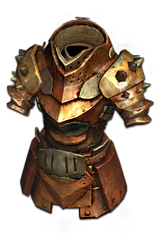 (Body Armour) The Brass Dome - Brass Dome is a more defensive option if you have the Unbreakable passive and if you need the extra Maximum Resistances to reach 90%. It causes you to take no damage from Crits, but your Ignite Duration won't be extended, which is not great. (Body Armour) The Brass Dome - Brass Dome is a more defensive option if you have the Unbreakable passive and if you need the extra Maximum Resistances to reach 90%. It causes you to take no damage from Crits, but your Ignite Duration won't be extended, which is not great. |
|
| (350-400)% increased Armour +(1-5)% to all maximum Elemental Resistances Strength provides no bonus to Maximum Life Take no Extra Damage from Critical Strikes |
|
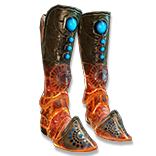 (Boots) Legacy of Fury - The best-in-slot Boots for any Fire DoT character. It massively increases your clear speed due to the "explosions" and Scorches the enemies, which increases your DPS. (Boots) Legacy of Fury - The best-in-slot Boots for any Fire DoT character. It massively increases your clear speed due to the "explosions" and Scorches the enemies, which increases your DPS. |
|
| (200-300)% increased Armour and Evasion 30% increased Movement Speed Nearby Enemies are Scorched (30-50)% increased Effect of Scorch (30-40)% chance when you Kill a Scorched Enemy to Burn Each surrounding Enemy for 4 seconds, dealing 8% of the Killed Enemy's Life as Fire Damage per second |
|
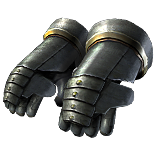 (Gloves) Rare Gloves - There's not much to look for, except for Life, Resistance, and Armour. You can also seek generic Life Regeneration. For the Eldritch Implicits, get Fire Exposure as the blue one, and Ignite Proliferation (if you don't have Fan of Flames) or Fire DoT Multiplier as the red one. (Gloves) Rare Gloves - There's not much to look for, except for Life, Resistance, and Armour. You can also seek generic Life Regeneration. For the Eldritch Implicits, get Fire Exposure as the blue one, and Ignite Proliferation (if you don't have Fan of Flames) or Fire DoT Multiplier as the red one. |
|
| Min. requirements: +80 to Maximum Life +60% to Chaos and Fire Resistance Optional affixes: Spell Suppression Chance Armour Life Regeneration Rate |
|
 (Belt) Rare Belt - There's also not much here, only the most basic Life, Resistances, and Armour. You can put some effort into finding a Belt with various Flask modifiers. (Belt) Rare Belt - There's also not much here, only the most basic Life, Resistances, and Armour. You can put some effort into finding a Belt with various Flask modifiers. |
|
| Min. requirements: +80 to Maximum Life +60% to Chaos and Fire Resistance Optional affixes: Flask modifiers increased Maximum Life Armour |
|
 (Amulet) Defiance of Destiny - Your character is extremely durable against Hits so it's unlikely for him to get one-shotted. It has relatively low Life Recovery as it can't Leech from DoTs, so it can often lack some portion of its Life Pool. The Defiance of Destiny is the best option in such a scenario, by "healing" you if this damage is low, which it is, on account of your high durability. (Amulet) Defiance of Destiny - Your character is extremely durable against Hits so it's unlikely for him to get one-shotted. It has relatively low Life Recovery as it can't Leech from DoTs, so it can often lack some portion of its Life Pool. The Defiance of Destiny is the best option in such a scenario, by "healing" you if this damage is low, which it is, on account of your high durability. |
|
| (20-30)% increased Mana Regeneration Rate +(60-80) to maximum Life +(10-40)% to Fire Resistance +(10-40)% to Cold Resistance +(10-40)% to Lightning Resistance Gain (25-35)% of Missing Unreserved Life before being Hit by an Enemy |
|
| Recommended Anointments: Aspect of Stone Anointed Flesh Adamant Growth and Decay |
|
 (Ring) Death Rush - Grants you the Adrenaline buff for Damage, Movement Speed, and Physical Damage Reduction. The Life on Kill is impactful as well. Use it if you don't plan to face any major single targets as it works only after you kill an enemy. (Ring) Death Rush - Grants you the Adrenaline buff for Damage, Movement Speed, and Physical Damage Reduction. The Life on Kill is impactful as well. Use it if you don't plan to face any major single targets as it works only after you kill an enemy. |
|
| +(17-23)% to Chaos Resistance Recover (3-5)% of Life on Kill Gain Adrenaline for (1-3) seconds on kill |
|
 (Ring) Winterweave - You can self-chill yourself with Frostblink and Fulcrum. Instead of suffering the negative effects of it, this Ring increases your Action Speed, which results in more Movement Speed. It's also increased while you're Ignited, which you are all the time. (Ring) Winterweave - You can self-chill yourself with Frostblink and Fulcrum. Instead of suffering the negative effects of it, this Ring increases your Action Speed, which results in more Movement Speed. It's also increased while you're Ignited, which you are all the time. |
|
| +(20-30) to maximum Life Adds (12-15) to (25-30) Fire Damage to Attacks Adds (12-15) to (25-30) Cold Damage to Attacks +(20-40) to maximum Life +(25-30)% to Cold Resistance 10% increased Movement Speed while Ignited The Effect of Chill on you is reversed |
|
 (Ring) Rare Ring - Use Ruby Or Amethyst Rings for a lot of Fire and Chaos Resistance, and combine them with Suffixes with similar effects. Maximum Life, DoT Multiplier, and Life Regeneration are also here to grab. (Ring) Rare Ring - Use Ruby Or Amethyst Rings for a lot of Fire and Chaos Resistance, and combine them with Suffixes with similar effects. Maximum Life, DoT Multiplier, and Life Regeneration are also here to grab. |
|
| Min. requirements: +80% to Chaos and Fire Resistance +60 to Maximum Life Optional affixes: Damage over Time Multiplier Life Regeneration |
|
 (Jewel) Rare Jewels - Increased Maximum Life for a Suffix, and Resistances for Prefixes are good enough here. You can look for some Reservation Efficiency or Burning Damage too if you need it, (Jewel) Rare Jewels - Increased Maximum Life for a Suffix, and Resistances for Prefixes are good enough here. You can look for some Reservation Efficiency or Burning Damage too if you need it, |
|
| Recommended affixes: Fire Resistance increased Maximum Life increased Mana Reservation Efficiency Chaos Resistance increased Burning Damage |
|
 (Jewel) Large Cluster Jewel - Nearly anything on a Fire Damage Large Cluster Jewel is good, but Master of Fire for Exposure is particularly useful if you cannot get it on your Gloves. (Jewel) Large Cluster Jewel - Nearly anything on a Fire Damage Large Cluster Jewel is good, but Master of Fire for Exposure is particularly useful if you cannot get it on your Gloves. |
|
| Recommended affixes: 1 Added Passive Skill is Master of Fire 1 Added Passive Skill is Burning Bright 1 Added Passive Skill is Prismatic Heart 1 Added Passive Skill is Smoking Remains 1 Added Passive Skill is Widespread Destruction Fire Resistance Chaos Resistance |
|
 (Jewel) Medium Cluster Jewel - Fan of Flames is necessary if you don't have Ignite Proliferation on your Gloves. All the other notables from a Fire DoT Medium Cluster Jewel are acceptable, but we recommend Circling Oblivion for Ignite Duration and Student of Decay for Chaos Resistance the most. (Jewel) Medium Cluster Jewel - Fan of Flames is necessary if you don't have Ignite Proliferation on your Gloves. All the other notables from a Fire DoT Medium Cluster Jewel are acceptable, but we recommend Circling Oblivion for Ignite Duration and Student of Decay for Chaos Resistance the most. |
|
| Recommended affixes: 1 Added Passive Skill is Fan of Flames 1 Added Passive Skill is Flow of Life 1 Added Passive Skill is Master of Fire 1 Added Passive Skill is Circling Oblivion 1 Added Passive Skill is Student of Decay Fire Resistance Chaos Resistance |
|
 (Jewel) Elegant Hubris - Transmogrify your Eternal Youth into Supreme Ostentation so that you won't need Attributes. It will also allow you to possibly get up to 100% Fire Resistance (2x Crematorium Worker) by spending only 2 additional Skill Points, which is good for your already high Armour. (Jewel) Elegant Hubris - Transmogrify your Eternal Youth into Supreme Ostentation so that you won't need Attributes. It will also allow you to possibly get up to 100% Fire Resistance (2x Crematorium Worker) by spending only 2 additional Skill Points, which is good for your already high Armour. |
|
| Commissioned (2000-160000) coins to commemorate Caspiro Passives in radius are Conquered by the Eternal Empire Historic |
|
 (Jewel) Rational Doctrine - With your Strength being the highest, which it is, you will be constantly under the effect of Consecrated Ground for a lot of Life Regeneration and reduced Curse Effect on you. With a proper Flask Modifier, it will make you unaffected by Curses. (Jewel) Rational Doctrine - With your Strength being the highest, which it is, you will be constantly under the effect of Consecrated Ground for a lot of Life Regeneration and reduced Curse Effect on you. With a proper Flask Modifier, it will make you unaffected by Curses. |
|
| <Three random synthesis implicit modifiers> You have Consecrated Ground around you while stationary if Strength is your highest Attribute 25% chance to create Profane Ground on Critical Strike if Intelligence is your highest Attribute Effects of Consecrated Ground you create Linger for 4 seconds Effects of Profane Ground you create Linger for 4 seconds |
|
  (Jewel) Forbidden Flame & Flesh - Get the Unbreakable. It's excellent with high Armour for Elemental Damage mitigation, and you do have a lot of it, around 200k or more. (Jewel) Forbidden Flame & Flesh - Get the Unbreakable. It's excellent with high Armour for Elemental Damage mitigation, and you do have a lot of it, around 200k or more. |
|
| Allocates <Random Ascendancy Notable> if you have the matching modifiers on Forbidden Flesh Allocates <Random Ascendancy Notable> if you have the matching modifiers on Forbidden Flame |
|
 (Jewel) Watcher's Eye - Look for the extra Damage over Time Multiplier from Malevolence and some Physical Damage taken as Fire from Purity of Fire. These are the best mods. (Jewel) Watcher's Eye - Look for the extra Damage over Time Multiplier from Malevolence and some Physical Damage taken as Fire from Purity of Fire. These are the best mods. |
|
| (4-6)% increased maximum Energy Shield (4-6)% increased maximum Life (4-6)% increased maximum Mana <Two or Three random aura modifiers> |
|
 (Flask) Progenesis - To make the build extra tanky, get Progenesis. It's not necessary, but great for the aspirational content like wave 30 of Simulacrum. (Flask) Progenesis - To make the build extra tanky, get Progenesis. It's not necessary, but great for the aspirational content like wave 30 of Simulacrum. |
|
| +35% to Chaos Resistance (20-10)% reduced Charges per use (-35-35)% increased Duration When Hit during effect, 25% of Life loss from Damage taken occurs over 4 seconds instead |
|
|
Other suggested Flasks:
|
|
    |
|
|
If you have any other build requests please leave that in the comments below. We are always open to suggestions and constructive feedback.
Pictures used in this article are the intellectual property of Grinding Gear Games.
