
Chaos Flameblast Totem Hierophant
Flameblast Totem build for Hierophant that deals Chaos Damage via conversionFlameblast Totem
Hierophant Build
Updated for Patch 3.21
The Best Crafty Guides by Odealo
| Guide notes |
| January 28, 2022 -Build created May 17, 2023 -Updated for Patch 3.21 |
| Build overview | |||
| Tags: [TOTEM] [ELEMENTAL] [HYBRID] | |||
|
Budget: Defenses: |
|
Boss DPS: AoE: |
|
Flameblast is a Channeling Spell that's deals damage only after you finish Channeling it. That's why it's not a very popular choice for self-casters as you have to stop each time you want to kill even the smallest pack of enemies. With Totems this downside is mitigated - you place a Totem and it automatically targets enemies while you can move on to the next pack of monsters, the more Totems the more efficient the process of mapping is. The Damage and AoE grow in size, it can reach up to 10 stages and after that, it's automatically detonated dealing Chaos Damage. Flameblast with Normal Gem Quality deals fire damage, and you don't want to deal Fire Damage. To convert Fire to Chaos use the Anomalous version and equip two The Consuming Dark Unique Daggers - that's exactly 100% of Fire Damage converted to Chaos.
As a Hierophant with Ritual Awakening, you will be able to summon up to 6 Totems where your Damage and resource Regeneration grows with each one making it the best Ascendancy. You should also take Divine Guidance and Sanctuary of Thought for more Mana, Damage, AoE, Reservation Efficiency, and Energy Shield. Self-Flagellation is a great source of Damage since your character will bear many Curses at once. Energy Shield, Maximum Life, and Mana (with Mind over Matter) are all resources counting as your Hitpoints, when combined your effective Health Pool can easily reach 10k. With a high Block Chance, Arcane Cloak, and fast regeneration of Life and Mana, it's a reasonably tanky build. Equip Viridi's Veil so that you're Hexproof and Curses won't affect you.
You can also check our other Path of Exile builds right over here Odealo's Crafty Guides - Full List
1. Gameplay
It's a regular Totem build, place the Totems ahead of you and let them deal with enemies. Flame Dash is one of the best Travel Skills you can use, Arcane Cloak should be a Guard Spell of your choice. For boss fights use Wither with Hextouch to apply Despair, it will reduce the Chaos Resistance. Have Void Sphere linked with Cast when Damage Taken to Hinder enemies - it reduces their Movement Speed. For Passive Skills use Lightning Golem, Vitality, Clarity, and Skitterbots.
|
Full gameplay video:
This video was recorded on a level 92 Hierophant that used low-budget gear with a 24 Flameblast. There was plenty of space for extra improvements, and with the planned buffs in Patch 3.17 to Flameblast, you should be easily able to nearly triple to damage shown with extra investments |
|
|

2. Build's PROS & CONS
| PROS |
|
| CONS |
|
3. Leveling tips
Follow our Templar Leveling Guide using Totems. You will deal mostly Fire type Damage and transition to Chaos after achieving level 53 - the minimum level to equip The Consuming Dark, and getting Anomalous Flameblast, which can be done much later. To equip Soul Mantle you must first be Hexproof or Immune to Curses - the easiest way to do so is by getting Viridi's Veil, which requires level 68. After that, the build is pretty much complete.
Bandits:
Kill all three bandits to get two additional Passive Skill Points
Leveling Skill Trees:
28 Points Passive Tree
Head for the Ancestral Bond Keystone as shown, then pick some Maximum Life and Totem Damage.
63 Points Passive Tree
Allocate Arcane Capacitator and head to the upper side of the Skill Tree to pick more Mana, Life, and Fire Damage
Recommended leveling items:
 Le Heup of All - provides Attributes, Damage, and extra Elemental Resistances Le Heup of All - provides Attributes, Damage, and extra Elemental Resistances |
|
| Adds 1 to 4 Physical Damage to Attacks +(10-30) to all Attributes (10-30)% increased Damage (10-30)% increased Rarity of Items found +(10-30)% to all Elemental Resistances |
|
 Goldrim - a Helmet to give you a lot of Elemental Resistances Goldrim - a Helmet to give you a lot of Elemental Resistances |
|
| +(30-50) to Evasion Rating 10% increased Rarity of Items found +(30-40)% to all Elemental Resistances Reflects 4 Physical Damage to Melee Attackers Level Requirement reduced by 100 (Hidden) |
 Tabula Rasa - allows you to six-link any setup from the start, heavily recommended Tabula Rasa - allows you to six-link any setup from the start, heavily recommended |
|
| Item has no level requirement and Energy Shield (Hidden) Item has 6 White Sockets and is fully linked (Hidden) |
|
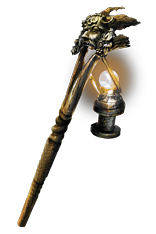 Nycta's Lantern - low-level Scepter that is perfectly suited for Fire Damage build, especially with Holy Flame Totem Nycta's Lantern - low-level Scepter that is perfectly suited for Fire Damage build, especially with Holy Flame Totem |
|
| 30% increased Elemental Damage (150-200)% increased Physical Damage Adds (76-98) to (161-176) Fire Damage 50% increased Light Radius Battlemage |
|
4. Final Skill Tree, Ascendancy Points, and Pantheon
Final Skill Tree:
108 Points Final Passive Tree (doesn't include Cluster Jewels)
115 Points Path of Building (PoB) link
Ascendancy points:
Preferably in that order:
- Pursuit of Faith
- Ritual Awakening
- Divine Guidance
- Sanctuary of Thought
Pantheon:
Major God: Soul of The Brine King: 1% You cannot be Stunned if you've been Stunned or Blocked a Stunning Hit in the past 2 seconds
Minor God: Soul of Abberath: 60% less Duration of Ignite on You; 10% increased Movement Speed while on Burning Ground; Unaffected by Burning Ground
5. Final Gems links
| [DPS] Flameblast Totem setup | |
 |
Flameblast - A Channeling Spell that deals Damage as the Channeling finishes by reaching ten stages or if it's interrupted. It Should deal exclusively Chaos Damage. It has to be Anomalous. |
 |
Controlled Destruction Support - your Elemental Damage is increased, but Critical Strike Chance reduced |
 |
Multiple Totems Support - you can summon more Totems to deal more Damage |
 |
Elemental Focus Support - disables Ignites you can cause by using Flameblast, but Burning Damage is not an important part of the build |
 |
Faster Casting Support - as your cast speed grows, you can reach a maximum of ten stages sooner |
 |
Empower Support - Flameblast grows noticeably with its Gem Level |
| provided by Soul Mantle | |
 |
Spell Totem Support - Flameblast is cast via Totems |
| [UTILITY] Wither setup | |
 |
Wither - Use it to apply Withered debuff - enemies take increased Chaos Damage. It's a stackable debuff - you can stack it 20 times. |
|
Faster Casting Support |
| [UTILITY] Golem setup | |
 |
Summon Lightning Golem - Golem which grants you increased Cast Speed |
 |
Cast when Damage Taken - Supported Skill are cast automatically as you take damage, can be at maximum Gem Level |
| [UTILITY] Void Sphere setup | |
 |
Void Sphere - it should be kept at level 1 - use it not to deal damage but to Slow and Hinder enemies. It can be also used to apply Despair Curse |
|
Cast when Damage Taken - used to trigger linked Spells (Void Sphere in this case) after you take a certain amount of damage. Keep it at level 1 for more request casts |
 |
Hextouch Support - Void Sphere will apply your linked Curse with Hits |
 |
Despair - the best Curse for this build which reduces the Chaos Resistance of affected enemies, and also increased DoT Damage they take |
| [UTILITY] Aura setup | |
 |
Vitality - an Aura that Regenerates your Life |
 |
Clarity - increases your Mana Regeneration by around 180 per second |
 |
Summon Skitterbots - Skitterbots Chill and Shock enemies reducing their mobility and increasing received damage |
 |
Enlighten Support - linked Spells Reserve less Mana |
| [UTILITY] Flame Dash | |
 |
Flame Dash - Movement Skill that enhances your mobility |
| [UTILITY] Arcane Cloak setup | |
 |
Arcane Cloak - At the cost of 64% of your current Mana, it creates a protective layer that reduces the Damage you take from Hits by 75%. It can mitigate more Damage the more Mana it has consumed. |
 |
Arcane Surge Support - grants you more Spell Damage and Mana Regeneration after you use Arcane Cloak |
 |
Increased Duration Support - Arcane Cloak and Arcane Surge last longer |
 |
Enhance Support - increases the Quality of all linked Skill Gems |
|
|
6. Gear Setup
Your Weapons, Body Armour, and Helmet have to be Unique, the rest of your Gear should provide Elemental Resistances, Maximum Life, Mana, and Energy Shield. Offensive stats that would benefit you are ones that add or increase Fire Damage with Spells or Totems, or your Cast Speed. You don't need Crit. Strike Chance. As you're using Viridi's Veil, be sure that your right Ring is Magic, not Rare nor Unique. Magic Items are blue and can have only two Affixes.
Our recommended items will:
- Cap your resistances at 75%
- Provide you with enough DPS and Life to start mapping
|
Stat priorities on items:
|
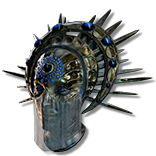 (Helmet) Viridi's Veil - it's the Helmet that can make you Hexproof. Curses still apply to you but have no effect - it's better than being immune to Curses due to Self-Flagellation. You need to have a Magic Ring in the right slot (Helmet) Viridi's Veil - it's the Helmet that can make you Hexproof. Curses still apply to you but have no effect - it's better than being immune to Curses due to Self-Flagellation. You need to have a Magic Ring in the right slot |
|
| +(1-2) to Level of Socketed Gems (120-160)% increased Armour and Energy Shield +(15-25)% to all Elemental Resistances Damage of Enemies Hitting you is Unlucky while you have a Magic Ring Equipped You are Hexproof if you have a Magic Ring in right slot Take no Extra Damage from Critical Strikes if you have a Magic Ring in left slot |
|
| Helmet enchantments: Flameblast enchantments |
|
 (Weapon) The Consuming Dark - you will need two of these to convert your Fire Damage to Chaos. The weapon also increases the Gem Level of Flameblast and Fire Damage which is undoubtedly helpful. (Weapon) The Consuming Dark - you will need two of these to convert your Fire Damage to Chaos. The weapon also increases the Gem Level of Flameblast and Fire Damage which is undoubtedly helpful. |
|
| 40% increased Global Critical Strike Chance +1 to Level of all Fire Spell Skill Gems +(20-40) to Intelligence (40-60)% increased Fire Damage 30% of Fire Damage Converted to Chaos Damage Your Chaos Damage has 60% chance to Poison Enemies |
|
 (Boots) Soul Mantle - You can have one more Totem, and you save a gem socket by having one provided by the Item itself - definitely a must-have. Curses not only have no effect on you - these will increase your Damage via Self-Flagellation. (Boots) Soul Mantle - You can have one more Totem, and you save a gem socket by having one provided by the Item itself - definitely a must-have. Curses not only have no effect on you - these will increase your Damage via Self-Flagellation. |
|
| Socketed Gems are Supported by Level 20 Spell Totem (20-25)% increased Spell Damage (100-120)% increased Energy Shield (20-30)% increased Totem Life Inflicts a random Hex on you when your Totems die |
|
 (Boots) Rare Boots - Maximum Life, increased Movement Speed, and Elemental Resistances are obligatory, increased Mana Regeneration Rate if you've cast a Spell Recently is one of the Lab Enchantments you should definitely get (Boots) Rare Boots - Maximum Life, increased Movement Speed, and Elemental Resistances are obligatory, increased Mana Regeneration Rate if you've cast a Spell Recently is one of the Lab Enchantments you should definitely get |
|
| Min. requirements: +60 to maximum Life 25% increased Movement Speed +50% to Elemental Resistances Optional affixes: Chaos Resistance Energy Shield Maximum Mana |
|
| Min. requirements: +70 to maximum Life +70% to Elemental Resistances Optional affixes: increased Spell Damage Dexterity Maximum Mana Energy Shield |
|
 (Belt) Rare Belt - a Belt granting Maximum Life, Resistances, and Energy Shield is good to go (Belt) Rare Belt - a Belt granting Maximum Life, Resistances, and Energy Shield is good to go |
|
| Min. requirements: +100 to maximum Life +70% to Elemental Resistances Optional affixes: increased Energy Shield from Body Armour increased Damage increased Maximum Life Maximum Mana |
|
 (Amulet) Rare Amulet - Besides Life and Resistances it should grant you Maximum Mana, the most efficient way for it is to get the "#% increased maximum Mana" affix. Mana Regeneration Rate and Dexterity are also desirable stats to look for. (Amulet) Rare Amulet - Besides Life and Resistances it should grant you Maximum Mana, the most efficient way for it is to get the "#% increased maximum Mana" affix. Mana Regeneration Rate and Dexterity are also desirable stats to look for. |
|
| Min. requirements: +70 to maximum Life +70% to Elemental Resistances Optional affixes: #% increased maximum Mana Maximum Mana increased Mana Regeneration Rate Lightning Damage Leeched as Energy Shield Energy Shield Dexterity |
|
| Recommended Anointments: Surveillance |
|
 (Ring) Rare Ring - One of these Rings has to be Magic, it's where you can easily craft some of the rarest mods without spending too much currency. Seek Life, Mana, and Resistances. (Ring) Rare Ring - One of these Rings has to be Magic, it's where you can easily craft some of the rarest mods without spending too much currency. Seek Life, Mana, and Resistances. |
|
| Min. requirements: +80% to Elemental Resistances +60 to Maximum Life Optional affixes: Dexterity Maximum Mana Maximum Energy Shield increased mana Regeneration Rate |
|
 (Jewel) Rare Jewels - get the missing Attributes and Resistances, increase your Maximum Life, Mana, or Energy Shield, and get more Spell or Totem Damage (Jewel) Rare Jewels - get the missing Attributes and Resistances, increase your Maximum Life, Mana, or Energy Shield, and get more Spell or Totem Damage |
|
|
Recommended affixes: |
|
 (Jewel) Self-Flagellation - the number of Curses on you will always be around seven or eight, increasing your damage substantially (Jewel) Self-Flagellation - the number of Curses on you will always be around seven or eight, increasing your damage substantially |
|
| (10-20)% increased Damage per Curse on you An additional Curse can be applied to you |
|
 (Jewel) Watcher's Eye - You're using Vitality and Clarity for your Auras. You can try to find suitable mods such as Maximum Mana as Extra Maximum Energy Shield or increased Mana Recovery Rate. (Jewel) Watcher's Eye - You're using Vitality and Clarity for your Auras. You can try to find suitable mods such as Maximum Mana as Extra Maximum Energy Shield or increased Mana Recovery Rate. |
|
| (4-6)% increased maximum Energy Shield (4-6)% increased maximum Life (4-6)% increased maximum Mana <Two or Three random aura modifiers> |
|
 (Jewel) Large Cluster Jewels - The Chaos-oriented Cluster is a good choice. Dark Ideation is definitely the best Notable here (Jewel) Large Cluster Jewels - The Chaos-oriented Cluster is a good choice. Dark Ideation is definitely the best Notable here |
|
| Recommended affixes: 1 Added Passive Skill is Dark Ideation 1 Added Passive Skill is Unholy Grace 1 Added Passive Skill is Unwaveringly Evil |
|
 (Jewel) Medium Cluster Jewels - Dark Ideation and Eldritch Inspiration are the top choices in medium Cluster Jewels (Jewel) Medium Cluster Jewels - Dark Ideation and Eldritch Inspiration are the top choices in medium Cluster Jewels |
|
| Recommended affixes: 1 Added Passive Skill is Dark Ideation 1 Added Passive Skill is Eldritch Inspiration |
|
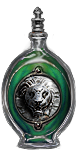
 (Flask) Atziri's Promise - a must-have Flask, it grants you Life Leech and extra Chaos Damage (Flask) Atziri's Promise - a must-have Flask, it grants you Life Leech and extra Chaos Damage |
|
| +35% to Chaos Resistance 2% of Chaos Damage Leeched as Life during Flask effect Gain (5-8)% of Physical Damage as Extra Chaos Damage during effect Gain (5-8)% of Elemental Damage as Extra Chaos Damage during effect |
|
 (Flask) Rumi's Concoction - use it for an additional Armour and more Block Chance against Spells and Attacks (Flask) Rumi's Concoction - use it for an additional Armour and more Block Chance against Spells and Attacks |
|
| +1500 to Armour +(8-12)% Chance to Block Attack Damage during Flask effect +(4-6)% Chance to Block Spell Damage during Flask effect |
|
|
Suggested Flasks:
|
|
   |
|
|
If you have any other build requests please leave that in the comments below. We are always open to suggestions and constructive feedback.
Pictures used in this article are the intellectual property of Grinding Gear Games.
