Games Marketplace - Odealo
0.00 25 (Click on the icon to view details)

Articles

The Best PvE Feral Druid Build for WoW Classic

The Best PvE Feral Druid Build for WoW Classic

An in-depth guide on becoming the Top Raid DPS or off-tank as a Feral Druid character

Feral Druid PvE DPS Builds
Odealo's Pocket Guide

Druid

You can find all our Pocket Guides for other WoW Classic Classes builds right here: Best WoW Classic Builds

If you have just started leveling your Druid, you may want to check out our Druid leveling Guide first

Changelog
  • Added Phase 2 BiS Equipment
  • Added Phase 3 BiS Equipment
  • Reviewed Talent Builds, Consumables, and Rotations


Overview

As a hybrid Class, Druid suffers from the "can do everything but can't do anything up to par" problem. Because of this, Druid in a difficult spot... if he tries to specialize in a single role, he will be outclassed by all single-purpose Classes and will not find a spot in any Raid. This forces Him to embrace His greatest strength - flexibility. Beside great flexibility, Feral Druid provides his Raid with very solid utilities, like Rebirth - the only "real" Combat Resurrection of Classic) and Innervate - one of the best mana regeneration cooldowns in the game. On top of that, he brings Leader of the Pack to the table. This 3% Critical Chance buff offsets Feral's sub-par performance to some extent, at least.

If you can do anything, do it - this is the only way. As a Feral Druid, you have to fill the gaps. You will not top any chart, but you can prevent wipes by making the right decisions (even if this means healing in a Feral spec). Make yourself as useful as possible; this will increase your chances of finding a Raid (and finding a Raid as a Feral Druid can be problematic).

All in all, Feral Druid is one of the most flexible specializations out there. Moreover, it uses engaging rotation, which is rare in Classic. If you are looking for a challenge and don't shy away from the dirty work, Feral will suit you well.


 Pros  Cons
 Great Utility  Rather disappointing Damage output
 One of the most flexible specs in the game  Hard-to-master rotation
 Incredible mobility (especially while outdoors)  Has to do more grinding than other Classes if he wants to perform (farming Manual Crowd Pummelers FTW)
 Can off-tank quite well, even in a DPS-focused build  Gearing up can be problematic because of the high competition
 Has access to the only Combat Resurrection ability in Classic  Most often forced to fill the support role


The Best Race Choice

There are only two Druid Races; one for each faction, so there is no much choice - if you want to play Alliance, you pick Night Elf, and if you want to play Horde, you pick Tauren. However, we will compare them to each other in case you value racial benefits over faction ones.

Tauren gets 5% more Health, but Night Elf has a 1% increased Dodge Chance. Both of these Talents are quite good for Feral Druid Tanks, but they do not affect DPS gameplay at all. Neither Race has a Racial that affects DPS directly, but Druid's Shadowmeld makes your Prowl a bit better which helps when soloing and while sneaking around in a PvP environment. On the other hand, Tauren's War Stomp has a multitude of uses in both PvP and PvE (AoE stun can be used as standard CC, as a way of escaping danger, or even as an AoE interrupt). All of the above considered, Night Elf and Tauren are pretty much equal as PvE Feral Druids, so picking a Race over a Faction, in this case, defeats the point (in our opinion, at least).


The Best Professions Choice

There is only one profession that makes a real impact in Raids and it is Engineering (Alchemy is also a decent option, but you can buy Flasks, Elixirs, and Potions from other players, which makes it much less impactful). It gives you access to powerful explosives that increase your AoE and Single-Target DPS. On top of that, it lets you create and use Gnomish Battle Chicken Trinket that summons a Guardian Chicken that fights at your side and has a chance on hit to cast a "Battle Squawk" which boosts Melee attack speed of all Party members by 5%, making it a must-have in every competitive group. The fact that Engineering is also considered the best PvP profession is an added benefit to its power in the PvE environment. The second interesting choice is Leatherworking. Although it will not affect your DPS directly, it will enable you to craft some high-quality Druid Items, like Devilsaur Set which is a part of the pre-Raid BiS set for Feral and the Wolfshead Helm which is Best in Slot for Feral Druids throughout all Classic.

If you are interested in Leatherworking and you are still leveling, you should go for it first as it the easiest to skill up while leveling if you also pick Skinning (collecting Leather is very convenient; you are fighting a lot of beasts while questing anyway). Otherwise, you should pick Mining to supplement your Engineering Skill, you can always switch it to another profession of your liking later on.

Note: If you want to know more about all available professions and secondary skills, please check our detailed WoW Classic Professions Guide.


Statistics Priority

  1. Hit Rating -  Increases your chance to Hit a Target. At level 60, with a Weapon Skill of 300, you have a 5% chance to miss with a special attack against a Target of equal level. Against level 63 Boss, who has 315 Defense skill, you need 9% Hit Rating to never miss a special attack. Getting 9% Hit Rating is paramount for a Raiding Feral Druid and should be your first goal when gearing up as missing an Ability will throw off your rotation.
  1. Agility - Increases your Attack Power, improves your Dodge, and Critical Strike chance. Druid gets 1% Critical Chance for 20 Agility (0,05% per point) and 1 AP per 1 Agility. This is your primary stat and you should look for it on all item upgrades after covering Hit Rating.
  1. Strength - Increases Damage you deal to enemies. Druid's Strength to Attack Power proportion is calculated as follows: 1 Str = 2 AP without Hart of the Wild Talent and 1 Str = 2,4 AP with the Talent. The value of Strength is comparable to that of Agility.
  1. Critical Strike - Increases your chance to deal bonus (critical) damage with all your attacks. Crit is a powerful statistic for a Feral Druid, but it gets a bit overshadowed by the fact that Agility provides both Critical Chance and Attack Power.
  1. Attack Power - Increases Damage dealt. Druid's damage in Shapeshift forms is calculated only based on the AP value (Weapon Damage does not matter). Both Strength and Agility provide AP and are more efficient than this statistic in what they do.
  1. Intellect - Increases your mana pool which in turn allows you to Powershift more, and Powershifting increases your DPS.
  1. Spirit - Increases your Health and Mana regeneration while out of combat. Moreover, your mana will regenerate in combat according to the 5-second rule. The fact that mana regenerates while you are shapeshifted may lead you to believe that Spirit is a great stat for Druids as it will enable you to Powershift more often. Sadly, this is not the case because you want to Powershift in specific time-windows which greatly limits Spirit's viability. However, Spirit will play a role if you completely run out of mana during a fight.

Statistic Priority for a Raiding Feral Druid:

Hit Cap Agility =/ Strength  Critical Chance ⇒ Attack Power Intellect Spirit


The Best Talent Builds

Proper Talent allocation is essential for maximizing Damage output and/or Survivability. Here, we will describe the most optimal Feral Druid specs and lead you through Talent Trees level-by-level to explain some choices.

There are two competitive PvE Talent Builds for Feral Druids to choose from:

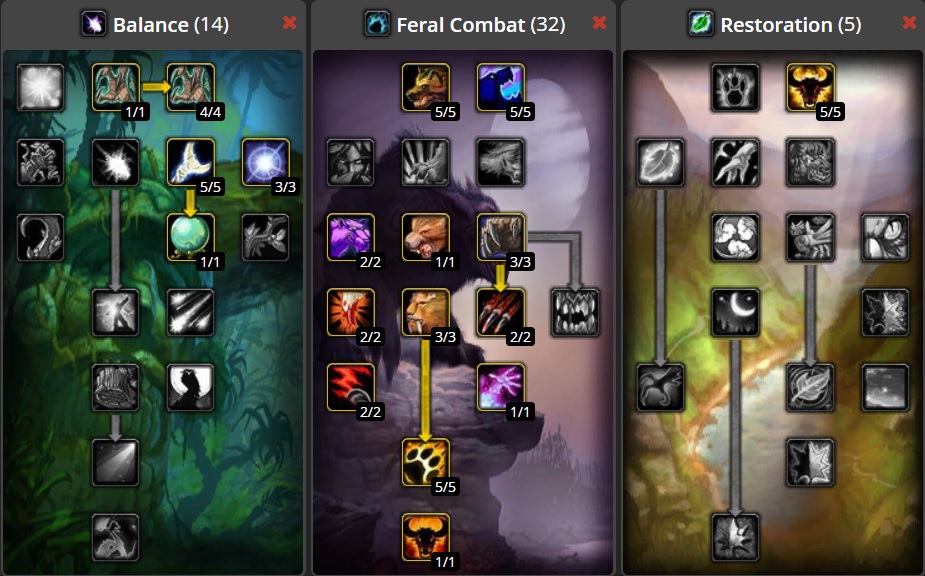
  • DPS Feral Druid Build - Standard Feral DPS Talent setup. It secures all Damage-increasing Talents and enables you to powershift* effectively, by securing Furor and Natural Shapeshifter Talents. If you don't have to off-Tank in Raids, this Feral spec is the way to go. It will let you do the highest possible DPS (as far as Feral Druid Builds go).
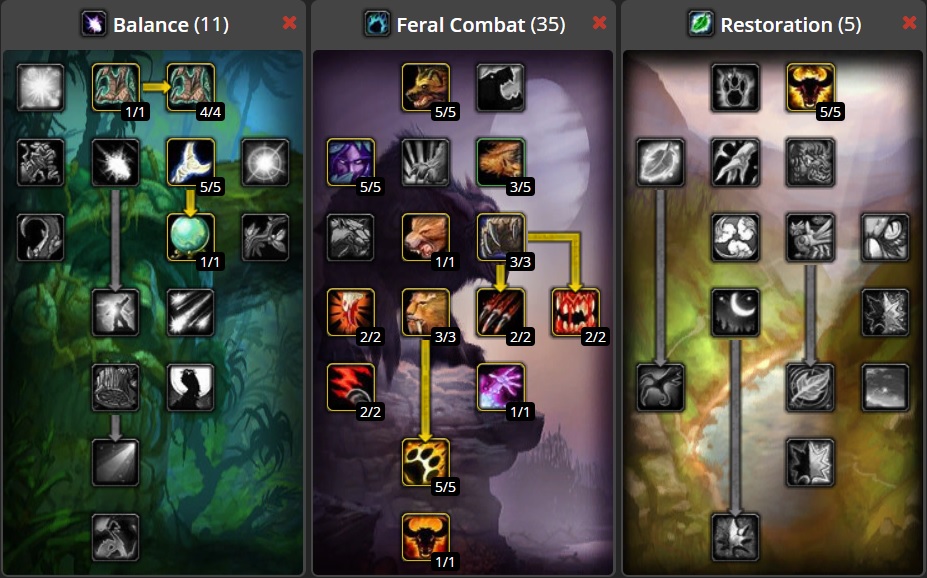
  • DPS/Tank Hybrid Feral Druid Build - This version of Feral Druid spec sacrifices some offensive power in exchange for increased survivability and improved Bear Form performance. The Build loses Natural Shapeshifter, Feline Swiftness, and Feral Aggression, but gains Primal Fury, Feral Instinct, and Thick Hide in exchange. Our featured version also sacrifices 2 points from Thick Hide to secure Faerie Fire (Feral) and Feral Charge as these two abilities make Feral Druid much more versatile. With this build, you will do less DPS, but you will also be much more useful during encounters that require off-Tanks to be present. Moreover, you will still provide your party members with the Leader of the Pack buff, which is mandatory for all Ferals.

DPS Feral Druid Build for PvE
Talent allocation for DPS Feral Druid Build

Balance Tree:

  • 1/1 Nature's Grasp - This is potentially useful for immobilizing an add, but can only be used outdoors which makes it very situational. It can save your life if you pull aggro on a mob that isn't immune to CC, but it also may be detrimental in some cases - for example when you want adds to be grouped up (you don't want one of them to be immobilized in a different location). Also very solid in PvP.
  • 4/4 Improved Nature's Grasp - Makes Nature's Grasp much more reliable by making it trigger with 100% probability.
  • 5/5 Natural Weapons - Feral Talent in the Balance Tree - very balanced. Jokes aside, 10% physical Damage increase is very solid.
  • 3/3 Natural Shapeshifter - Makes Powershifting* much more cost-effective, which visibly increases your DPS. 
  • 1/1 Omen of Clarity - Gives you a chance to enter a Clearcasting state, which is one of the most powerful effects in Classic. While in Clearcasting state, your next spell or ability cast is free (this saves you 48 energy if used with Shred).

Feral Combat Tree:

  • 5/5 Ferocity - Makes your main Cat and Bear abilities more efficient.
  • 5/5 Feral Aggression - Improves your go-to finishing ability by making it hit 15% harder. Increased Attack Power reduction of your Demoralizing Roar is a nice bonus.
  • 2/2 Feline Swiftness - Feral Druid is one of the most mobile specs in Classic thanks to this Talent (while outdoors, that is).
  • 1/1 Feral Charge - Charge ability only usable in Bear Forms (this is not a downside actually, thanks to the Furor Talent), very useful for interrupting enemy spell casts and closing your distance to the target quickly.
  • 3/3 Sharpened Claws - 6% increased Critical Chance in Cat and Bear forms.
  • 2/2 Improved Shred - Shred now costs 48 Energy to use. This increases your DPS and makes your rotation much more fluid.
  • 3/3 Predatory Strikes - 90 Attack Power for 3 Talent Points (at level 60). Worth it.
  • 2/2 Blood Frenzy - Your Critical Strikes from Combo Point-generating abilities now award an additional CP. This Talent greatly increases the value of Critical Chance stat.
  • 2/2 Savage Fury.
  • 1/1 Faerie Fire (Feral) - Armor-decreasing debuff. It should be active on the Boss at all times. Also, a great way to counter Rogues and other Druids in PvP.
  • 5/5 Heart of the Wild - Solid boost to your primary statistics.
  • 1/1 Leader of the Pack - Provides 3% extra Critical Chance for all party members within 45 yards while your Cat, Dire Bear or Bear form is active. This Talent is mandatory for all Feral Druid builds as it makes them much more viable in Raids.

Restoration Tree:

  • 5/5 Furor - Gives you 10 Rage when you shapeshift into Bear Forms or 40 Energy if you shapeshift into Cat Form. This Talent singlehandedly makes Powershifting* possible.

*Powershifting - Act of instantly switching out and back into Bear or Cat Form to gain instant Rage/Energy injection provided by the Furor Talent and/or the Wolfshead Helm. This technique allows you to exchange your mana for Energy or Rage, which in turn increases your DPS. It should be used on as low Energy/Rage level as possible for the maximum effect.

DPS/Tank Hybrid Feral Druid Build for PvE
Talent allocation for DPS/Tank Hybrid Feral Druid Build

Balance Tree:

  • 1/1 Nature's Grasp. 
  • 4/4 Improved Nature's Grasp
  • 5/5 Natural Weapons
  • 1/1 Omen of Clarity. 

Feral Combat Tree:

  • 5/5 Ferocity
  • 5/5 Feral Instinct - Increases your Threat Generation which is mandatory for Tanking. Improved Prowl is also quite nice for PvP.
  • 3/5 Thick Hide - Increases your Armor contribution from items by 6%. This Talent is much better than it looks, thanks to the fact that the Dire Bear form increases your Armor contribution from items by 360%. Yes, these two effects stack.
  • 1/1 Feral Charge. 
  • 3/3 Sharpened Claws. 
  • 2/2 Improved Shred. 
  • 3/3 Predatory Strikes
  • 2/2 Blood Frenzy. 
  • 2/2 Primal Fury - Improves your Rage generation. This scales well with Critical Chance.
  • 2/2 Savage Fury.
  • 1/1 Faerie Fire (Feral). 
  • 5/5 Heart of the Wild. 
  • 1/1 Leader of the Pack. 

Restoration Tree:

  • 5/5 Furor. 


Where to get Pre-Raid/Raid BiS Gear

To maximize your DPS, you should aim to assemble the best possible Gear. This applies to both Pre-Raid and each of the Raid Tiers/Phases.

Note: The list will be updated with new items concurrently with the introduction of new Raids/Phases, so remember to visit this page, after the new Raid opens, for an update on what current best Feral Druid items in each lot are.

The Best Feral Druid Items
Weapon (MH)
  • Pre-Raid - Widowmaker (BoE World Drop) / Bonescraper (Drop from Baron Rivendare, Stratcholme) 
  • Phase 1 - Core Hound Tooth (Contained in Cashe of the Firelord, Molten Core) / Widowmaker
  • Phase 2 - Core Hound Tooth / Grand Marshal's Punisher (Rank 14 PvP Reward) 
  • Phase 3 - Grand Marshal's Punisher 
  • Phase 4 - TBA
  • Phase 5 - TBA
  • Phase 6 - TBA
Off-Hand
  • Pre-Raid - Tome of Knowledge (Drop from Archivist Galford, Stratcholme)
  • Phase 1 - Tome of Knowledge
  • Phase 2 - Tome of Knowledge 
  • Phase 3 - Tome of Knowledge 
  • Phase 4 - TBA
  • Phase 5 - TBA
  • Phase 6 - TBA
Weapon (TH)
  • Pre-Raid - Manual Crowd Pummeler* (Drop from Crowd Pummeler 9-60, Gnomeregan)
  • Phase 1 - Manual Crowd Pummeler*
  • Phase 2 - Manual Crowd Pummeler* / The Unstoppable Force (Alterac Valley Reputation Reward - Exalted) / Grand Marshal's Battle Hammer (Rank 14 PvP Reward) 
  • Phase 3 - Manual Crowd Pummeler* / The Unstoppable Force / Grand Marshal's Battle Hammer / Draconic Maul (Trash Drop, Blackwing Lair) 
  • Phase 4 - TBA
  • Phase 5 - TBA
  • Phase 6 - TBA

*If it has charges left - you'll have to farm them constantly. 

Trinket 1
  • Pre-Raid - Counterattack Lodestone (Contained in Gordok Tribute, Dire Maul) / Hand of Justice (Drop from Emperor Dagran Thaurissan, Blackrock Depths)
  • Phase 1 - Counterattack Lodestone
  • Phase 2 - Counterattack Lodestone 
  • Phase 3 - Counterattack Lodestone / Blackhand's Breadth
  • Phase 4 - TBA
  • Phase 5 - TBA
  • Phase 6 - TBA
Trinket 2
  • Pre-Raid - Blackhand's Breadth (Quest Reward from "HordeFor the Horde!" / "AllianceGeneral Drakkisath's Demise", Upper Blackrock Spire)
  • Phase 1 - Blackhand's Breadth
  • Phase 2 - Blackhand's Breadth 
  • Phase 3 - Drake Fang Talisman (Drop from Ebonroc, Blackwing Lair) 
  • Phase 4 - TBA
  • Phase 5 - TBA
  • Phase 6 - TBA
Neck
  • Pre-Raid - Mark of Fordring (Quest Reward from "In Dreams", Western Plaguelands)
  • Phase 1 - Onyxia Tooth Pendant (Quest Reward from "HordeFor All To See" / "AllianceCelebrating Good Times", Onyxia's Lair)
  • Phase 2 - Onyxia Tooth Pendant 
  • Phase 3 - Onyxia Tooth Pendant / Prestor's Talisman of Connivery (Drop from Nefarian, Blackwing Lair) 
  • Phase 4 - TBA
  • Phase 5 - TBA
  • Phase 6 - TBA
Ring 1
  • Pre-Raid - Myrmidon's Signet (BoE World Drop) / Magni's Will (Quest Reward from "AllianceThe Princess's Surprise", Blackrock Depths)
  • Phase 1 - Quick Strike Ring (Drop from multiple Bosses, Molten Core) / Tarnished Elven Ring
  • Phase 2 - Quick Strike Ring / Don Julio's Band 9Alterac Valley Reputation Reward - Exalted) 
  • Phase 3 - Quick Strike Ring / Don Julio's Band / Circle of Applied Force (Drop from Flamegor, Blackwing Lair) 
  • Phase 4 - TBA
  • Phase 5 - TBA
  • Phase 6 - TBA
Ring 2
  • Pre-Raid - Tarnished Elven Ring (Contained in Gordok Tribute, Dire Maul)
  • Phase 1 - Band of Accuria (Drop from Ragnaros, Molten Core) / Tarnished Elven Ring
  • Phase 2 - Band of Accuria / Don Julio's Band
  • Phase 3 - Band of Accuria / Circle of Applied Force / Don Julio's Band
  • Phase 4 - TBA
  • Phase 5 - TBA
  • Phase 6 - TBA
Head
  • Pre-Raid - Wolfshead Helm (Created by Leatherworking)
  • Phase 1 - Wolfshead Helm
  • Phase 2 - Wolfshead Helm
  • Phase 3 - Wolfshead Helm (This will remain BiS Helmet throughout all Phases in fact) 
  • Phase 4 - TBA
  • Phase 5 - TBA
  • Phase 6 - TBA
Chest
  • Pre-Raid -  Cadaverous Armor (Drop from Multiple Bosses, Scholomance)
  • Phase 1 - Cadaverous Armor
  • Phase 2 - Cadaverous Armor / Field Marshal's Dragonhide Breastplate (Rank 13 PvP Reward) 
  • Phase 3 - Field Marshal's Dragonhide Breastplate / Malfurion's Blessed Bulwark (Drop from Ebonroc, Blackwing Lair) 
  • Phase 4 - TBA
  • Phase 5 - TBA
  • Phase 6 - TBA
Legs
  • Pre-Raid - Devilsaur Leggings (Created by Leatherworking)
  • Phase 1 - Devilsaur Leggings
  • Phase 2 - Devilsaur Leggings / Marshal's Dragonhide Legguards (Rank 12 PvP Reward) 
  • Phase 3 - Marshal's Dragonhide Legguards 
  • Phase 4 - TBA
  • Phase 5 - TBA
  • Phase 6 - TBA
Gloves
  • Pre-Raid - Devilsaur Gauntlets (Created by Leatherworking)
  • Phase 1 - Devilsaur Gauntlets
  • Phase 2 - Devilsaur Gauntlets / Marshal's Dragonhide Gauntlets (Rank 12 PvP Reward) 
  • Phase 3 - Marshal's Dragonhide Gauntlets 
  • Phase 4 - TBA
  • Phase 5 - TBA
  • Phase 6 - TBA
Boots
  • Pre-Raid - Swiftwalker Boots (Drop from Princess Moira Bronzebeard, Blackrock Depths)
  • Phase 1 - Swiftwalker Boots
  • Phase 2 - Swiftwalker Boots / Marshal's Dragonhide Boots (Rank 12 PvP Reward) 
  • Phase 3 - Marshal's Dragonhide Boots / Boots of the Shadow Flame (Drop from Nefarian, Blackwing Lair) 
  • Phase 4 - TBA
  • Phase 5 - TBA
  • Phase 6 - TBA
Shoulders
  • Pre-Raid - Truestrike Shoulders (Drop from Pyroguard Emberseer, Upper Blackrock Spire)
  • Phase 1 - Truestrike Shoulders
  • Phase 2 - Truestrike Shoulders / Field Marshal's Dragonhide Spaulders (Rank 13 PvP Reward) 
  • Phase 3 - Truestrike Shoulders / Field Marshal's Dragonhide Spaulders 
  • Phase 4 - TBA
  • Phase 5 - TBA
  • Phase 6 - TBA
Wrists
  • Pre-Raid - Braces of the Eclipse (Drop from Prince Tortheldrin, Dire Maul West) / Blackmist Armguards (Drop from The Beast, Upper Blackrock Spire)
  • Phase 1 - Wristguards of Stability (Drop from Shazzrah, Lucifron, Sulfuron Harbinger, and Gehennas, Molten Core)
  • Phase 2 - Wristguards of Stability  / Forest Stalker's Bracers (Warsong Gulch Reputation Reward - Exalted) 
  • Phase 3 - Forest Stalker's Bracers 
  • Phase 4 - TBA
  • Phase 5 - TBA
  • Phase 6 - TBA
Belt
  • Pre-Raid - Cloudrunner Girdle (Drop from Quartermaster Zigris, Lower Blackrock Spire)
  • Phase 1 - Cloudrunner Girdle
  • Phase 2 - Cloudrunner Girdle 
  • Phase 3 - Cloudrunner Girdle 
  • Phase 4 - TBA
  • Phase 5 - TBA
  • Phase 6 - TBA
Back
  • Pre-Raid - Cape of the Black Baron (Drop from Baron Rivendare, Stratholme)
  • Phase 1 - Cape of the Black Baron
  • Phase 2 - Puissant Cape (Drop from Azuregos, Azshara World Boss) 
  • Phase 3 - Cloak of Draconic Might (Trash Drop, Blackwing Lair) 
  • Phase 4 - TBA
  • Phase 5 - TBA
  • Phase 6 - TBA


The Best Enchants and Consumables

Proper enchants and consumables will greatly increase your Damage output. While getting enchants is a one-time-deal, farming consumables might be a real chore, but it is still worth it as numbers clearly show.

The Best Enchants
Weapon (TH) Enchant Weapon - Major Intellect (+9 Intellect); This will be extremely expensive if you use Manual Crowd Pummelers
Head Lesser Arcanum of Voracity (+8 Agility, available from Libram of Voracity Quest in Burning Steppes)
Chest Enchant Chest - Greater Stats (+4 to all stats)
Legs Lesser Arcanum of Voracity (+8 Agility, available from Libram of Voracity Quest in Burning Steppes)
Hands Enchant Gloves - Greater Agility (+ 7 Agility)
Feet Enchant Boots - Enchant Boots - Greater Agility (+7 Agility)
Shoulders Chromatic Mantle of the Dawn (+5 to all Resistances)
Wrists Enchant Bracer - Superior Strength (+9 Strength)
Back Enchant Cloak - Lesser Agility (+3 Agility)

The Best Consumables
Manual Crowd Pummeler
+50% Attack Speed for 30 seconds. It has 3 charges (and does not recharge). This is Feral's BiS Weapon and a Consumable in one. Gnomeregan will become your second home...
Flask of Distilled Wisdom
+2000 maximum Mana for 2 hours; effect persists through death. Created by Alchemy. The recipe can be dropped from Balnazzar, Stratcholme. 
R.O.I.D.S.
R.O.I.D.S.
+25 Strength for 60 minutes. Reward from the Rage of Ages repeatable Quest in the Blasted Lands.
Elixir of the Mongoose
+25 Agility and +2% Critical Strike Chance for 60 minutes. It can be bought on AH or directly from an Alchemist.
Juju Power
Juju Power
+30 Strength for 30 minutes. Reward from a reputable Quest available from NPC Witch Doctor Mau'ari, Everlook, Winterspring.
Juju Might
Juju Might
+40 Attack Power for 10 minutes. Reward from a reputable Quest available from NPC Witch Doctor Mau'ari, Everlook, Winterspring.
Winterfall Firewater
+35 Attack Power for 20 minutes. Drop from Winterfall Furbolgs in Winterpring (this is an alternative for JuJu Might, as the effects don't stack).
Elemental Sharpening Stone
+2% Critical Chance for 30 minutes. Applied to a Weapon.
Demonic Rune
Demonic Rune
Restores 1356 mana at the cost of 862 life. Drop from Demons in Azshara, Felwood, and Blasted Lands (Satyrs and Fel Guards).
Major Mana Potion
Major Mana Potion
Restores 1350 to 2250 Mana. Created by Alchemy. Recipe drops from various high-level mobs, elites, and Bosses.
Grilled Squid
Grilled Squid
+10 Agility for 10 minutes. Created by Cooking, Raw Squids can be fished, but only during Winter.


Rotations

In Classic, Druid's Rotation revolves around proper resource management. You will take advantage of the Furor Talent and Wolfshead Helm by Powershifting. Remember that you lose all your current Energy when you switch out of Cat Form. This means that Powershifting should be performed at as low Energy as possible and immediately after an Energy tick; the basic sequence should look as follows:

Energy Tick  Immediate usage of an ability  Powershift before next Energy Tick occurs

Note1: The pace of your Rotation should rely on your Energy; the order presented below is just a guideline and the real key to Feral's Rotation is the ability to Powershift properly!

Note2: Critical Strikes will affect your rotation thanks to the Savage Fury Talent. Change your sequence accordingly after landing a Critical Strike (always use Ferocious Bite instead of a Shred if you have 5 Combo Points).

Note3: Ferocious Bite should be used at ~35 Energy if possible as it drains all your remaining Energy (it converts excess Energy into Damage, but the conversion is incredibly inefficient and should be avoided).

Please use the following Rotation for sustained Single-Target Damage output:

  1. Shred for Combo Point generation
Shred
  1. Shred for Combo Point generation
Shred
  1. Powershift immediately after Shred; in-between Energy Ticks (Cast Cat Form twice)
Cat Form ⇒ Cat Form
  1. Shred for Combo Point generation
Shred
  1. Shred for Combo Point generation
Shred
  1. Powershift immediately after Shred; in-between Energy Ticks (Cast Cat Form twice)
Cat Form ⇒ Cat Form
  1. Shred for Combo Point generation
Shred
  1. Ferocious Bite as a Combo Point spender
Ferocious Bite
  1. Powershift immediately after Ferocious Bite; in-between Energy Ticks (Cast Cat Form twice)
Cat Form ⇒ Cat Form


Tips and Tricks for aspiring Feral Druid Raiders

  1. If you want to deal more Damage and stand out from your Raid competition, Stack Consumables. Spending some additional Gold or a few extra hours grinding might secure you a spot in a Raid, as Raid leaders prefer dedicated and well-prepared players. This, above all else, applies to the Manual Crowd Pummeler - if you want to do competitive DPS, you have to have enough of them for the whole Raid's duration.
  1. Fill the gaps. You play as the most versatile Class in the game - take advantage of it. Does a Healer need saving from an add while an off-Tank is not paying attention? - saving that Healer is your job. Does your group need more healing? - you can help with that as well; you will not be very efficient, but you might make the difference.
  1. Do not waste your Energy. Proper timing is the key to increasing your energy efficiency, especially when Powershifting.
  1. Do not ever overcap your Combo Points. Keep track of your Savage Fury procs and shorten your sequence to avoid wasting Combo Points.
  1. Always try to improve. Get an addon that tracks your performance and try to optimize your equipment and rotation.


END NOTE

This Guide should help you to prepare yourself for that legendary Vanilla  Raiding Experience and allow you to progress through Raid Tiers efficiently and with a good amount of fun.

We hope that you have found this guide useful and informative.  If we have missed a piece of information that is important to you, please let us know! 

Please do note that this is an early version of our guide, and we will be happy to receive constructive criticism, that will help us improve it, so leave your suggestions in the comments section below.

Pictures used in this article are the intellectual property of Blizzard Entertainment Inc.