Soulwrest Phantasms Summoner Build
Poisons dealt by your Minions have never been this strong! A tanky Summoner using auto-summoning Minions with smooth gameplaySummon Poisonous Phantasms
Necromancer Build
Updated for Patch 3.19
The Best Crafty Guides by Odealo
| Guide notes |
| September 27, 2022 -Build created |
| Build Overview | |||
| Tags: [MINION] [POISON] [LIFE] | |||
|
Budget: Defenses: |
|
Boss DPS: AoE: |
|
Summon Phantasm is a very unusual Minion Skill in Path of Exile. It is not even an active Skill Gem! Summon Phantasm was designed as a Support Gem for your other Minions. Yet, this build manages to use Phantasms as the main way of dealing Damage. Typically, to summon Phantasm you or your Minions have to deal the Killing Blow on the enemy, but by using Soulwrest Unique Staff we can bypass this requirement and trigger them on every Corpse consumption we make. To make it even easier, we have a fully passive way of consuming corpses every 5 seconds.
Patch 3.19 has removed the hidden penalty to various Damage over Time effects for Minions in an effort to enable more Ailment-focused Minion builds. With this build, we try to explore those new options by using Poison Damage. At our disposal, we have 21 Phantasms, each dealing light Physical Damage with their Projectile Spell, stacking Poisons on enemies really quickly. One thing you need to avoid is letting Minions get too close to the enemy, as this can cause them to use a weak melee Attack instead. Unfortunately, Phantasms are incredibly squishy, as they were designed to be supportive Minions after all. We have two solutions to that problem. Firstly, we use Blessed Rebirth Notable found on Medium Cluster Jewels, making them invulnerable for 4 seconds upon spawning. Secondly, we utilize a fully capped Attack and Spell Block so they can safely ignore most of the incoming Damage.
Just as our Minions, we also are using Block to make ourselves tankier. Thanks to Necromancer Ascendancy, Bone Offering affects us too, at reduced effectiveness, making it really easy to reach the Block cap. Paired with decent Maximum Life and high Armour, this results in a very well-rounded character capable of clearing T16 maps at a very low budget.
You can also check our other Path of Exile builds right over here Odealo's Crafty Guides - Full List
1. Gameplay
At the start of every map, you will have to create some Corpses and consume them by using Bone Offering to create your first Phantasms. After that, all you really have to do is to move from pack to pack, occasionally resummoning your Minions to your location by using Convocation and renewing Bone Offering. Feast of Flesh from your Helmet will automatically consume nearby Corpses every 5 seconds, resummoning Phantasms and restoring a big amount of your Life. By linking all important utility Skills to your Wither and Cast while Channeling setup, you will greatly limit your button usage.
|
This video was recorded on a level 95 Necromancer using the Devouring Diadem and Brass Dome - neither is mandatory, but allows you to use additional Aura and boosts your defenses. Sadly, the damage scaling options are limited, but the damage shown in the video is available for you in far lower than 1 Divine Orb budget |
|
|

2. Build's PROS & CONS
| PROS |
|
| CONS |
|
3. Leveling tips
Leveling as a summoner is famous for its simplicity. With Summon Raging Spirits and Summon Skeletons you will be able to roll through the campaign with no effort at all. If you have Tabula Rasa, put both of those Skills for a double 5-link setup. Passive Tree will allow you to pick up most of the useful Minion Damage nodes very early for even easier leveling. Without Soulwrest, it is not worth bothering with Phantasms. You can level easily just by using random Rares found on the way, but there are some Uniques that will make leveling process even smoother.
Suggested leveling Gem setups:
| Flame Wall setup | |
 |
Summon Raging Spirits - it's the first Minion Skill available to you except for Zombies, which are rather slow and weak. They deal purely Fire Damage and you can have up to 20 of them. |
 |
Combustion Support - it grants more fire Damage and monsters ignited by your SRS will have lower Fire Resistances |
 |
Minion Damage Support - it simply gives your Minions More Damage |
 |
Added Fire Damage Support - grants part of Physical Damage as Extra Fire Damage |
| Fire Trap setup | |
 |
Summon Skeletons - summons Skeleton Warriors to fight under your command for a short duration |
|
Minion Damage - boosts Skeletons Damage |
 |
Melee Physical Damage Support - this will boost Skeletons' Physical Damage |
 |
Minion Speed Support - Skeletons are rather slow, this Support Gem will boost their Movement and Attack Speed |
| Auras setup | |
 |
Determination - Grants a lot of flat base Armour Rating to help you with early progression |
 |
Clarity - grants Mana Regeneration so you can spam your abilities freely |
 |
Vitality - similarly to Clarity, this will give you Life Regeneration. Useful for early Levels |
| Curse and Flame Dash setup | |
 |
Flame Dash - basic Movement Skill to help you move around |
 |
Faster Casting Support - this will make linked Skills faster to Cast |
 |
Flammability - this will lower enemy Fire Resistances so SRS can deal more Damage |
Bandits:
Kill all three bandits to be rewarded with 2 additional Passive Skill Points
Leveling Skill Trees:
35 Points Passive Tree
We recommend this order: 1)Lord of the Dead 2 )Heart and Soul 3)Enduring Bond 4)Quick Recovery 5) Purity of Flesh 6)Sanctity
64 Points Passive Tree
Allocate 1)Redemption and Righteous Army 2)Sovereignty 3) Devotion 4)Death Attunement 5)Combat Stamina
Recommended leveling items:
 Le Heup of All - generic Damage won't apply to Minions, but it's a good Ring for leveling nonetheless. Le Heup of All - generic Damage won't apply to Minions, but it's a good Ring for leveling nonetheless. |
|
| Adds 1 to 4 Physical Damage to Attacks +(10-30) to all Attributes (10-30)% increased Damage (10-30)% increased Rarity of Items found +(10-30)% to all Elemental Resistances |
|
 Goldrim - very good Helmet with a huge amount of Elemental Resistances Goldrim - very good Helmet with a huge amount of Elemental Resistances |
|
| +(30-50) to Evasion Rating 10% increased Rarity of Items found +(30-40)% to all Elemental Resistances Reflects 4 Physical Damage to Melee Attackers Level Requirement reduced by 100 (Hidden) |
 Tabula Rasa - White Sockets allow you to use Gems of any Colour, you can get one with corruption for +2 to Socketed Duration Gems Tabula Rasa - White Sockets allow you to use Gems of any Colour, you can get one with corruption for +2 to Socketed Duration Gems |
|
| Item has no level requirement and Energy Shield (Hidden) Item has 6 White Sockets and is fully linked (Hidden) |
|
 Perandus Blazon - this useful Belt will help with Attribute Requirements and Duration of your Quicksilver Flasks. Perandus Blazon - this useful Belt will help with Attribute Requirements and Duration of your Quicksilver Flasks. |
|
| (15-25)% increased Stun and Block Recovery +(20-30) to all Attributes (6-8)% increased Quantity of Items found +20% to Fire Resistance 20% increased Flask Effect Duration -2 Physical Damage taken from Attack Hits |
|
 Rare Wand or Sceptre- you can easily get a pair of Wands with "+1 to Level of all Fire Spell Skill Gems" which will boost the Damage of your Summon Raging Spirits significantly Rare Wand or Sceptre- you can easily get a pair of Wands with "+1 to Level of all Fire Spell Skill Gems" which will boost the Damage of your Summon Raging Spirits significantly |
|
|
+1 to Level of all Fire Spell Skill Gems |
|
 Mark of the Red Covenant - with this Helmet you will have fewer SRS but they will be much stronger, improving overall Damage Mark of the Red Covenant - with this Helmet you will have fewer SRS but they will be much stronger, improving overall Damage |
|
| +(30-50) to maximum Energy Shield Summoned Raging Spirits deal 175-250% increased Damage 75% reduced Maximum number of Summoned Raging Spirits Summoned Raging Spirits' Hits always Ignite Summoned Raging Spirits' Melee Strikes deal Fire-only Splash Damage to Surrounding Targets |
|
 Wanderlust - very good leveling Boots, as they grant bonus to Mana Regeneration and make you Immune to Freezes Wanderlust - very good leveling Boots, as they grant bonus to Mana Regeneration and make you Immune to Freezes |
|
| +5 to Dexterity +(10-20) to maximum Energy Shield (20-40)% increased Mana Regeneration Rate 20% increased Movement Speed Cannot be Frozen |
|
4. Final Skill Tree, Ascendancy Points, and Pantheon
Final Skill Tree:
110 Points Final Passive Tree (doesn't include Cluster or Unique Jewels)
119 Points Path of Building (PoB) link
Ascendancy points:
Preferably in that order:
- Mindless Aggression
- Unnatural Strength
- Mistress of Sacrifice
- Plaguebringer (optionally Commander of Darkness, slightly less Damage but easier gearing process)
Pantheon:
Major God: Arakalii: 10% reduced Damage taken from Damage Over Time, +40% Chaos Resistance against Damage Over Time
Minor God: Soul of Abberath: 60% less Duration of Ignite on You; Unaffected by Burning Ground
5. Final Gems links
| [DPS] Summon Phantasm setup (socket it in your Staff) |
|
 |
Summon Phantasm Support - our main setup actually has no Active Skills, and they don't have to be linked, just Socket them in your Staff. Phantasm Support will raise the overall limit of Summoned Phantasms to 21 |
 |
Predator Support - you can command your Minions to attack the single enemy with increased Damage |
|
Minion Damage Support - boosts our Phantasms Damage, but reduced their Life |
 |
Unbound Ailments Support - increases Duration and Damage of Poisons on enemy |
 |
Chance to Poison Support - increases chances to Poison and adds some Chaos Damage |
 |
Greater Multiple Projectiles Support - Ignite lasts shorter, but deals More Damage during that time |
 |
(Optionally)Void Manipulation - for tough enemies you can use this Support instead of GMP |
| [UTILITY] Defensive Aura | |
 |
Determination - this Aura gives a lot of Armour Rating, which is our primary Defense |
 |
Defiance Banner - a Banner that increases Armour Rating and lowers nearby enemies' Chance to Critical Strike |
| [UTILITY] Offensive Aura | |
 |
Malevolence - on the other hand, this Aura boosts Damage over Time, which is our main Damage |
 |
Haste - gives a lot of Movement and Cast Speed. Use the Vaal version for an even stronger effect |
 |
Generosity Support - by linking it to our Offensive Auras, you will boost your Minions even further. Do not use it with Determination, as you need Armour Bonus for yourself |
| [UTILITY] Wither setup | |
 |
Wither - channeling Spell that increases Chaos Damage Taken by the enemy. Use it for Damage boost and to cast other Utility Skills, You can use Divergent Alternate Quality to reach maximum bonus more quickly. |
 |
Cast While Channeling Support - it will cause other socketed Spells to be cast while Channeling Wither. Arrangement of Gems in Sockets matters for Trigger order. |
 |
Desecrate - creates corpses that you can consume to summon Phantasms. |
 |
Bone Offering - consumes Corpses to give you and your Minions defensive Buff for a short duration |
 |
Despair - this curse lowers enemy Chaos Resistances and adds some Chaos Damage to Hits |
| [UTILITY] Carrion Golem and Spectres setup | |
 |
Summon Carrion Golem - a Minion that grants other Minions added Physical Damage, making them stronger |
 |
Raise Spectre - summons fallen monsters as your servant. Use Apes from Act 2 to generate Frenzy Charges for your Phantasms |
 |
Feeding Frenzy Support - grants your utility Minions chance to give Damage Buff for all your Minions |
 |
Minion Life Support - increases the survivability of your Minions |
| [MOBILITY] Flame Dash setup | |
|
Flame Dash - a Movement Skill used to travel across the Map faster, and jump over terrain gaps. |
 |
Withering Step - second Movement Skill, used to gain Phasing and quickly apply Withered Stacks to the enemies |
| [UTILITY] Molten Shell | |
 |
Molten Shell - this Guard Skill creates a protective Shield based on your Armour. Vaal version almost makes you immortal for a short duration |
| [UTILITY] Convocation | |
 |
Convocation - summons all your Minions to your current location and heals them a bit |
|
|
6. Gear Setup
This build uses a lot of Unique Items, but only some of them are mandatory. Soulwrest Unique Staff is a core Item for this build. It allows you to create Phantasms upon Corpse consumption, grants them a nice chunk of Physical Damage, and effectively raises the maximum limit of Phantasms by 10, as you can link regular Summon Phantasm Support to this staff for a total of 21 Phantasms summoned at once. Another important item is the Darkness Enthroned Unique Belt, which significantly boosts the effect of socketed Abyss Jewels. We need a total of 60% chance to Poison for Minions from our Ghastly Eye Jewels, so it is important to put your best Jewels in this Belt. To use all 3 Auras, you will need Devouring Diadem paired with Charisma anoint on your Amulet, or enchant for 30% Mana Reservation Efficiency for one of your Auras. If you don't have those yet, you can just stick to using only Vaal Haste for short bursts of speed.
The rest of the gear should be just Rare Items with a lot of Maximum Life and Resistances. You will also need some Attributes.
Our recommended items will:
- Cap your resistances at 75%
- Provide you with enough DPS and Life to start mapping
|
Stat priorities on Rare Items:
|
 (Helmet) Rare Helmet - at the beginning, you can use just a Rare Helmet with Life, Resistances, and Attributes (Helmet) Rare Helmet - at the beginning, you can use just a Rare Helmet with Life, Resistances, and Attributes |
|
| Min. requirements: +60% to Elemental Resistances +70 to Maximum Life +40 to Attributes |
|
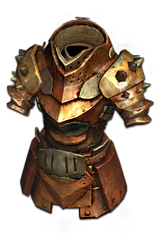
 (Helmet) Devouring Diadem - this Helmet is required to run Haste Aura permanently, it also triggers Feast of Flesh, summoning new Phantasms automatically (Helmet) Devouring Diadem - this Helmet is required to run Haste Aura permanently, it also triggers Feast of Flesh, summoning new Phantasms automatically |
|
| +1 to Level of Socketed Gems Socketed Gems have 25% increased Reservation Efficiency Trigger Level 15 Feast of Flesh every 5 seconds (180-220)% increased Energy Shield 10% chance for Energy Shield Recharge to start when you use a Skill Eldritch Battery |
|
| Helmet enchantments: 150% increased Effect of the Buff granted by your Carrion Golems |
|
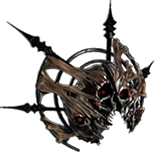
 (Weapon) Soulwrest - by using this Staff you can bypass Summon Phatasms requirements and summon them at any time. You don't need to link Sockets at all. By using another Summon Phantasm Support with a 21 Gem level, we increase the maximum limit of Phantasms summoned at the same time. (Weapon) Soulwrest - by using this Staff you can bypass Summon Phatasms requirements and summon them at any time. You don't need to link Sockets at all. By using another Summon Phantasm Support with a 21 Gem level, we increase the maximum limit of Phantasms summoned at the same time. |
|
| +20% Chance to Block Attack Damage while wielding a Staff Trigger Level 20 Summon Phantasm Skill when you Consume a corpse (100-140)% increased Spell Damage (25-30)% increased Cast Speed (80-100)% increased Mana Regeneration Rate Minions deal (45-51) to (66-78) additional Physical Damage If you Consumed a corpse Recently, you and nearby Allies Regenerate 5% of Life per second |
|
 (Body Armour) Rare Body Armour - it will be enough for most content. You only need 5-link for your Wither Setup, but it's worth having 6 sockets as this build uses a lot of Skill Gems. (Body Armour) Rare Body Armour - it will be enough for most content. You only need 5-link for your Wither Setup, but it's worth having 6 sockets as this build uses a lot of Skill Gems. |
|
| Min. requirements: +120 to maximum Life +70% to Elemental Resistances Optional affixes: You can apply an additional Curse 30% increased effect of Non-Curse Auras from your Skills |
|
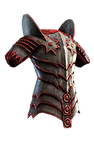
 (Body Armour) Brass Dome - it's the tankiest Armour you can get in the game, even though it reduces your Life by taking away the Strength bonus. It is hard to get matching colours, so you might want to grab one with 6 White Sockets (Body Armour) Brass Dome - it's the tankiest Armour you can get in the game, even though it reduces your Life by taking away the Strength bonus. It is hard to get matching colours, so you might want to grab one with 6 White Sockets |
|
| (350-400)% increased Armour +(1-5)% to all maximum Elemental Resistances Strength provides no bonus to Maximum Life Take no Extra Damage from Critical Strikes |
|
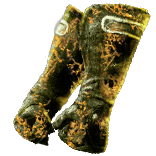
 (Boots) Rare Boots - just a basic pair of Boots with high maximum Life, Movement Speed, and Elemental Resistances (Boots) Rare Boots - just a basic pair of Boots with high maximum Life, Movement Speed, and Elemental Resistances |
|
| Min. requirements: +70 to maximum Life 25% increased Movement Speed +60% to Elemental Resistances Optional affixes: (6–9)% increased Movement Speed if you haven't been Hit Recently Cannot be Chilled |
|
 (Gloves) Rare Gloves - in addition to your typical maximum Life and Resistances, you can also get Minion Damage increase as a regular affix and Eldritch Implicit (Gloves) Rare Gloves - in addition to your typical maximum Life and Resistances, you can also get Minion Damage increase as a regular affix and Eldritch Implicit |
|
| Min. requirements: +60 to maximum Life +40% to Elemental Resistances +40 Attributes Optional affixes: Abyss Socket increased Minion Damage |
|
 (Gloves) Breathstealer - with those Gloves you to get additional Anoint, and create temporary Auras on the ground upon killing Rare Enemy (Gloves) Breathstealer - with those Gloves you to get additional Anoint, and create temporary Auras on the ground upon killing Rare Enemy |
|
| (100-150)% increased Armour and Evasion +(30-50) to maximum Mana +(10-16)% to all Elemental Resistances (5-10)% increased Attack and Cast Speed Create a Blighted Spore when your Skills or Minions Kill a Rare Monster Recommended Anoint: Corruption |
|
 (Belt) Darkness Enthroned - you can Socket in 2 of your best Abyss Jewels here. Preferably use the ones with Poison Chance for your Minions. (Belt) Darkness Enthroned - you can Socket in 2 of your best Abyss Jewels here. Preferably use the ones with Poison Chance for your Minions. |
|
| Has 1 Abyssal Socket 75% increased Effect of Socketed Abyss Jewels |
|
 (Amulet) Rare Amulet - at first you can simply use Rare Amulet with lots of Life, Elemental Resistances and Attributes (Amulet) Rare Amulet - at first you can simply use Rare Amulet with lots of Life, Elemental Resistances and Attributes |
|
| Min. requirements: +70% to Elemental Resistances +60 to Maximum Life Optional affixes: Attributes |
|
| Recommended Anointments: Charisma |
|
 (Amulet) Aul's Uprising - this Amulet provides you with free Envy Aura which adds Chaos Damage to your Minions' Spells. It also adds some Attributes and boosts Global Defences (Amulet) Aul's Uprising - this Amulet provides you with free Envy Aura which adds Chaos Damage to your Minions' Spells. It also adds some Attributes and boosts Global Defences |
|
| +(10-16) to all Attributes Grants Level 15 Envy Skill +(15-20) to all Attributes +(50-70) to maximum Life (15-20)% increased Global Defences Envy has no Reservation |
|
| Recommended Anointments: Charisma |
|
 (Ring) Rare Ring - the new addition to the game, Bone Rings, can provide very strong modifiers for your Minions. Other than that, as usual, you need maximum Life, Resistances, and Attributes (Ring) Rare Ring - the new addition to the game, Bone Rings, can provide very strong modifiers for your Minions. Other than that, as usual, you need maximum Life, Resistances, and Attributes |
|
| Min. requirements: +80% to Elemental Resistances +60 to Maximum Life Attributes Optional affixes: Minions deal #% increased Damage Minions have #% increased Attack and Cast Speed |
|
 (Jewel) Rare Abyss Jewels - you will need a total of 3 Abyss Jewels that grant Poison Chance to your Minions, 2 of them have to be socketed in Your Belt. Other than that, look for maximum Life and other Damage modifiers for your Minions. (Jewel) Rare Abyss Jewels - you will need a total of 3 Abyss Jewels that grant Poison Chance to your Minions, 2 of them have to be socketed in Your Belt. Other than that, look for maximum Life and other Damage modifiers for your Minions. |
|
|
Mandatory affixes: |
|
 (Jewel) Watcher's Eye - offensive modifiers from this Jewel won't apply to your Minions. That's why you can use purely defensive or utility modifiers, which are usually cheaper (Jewel) Watcher's Eye - offensive modifiers from this Jewel won't apply to your Minions. That's why you can use purely defensive or utility modifiers, which are usually cheaper |
|
| (4-6)% increased maximum Energy Shield (4-6)% increased maximum Life (4-6)% increased maximum Mana <Two or Three random aura modifiers> Recommended Aura mods: +(5–8)% Chance to Block Attack Damage while affected by Determination (5–8)% additional Physical Damage Reduction while affected by Determination You have Phasing while affected by Haste Unaffected by Poison while affected by Malevolence |
|
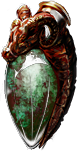
 (Jewel) Amanamu's Gaze - with all your Ghastly Eye Jewels, this Unique Jewel will give your Minions a lot of Damage. (Jewel) Amanamu's Gaze - with all your Ghastly Eye Jewels, this Unique Jewel will give your Minions a lot of Damage. |
|
| +(5-10) to all Attributes Minions have +6% to Damage over Time Multiplier per Ghastly Eye Jewel affecting you, up to a maximum of +30% |
|
 (Jewel) Fortress Covenant - it grants a lot of Damage and Block Chance for your Minions. Put it in Cluster Jewel Socket to avoid its downside (Jewel) Fortress Covenant - it grants a lot of Damage and Block Chance for your Minions. Put it in Cluster Jewel Socket to avoid its downside |
|
| Minions deal (35-45)% increased Damage Minions have +(10-12)% Chance to Block Attack Damage Minions have +(10-12)% Chance to Block Spell Damage Notable Passive Skills in Radius are Transformed to instead grant: Minions take 20% increased Damage |
|
 (Jewel) Quickening Covenant - similarly to the previous Jewel, you can put it in Cluster Jewel Socket. Look for a high Cast Speed modifier (Jewel) Quickening Covenant - similarly to the previous Jewel, you can put it in Cluster Jewel Socket. Look for a high Cast Speed modifier |
|
| Minions have (12-16)% increased Attack Speed Minions have (12-16)% increased Cast Speed Minions have +(20-24)% chance to Suppress Spell Damage Notable Passive Skills in Radius are Transformed to instead grant: Minions have 25% reduced Movement Speed |
|
 (Jewel) Large Cluster Jewels - they provide rather weak Notables for this build, but you will need Cluster Sockets for the Covenants Jewels. Use one with 8 Passive Skills, at least 25% increased effect of Small Passive Skills, and any useful Affixes you can find. (Jewel) Large Cluster Jewels - they provide rather weak Notables for this build, but you will need Cluster Sockets for the Covenants Jewels. Use one with 8 Passive Skills, at least 25% increased effect of Small Passive Skills, and any useful Affixes you can find. |
|
| Recommended affixes: Added Small Passive Skills have (25-35)% increased Effect Added Small Passive Skills also grant: Minions have (1-3)% increased Attack and Cast Speed Resistances Attributes |
|
 (Jewel) Medium Cluster Jewels - Blessed Rebirth Notable is necessary here. The second Notable is not as important. Use Jewel with a maximum of 5 Passive Skills. (Jewel) Medium Cluster Jewels - Blessed Rebirth Notable is necessary here. The second Notable is not as important. Use Jewel with a maximum of 5 Passive Skills. |
|
| Recommended affixes: 1 Added Passive Skill is Blessed Rebirth 1 Added Passive Skill is Feasting Fiends |
|
 (Flask) Rumi's Concoction - it can be used for extra Block Chance. Especially useful if you don't have Watcher's Eye with Block modifier. (Flask) Rumi's Concoction - it can be used for extra Block Chance. Especially useful if you don't have Watcher's Eye with Block modifier. |
|
| +(8-12)% Chance to Block Attack Damage during Flask effect +(4-6)% Chance to Block Spell Damage during Flask effect |
|
 Flask) Taste of Hate - you can optionally use this Fllask for additional Cold and Physical Damage mitigation Flask) Taste of Hate - you can optionally use this Fllask for additional Cold and Physical Damage mitigation |
|
| (10-15)% of Physical Damage from Hits taken as Cold Damage during Flask effect Gain (10-15)% of Physical Damage as Extra Cold Damage during effect 30% chance to Avoid being Chilled during Flask effect 30% chance to Avoid being Frozen during Flask effect |
|
|
Suggested Flasks:
|
|
    |
|
|
If you have any other build requests please leave that in the comments below. We are always open to suggestions and constructive feedback.
Pictures used in this article are the intellectual property of Grinding Gear Games.
