 Buy/Sell
 Log in

Pyroclast Mine Saboteur Build
An explosive Saboteur build that rains down fiery projectiles and melts Bosses with long Pyroclast Mine detonation chains!Pyroclast Mine
Saboteur Build
Patch 3.30 - Covens of Umbra
The Best Crafty Guides by Odealo
| Guide notes |
| November 13, 2026 Covens of Umbra - Patch 3.30 |
| Build overview | |||
| Tags: [MINE] [FIRE] [CRITICAL] [LIFE] [EVASION] | |||
|
Budget: Defenses: |
|
Boss DPS: AoE: |
|


Pyroclast Mine fires a burst of molten projectiles whenever a Mine detonates. Its explosions can overlap against large targets, and each successive detonation in a long sequence releases more projectiles. This gives the build particularly high Damage against stationary Bosses while keeping the Campaign and early Atlas inexpensive. Saboteur can begin with basic Rare Equipment, then develop into a Hybrid Life/Energy Shield Critical Strike character without changing its main Skill.
The build combines Life, Evasion, Energy Shield, Spell Suppression, and Ghost Dance for several layers of defence. Grace supplies a large amount of Evasion, while Flesh and Stone reduces Damage from nearby enemies in Sand Stance. Pyromaniac supplies Life Regeneration and protection against Ignite and Shock, and Born in the Shadows blinds nearby enemies. Frost Shield adds protection when preparing longer detonation sequences against Bosses.
Armed Pyroclast Mines apply Fire Exposure to nearby enemies. Demolitions Specialist improves the effect of this Mine Aura, while Charged Mines provides an important source of Power and Frenzy Charges. Automatic detonation keeps Mapping comfortable, but manually starting a full sequence after pre-placing Mines delivers far more burst Damage against Bosses. Further upgrades focus on Gem Levels, Mine Throwing Speed, Critical Strike Chance, and Critical Strike Multiplier.
The main Endgame upgrades are Sandstorm Visage, a high-base-Critical-Strike Prophecy Wand, and Astral Projector. Sandstorm Visage makes the Wand's base Critical Strike Chance especially valuable, while Astral Projector improves the targeting of the explosions during Mapping. The Arkhon's Tools adds a Scorching Skitterbot and substantial Mine Throwing Speed, but its Skitterbot auras can also affect you. Ancestral Vision and Elemental Ailment Avoidance on Rare Equipment help make this combination safe to use, without it don't use Arkhon's Tools.
You can also check our other Path of Exile builds right over here Odealo's Crafty Guides - Full List
1. Gameplay
Throw Pyroclast Mines ahead of each pack and use Automation linked to Detonate Mines for regular Mapping. Travel with Shield Charge and Frostblink. For Bosses, disable Automation, preload Mines, place Arcanist Brand to apply your offensive Spells, then manually start a single long Detonation Sequence. Additional Mines thrown during that sequence join the chain, strengthening later explosions. Use Frost Shield before dangerous stationary phases, keep Flesh and Stone in Sand Stance, and reactivate Automation when you return to Mapping.
|
|
|
|


2. Build's PROS & CONS
| PROS |
|
| CONS |
|
3. Leveling tips
Begin with Stormblast Mine from Act 1. Add Added Lightning Damage, Swift Assembly, and Trap and Mine Damage as links become available. Around Level 28, after Sever the Right Hand in Act 3, buy Pyroclast Mine and switch your main links over to Fire. A four-link is enough for the campaign, and a five- or six-link Rare Body Armour will carry you into Maps. Use a Mana Flask until your regeneration and passive reductions make Mine costs comfortable.
Start by capping Elemental Resistances and collecting Maximum Life, Movement Speed, Mine Damage, and a Wand with Spell or Fire Gem Levels. Keep a Mana Flask until your Reservation Efficiency and Mana recovery are sufficient. During Atlas progression, add Evasion, Energy Shield, Spell Suppression, and Ghost Dance. Build toward the Hybrid Crit setup with Sandstorm Visage and a high-base-crit Wand, followed by Astral Projector, improved Mine Cluster Jewels, and The Arkhon's Tools once you can safely avoid Elemental Ailments.
Suggested leveling Gem setups:
| Stormblast Mine setup - Acts 1-3 | |
 |
Stormblast Mine - your early Mine Skill. It works with generic Spell and Mine passives until Pyroclast becomes available. |
 |
Added Lightning Damage Support - adds useful Flat Damage to the early Stormblast setup; replace it when switching to Fire. |
 |
Swift Assembly Support - gives a chance to throw extra Mines and makes the early campaign more comfortable. |
 |
Trap and Mine Damage Support - a straightforward Damage multiplier for the leveling setup. |
| Pyroclast Mine setup - Level 28+ | |
 |
Pyroclast Mine - switch here after the Act 3 quest and begin scaling Fire, Area, Projectile, and Mine Damage. |
|
Trap and Mine Damage Support - your main early Damage support; keep it in the final link. |
|
Swift Assembly Support - helps place multiple Mines while sockets are limited. Change to Minefield later. |
Recommended leveling items:
 Lifesprig - a convenient early Wand for Spell Gem Levels, Life, and Mana. Entirely optional if you find a suitable Rare Wand. |
|
| (8-12)% increased Spell Damage +1 to Level of Socketed Spell Gems (20-28)% increased Spell Damage (5-8)% increased Cast Speed +(15-20) to maximum Life +(15-20) to maximum Mana Regenerate (6-8) Life over 1 second when you Cast a Spell |
 Goldrim - helps cover Elemental Resistances during the early Acts. Replace it with a Life and Evasion Helmet when your gear allows. |
|
| +(30-50) to Evasion Rating 10% increased Rarity of Items found +(30-40)% to all Elemental Resistances Reflects 4 Physical Damage to Melee Attackers |
 Praxis - a useful Ring for easing early Mana costs when your Mine links begin to feel expensive. |
|
| +(20-30) to maximum Mana +(30-60) to maximum Mana Regenerate (3-6) Mana per second (-8--4) to Total Mana Cost of Skills 8% of Damage taken Recouped as Mana (20-30)% increased Mana Cost Efficiency |
Bandits:
Kill all the Bandits for the additional Passive Skill Point. Helping Alira is a reasonable alternative if you want an easier time capping Resistances early on.
Leveling Skill Trees:
Early campaign(50 points): Take nearby Life, Mine Damage, Mine Throwing Speed, and Mana Cost/Reservation Efficiency. Pick the efficient Mine clusters on the Shadow side of the tree before reaching farther for Critical Strike nodes.
Early Mapping: Continue through Life and Mine clusters, allocate Ghost Dance once Evasion and Energy Shield are useful, and build toward capped Spell Suppression. Add Critical Strike Chance and Multiplier after the defensive foundation is in place. For exact skill tree, try to follow our Final Skill Tree(120 points).
4. Final Skill Tree, Ascendancy Points, and Pantheon
Final Skill Tree:
120 Points Final Skill Tree - take efficient Mine Damage and Aura Effect, Life, Evasion, Energy Shield, Spell Suppression, Ghost Dance, Reservation Efficiency, and Critical Strike clusters. The Life Mastery granting increased maximum Life with no Life modifiers on the Body Armour can be used on a suitable Rare piece. Prioritise the Masteries that strengthen Mine Auras and protect against damage from nearby Mines.
Ascendancy points:
Preferably in that order:
- Demolitions Specialist
- Pyromaniac
- Born in the Shadows
- Bomb Specialist
Pantheon:
Major God: Soul of Lunaris - Physical Damage Reduction for each nearby enemy and increased movement speed
Minor God: Soul of Shakari - valuable protection against Poison and Chaos Damage during campaign and Atlas progression.
5. Final Gems links
| [DPS] Pyroclast Mine setup | |
|
Pyroclast Mine - your main Fire Spell. Long detonation chains increase its projectile count, making overlapping explosions particularly effective against Bosses. |
|
Trap and Mine Damage - a substantial Damage multiplier for every Mine Detonation. |
 |
Charged Mines - generates Power and Frenzy Charges while improving Mine Throwing Speed and Critical Strike performance. |
 |
Increased Critical Damage - scales the high Critical Strike Chance supplied by the final Wand and Sandstorm Visage combination. |
 |
Elemental Focus - adds a large Elemental Damage multiplier. Fire Exposure comes from the Mines' aura, so it remains available. |
 |
Minefield - throws several Mines per action to build longer sequences quickly; compensate for its Throwing Speed penalty with Gear and passives. |
| [MOBILITY] Shield Charge and Frostblink setup | |
 |
Shield Charge - the main movement Skill for travelling between packs while using a Wand and Shield. |
 |
Faster Attacks - makes Shield Charge faster and more responsive. |
 |
Frostblink - an instant repositioning tool that crosses gaps and helps avoid dangerous attacks. |
 |
Clarity - provides Mana Regeneration for Mine throwing and utility Skills. Raise it level only if the reservation allows. |
| [UTILITY] Automated Detonation and Guard setup | |
 |
Automation - regularly triggers supported Skill Gems while active, keeping Mapping simple. |
 |
Detonate Mines - starts the detonation sequence. Keep it at Level 1 and temporarily disable Automation before setting up long Boss sequences. |
 |
Immortal Call - provides a short defensive window against incoming hits. Keep it at Level 1 to minimise its Mana cost. |
 |
More Duration - extends the defensive benefit of Immortal Call |
| [UTILITY] Flame Wall and Boss Curse setup | |
 |
Flame Wall - adds a stationary Fire Damage effect under Bosses; projectiles crossing the wall can also gain additional Fire Damage. |
 |
Arcanist Brand - automates the linked offensive Spells after attaching to a target, leaving you free to throw Mines. |
 |
Sniper's Mark - a major single-target damage boost for your projectile-based Mine explosions. |
 |
Flammability - reduces the target's Fire Resistance. Take Whispers of Doom or obtain another source of +1 to maximum Curses to maintain it together with Sniper's Mark. |
| [AURA] Grace and Skitterbots setup | |
 |
Grace - a major source of Evasion that supports Ghost Dance and the build's defensive layers. |
 |
Summon Skitterbots - applies Shock and Chill to nearby enemies. The Arkhon's Tools also summons a Scorching Skitterbot, increasing its offensive utility. |
 |
Unbound Ailments - improves the non-damaging ailments applied by Skitterbots, increasing their contribution to Damage and safety. |
| [UTILITY] Frost Shield and Flesh and Stone setup | |
 |
Frost Shield - creates a protective area for difficult encounters, especially when preparing a stacked Mine detonation sequence. |
|
More Duration - extends Frost Shield's duration |
 |
Flesh and Stone - use Sand Stance to take less Damage from nearby enemies, with the strongest protection at close range |
|
|
5. Gear Setup
Pyroclast Mine starts on inexpensive Rare Gear, then scales into a Life/Energy Shield Hybrid Crit character with high Evasion, Ghost Dance, and Spell Suppression. Prioritise a strong high-base-crit Wand for Sandstorm Visage, followed by Astral Projector, a good Rare Body Armour, Mine Cluster Jewels, and the Skitterbot package built around The Arkhon's Tools and Ancestral Vision. When using the Life Mastery for Body Armours without Life modifiers, choose a Body Armour that meets that condition.
|
Stat priorities on items:
|
 (Weapon) Rare Prophecy Wand - a high-base-Critical-Strike Wand is especially valuable with Sandstorm Visage. Start with a Rare Wand carrying Gem Levels, then add Mine Throwing Speed and Critical Strike modifiers as your budget grows. |
|
| Min. requirements: 30% increased Critical Strike Chance 60% increased Spell Damage 80% increased Critical Strike Chance for Spells Adds # to # Fire Damage to Spells Optional affixes: +1 to Level of all Fire Spell Skill Gems +1 to Level of all Spell Skill Gems 15% increased Mine Throwing Speed +30% to Global Critical Strike Multiplier 25% increased Fire Damage |
|
 (Shield) Rare Harmonic Spirit Shield - adds valuable Energy Shield defences and provides room for Spell Damage, Life, and Resistances without requiring an expensive Unique. |
|
|
Min. requirements: |
|
 (Helmet) Sandstorm Visage - one of the most important Endgame upgrades. It makes the base Critical Strike Chance of your main-hand Wand a key part of Pyroclast Mine's Crit scaling. A Life/Resistance Rare Helmet is suitable until you can acquire it. |
|
| (8-10)% increased Cast Speed (200-250)% increased Energy Shield Ignore Stuns while Casting Base Spell Critical Strike Chance of Spells is equal to that of Main Hand Weapon Cannot deal Critical Strikes with Attacks |
|
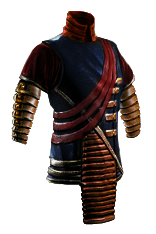 (Body Armour) Rare Evasion/Energy Shield Body Armour - supplies the main six-link and a large portion of Evasion and Energy Shield. The final tree uses a Life Mastery that rewards a Body Armour with no Life modifiers, so check the item before equiping it. |
|
| Min. requirements: 1,000+ Evasion Rating 250+ Energy Shield +70% to Elemental Resistances Optional affixes: +(11-14)% chance to Suppress Spell Damage +30% to Chaos Resistance 30% chance to Avoid Elemental Ailments |
|
 (Gloves) Rare Gloves - provide Spell Suppression, Resistances, and Elemental Ailment Avoidance. Their suffixes can help make The Arkhon's Tools safe to equip. |
|
| Min. requirements: +75 to maximum Life +(11-14)% chance to Suppress Spell Damage +70% to Elemental Resistance Optional affixes: +30% to Chaos Resistance 25% chance to Avoid Elemental Ailments 15% increased Mine Throwing Speed Useful Eldritch Implicit modifiers |
|
 (Boots) Rare Boots - combine Movement Speed and Spell Suppression with avoidance against elemental ailments, which is particularly valuable once The Arkhon's Tools is equipped. |
|
| Min. requirements: 30% increased Movement Speed +75 to maximum Life +(11-14)% chance to Suppress Spell Damage 30% chance to Avoid Elemental Ailments Optional affixes: +35% to Elemental Resistance +25% to Chaos Resistance Additional Evasion Rating |
|
 (Belt) The Arkhon's Tools - adds Mine Throwing Speed and a Scorching Skitterbot. Because its Skitterbot auras also affect you, prepare Elemental Ailment Avoidance before equipping it. Use a simple Life/Resistance Rare Belt with crafted Mine Throwing Speed while progressing. |
|
| (15-25)% increased Stun and Block Recovery +(20-30) to Dexterity and Intelligence (10-20)% increased Mana Reservation Efficiency of Skills Summon Skitterbots also summons a Scorching Skitterbot Summoned Skitterbots' Auras affect you as well as Enemies (50-75)% increased Effect of Non-Damaging Ailments inflicted by Summoned Skitterbots (15-25)% increased Trap and Mine Throwing Speed |
|
 (Amulet) Rare Amulet - balances Attributes, Resistances, and Critical Strike Multiplier. An additional Curse limit is essential to apply both Sniper's Mark and Flammability from Arcanist Brand. |
|
| Min. requirements: +70 to maximum Life +30% to Critical Strike Multiplier +25 to Strength or Dexterity -7 to Total Mana Cost of Non-Channelling Skills Optional affixes: +1 to Level of all Fire Skill Gems +#% Elemental Resistance 20% increased Spell Damage |
|
| Recommended Anointments: Whispers of Doom |
|
 (Ring) Rare Amethyst Ring - covers Chaos Resistance, Life, and remaining Attributes. A flexible Rare Ring is especially valuable when Astral Projector occupies the other Ring slot. |
|
|
Min. requirements: |
|
 (Ring) Astral Projector - makes the Nova explosions target enemies directly, greatly improving consistency against moving targets and Map packs. It is a high-value Quality-of-Life upgrade after the main defensive requirements are covered. |
|
| +(20-30)% to Lightning Resistance +(30-50) to Intelligence (20-25)% increased Spell Damage 30% chance to Avoid Elemental Ailments Nova Spells have 20% less Area of Effect Nova Spells Cast at the targeted location instead of around you |
|
 (Jewel) Large Fire Damage Cluster Jewel - opens efficient Fire Damage passives and additional sockets for Medium Mine Cluster Jewels. |
|
| Min. requirements: Cremator Prismatic Heart Widespread Destruction |
|
 (Jewel) Medium Trap and Mine Cluster Jewel - provides efficient Mine Damage and Throwing Speed, improving both Boss preparation and regular Mapping. |
|
| Min. requirements: Surprise Sabotage Guerilla Tactics |
|
 (Jewel) Rare Cobalt Jewel - fills missing Maximum Life and Critical Strike Multiplier while providing flexible Resistances or Attributes. |
|
| Min. requirements: 7% increased maximum Life +12% to Global Critical Strike Multiplier Optional affixes: +12% to Critical Strike Multiplier with Fire Skills +20% to Elemental Resistances +12% to Critical Strike Multiplier with Elemental Skills 7% increased Mine Throwing Speed |
|
 (Jewel) Ancestral Vision - converts part of your Spell Suppression investment into Elemental Ailment Avoidance. It is especially important when using The Arkhon's Tools, since Skitterbot auras affect your character too. |
|
| +(5-10) to Dexterity Modifiers to Chance to Suppress Spell Damage also apply to Chance to Avoid Elemental Ailments at 50% of their Value |
|
|
Other suggested Flasks:
|
|
     |
|
|
If you have any other build requests please leave them in the comments below. We are always open to suggestions and constructive feedback.
Pictures used in this article are the intellectual property of Grinding Gear Games.
