
Mjölner CoC Ball Lightning Inquisitor Builld
Inquisitor build that deals Lightning Damage via automatically casted Spells while using CycloneMjölner Cyclone
Inquisitor build
Updated for Patch 3.16
The Best Crafty Guides by Odealo
Estimated budget: low to medium

| Guide notes |
| August 20, 2021 - Build created September 19, 2021 -Added gameplay video October 08, 2021 -Updated for Patch 3.16 -Added The Squire build variant |
Inquisitor's Cast on Crit Cyclone builds with Mjölner that automatically triggers Lightning Spells are one of the smoothest builds to play. There are two main damaging Spells - one that you can trigger on Hit with your Mjölner, and the other one is a Cyclone linked with Cast on Critical Strike Support Gem. Mjölner is a One-Handed Mace that requires a lot of Strenght and Intelligence but has a high frequency of Spell activation. Cyclone is the fastest Attack in the game, which allows the character to cast a lot of spells in a short span of time as well. Inquisitor is the best-suited ascendancy - Righteous Providence increases the Critical Strike Chance based on our Strength or Intelligence, which is needed anyway to Wield the Mjölner. Inevitable Judgement lowers on even completely ignores enemy Elemental Resistances when you strike them with Critical Hit. Sanctuary and Pious Path increases and improvers by new features the effectiveness of Consecrated Ground.
This is a Low-Life build that uses Shavronne's Wrappings and Prism Guardian. You rely completely on ES, which will be regenerated by Consecrated Ground and Fenumus' Spinnerets - it's possible to reach around 6k or 7k of Energy Shield. The Presence of Chayula will fix your Chaos Resistance, give you more ES and Stun Immunity - which is especially useful with Cyclone. With Prism Guardian you will be able to accommodate three more Auras at the cost of your Life Pool. Other Unique items suit this build very well. The build is generally cheap when it comes to Unique Items - most of them are worth a few Chaos Orbs, Jewels, and Cluster Jewels, however, can get quite expensive.
If you plan to elevate this build to its maximum potential you can swap the Shield to The Squire - one of the most expensive Unique in the Game. With this Shield on you can make a six-link out of your Mjölner setup. By ditching the previous Shield that was quite essential to the build you will have to make some more big changes as well - use Aul's Uprising, free Determination Variant. You won't use Shavronne's Wrappings as your Build will be more Life-based, with some of your Auras reserving Life via Arrogance Support. Additionally, put Glorious Vanity in one of the sockets near a Keystone to get Corrupted Soul. The upgraded version of the build is expensive, this end-game variant of the build will be referred to as The Squire version.
You can also check our other Path of Exile builds right over here Odealo's Crafty Guides - Full List
1. Gameplay
The gameplay is fully automated, all you have to do is press and hold the Cyclone button and hit enemies - it will activate your Arc on Hits and Ball Lightning on Crfits. Vaal Righteous Fire can be used during boss fights for more Spell Damage. There's also your movement Spell - Frostblink of Flame Dash, and Bloodrage that you have to activate once or twice during the whole mapping experience. The Curse on Hit should come from your Ring, Immortal call is automatically triggered after you take damage.
|
|
|
|

2. Build's PROS & CONS
| PROS |
|
| CONS |
|
3. Leveling tips
It's an ES-based build and you won't be able to level relying only on Energy Shield, the transition from leveling gear to endgame gear won't be smooth as it usually is. Start with Elemental Spells such as Arc, cast it manually, and gather some Maximum Life while still trying to build your tree around the final set up so you won't spend too many Orbs of Regret. Around level 60 you will be able to wear most of the necessary unique items, respec the unnecessary nodes and follow the final Skill Tree after that. On your gear look for Lightning or Elemental Damage, Critical Strike, and Maximum Life with Elemental Resistance.
Suggested leveling Gem setups:
| Arc setup | |
 |
Arc - You will use Arc or any other Lightning Spell that suits you. Arc is good for clearing but bad against bosses, that's why you can consider Ball Lightning as well. |
 |
Added Lightning Damage Support - adds flat Lightning Damage to your Spells and Attacks |
 |
Inspiration Support - Skills cost less Mana, have higher Critical Strike Chance, and increases Elemental Damage |
 |
Arcane Surge Support - more Spell Damage, increased Cast Speed and Mana Regeneration as you spend Mana on Skills |
| Flame Dash setup | |
 |
Flame Dash - use Flame Dash or a Frostblink for better mobility |
 |
Lifetap Support - spend Life instead of Mana on your movement Skill |
| Utility Gems | |
 |
Wrath - Wrath is the Aura dedicated for build dealing Lightning Damage, it adds more of it to your Spells and Attacks |
 |
Herald of Thunder - Grants more Lightning Damage and creates storm which hits enemies dealing Lightning Damage |
 |
Clarity - used for faster Mana Regeneration |
Bandits:
You should kill all the Bandits and take two more Passive Skill Points
Leveling Skill Trees:
32 Points Skill Tree
Take Retribution, Sanctity, and the head for The Cruel Preparation as Shown. Take Elemental Damage nodes as you see any nearby.
74 Points Skill Tree
Look for more Critical Strike nodes and Maximum Life and Mana. Lightning damage nodes are useful as well. Start to look for ES gear from now on.
Recommended leveling items:
 Goldrim - a common choice for leveling characters due to the above-average Elemental Resistances Goldrim - a common choice for leveling characters due to the above-average Elemental Resistances |
|
| +(30-50) to Evasion Rating 10% increased Rarity of Items found +(30-40)% to all Elemental Resistances Reflects 4 Physical Damage to Melee Attackers Level Requirement reduced by 100 (Hidden) |
 Tabula Rasa - great Body Armour, allows you to have a six-linked setup right away Tabula Rasa - great Body Armour, allows you to have a six-linked setup right away |
|
| Item has no level requirement and Energy Shield (Hidden) Item has 6 White Sockets and is fully linked (Hidden) |
|
 Axiom Perpetuum - any decent Scepter or Wand with Added or Increased Lightning or Elemental Damage will do, but this unique is worth considering too Axiom Perpetuum - any decent Scepter or Wand with Added or Increased Lightning or Elemental Damage will do, but this unique is worth considering too |
|
| 12% increased Elemental Damage Adds (2-3) to (5-6) Fire Damage to Spells Adds (2-3) to (5-6) Cold Damage to Spells Adds 1 to (10-12) Lightning Damage to Spells (4-6)% increased Cast Speed (100-140)% increased Critical Strike Chance for Spells |
4. Final Skill Tree, Ascendancy Points, and Pantheon
Final Skill Tree:
94 Points Final Skill Tree (doesn't include Cluster Jewels nor Thread of Hope)
123 Points Path of Building (PoB) link
118 Points Path of Building (PoB) link, The Squire version
Ascendancy points:
Preferably in that order:
- Sanctuary
- Pious Path
- Righteous Providence
- Inevitable Judgement
Pantheon:
Major God: Soul of Solaris 6% additional Physical Damage Reduction while there is only one nearby Enemy; 20% chance to take 50% less Area Damage from Hits
Minor God: Soul of Shakari 5% reduced Chaos Damage taken; 25% reduced Chaos Damage over Time taken while on Caustic Ground
5. Final Gems links
| [DPS] Ball Lightning setup | |
 |
Ball Lightning - Ball Lightning is great where Arc lacks its virtues and vice versa. This Speel is great for single targets, it can travel independently of enemies' position and can hit targets far away from you. |
| Cast on Critical Strike - you should be able to reach around 100% Chance to Crit, meaning each Hit will trigger Ball Lightning, with Cyclone's extraordinary Attack Speed it will be quite often | |
 |
Cyclone - the sole candidate for all CoC setups - allows you to travel during its Channeling and has the highest Attack Speed of any other Attacks but the Damage of this Skill is negligible in general |
|
Inspiration Support - use it to lower Mana Cost, increase Elemental Damage, and Critical Strike Chance for Skills you use constantly |
 |
Slower Projectiles Support - it's great to have slower-moving projectiles as they will stay close to your target for a longer period of time, damaging it constantly, the projectile damage is also increased; you can also use Greater Multiple Projectiles |
 |
Increased Critical Strikes Support - use it to have a higher chance of triggering Spell on Hit, and to deal more damage with the Spell itself |
| [UTILITY] Aura setup (Life Reservation) (socketed in Prism Guardian) |
|
 |
Zealotry - Very important Aura - it has a chance to create Consecrated Ground as you Hit Rare or Unique enemies - during boss fights you might run out of Sulphur Flask Charges. It increases your Critical Strike Chance. |
|
Wrath - adds Lightning Damage to your Spells and Attacks which is the type of Elemental Damage you're mostly dealing |
 |
Vaal Discipline - Gives you more Energy Shield - around 1k later in the game. Vaal version grants you a temporary buff where ES Recharge is not delayed by damage. |
| [UTILITY] Aura setup (Mana Reservation) | |
|
Herald of Thunder - The optimal choice of a Herald for Lightning Damage-based builds, it grants you more Damage of this type and creates storms that hit enemies as you kill them while they're Shocked |
 |
Flesh and Stone - Stay in Sand Stance at all times to blind nearby enemies and to take less damage from them, Flesh Stance grants you close to nothing |
 |
Precision - More Accuracy Rating and increased Critical Strike Chance, one of the most important Auras to increase the DPS |
 |
Enlighten Support - it makes the skills in this setup Reserve less Mana |
| [UTILITY and MOBILITY] Clarity, Vaal Righteous Fire, and Movement Skills setup | |
|
Clarity - it's an optional choice since you might run out of Mana to Reserve but you should be able to have it at level 1 |
 |
Vaal Righteous Fire - use only the Vaal component of this Spell for more Spell Damage during its Duration |
 |
Frostblink - Frostblink is used to quickly relocate and dodge hits, it can be replaced with Flame Dash depending on your personal preferences |
|
Arcane Surge Support - Keep Arcane surge at a low level, so that one single cast of Frostblink will activate its Buff that grants more Cast Speed, Spell Damage, and Mana Regeneration |
| [DPS] Arc setup (socketed in Mjölner) |
|
|
Arc - Arc is really great to deal with a large number of weak enemies - it instantly hits a pack of mobs dealing Lighting Damage and with the insanely fast casts thanks to Mjölner and Cyclone the clear speed is one of the best you can get |
|
Increased Critical Strikes Support - increases the Chance that Arc will Hit Critically |
|
Added Lightning Damage Support - adds Lightning Damage to Arc |
| [UTILITY] Blood Rage and Immortal Call setup | |
 |
Blood Rage - use Blood Rage with high Gem Level and Quality to increase your Attack Speed, meaning your Spells will be cast more often |
 |
Increased Duration Support - increases the Duration of Immortal Call and Blood Rage |
 |
Cast when Damage Taken - will automatically trigger Immortal Call, Blood Rage has to be turned on manually |
 |
Immortal Call - keep Immortal Call at level 3, and CwDM at level 1 so that it will trigger more often |
| [UTILITY] The Squire setup (an alternative to Prism Guardian) (socketed in The Squire) |
|
 |
Elemental Focus Support - you won't need two sources of Shock, so it's perfectly fine to have this Support Gem to increase your Elemental Damage |
 |
Increased Critical Damage Support - your Critical Strikes Deal much more Damage by up to additional 150% |
|
Inspiration Support |
| [UTILITY] The Squire setup (an alternative 4-link setup) | |
 |
Vitality - Vitality regenerates your Life at a steady rate |
 |
Defiance Banner - use it for more Armour and Evasion Rating and to reduce enemies' Crit Chance |
|
Precision |
 |
Arrogance Support - all linked Auras should Reserve Life instead of Mana |
| [UTILITY and MOBILITY] The Squire setup (an alternative 4-link setup) | |
|
Wrath |
|
Zealotry |
|
Flame Dash - a movement Skill that can be replaced with Frostblink, depending on your preferences |
|
Enlighten Support |
| [UTILITY] The Squire setup (an alternative 4-link setup) | |
 |
Molten Shell - grants you a temporary damage reduction, the Skill can prevent more damage the more Armour you have |
 |
Tempest Shield - massively increases your Block Chance for Attacks and Spells, grants immunity to Shock, and damages enemies in a fashion similar to Arc on Block |
 |
Determination - WIth the right version of Aul's Uprising you should be able to have this additional Armour-granting Aura at no cost |
 |
Enhance Support - increases Quality of linked Gems, it's especially useful with Anomalous Molten Shell |
|
|
5. Gear Setup
At first, you should of course cap your Elemental Resistances, then your Priority is to have a decent amount of Energy Shield. The biggest problem after that will be to meet the requirement for Mjölner - 412 Strength. As your Gear will be mostly Uniques, you will have to look for this Attribute on Rings, Jewels, and Belt. In fact, these gear pieces are the only rare items here, and you will need to cap your Elemental Resistances there as well. It's probably the biggest challenge of this build to balance all these requirements with almost no room for stats that are absolutely mandatory.
Our recommended items will:
- Cap your resistances
- Give you enough DPS/Life to start mapping successfully
|
Stat priorities on items:
|
 (Helmet) Crown of the Inward Eye - there is no choice, this is the Helmet that you will need to get - it gives a lot of Energy Shield and total DPS, but sadly no Elemental Resistances (Helmet) Crown of the Inward Eye - there is no choice, this is the Helmet that you will need to get - it gives a lot of Energy Shield and total DPS, but sadly no Elemental Resistances |
|
| 333% increased Armour and Energy Shield (9-21)% increased maximum Life, Mana and Global Energy Shield Transfiguration of Soul Transfiguration of Body Transfiguration of Mind |
|
| Helmet enchantments: Arc or Ball Lighting Enchantments |
|
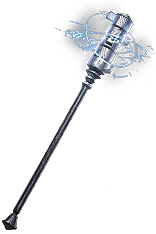
 (Weapon) Mjölner - The core element of the build. It activates your Arc with each Hit, and that's the bigger part of your total DPS. (Weapon) Mjölner - The core element of the build. It activates your Arc with each Hit, and that's the bigger part of your total DPS. |
|
| 15% reduced Enemy Stun Threshold Trigger a Socketed Lightning Spell on Hit, with a 0.15 second Cooldown Socketed Lightning Spells have no Cost if Triggered +300 Intelligence Requirement +200 Strength Requirement (80-120)% increased Physical Damage Skills Chain +1 times (30-40)% increased Lightning Damage with Attack Skills |
|
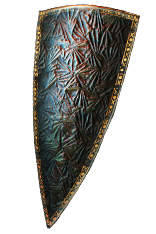 (Shield) Prism Guardian - With this Shield you can have three more Auras at the cost of your Life Pool - that's not a problem since you rely on ES. The Shield also improves your socketed Auras, grants you a lot of Elemental Resistances and Dexterity - all needed. (Shield) Prism Guardian - With this Shield you can have three more Auras at the cost of your Life Pool - that's not a problem since you rely on ES. The Shield also improves your socketed Auras, grants you a lot of Elemental Resistances and Dexterity - all needed. |
|
| +12% to all Elemental Resistances +2 to Level of Socketed Aura Gems Socketed Gems Cost and Reserve Life instead of Mana Socketed Gems have 25% reduced Reservation +(20-30) to Dexterity +25% to all Elemental Resistances |
|
 (Shield) The Squire - It's an expensive Shield that significantly alters the build, the socket there are "linked" with your Mjölner allowing you to deal much more damage (Shield) The Squire - It's an expensive Shield that significantly alters the build, the socket there are "linked" with your Mjölner allowing you to deal much more damage |
|
| Has 3 Sockets All Sockets are White +(5-8)% to Quality of Socketed Support Gems Socketed Support Gems can also Support Skills from your Main Hand (100-150)% increased Armour and Evasion +(3-5)% Chance to Block |
|
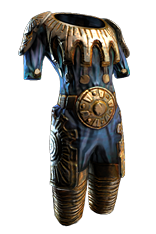
 (Body Armour) Shavronne's Wrappings - with almost no Life any Chaos Damage could easily kill you since it bypasses ES. With this Body Armour on, it will no longer do so. Other mods provided are useful as well. (Body Armour) Shavronne's Wrappings - with almost no Life any Chaos Damage could easily kill you since it bypasses ES. With this Body Armour on, it will no longer do so. Other mods provided are useful as well. |
|
| (3-10)% increased Spell Damage (100-150)% increased Energy Shield 10% faster start of Energy Shield Recharge +(30-40)% to Lightning Resistance Reflects 1 to 250 Lightning Damage to Melee Attackers Chaos Damage does not bypass Energy Shield |
|
 (Body Armour) Rare Body Armour - when using The Squire, be sure to have a good Body Armour too, one that grants a lot of Maximum Life, Energy Shield, and Spell Critical Strike Chance (Body Armour) Rare Body Armour - when using The Squire, be sure to have a good Body Armour too, one that grants a lot of Maximum Life, Energy Shield, and Spell Critical Strike Chance |
|
| Min. requirements: Gain 10% of Maximum Life as Extra Maximum Energy Shiel +100 to maximum Life +1.5% to Spell Critical Strike Chance Optional affixes: Maximum Energy Shield Elemental Resistances increased effect of Non-Curse Auras from your Skills |
|
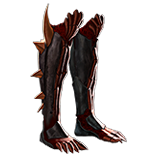 (Boots) Fenumus' Spinnerets - Lightning and Chaos Resistance, Es, and Movement Speed are all nice, but the Aspect of the Spider improvements are what makes this item such a great choice - your ES regeneration will be insanely high. The aspect of the Spider is an extremely useful Skill by itself, but you will have to Craft it as a Suffix in one of your Rare Items. (Boots) Fenumus' Spinnerets - Lightning and Chaos Resistance, Es, and Movement Speed are all nice, but the Aspect of the Spider improvements are what makes this item such a great choice - your ES regeneration will be insanely high. The aspect of the Spider is an extremely useful Skill by itself, but you will have to Craft it as a Suffix in one of your Rare Items. |
|
| (160-200)% increased Evasion and Energy Shield +(20-30)% to Lightning Resistance +(17-23)% to Chaos Resistance 25% increased Movement Speed Aspect of the Spider can inflict Spider's Web on Enemies an additional time Gain (15-20) Energy Shield for each Enemy you Hit which is affected by a Spider's Web (40-50)% increased Aspect of the Spider Debuff Duration |
|
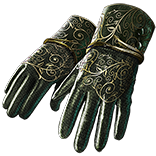 (Gloves) Shaper's Touch - with a lot of Intelligence and Strength it will grant you a meaningful amount of Mana, Energy Shield, Evasion Rating, and Accuracy Rating (Gloves) Shaper's Touch - with a lot of Intelligence and Strength it will grant you a meaningful amount of Mana, Energy Shield, Evasion Rating, and Accuracy Rating |
|
| (80-120)% increased Armour and Energy Shield +4 Accuracy Rating per 2 Intelligence +1 Life per 4 Dexterity +1 Mana per 4 Strength 1% increased Energy Shield per 10 Strength 2% increased Evasion Rating per 10 Intelligence 2% increased Melee Physical Damage per 10 Dexterity |
|
 (Belt) Rare Belt - You should probably look for a belt with a lot of Energy Shield and Elemental Resistances, other useful mods are not your priority but it's always nice to have them (Belt) Rare Belt - You should probably look for a belt with a lot of Energy Shield and Elemental Resistances, other useful mods are not your priority but it's always nice to have them |
|
| Min. requirements: 80 maximum Energy Shield 60% Total Elemental Resistances Optional affixes: increased Energy Shield from Body Armour Chaos Resistance increased Lightning Damage |
|
 (Amulet) Presence of Chayula - The presence of Chayula is a well-suited item for this build. It grants you Attributes, Stun Immunity, 60% of Chaos Resistance, and a lot of Energy Shield. Utmost Might is mandatory Anointment for it gives you almost 100 Strength. (Amulet) Presence of Chayula - The presence of Chayula is a well-suited item for this build. It grants you Attributes, Stun Immunity, 60% of Chaos Resistance, and a lot of Energy Shield. Utmost Might is mandatory Anointment for it gives you almost 100 Strength. |
|
| +(10-16) to all Attributes 30% increased Rarity of Items found +60% to Chaos Resistance Cannot be Stunned 20% of Maximum Life Converted to Energy Shield |
|
 (Amulet) Aul's Uprising (Strength) - if you're suing The Squire, get a version of this Amulet that makes your Determination reserve no Mana, it's the best way to make up for the relative lack of Auras (Amulet) Aul's Uprising (Strength) - if you're suing The Squire, get a version of this Amulet that makes your Determination reserve no Mana, it's the best way to make up for the relative lack of Auras |
|
| +(10-16) to all Attributes +(20-30) to Strength (15-20)% increased Armour +(50-70) to maximum Life Nearby Enemies have 10% reduced Stun and Block Recovery <Random Strength aura> Reserves no Mana |
|
| Recommended Anointments: Utmost Might |
|
 (Ring) Rare Ring - A good ring will be the key to getting this build up and running. You will need to look for Elemental Resistance, Strength, and Energy Shield. One of your Rings must have a Crafted Suffix that grants you Aspect of the Spider Skill. Additionally, you can look for Critical Stikes-related mods. (Ring) Rare Ring - A good ring will be the key to getting this build up and running. You will need to look for Elemental Resistance, Strength, and Energy Shield. One of your Rings must have a Crafted Suffix that grants you Aspect of the Spider Skill. Additionally, you can look for Critical Stikes-related mods. |
|
| Min. requirements: 40 maximum Energy Shield 80% Total Elemental Resistances Strength Grants Level 20 Aspect of the Spider Skill Optional affixes: %increased maximum Energy Shield increased Lightning Damage Global Critical Strike Multiplier Critical Strike Chance |
|
 (Jewel) Rare Jewels - Strength, Elemental Resistances, Energy Shield, and Critical Strike Multipliers will be the mods to look for here (Jewel) Rare Jewels - Strength, Elemental Resistances, Energy Shield, and Critical Strike Multipliers will be the mods to look for here |
|
| Recommended affixes: Strength increased maximum Energy Shield Elemental Resistances Dexterity Critical Strike Multiplier with Lightning or Elemental Skills Critical Strike Multiplier for Spells |
|
 (Jewel) Replica Conqueror's Efficiency - it's the best way to lower the cost of your non-channelling Skills (Jewel) Replica Conqueror's Efficiency - it's the best way to lower the cost of your non-channelling Skills |
|
| 4% increased Skill Effect Duration +5 to Maximum Rage Non-Channelling Skills have -9 to Total Mana Cost |
|
 (Jewel) Efficient Training - it's a huge bonus to Strength, put it in the Socket near Elemental Equilibrium (Jewel) Efficient Training - it's a huge bonus to Strength, put it in the Socket near Elemental Equilibrium |
|
| +(16-24) to Strength Intelligence from Passives in Radius is Transformed to Strength |
|
 (Jewel) Unnatural Instinct - near Harrier at the center of the Skill Tree is the most optimal spot for this Gem, which is optional (Jewel) Unnatural Instinct - near Harrier at the center of the Skill Tree is the most optimal spot for this Gem, which is optional |
|
| Allocated Small Passive Skills in Radius grant nothing Grants all bonuses of Unallocated Small Passive Skills in Radius |
|
 (Jewel) Watcher's Eye - Zealotry, Wrath, and Clarity if you're using one are the Aura mods that you try to get. It's a costly and optional Jewel for finishing touches. (Jewel) Watcher's Eye - Zealotry, Wrath, and Clarity if you're using one are the Aura mods that you try to get. It's a costly and optional Jewel for finishing touches. |
|
| (4-6)% increased maximum Energy Shield (4-6)% increased maximum Life (4-6)% increased maximum Mana <Two or Three random aura modifiers> |
|
 (Jewel) Large Cluster Jewel - Overshock and Snowstorm will be the most beneficial Notables. Doryani's Lesson is required for Life Leech (that will be in fast ES Leech with Ghost Reaver) (Jewel) Large Cluster Jewel - Overshock and Snowstorm will be the most beneficial Notables. Doryani's Lesson is required for Life Leech (that will be in fast ES Leech with Ghost Reaver) |
|
| Recommended affixes: 1 Added Passive Skill is Overshock 1 Added Passive Skill is Snowstorm 1 Added Passive Skill is Widespread Destruction 1 Added Passive Skill is Doryani's Lesson |
|
 (Jewel) Medium Cluster Jewel - Basics of Pain, Quick Gateway, and Pressure Points are for more damage, Stormired and Chilling Presence are a combination that will Chill and increase damage against Chilled enemies, additionally it will activate your Snowstorm from Large Cluster Jewel. One Mater of Fear and Wish for Death are really useful overall. (Jewel) Medium Cluster Jewel - Basics of Pain, Quick Gateway, and Pressure Points are for more damage, Stormired and Chilling Presence are a combination that will Chill and increase damage against Chilled enemies, additionally it will activate your Snowstorm from Large Cluster Jewel. One Mater of Fear and Wish for Death are really useful overall. |
|
| Recommended affixes: 1 Added Passive Skill is Chilling Presence 1 Added Passive Skill is Stormrider 1 Added Passive Skill is Basics of Pain 1 Added Passive Skill is Pressure Points 1 Added Passive Skill is Quick Gateway 1 Added Passive Skill is Master of Fear 1 Added Passive Skill is Wish for Death |
|
| Creates Consecrated Ground on Use (20-40)% increased Duration Consecrated Ground created by this Flask has Tripled Radius 100-150% increased Critical Strike Chance against Enemies on Consecrated Ground during Effect Consecrated Ground created during Effect applies (7-10)% increased Damage taken to Enemies |
|
 (Flask) Rumi's Concoction - grants a lot of Armour and Chance to Block Hits from Spells and Attacks, one of the best defensive Flasks in general (Flask) Rumi's Concoction - grants a lot of Armour and Chance to Block Hits from Spells and Attacks, one of the best defensive Flasks in general |
|
| +1500 to Armour +(8-12)% Chance to Block Attack Damage during Flask effect +(4-6)% Chance to Block Spell Damage during Flask effect |
|
|
Other suggested Flasks:
|
|
    |
|
|
If you have any other build requests please leave that in the comments below. We are always open to suggestions and constructive feedback.
Pictures used in this article are the intellectual property of Grinding Gear Games.
