
Liminal Coil Blood Mage POE 2 Build
An incredibly powerful Setup for the new Liminal Coil Wand that uses its unique Spell to cover the entire battlefield with swift projectilesLiminal Coil
Blood Mage
Updated for Path of Exile 2 Early Access
The Best Crafty Guides by Odealo
| Guide notes |
| June 17 2026 - Created for Early Access Patch 0.5.0 |
| Build Overview | |||
| Tags: [CASTER] [CRITICAL] [HYBRID] | |||
|
Budget: Defenses: |
|
Boss DPS: AoE: |
|
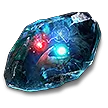
The Liminal Coil is a new Unique Wand that grants the Coiling Bolts Skill. It fires two Projectiles merged together, one that deals Physical Damage, while the second deals Chaos Damage. You can't add additional Projectiles to this Skill, but it increases the Split targets instead. This Bolt also chains an unlimited number of times from all Cursed Enemies. The Wand itself also provides very unusual modifiers. It allows you to ignore the Curse limit and adds 30% extra Chaos and Physical Damage for each Curse affected by the target, but disables the Curse Effect. This extra Damage applies to any Skill, but in this Setup, we will focus only on the Coiling Bolts as your main and only source of Damage.
Notably, you can use the second Weapon Set to apply 2 potent Curses as usual and then switch back to your main Weapon to apply the remaining Curses with no Magnitude. To make it easier, the Curses with no effect should be applied automatically via Blapshemy. In total, you will apply all Curses that exist in the game: Despair, Vulnerability, Elemental Weakness, Temporal Chains, Enfeeble, but also the new runic addition, the Repulsion. This results in 180% of the damage gained as Extra Chaos and Physical, or 360% as Extra Cold if you use the Embitter Support.
Scaling multiple types of Damage can be somewhat problematic, so it is best to pivot to Critical Strikes for universal bonuses. As a Blood Mage, you can set your base Critical Strike to 15% and use the Effigy of Cruelty in your second Weapon Set to quickly apply all stacks of Critical Weakness Debuff, which grants another 10% base Critical Strike Chance. You can also use the Embitter Support to gain all the Extra Damage as Cold only, which allows you to scale your Damage through Elemental Weakness and potent Exposure Effect. The default Chaos and Physical variant relies on Armour Break and Withering Debuff. It is less effective, but easier to manage, as most Enemies rarely resist Chaos Damage, and don't have that much Armour. The Cold Damage has higher potential against Bosses, but it is also a very good defensive layer, as you will Freeze and heavily slow all Enemies. It is quite important, as your main defense is simply lots of maximum Life and a bit of Energy Shield. The Coiling Bolts cost no Mana or Life to cast, so the Life Remnants will reliably Overflow your Life most of the time, and you can shift some of the incoming Damage to be Taken by Mana. The Vitality Siphon offers Life Leech, but it is usually not needed due to Life Remnants. It is better to pick up the Whispers of the Flesh to take away 15% of the enemy's Life and stop their Regeneration.
You can also check our other Path of Exile 2 builds right over here Odealo's Crafty Guides - Full List
1. Gameplay
Your only Damaging Spell is Coiling Bolts, use it against Bosses and hordes of enemies alike. You will apply 4 Curses automatically with the Blasphemy Aura, but the remaining 2 require manual casting. If you have the Embitter Support, you should use Freezing Mark and Frost Bomb. If you have spare Spirit, use Covalence to restore Energy Shield during combat.
|
|
|
|

2. Build's PROS & CONS
| PROS |
|
| CONS |
|
3. Leveling tips
The Liminal Coil requires at least level 78 to unlock, and might be even higher if you get a variant with a higher Skill level. Our recommendation is to level up with the Essence Drain on the Lich Ascendancy and change to the final Setup once you can equip all the necessary Items.
4. Final Skill Tree, Ascendancy Points, and Pantheon
Final Skill Tree:
 |
|
Click on the image to open the Passive Tree preview in a new window, or use the Path of Building (PoB) tool, |
Ascendancy points:
Preferably in this order:
- Sunder the Flesh
- Grasping Wounds
- Crimson Power
- Whispers of the Flesh
5. Final Gems links
| [DPS] Coiling Bolts setup Weapon Set 1 |
|
 |
Coiling Bolts - fires two merged Projectiles that Split and Chain to nearby Enemies. This Skill is granted by the Liminal Coil Wand. |
 |
Embitter - you can opt for the Cold Damage for Freeze and higher DPS ceiling, or stick to the default Physical and Chaos Damage for simpler gameplay. |
 |
Zenith II |
 |
Considered Casting |
 |
Trickster's Shard |
 |
Deliberation/Mobility |
| [Utility] Blasphemy setup | |
 |
Blasphemy - the Liminal Coil disables the effect of your Curses, but grants you 60% Extra Damage for each Curse affecting your target, and allows you to ignore Curse limits. |
 |
Despair - if you don't use the Embitter Support, you will want to use Despair and Vulnerability in your second Weapon set. |
 |
Vulnerability |
 |
Enfeeble |
 |
Repulsion |
 |
Ritualistic Curse |
| [Utility] Elemental Weakness setup Weapon Set 2 |
|
 |
Elemental Weakness - Curses used by your second Weapon still apply their effect to your target, but also count towards the extra Damage from your main Wand. |
 |
Heightened Curse |
 |
Focused Curse |
 |
Efficiency II |
 |
Prolonged Duration II |
| [Utility] Temporal Chains setup Weapon Set 2 |
|
 |
Temporal Chains - for the Cold Setup with the Embitter you will want Elemental Weakness to improve your Damage and Temporal Chains for extra defense. |
|
Heightened Curse |
|
Focused Curse |
|
Efficiency II |
 |
Slow Potency |
|
Prolonged Duration II |
| [Utility] Frost Bomb setup Weapon Set 2 |
|
 |
Frost Bomb - applies potent Elemental Exposure that lowers the enemy Elemental Resistance. You only need it for the Cold variant. |
 |
Potent Exposure |
 |
Cooldown Recovery II |
 |
Magnified Area II |
 |
Prolonged Duration II |
| [Utility] Entangle setup Weapon Set 2 |
|
 |
Entangle - rapidly hits enemies, which is ideal for the Effigy of Cruelty to quickly apply all stacks of Critical Weakness. You can use the low-level Gem to save Mana. |
 |
Rapid Casting II |
 |
Pinpoint Critical |
 |
Upheaval II |
|
Prolonged Duration II |
 |
Withering Touch - if you opt for the Physical and Chaos variant, you will want to use a high-level Entangle to apply additional Withered Debuff stacks. It is unnecessary for the Cold variant. |
| [UTILITY] Freezing Mark setup Weapon Set 2 |
|
 |
Freezing Mark - improves the Freeze Build-up on affected enemies and grants you extra Cold Damage once you successfully Freeze the target. |
|
Prolonged Duration II |
 |
Charged Mark |
| [UTILITY] Mana/Life Remnants setup | |
 |
Mana Remnants - you can use your Mana as additional protection against incoming Damage. The Mana Remnants allow you to recover and overflow it quickly. As a Blood Mage, you will also have the Life Remnants Skill for free. |
 |
Remnant Potency II |
 |
Harmonic Remnant II |
| [UTILITY] Withering Presence setup | |
 |
Withering Presence - if you are not using Embitter, you will need this Skill to apply Withering Debuff. |
|
Prolonged Duration II |
|
|
6. Gear Setup
The Liminal Coil is obviously mandatory, as it grants you the Coiling Bolts Skill. You will also need the Alpha's Howl for the massive amount of Spirit it provides. Coiling Bolts is a Spell, so it scales insanely well with Skill Levels. Notably, it is also a Projectile Skill, so you can use either modifier. The new Caster modifiers obtainable through Breach Jewellery are very potent, but you will need a solid amount of Resistance on your other gear pieces to fit them in. You will need lots of Spirit on your Body Armour to use all your Skills. You could get it on Amulet as well, but it would be insanely expensive. Your main defense is maximum Life, supplemented a bit by Mana and Energy Shield. Both Physical and Cold variants use the same Gear pieces.
|
Stat priorities on items:
|
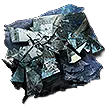
 (Weapon) Liminal Coil - the only source of the Coiling Bolts Skill. You can use Perfect Flux and Jeweller's Orb now to improve it like other regular Skills, but it can be quite expensive. Try to get the maximum rolls on both Extra Damage modifiers. (Weapon) Liminal Coil - the only source of the Coiling Bolts Skill. You can use Perfect Flux and Jeweller's Orb now to improve it like other regular Skills, but it can be quite expensive. Try to get the maximum rolls on both Extra Damage modifiers. |
|
| Grants Skill: Coiling Bolts (71—113)% increased Spell Damage (7—13)% increased Cast Speed Magnitudes of Curses you inflict are zero Curses you inflict ignore Curse limit Spell Hits Gain (23—31)% of Damage as Extra Chaos Damage per Curse on target Spell Hits Gain (23—31)% of Damage as Extra Physical Damage per Curse on target |
|
 (Weapon) Rare Wand - you will want a simple Rare Wand for your second Weapon Set to cast your Curses and apply Critical Weakness Debuff. It only needs additional Cast Speed and Crit Chance to make it smoother, but you can also include some Mana and Regeneration. (Weapon) Rare Wand - you will want a simple Rare Wand for your second Weapon Set to cast your Curses and apply Critical Weakness Debuff. It only needs additional Cast Speed and Crit Chance to make it smoother, but you can also include some Mana and Regeneration. |
|
| Min. requirements: 60% increased Critical Hit Chance for Spells 20% increased Cast Speed Optional affixes: +# to maximum Mana #% increased Mana Regeneration Rate |
|
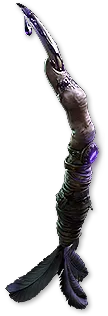 (Weapon) The Wicked Quill - for the Physical and Chaos variant, you will need this Wand in your off-hand for the additional Withered Debuff application. (Weapon) The Wicked Quill - for the Physical and Chaos variant, you will need this Wand in your off-hand for the additional Withered Debuff application. |
|
| (60—100)% increased Spell Damage +(60—100) to maximum Mana +(7—13)% to Chaos Resistance Spells have a 25% chance to inflict Withered for 4 seconds on Hit |
|
 (Focus) Rare Focus - your Wand does not provide any Skill Levels, so you will need them from other sources. You should also pick up Cast Speed or Spell Damage here. (Focus) Rare Focus - your Wand does not provide any Skill Levels, so you will need them from other sources. You should also pick up Cast Speed or Spell Damage here. |
|
| Min. requirements: +2 to Level of all Spell Skills 20% increased Cast Speed Optional affixes: % increased Spell Damage % total Elemental and Chaos Resistance |
|
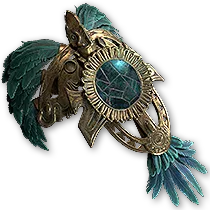
 (Focus) Effigy of Cruelty - this Focus is your source of Critical Weakness, use it in your second Weapon Set for the Entangle. Use the Ancient Rune of Witchcraft to massively increase the radius of your Curses. (Focus) Effigy of Cruelty - this Focus is your source of Critical Weakness, use it in your second Weapon Set for the Entangle. Use the Ancient Rune of Witchcraft to massively increase the radius of your Curses. |
|
| +(20—30) to maximum Energy Shield (40—50)% increased Spell Damage +10 to Intelligence +(7—13)% to Chaos Resistance Critical Hits with Spells apply (1-3) Stacks of Critical Weakness |
|
 (Amulet) Rare Amulet - you will need bonus Skill Levels here. Usually, Projectile Skill levels are cheaper than generic Spell Levels. You can also get a lot of useful Spell modifiers, but Skill Levels take priority. You can get the necessary Spirit here, but it will be extremely expensive. (Amulet) Rare Amulet - you will need bonus Skill Levels here. Usually, Projectile Skill levels are cheaper than generic Spell Levels. You can also get a lot of useful Spell modifiers, but Skill Levels take priority. You can get the necessary Spirit here, but it will be extremely expensive. |
|
| Min. requirements: +3 to Level of all Spell/Projectile Skills Optional affixes: % increased Spell Damage % increased Cast Speed +# to maximum Life % total Elemental and Chaos Resistance |
|
 (Ring) Rare Ring - the Breach-crafted Ring offers specialised Caster modifiers, but the default Cast Speed modifier remains the strongest option among them. Use the Sibilant Catalyst to improve all Caster bonuses even further. At first, simple Life and Resistance bonuses will suffice. (Ring) Rare Ring - the Breach-crafted Ring offers specialised Caster modifiers, but the default Cast Speed modifier remains the strongest option among them. Use the Sibilant Catalyst to improve all Caster bonuses even further. At first, simple Life and Resistance bonuses will suffice. |
|
| Min. requirements: +80 to maximum Life 20% increased Cast Speed +40% total Elemental and Chaos Resistance Optional affixes: % increased Rarity of Items found % increased Spell/Cold Damage +1 to Level of all Spell Skills % increased Critical Hit Chance for Spells % increased Critical Spell Damage Bonus |
|
 (Belt) Rare Belt - similarly, start with the basic Rare Belt to cover lacking Resistances and bolster your Life. Later on, look for Breach-crafted Belt with special Spell modifiers. (Belt) Rare Belt - similarly, start with the basic Rare Belt to cover lacking Resistances and bolster your Life. Later on, look for Breach-crafted Belt with special Spell modifiers. |
|
| Min. requirements: +130 to maximum Life +40% total Elemental and Chaos Resistance Optional affixes: % increased Spell Damage during any Flask Effect % increased Cast Speed during any Flask Effect % of Damage is taken from Mana before Life |
|
 (Belt) Darkness Enthroned - this Belt can offer a surprisingly high amount of Movement Speed for a quite low price. You can also experiment with other variants for different Armour pieces. It is obviously not as good as the Mageblood Belt, but significantly cheaper. (Belt) Darkness Enthroned - this Belt can offer a surprisingly high amount of Movement Speed for a quite low price. You can also experiment with other variants for different Armour pieces. It is obviously not as good as the Mageblood Belt, but significantly cheaper. |
|
| Has (1—3) Charm Slots (50—100)% increased effect of Socketed Augment Items This item gains bonuses from Socketed Items as though it was Boots Has 2 Augment Sockets Recommended Augments: 5% increased Movement Speed 8% increased Movement Speed during Sprinting |
|
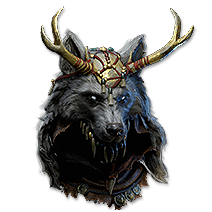 (Helmet) Alpha's Howl - this Helmet is mandatory due to the vast amount of Spirit you need to automate your Curses. It requires a lot of Dexterity, which you can lower a bit with the Soul Core that Converts Requirements, but the Idol of Egrin is a better choice for endgame. (Helmet) Alpha's Howl - this Helmet is mandatory due to the vast amount of Spirit you need to automate your Curses. It requires a lot of Dexterity, which you can lower a bit with the Soul Core that Converts Requirements, but the Idol of Egrin is a better choice for endgame. |
|
| (80—100)% increased Evasion Rating +100 to Spirit +(50—75)% to Cold Resistance Presence Radius is doubled |
|
 (Body Armour) Rare Armour - it is your main source of Life and Energy Shield. With the Crimson Power Notable, you will gain an equivalent amount of Energy Shield as bonus maximum Life. However, you also need at least 50 Spirit, so you have to sacrifice some defense here, or damage on the Amulet. (Body Armour) Rare Armour - it is your main source of Life and Energy Shield. With the Crimson Power Notable, you will gain an equivalent amount of Energy Shield as bonus maximum Life. However, you also need at least 50 Spirit, so you have to sacrifice some defense here, or damage on the Amulet. |
|
| Min. requirements: +200 to maximum Life +400 to Energy Shield +50 to Spirit +40% total Elemental and Chaos Resistance Optional affixes: #% reduced effect of Curses on you (Desecrate) #% increased Energy Shield Recharge Rate +# to Attributes |
|
|
|
|
| Min. requirements: +100 to maximum Life +100 to Energy Shield +80% total Elemental and Chaos Resistance Optional affixes: +2 to Level of all Projectile Skills (28—34)% increased Critical Hit Chance Projectiles have (20—32)% chance to Chain an additional time from terrain |
|
 (Boots) Rare Boots - the Boots are extremely basic, but quite important. You will need lots of Movement Speed and some basic defensive modifiers. Later on, you can include Slow reduction too. (Boots) Rare Boots - the Boots are extremely basic, but quite important. You will need lots of Movement Speed and some basic defensive modifiers. Later on, you can include Slow reduction too. |
|
| Min. requirements: 30% increased Movement Speed +100 to maximum Life +40% total Elemental and Chaos Resistance Optional affixes: % increased Rarity of Items found % reduced Slowing Potency of Debuffs on You +# to Attributes |
|
 (Jewel) Rare Jewel - your Jewels are the most potent source of Critical Damage Bonus, but some utility in the form of Life Recovery on Kill, Freeze Build-up, or boosting your Energy Shield is useful too. (Jewel) Rare Jewel - your Jewels are the most potent source of Critical Damage Bonus, but some utility in the form of Life Recovery on Kill, Freeze Build-up, or boosting your Energy Shield is useful too. |
|
| Optional affixes: % increased Spell/Cold Damage % increased Damage against Rare and Unique Enemies % increased maximum Energy Shield % increased Critical Damage Bonus % increased Critical Spell Damage Bonus % faster start of Energy Shield Recharge % increased Freeze Buildup Recover #% of maximum Life on Kill % increased Area of Effect of Curses |
|
 (Jewel) Rare Time-lost Jewel - there are 2 Jewel Sockets on your Passive Tree that are more efficient to combine with the very similar Time-lost Jewels. The Liquid Fear adds Critical Damage Bonus for Spells, which pairs nicely with the generic Crit Damage Bonus. (Jewel) Rare Time-lost Jewel - there are 2 Jewel Sockets on your Passive Tree that are more efficient to combine with the very similar Time-lost Jewels. The Liquid Fear adds Critical Damage Bonus for Spells, which pairs nicely with the generic Crit Damage Bonus. |
|
| Optional affixes: Notable Passive Skills in Radius also grant #% increased Critical Damage Bonus Notable Passive Skills in Radius also grant #% increased Critical Spell Damage Bonus |
|
 (Flask) Lavianga's Spirits - a very useful Flask that provides minor Mana Regeneration at all times and enables certain modifiers that require an active Flask. (Flask) Lavianga's Spirits - a very useful Flask that provides minor Mana Regeneration at all times and enables certain modifiers that require an active Flask. |
|
| This Flask cannot be Used but applies its Effect constantly (70—80)% reduced Amount Recovered |
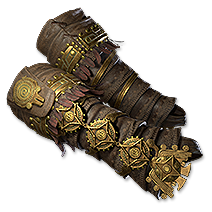 (Gloves) Rare Gloves - initially, you only need basic defenses here, but later on, you should include the special Marksman modifiers available through Kolr's Hunt Augument. The most impactful is raising the Projectile Skills Levels, but additional Chains from terrain are also quite useful.
 |
|
If you have any other build requests please leave that in the comments below. We are always open to suggestions and constructive feedback.
Pictures used in this article are the intellectual property of Grinding Gear Games.