Lightning Trap Assassin Build
A very swift Starter build that uses this heavily underestimated Trap ability to kill enemies all over the screenLightning Trap
Assassin Starter build
Updated for Patch 3.23
The Best Crafty Guides by Odealo
| Guide notes |
| December 11, 2023 -Build created |
| Build overview | |||
| Tags: [TRAP] [ELEMENTAL] [LIFE] [STARTER] | |||
|
Budget: Defenses: |
|
Boss DPS: AoE: |
|
Lightning Trap is a bit forgotten Trap Skill. It's a very simple skill, the Trap fires eight Projeticles in all directions that deal Lightning Damage. This skill is really great when fighting a lot of enemies scattered across the map, and the optional Projectile Return, or the Transfigured variant of the Sparking, makes the Clear Speed even better. The Returning Projectile also boosts your Single-target Damage, as it can hit the Boss again. The Lightning Trap has a very high inherited Critical Strike Chance and Added Damage Effectiveness, which are very important factors in scaling your Damage. Sources of Trap Throwing Speed are rather limited, but thanks to the Charged Traps Support and extending your Power Charge limit to Frenzy Charges with the Badge of the Brotherhood Amulet, or simply investing into Frenzy Charges on your Passive Tree, you can get very solid amounts of that modifier. You could also use the Slavedriver's Hand Gloves and stack Cast Speed, but we find that solution inferior overall. The Mana Costs are quite problematic, so to solve that you should pick up the Eldritch Battery Keystone. This allows you to Reserve all your Mana, but you have to get enough Energy Shield on your Items. It also allows you to use one extra Aura in the form of Divine Blessing.
The Assassin Ascendency is very powerful for this Build. It easily caps your Critical Strike Chance with the first Hit or when the Enemy drops below 50% maximum Life, which is quite handy at Boss encounters as you can pre-load all your Traps to Hit at once at first. The last phase is usually the hardest, so extra Damage is useful here too. The Opportunistic Notable is a bit hard to track, but both bonuses are very strong, so it doesn't matter which one you have that much. This Ascendency doesn't provide much defense, but you can source it from your Gear instead, without worrying about lack of Damage.
This version of the build is a League Starter - it consists of cheap items and it's Life-based. The types of defense used are Maximum Life, Evasion Rating, capped Spell Suppression, rapid Life Regeneration, massive Physical Damage reduction from the Lightning Coil Armour, and delayed Damage from Petrified Blood. That being said, smart positioning and fast movement are more important when it comes to surviving dangerous encounters.
You can also check our other Path of Exile builds right over here Odealo's Crafty Guides - Full List
1. Gameplay
The gameplay is similar to other Trap Builds, you throw your Lightning Trap into a pack of Enemies. Against more formidable Enemies you should also add the Bear Trap and Sniper Mark to improve your Damage. For mobility use Shield Charge and Frostblink. Skitterbots will shock and chill your opponents - and with the Profany Proxy Ring, they will also apply the Conductivity Curse. Place the Frost Shield and use Steelskin to reduce incoming Damage.
|
|
|
|

2. Build's PROS & CONS
| PROS |
|
| CONS |
|
3. Leveling tips
Lightning Trap can be used early in the game, linking it with other Gems that would increase its damage such as Swift Assembly Support. At level 38 it will be possible to swap it with Cluster Traps Support. During the campaign look for items with bonuses to your Spell or Elemental Damage and Critical Strike Chance. Capping Resistances is the most important defensive aspect, Evasion, Armour, or even maximum Life doesn't matter that much.
Suggested leveling Gem setups:
| Lightning Trap setup | |
 |
Lightning Trap - you can use Lightning Trap to level up, you can obtain it by entering the Caverns of Wrath at the end of Act 1. |
 |
Swift Assembly Support - before you're able to use  Cluster Traps Support, use this Gem Cluster Traps Support, use this Gem |
 |
Trap and Mine Damage Support - It will provide you with more Trap Damage. |
 |
Inspiration Support - Inspiration Support is great for More Elemental Damage, Crit Chance, and Reducing Mana Cost of Skills. |
 |
Lightning Penetration Support - allows you to shred through Lightning-Resistant Enemies. |
 |
Elemental Focus Support - Use it for More Elemental Damage, but lose the ability to cause Elemental Ailments such as Shock. |
| Flame Dash setup | |
 |
Flame Dash - as a movement Skill you can use Flame Dash or any other Skill that suits your playstyle. |
| Utility Gems | |
 |
Summon Skitterbots - Skitterbots are really useful Minions, they Chill and Shock enemies nearby - something that Elemental Focus Support prevents your others' skills from doing |
 |
Vitality - Life Regeneration is the only way to recover your Life as a Trap Build. |
 |
Clarity - this Aura is very helpful to help you with the Mana Costs of your Traps. You will probably still need a Mana Flask to spam your Traps against bosses. |
 |
Conductivity - A Curse that increases the amount of Lightning Damage your opponents take. |
Bandits:
You should kill all the Bandits and take two more Passive Skill Points, but if you struggle with Mana and Elemental Resistances - help Alira.
Leveling Skill Trees:
32 Points Skill Tree
Take Blood Siphon, Assassination, Saboteur, Expeditious Munitions, and Clever Construction.
70 Points Skill Tree
Take Doom Cast, Instinct, Piercing Shots, Inveterate, Charisma, Heartseeker, and nearby maximum Life Notables.
Recommended leveling items:
 Le Heup of All - grants all useful modifiers such as Damage, Attributes, and Resistances. Le Heup of All - grants all useful modifiers such as Damage, Attributes, and Resistances. |
|
| (10-30)% increased Damage +(10-30) to all Attributes (10-30)% increased Rarity of Items found +(10-30)% to all Elemental Resistances |
|
 Goldrim - a very useful Helmet to help you cap your Resistance. Goldrim - a very useful Helmet to help you cap your Resistance. |
|
| +(30-50) to Evasion Rating 10% increased Rarity of Items found +(30-40)% to all Elemental Resistances Reflects 4 Physical Damage to Melee Attackers Level Requirement reduced by 100 (Hidden) |
|
 Tabula Rasa - with this Body Armour you can have a six-linked skill set up right from the start, but keep in mind that the Mana cost of your Skills will be abnormally high Tabula Rasa - with this Body Armour you can have a six-linked skill set up right from the start, but keep in mind that the Mana cost of your Skills will be abnormally high |
|
| Item has no level requirement and Energy Shield (Hidden) Item has 6 White Sockets and is fully linked (Hidden) |
|
 Wanderlust - those Boots provide Movement Speed and some Mana Regeneration Rate, which are quite useful. They also make you immune to Freeze, so opening Strongboxes is much less scary. Wanderlust - those Boots provide Movement Speed and some Mana Regeneration Rate, which are quite useful. They also make you immune to Freeze, so opening Strongboxes is much less scary. |
|
| +5 to Dexterity +(10-20) to maximum Energy Shield (20-40)% increased Mana Regeneration Rate 20% increased Movement Speed Cannot be Frozen |
|
4. Final Skill Tree, Ascendancy Points, and Pantheon
Final Skill Tree:
118 Points Final Skill Tree (doesn't include Unique or Cluster Jewels)
118 Points Path of Building(PoB) link
Ascendancy points:
Preferably in the order:
- Ambush and Assassinate
- Opportunistic
- Unstable Infusion
- Deadly Infusion
Pantheon:
Major God: Soul of Arakaali 10% reduced Damage taken from Damage Over Time; +40% Chaos Resistance against Damage Over Time
Minor God: Soul of Shakari 50% less Duration of Poisons on You; 5% reduced Chaos Damage taken
5. Final Gems links
| [DPS] Lightning Trap setup | |
|
Lightning Trap - it is the core element of the build, it shoots out many Projectiles in a nova, dealing high Lightning Damage. The Transfigured variant of the Sparks can be used for better Clear Speed if you like that style more, but the single-target Damage remains superior with the regular versions. |
 |
Increased Critical Damage Support - grants tons of Critical Strike Multiplier, which is the main form of dealing Damage here. Later you can replace it with the Awakened Added Lightning Damage Support which increases the main Gem Level by 1. |
|
Trap and Mine Damage Support - more Trap Damage, but less Throwing Speed, overall it's worth the penalty. You can also use the Returning Projectiles Support for better Clear Speed. |
|
Cluster Traps Support - you can throw more Traps at once, and have more Traps at the same time, but each deals less damage, it's a good deal. |
 |
Charged Traps Support - generates Frenzy and Power Charges, and makes them extremely powerful for this Build, by adding the Trap Throwing Speed and Critical Strike Multiplier on top of their regular benefits. |
|
Lightning Penetration Support - by penetrating the Lightning Resistance of your opponent you'll deal significantly more Lightning Damage. The Awakened version can be used to apply Lightning Exposure. |
| [UTILITY] Auras setup | |
|
Summon Skitterbots - the Skitterbots grant you more Trap Damage, but also inflict Shock and Chill. With the Profane Proxy Ring, they apply a Curse of your choice instead. |
 |
Grace - it is the main source of Evasion Rating in this Build, allowing you to evade most incoming Attacks. |
 |
Petrified Blood - delays part of the incoming Damage, but makes you more susceptible to Damage over Time Effects. It also enables the Low Life status for 30% More Spell Damage. |
 |
Arctic Armour - reduces the Physical Damage you take while Throwing Traps, and makes you immune to Freeze. Skip it if you lack investments in Mana Reservation Efficiency. |
| [UTILITY] Arrogance setup | |
|
Vitality - grants you tons of Life Regeneration, which is the main way of Life Recovery in this Build, since you have no access to Life Leech. |
 |
Precision - grants a bit of Critical Strike Chance. You can also use the Defiance Banner instead to improve your Evasion Rating further. |
 |
Arrogance Support - when linked to your Auras, they will Reserve your Life instead of Mana. You are free to Reserve half of your maximum Life since you use the Petrified Blood anyway. |
| [UTILITY] Divine Blessing setup | |
 |
Wrath - greatly improves your Damage with Lightning Spells. It also has useful modifiers on the Watcher's Eye Jewel. |
 |
Discipline - if you lack Energy Shield on your Gear, you can use this Aura to boost it, as well as improve its Recharge Rate. Use it instead of Wrath if you can't spam your Traps on Boss encounters. |
 |
Divine Blessing Support - changes the permanent Aura into a temporary Buff that can be cast using your Energy Shield. |
 |
Inspiration Support - reduces the Mana Cost of linked Spells, making your Blessing cheaper to cast. |
| [MOBILITY] Movement setup | |
 |
Shield Charge - it is the best Movement Skill to use for Clearing Maps. It is a fast charge toward the targeted location, with no Cooldown. |
 |
Faster Attacks Support - it makes your Shield Charge even faster. |
 |
Enhance Support - it is optional, but highly encouraged as it further improves the Movement Speed of this setup. |
| [UTILITY] Guard setup | |
 |
Steelskin - your main Guard Skill that lowers incoming Damage you take and makes you Immune to Bleeding. |
 |
Frost Shield - places a frosty globe that drains your Energy Shield up to a limit, and significantly Reduces the Damage you take from outside sources. |
| [UTILITY] Various Utility Skills | |
 |
Frostblink - a Movement Skill that you can occasionally use to instantly dodge incoming Attacks or cross the terrain gap. |
 |
Bear Trap - greatly slows Enemy Movement Speed and makes it Take more Damage from your Lightning Trap for a few seconds. |
|
Conductivity - a powerful Curse that reduces Enemy Lightning Resistance and improves your Shock. You can automate it with the Profane Proxy Ring. |
 |
Sniper's Mark - after you pick up the Whispers of Doom Notable you can use a second Curse. The Sniper Mark is the best choice as it significantly improves your Damage with Projectiles. |
|
|
5. Gear Setup
To boost your Damage you should look for modifiers that grant you additional Gem Levels, increase your Elemental, Spell, or Lightning Damage, and Add Lightning Damage to your Spells. Trap Throwing Speed and Critical Strike Multiplier are also very important. To boost your Defense, look for maximum Life, capping your Elemental Resistances, and a bit of Spell Suppression. Life Regeneration is also useful to have. Your Items should be Energy Shield-based, optionally with the Evasion Rating as well. You will need plenty of Strength on your Gear to be able to use all your Gems at maximum level. Mana Reservation Efficiency on your Helmet is necessary to run the Arctic Armour. Remember that various on-kill modifiers don't work with Traps.
|
Stat priorities on items:
|
 (Helmet) Rare Helmet - here you can opt for lots of Mana Reservation Efficiency if you want to fit in the Arctic Armour. If that's irrelevant for you, just look for high maximum Life, Resistances, Attributes, Spell Suppression, and Energy Shield. (Helmet) Rare Helmet - here you can opt for lots of Mana Reservation Efficiency if you want to fit in the Arctic Armour. If that's irrelevant for you, just look for high maximum Life, Resistances, Attributes, Spell Suppression, and Energy Shield. |
|
| Min. requirements: 70 maximum Life 70% Total Elemental Resistances Optional affixes: Nearby Enemies take #% increased Elemental Damage #% increased Mana Reservation Efficiency of Skills (Essence of Loathing + Eldritch Implicit) % chance to Suppress Spell Damage #% of Physical Damage from Hits taken as Fire Damage Life Regeneration Attributes |
|
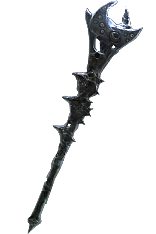 (Weapon) Rare Weapon - here you should look for additional Gem Levels, Spell Damage, or Critical Strike Multiplier and Added Lightning Damage to your Spells. Buy the Wand, Sceptre, or Rune Dagger with Fractured Gem Levels modifier and use Essence of Woe or Torment until you get the other two modifiers. (Weapon) Rare Weapon - here you should look for additional Gem Levels, Spell Damage, or Critical Strike Multiplier and Added Lightning Damage to your Spells. Buy the Wand, Sceptre, or Rune Dagger with Fractured Gem Levels modifier and use Essence of Woe or Torment until you get the other two modifiers. |
|
| Min. requirements: 60% increased Spell/Lightning/Elemental Damage 1-150 added Lightning Damage to Spells Optional affixes: +1 to level of all Lightning Spell Skill Gems Global Critical Strike Multiplier Trap Throwing Speed Attributes |
|
 (Weapon) Rare Shield - here you can find plenty of Damage bonuses too, but you should also look for defensive boosts. Additional Block Chance can also be useful. Only pure Energy Shield bases can roll additional Gem Levels. (Weapon) Rare Shield - here you can find plenty of Damage bonuses too, but you should also look for defensive boosts. Additional Block Chance can also be useful. Only pure Energy Shield bases can roll additional Gem Levels. |
|
| Min. requirements: 40% increased Spell/Lightning/Elemental Damage +1 to level of all Lightning Spell Skill Gems +50 to maximum Life Optional affixes: % chance to Suppress Spell Damage Resistance Life Regeneration Attack/Spell Block Chance |
|
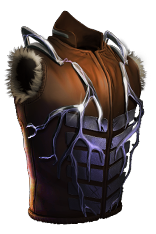 (Body Armour) Lightning Coil - it is the best Armour to reduce Physical Damage you take. You will need plenty of Lightning Resistances to cover the penalty, but it is worth it. Look for Corrupted ones with bonuses to Trap or Projectile Gem Levels, and Link it using the Tainted Currency. (Body Armour) Lightning Coil - it is the best Armour to reduce Physical Damage you take. You will need plenty of Lightning Resistances to cover the penalty, but it is worth it. Look for Corrupted ones with bonuses to Trap or Projectile Gem Levels, and Link it using the Tainted Currency. |
|
| Adds 1 to (20-30) Lightning Damage to Attacks (90-120)% increased Armour and Evasion +(60-80) to maximum Life -60% to Lightning Resistance 50% of Physical Damage from Hits taken as Lightning Damage |
|
 (Boots) Rare Boots - seek a lot of Elemental Resistances, Maximum Life, and Movement Speed. Attributes or Chaos Resistances are also very good to have. You can also find very useful Ailment Avoidances here. (Boots) Rare Boots - seek a lot of Elemental Resistances, Maximum Life, and Movement Speed. Attributes or Chaos Resistances are also very good to have. You can also find very useful Ailment Avoidances here. |
|
| Min. requirements: 25% Movement Speed +60 to maximum Life 60% Total Elemental Resistances Optional affixes: % chance to Suppress Spell Damage Chaos Resistance Life Regeneration % chance to Avoid Elemental Ailments |
|
 (Gloves) Rare Gloves - the Gloves have a wide variety of useful modifiers. You can use them to get basic defenses such as maximum Life, Resistances, or Life Regeneration, but you can also get tons of Damage modifiers. The Eldritch Implicits are also very important. (Gloves) Rare Gloves - the Gloves have a wide variety of useful modifiers. You can use them to get basic defenses such as maximum Life, Resistances, or Life Regeneration, but you can also get tons of Damage modifiers. The Eldritch Implicits are also very important. |
|
| Min. requirements: 70 maximum Life 70% Total Elemental Resistances Optional affixes: % increased Damage during any Flask Effect Inflict Lightning Exposure on Hit, applying -#% to Lightning Resistance (Eater) % chance to Unnerve Enemies for 4 seconds on Hit (Exarch) % increased Damage with Hits against Chilled Enemies % increased Elemental Damage % Trap Throwing Speed |
|
 (Gloves) Slavedriver's Hand - those can be used to alter the Build a lot. With them, you don't need to worry about Trap Throwing Speed or Eldritch Battery, but you will have to invest a lot into Cast Speed and Life Regeneration. It is an option worth mentioning, but not that good in this setup. (Gloves) Slavedriver's Hand - those can be used to alter the Build a lot. With them, you don't need to worry about Trap Throwing Speed or Eldritch Battery, but you will have to invest a lot into Cast Speed and Life Regeneration. It is an option worth mentioning, but not that good in this setup. |
|
| +(30-40) to Dexterity (200-250)% increased Evasion and Energy Shield (20-30)% reduced Trap Throwing Speed Skills used by Traps have (10-20)% increased Area of Effect Increases and Reductions to Cast Speed also Apply to Trap Throwing Speed 10% chance to gain an Endurance, Frenzy or Power Charge when any of your Traps are Triggered by an Enemy Skills which throw Traps have Blood Magic Skills which throw Traps Cost Life instead of Mana |
|
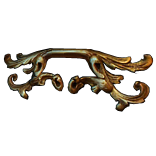
 (Belt) Rare Belt - on your Belt you should look for tons of Resistances, Life and its Regeneration, and Attributes. Use the Stygian Vise for additional Abyss Jewel. (Belt) Rare Belt - on your Belt you should look for tons of Resistances, Life and its Regeneration, and Attributes. Use the Stygian Vise for additional Abyss Jewel. |
|
| Min. requirements: 60 maximum Life 60% Total Elemental Resistances Optional affixes: increased Damage Chaos Resistance maximum Life % Attributes |
|
 (Belt) Rare Abyss Jewel - on your extra Abyss Jewel inside of your Belt you can obtain additional maximum Life, lacking Resistances or Attributes, and some Critical Strike Multiplier. (Belt) Rare Abyss Jewel - on your extra Abyss Jewel inside of your Belt you can obtain additional maximum Life, lacking Resistances or Attributes, and some Critical Strike Multiplier. |
|
| Min. requirements: 30 maximum Life Optional affixes: increased Damage with Spells % Total Elemental Resistances Attributes Critical Strike Multiplier |
|
 (Amulet) Rare Amulet - at first you can use just a regular Rare Amulet with bonuses to your maximum Life, Resistances, and possibly Gem Levels. You should not use it for too long. (Amulet) Rare Amulet - at first you can use just a regular Rare Amulet with bonuses to your maximum Life, Resistances, and possibly Gem Levels. You should not use it for too long. |
|
| Min. requirements: 60 maximum Life 60% Total Elemental Resistances Optional affixes: increased Spell Damage +1 to level of all Lightning Skill Gems Global Critical Strike Multiplier Attributes |
|
 (Amulet) Badge of the Brotherhood - it is an easy way to obtain 2 additional Frenzy Charges and save 4 Passive Point Skills. It is stronger than a regular Rare Amulet but provides nothing defensively. (Amulet) Badge of the Brotherhood - it is an easy way to obtain 2 additional Frenzy Charges and save 4 Passive Point Skills. It is stronger than a regular Rare Amulet but provides nothing defensively. |
|
| +(16-24) to Dexterity and Intelligence (7-10)% increased Cooldown Recovery Rate of Travel Skills per Frenzy Charge (7-10)% increased Effect of Elusive on you per Power Charge (20-25)% chance to lose a Frenzy Charge when you use a Travel Skill (20-25)% chance to lose a Power Charge when you gain Elusive Your Maximum Frenzy Charges is equal to your Maximum Power Charges |
|
 (Amulet) Replica Dragonfang's Flight - it grants tons of Damage via 3 additional Gem levels for your Lightning Trap and improves your Mana Reservation Efficiency, Resistances, and Attribute Requirements a bit. You will need to invest in 2 Frenzy Charge Notables to make up for the lack of Badge of the Brotherhood. (Amulet) Replica Dragonfang's Flight - it grants tons of Damage via 3 additional Gem levels for your Lightning Trap and improves your Mana Reservation Efficiency, Resistances, and Attribute Requirements a bit. You will need to invest in 2 Frenzy Charge Notables to make up for the lack of Badge of the Brotherhood. |
|
| +(10-16) to all Attributes +3 to Level of all <Random Skill> Gems +(5-10)% to all Elemental Resistances (5-10)% increased Reservation Efficiency of Skills Items and Gems have (10-5)% reduced Attribute Requirements |
|
 (Ring) Rare Ring - here you should look for Life and lacking Attributes or Resistances. If you want Damage, you should try to get increased Lightning Damage or Critical Strike Multiplier with Essences. (Ring) Rare Ring - here you should look for Life and lacking Attributes or Resistances. If you want Damage, you should try to get increased Lightning Damage or Critical Strike Multiplier with Essences. |
|
| Min. requirements: 60 to Maximum Life 60% Total Elemental Resistances Optional affixes: increased Lightning Damage Attributes Critical Strike Multiplier |
|
 (Ring) Profane Proxy - with this Ring you will automatically apply a high-level Curse via your Triggerbots. Such a Curse is usually at least twice as effective as a regular level 1 Curse on Hit modifier. (Ring) Profane Proxy - with this Ring you will automatically apply a high-level Curse via your Triggerbots. Such a Curse is usually at least twice as effective as a regular level 1 Curse on Hit modifier. |
|
| +3 to Level of Socketed Curse Gems +(20-30)% to Cold Resistance +(20-30)% to Lightning Resistance Left Ring Slot: Your Chilling Skitterbot's Aura applies Socketed Hex Curse instead Right Ring Slot: Your Shocking Skitterbot's Aura applies Socketed Hex Curse instead |
|
 (Ring) Nimis - as with every other Projectile Skill, this Ring will double your Damage if you have no other source of Returning Projectiles, making it extremely good. It is very expensive, so you should look into alternative sources first. (Ring) Nimis - as with every other Projectile Skill, this Ring will double your Damage if you have no other source of Returning Projectiles, making it extremely good. It is very expensive, so you should look into alternative sources first. |
|
| +(20-30)% to Lightning Resistance +(30-50) to Dexterity (25-35)% increased Projectile Damage Projectiles Return to you Projectiles are fired in random directions |
|
 (Jewel) Rare Jewels - Jewels offers a wide variety of stats. Having a 7% increased Maximum Life is one of the best mods, but you can also seek some Spell Damage and Critical Strike Multiplier in there. (Jewel) Rare Jewels - Jewels offers a wide variety of stats. Having a 7% increased Maximum Life is one of the best mods, but you can also seek some Spell Damage and Critical Strike Multiplier in there. |
|
| Recommended affixes: increased Critical Strike Multiplier with Spells or Elemental/Lightning Skills increased Maximum Life Elemental Resistances Attributes |
|
 (Jewel) Watcher's Eye - a high-end expensive Jewel, you can find a lot of mods that increase the effectiveness of Auras, the ones you're interested in are Wrath and Grace. (Jewel) Watcher's Eye - a high-end expensive Jewel, you can find a lot of mods that increase the effectiveness of Auras, the ones you're interested in are Wrath and Grace. |
|
| (4-6)% increased maximum Energy Shield (4-6)% increased maximum Life (4-6)% increased maximum Mana <Two or Three random aura modifiers> Recommended modifiers: +(12-15)% chance to Suppress Spell Damage while affected by Grace (40-60)% increased Lightning Damage while affected by Wrath Damage Penetrates (10-15)% Lightning Resistance while affected by Wrath |
|
 (Jewel) Ancestral Vision - with proper Boots and investments into Spell Suppression you can become fully immune to Elemental Ailments thanks to this Jewel. (Jewel) Ancestral Vision - with proper Boots and investments into Spell Suppression you can become fully immune to Elemental Ailments thanks to this Jewel. |
|
| +(5-10) to Dexterity Modifiers to Chance to Suppress Spell Damage also apply to Chance to Avoid Elemental Ailments at 50% of their Value |
|
 (Flask) Taste of Hate - this Flask further improves your Physical Damage Taken reduction by converting part of it into Cold Damage instead. (Flask) Taste of Hate - this Flask further improves your Physical Damage Taken reduction by converting part of it into Cold Damage instead. |
|
| (10-15)% of Physical Damage from Hits taken as Cold Damage during Effect Gain (10-15)% of Physical Damage as Extra Cold Damage during effect 30% chance to Avoid being Chilled during Effect 30% chance to Avoid being Frozen during Effect |
|
|
Other suggested Flasks:
|
|
    |
|
|
If you have any other build requests please leave that in the comments below. We are always open to suggestions and constructive feedback.
Pictures used in this article are the intellectual property of Grinding Gear Games.
