Hollow Palm Technique Ascendant duo-build
A very unique Melee/Unarmed build based on the new Keystone Passive Hollow Palm TechniqueHollow Palm Technique
Scion/Ascendant duo-build
Updated for Patch 3.10
The Best Crafty Guides by Odealo
Estimated budget: high

| Guide notes |
| May 21, 2020 -Build created |
Hollow Palm Technique is a newly added in Patch 3.10 Keystone Passive. It grants monstrous added Physical Damage to Attacks based on your Dexterity but makes your character unable to use any Items in both Weapon slots and Gloves slot. By stacking Dexterity (over 2,000 is within reach even when you loose 3 item sockets) you get massive Damage bonus to your preferred Attack of choice. You can use all Unarmed Skills like Cyclone, Infernal Blow, Ice Crash, Consecrated Path, Frenzy, Dominating Blow, Smite, and Tectonic Slam.
We have decided to make a duo-Build/Guide and include two alternative options for this Ascendant/Scion character. The first one is based on purely Fire/Elemental Damage, Consecrated Path, and Dodge/Evasion for the defenses, while the other build deals purely Physical Damage with Cyclone, utilizes Impale, and offers very high Armour Rating and Physical Damage mitigation. Switching between the two requires you to swap two to three Items and several Passives Points making it a very flexible and interesting character type.
You can also check our other Path of Exile builds at Odealo's Crafty Guides - Full List
1. Gameplay
Hollow Palm Technique Ascendant is a typical Melee fighter that deals high damage in close range. Both variations of this build use Area Attacks which offer decent clear speed. Consecrated Path is also a Movement Skill and makes you teleport to nearby enemies so it can feel slightly faster than Cyclone, but Dodge/Evasion seems to be slightly less reliable in terms of defeating higher Tier enemies and Bosses. Cyclone build is very similar in terms of playstyle, however, for the defenses, it utilizes high Block Chance, Armour Rating, and high Physical Damage mitigation. It's slightly slower and the initial on Hit damage is a bit lower, but overall it feels more "end-game compatible". Both variations of this build are quite easy to master, as with their limited number of available Sockets because of the missing three Item slot, you don't get to use many Active Skills.
|
0:08 Tier 16 Carcass In this video, the character had Enchanted Fractal Thoughts and Wildwrap. It had solid DPS output and was overall very fun to play, however, it felt like a Glass Cannon as it had to rely on Dodge Rolls and was vulnerable to strong AoE damage |
|
0:08 Tier 16 Carcass The Physical/Impale version used a Rare Helmet with high defensive stats and some extra flat Dexterity, and the Armour used had -15 to Total Mana Cost to Socketed Skills and high Life Bonus which made this build more convenient to play |
|
|

2. Build's PROS & CONS
| PROS |
|
| CONS |
|
3. Leveling tips
Leveling with Hollow Palm Technique is like a walk in a park. After you reach the Large Jewel Socket and put One With Nothing inside to get the Keystone, you will have a crazy amount of Added Physical Damage from just a few Dexterity Items and Passives on your Tree. You will be one-shotting everything on your path at this point and rushing through all 10 Acts. If you manage to get Astramentis, it alone will provide enough Dexterity for the leveling part. You can use any skill you want for this part, though Consecrated Path renders to be the fastest in terms of campaign progression. The leveling setup is the same for both variants of this build. You could also level up with Cyclone, but Consecrated Path appears to be simply faster and more efficient.
Suggested leveling Gem setups:
| Molten Strike/Consecrated Path setup | |
 |
Molten Strike - the first Attack that you are going to use until you reach level 28. At that point, simply replace it with  Consecrated Path and enjoy one of the fastest Melee leveling Consecrated Path and enjoy one of the fastest Melee leveling |
 |
Melee Physical Damage Support - grants a high bonus to Melee Physical DPS |
 |
Added Fire Damage Support - grants high extra Fire Damage based on your Physical DPS |
 |
Fortify Support - grants a solid defensive buff and increases your DPS significantly |
| Utility Gems | |
 |
Herald of Ash - grants high bonus Fire Damage based on your Physical DPS and causes fiery explosions when you kill enemies |
 |
Summon Ice Golem - this Golem increases your Accuracy Rating and Critical Strike Chance. Will help you reach 100% Chance to Hit until you get all the Accuracy from stacked Dexterity later on |
 |
Leap Slam - recommended Movement Skill which increases your mobility and allows you to leap over obstacles and cliffs |
 |
Ancestral Warchief - a Totem Spell which greatly increases your Melee Damage while active |
 |
Clarity - grants increased Mana Regeneration which is very useful on lower levels as a Melee character |
|
|
Bandits:
You should kill all the Bandits for two extra Passive Skill Points
Leveling Skill Trees:
33 Points Skill Tree
Priorities: 1) Large Jewel Socket 2) Constitution 3) Thick Skin 4) Primeval Force
62 Points Skill Tree
Priorities 1) Master of the Arena 2) Dervish 3) Golem's Blood 4) Acrobatics 5) Jewel Socket with Thread of Hope(Small Ring) to allocate Aspect of the Lynx, Weapon Artistry, Master of Force, Winter Spirit
Recommended leveling items:
 One with Nothing - mandatory Jewel for this build which happens to also be insanely powerful for the leveling part. It grants the Hollow Palm Technique Keystone Passive One with Nothing - mandatory Jewel for this build which happens to also be insanely powerful for the leveling part. It grants the Hollow Palm Technique Keystone Passive |
|
| Adds Hollow Palm Technique | |
 Victario's Flight - the best boots for pretty much the entire leveling phase. They grant very high bonus Movement Speed, Mana Recovery and some extra Dexterity Victario's Flight - the best boots for pretty much the entire leveling phase. They grant very high bonus Movement Speed, Mana Recovery and some extra Dexterity |
|
| +15 to Dexterity +15 to Intelligence (100-150)% increased Evasion Rating 5% increased Movement Speed (5-10)% of Damage taken gained as Mana over 4 seconds when Hit 10% increased Movement Speed 10% increased Movement Speed for you and nearby Allies |
|
 Astramentis - grants very high bonus Dexterity making it the best Amulet for the early stages when building this character Astramentis - grants very high bonus Dexterity making it the best Amulet for the early stages when building this character |
|
| +(10-16) to all Attributes +(80-100) to all Attributes -4 Physical Damage taken from Attack Hits |
|
 Briskwrap - the best Body Armour for the leveling. Its' Fated version is also the recommended Armour for the Elemental variant of this build Briskwrap - the best Body Armour for the leveling. Its' Fated version is also the recommended Armour for the Elemental variant of this build |
|
| 10% increased Attack Speed +(120-180) to Evasion Rating +(30-40)% to Cold Resistance 5% increased Movement Speed (20-25)% increased Mana Recovery from Flasks 15% increased Dexterity |
|
4. Final Skill Tree, Ascendancy Points, and Pantheon
Final Skill Tree:
ELEMENTAL VARIANT
122 Points Final Skill Tree (Cluster Jewels not included)
122 Points Path of Building(PoB) link
PHYSICAL VARIANT
122 Points Final Skill Tree (Cluster Jewels not included)
122 Points Path of Building(PoB) link
Ascendancy points:
ELEMENTAL VARIANT
- Marauder Ascendancy - Berserker
- Ranger Ascendancy - Pathfinder or Raider
- Path of the Ranger
PHYSICAL VARIANT
- Marauder Ascendancy - Berserker
- Duelist Ascendancy - Gladiator
- Path of the Duelist
Pantheon:
ELEMENTAL VARIANT
Major God: Soul of Lunaris 1% additional Physical Damage Reduction for each nearby Enemy, up to 8%; 1% increased Movement Speed for each nearby Enemy, up to 8%
Minor God: Soul of Garukhan +5% chance to Evade Attack Hits if you've taken a Savage Hit Recently
PHYSICAL VARIANT
Major God: Soul of Solaris 6% additional Physical Damage Reduction while there is only one nearby Enemy; 20% chance to take 50% less Area Damage from Hits
Minor God: Soul of Gruthkul 1% additional Physical Damage Reduction for each Hit you've taken Recently up to a maximum of 5%
5. Final Gems links
ELEMENTAL VARIANT
| [DPS] Consecrated Path | |
|
Consecrated Path - Area Attack which teleports you instantly to your target's location and deals damage around it. It utilizes nearly 100% of Physical to Fire Conversion |
| Combustion Support - increases Fire Damage dealt by Supported Spells and applies a very strong debuff to enemies you Ignite by Consecrated Path | |
 |
Elemental Damage with Attacks Support - grants very high bonus Elemental Damage. You can use its Awakened Gem if you can afford one |
 |
Fortify Support - grants high bonus Melee Damage and a very strong defensive buff |
 |
Inspiration Support - increases Elemental Damage and reduces the Mana Cost of your Consecrated Path. It's a must-have in this build otherwise you will be often out of Mana to cast Consecrated Path |
 |
Concentrated Effect Support - grants very high bonus Area Damage at the cost of reducing the Skill's radius |
| [UTILITY] Ancestral Warchief and Vaal Grace | |
|
Ancestral Warchief - increases your Melee Damage while you have this Totem summoned |
 |
Vaal Grace - used solely for the Vaal part of this Skill. It grants a temporary increase to your Dodge Chance making it a great addition against Bosses |
| [UTILITY] Auras and Herald | |
 |
Anger - grants added Fire Damage to Attacks, but the extra bonuses gained from Watcher's Eye Jewel are much more important as they will allow you to convert nearly 100% Damage to Fire |
|
Herald of Ash - grants added Fire Damage based on your base Physical Damage |
| [MOBILITY] Dash | |
 |
Dash - the recommended movement Spell for this build which teleports you instantly to the targeted location |
 |
Second Wind Support - allows you to store an additional use of Dash and increases its Cooldown Recovery Speed |
| [UTILITY] Immortal Call | |
 |
Cast when Damage Taken Support - will trigger Immortal Call whenever you take a certain amount of damage. It should be kept at level 1 for more frequent casts |
 |
Immortal Call - grants a very strong and brief damage reduction bonus. You need to match this Gem's level with your Cast when Damage Taken |
PHYSICAL VARIANT
| [DPS] Cyclone | |
 |
Cyclone - one of the most popular Area Attacks which has a very high Hit rate allowing you to stack Impale at an insane rate (and boost your DPS significantly) |
 |
Impale Support - increases your chance to Impale and increases its effectiveness |
|
Melee Physical Damage Support - grants very high bonus Physical Melee Damage. This Gem has a much more powerful Awakened variant |
|
Fortify Support |
 |
Brutality Support - increases your Physical Damage greatly but makes Supported Skill unable to deal non-Physical Damage. It also has an Awakened variant |
|
Concentrated Effect Support |
| [UTILITY] Ancestral Warchief and Vaal Molten Shell | |
|
Ancestral Warchief - increases your Melee Damage while you have this Totem summoned |
 |
Vaal Molten Shell - the best Guard Skill for this build which grants you a protective shield and increases your Armour Rating. Getting the Vaal Gem is optional - the regular one will work just fine as well |
| [UTILITY] Auras | |
 |
Pride - the best Aura for this build which increases Physical Damage taken by enemies affected by it |
 |
Flesh and Stone - increases Physical Damage taken by nearby enemies and Maims them when you are in Blood Stance |
 |
Blood and Sand - greatly increases your Area Damage while you are in Blood Stance |
 |
Dread Banner - grants increased Chance to Impale with Attacks |
| [MOBILITY] Dash | |
|
Dash - the recommended movement Spell for this build which teleports you instantly to the targeted location |
| [UTILITY] Blood Rage | |
 |
Blood Rage - increases your Attack Speed, generates Frenzy Charges, and grants Life Leech |
5. Gear Setup
Below you will find all the recommended gear for this build. Our setup consists mainly of Rare equipment except for the Weapons and Body Armour, with the latter being completely optional. However, you will also need several Primordial Jewels to add up one extra Golem, and it's good to pick at least one Large Cluster Jewel with Rotten Claws to increases your Minions Impale Chance. Either way, it should be rather easy to complete the build for low and mid-tier mapping with random replacements.
|
Stat priorities on items:
|
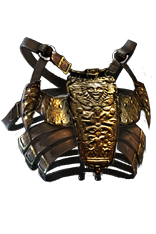
 (Helmet - ELEMENTAL var.) Fractal Thoughts - the best in the slot Helmet. It grants very high Elemental Damage and Dexterity bonuses (Helmet - ELEMENTAL var.) Fractal Thoughts - the best in the slot Helmet. It grants very high Elemental Damage and Dexterity bonuses |
| (140-180)% increased Evasion and Energy Shield +(25-40)% to Critical Strike Multiplier if Dexterity is higher than Intelligence 15% increased Dexterity if Strength is higher than Intelligence 1% increased Elemental Damage per 10 Dexterity +2 to Maximum Life per 10 Intelligence |
 (Helmet - BOTH var.) Rare Helmet - Rare Helmet is always a good option, however, it will not provide as high DPS bonuses as Fractal Thoughts for the ELEMENTAL version of this build. It offers much higher defensive utility for both builds though. Evasion based Helmet will work just fine for both variants too (Helmet - BOTH var.) Rare Helmet - Rare Helmet is always a good option, however, it will not provide as high DPS bonuses as Fractal Thoughts for the ELEMENTAL version of this build. It offers much higher defensive utility for both builds though. Evasion based Helmet will work just fine for both variants too |
| Min. requirements: 90 maximum Life 45 Dexterity Optional affixes: Elemental Resistances Nearby Enemies take 9% increased Physical Damage (PHYSICAL var. only) |
| Helmet enchantment: 40% increased Cyclone Damage (PHYSICAL) Consecrated Path deals 40% increased Damage (ELEMENTAL) |
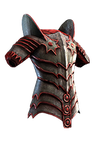 (Body Armour - BOTH var.) Rare Body Armour - it's almost a must-have to get the Delve affix here which reduces the Cost of Socketed Attacks by -15. It will make your Skills Mana Cost completely negligible. Rare Elder Armour can only come with a % increased Dexterity. It's preferred for the PHYSICAL variant of this build (Body Armour - BOTH var.) Rare Body Armour - it's almost a must-have to get the Delve affix here which reduces the Cost of Socketed Attacks by -15. It will make your Skills Mana Cost completely negligible. Rare Elder Armour can only come with a % increased Dexterity. It's preferred for the PHYSICAL variant of this build |
| Min. requirements: 100 maximum Life Socketed Attacks have -15 to Total Mana Cost 10% Increased Dexterity Optional affixes: Elemental Resistances |
| (Body Armour - BOTH var.) Wildwrap - one of the best Body Armours for this build. It offers very high bonus Dexterity and Damage, but a very limited defensive utility and requires you to work out a way to reduce the mana cost of your primary skill in an alternative way. It's preferred for the ELEMENTAL variant |
| 10% increased Attack Speed +(600-700) to Evasion Rating +(30-40)% to Cold Resistance 5% increased Movement Speed (20-25)% increased Mana Recovery from Flasks 15% increased Dexterity 1% increased Damage per 15 Dexterity |
 (Belt - BOTH var.) Rare Belt - again, aim for high defensive bonuses. It's primarily preferred for the ELEMENTAL version of this build as it's much harder to get enough Resistances and Life with Wildwrap and Fractal Thoughts equipped, but will surely work for both (Belt - BOTH var.) Rare Belt - again, aim for high defensive bonuses. It's primarily preferred for the ELEMENTAL version of this build as it's much harder to get enough Resistances and Life with Wildwrap and Fractal Thoughts equipped, but will surely work for both |
| Min. requirements: 90 maximum Life 35 Dexterity 100% Total Elemental Resistances Optional affixes: Elemental Damage with Attacks (ELEMENTAL only) |
 (Belt - BOTH var.) Cyclopean Coil - the BiS Belt for this build, but appears to be nearly impossible to wear for the ELEMENTAL one if using the beforementioned Uniques. It's recommended for the PHYSICAL version (Belt - BOTH var.) Cyclopean Coil - the BiS Belt for this build, but appears to be nearly impossible to wear for the ELEMENTAL one if using the beforementioned Uniques. It's recommended for the PHYSICAL version |
| +(25-40) to maximum Life +(60-80) to maximum Life (5-15)% increased Attributes Cannot be Frozen if Dexterity is higher than Intelligence Cannot be Ignited if Strength is higher than Dexterity Cannot be Shocked if Intelligence is higher than Strength 1% increased Damage per 5 of your lowest Attribute |
 (Amulet - BOTH var.) Rare Amulet - this is the most "universal" piece of equipment in this gear. Just the most important affixes here will be hard enough to obtain in the first place (Amulet - BOTH var.) Rare Amulet - this is the most "universal" piece of equipment in this gear. Just the most important affixes here will be hard enough to obtain in the first place |
| Min. requirements: 50 maximum Life 90 Dexterity 12% Increased Dexterity Optional affixes: Increased Damage per # Dexterity Elemental Damage with Attacks (ELEMENTAL only) Attributes Elemental Resistances |
| Recommended Anointments: Divine Fury (ELEMENTAL var.) Heart of the Warrior (BOTH var.) Diamond Skin (BOTH var.) Tenacity (BOTH var.) Ambidexterity (BOTH var.) |
 (Ring - BOTH var.) Rare Ring - one of your Rings has to be set to apply a Curse - Flammability for the ELEMENTAL var. and Vulnerability for the PHYSICAL one. Obviously, you want to get some extra Dexterity, Life, and Resistances on it (Ring - BOTH var.) Rare Ring - one of your Rings has to be set to apply a Curse - Flammability for the ELEMENTAL var. and Vulnerability for the PHYSICAL one. Obviously, you want to get some extra Dexterity, Life, and Resistances on it |
| Min. requirements: 50 maximum Life 40 Dexterity Applies level # Flammability/Vulnerability on Hit Optional affixes: Elemental Resistances |
| (Ring - BOTH var.) Rare Ring - on the other Ring you want extra Dexterity (obviously) and as many Elemental Resistances as you can afford |
| Min. requirements: 65 maximum Life 45 Dexterity 100% Total Elemental Resistances Optional affixes: Elemental Damage with Attacks (ELEMENTAL var.) Added Physical Damage to Attacks (Both var.) |
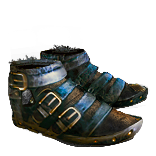
 (Gloves - BOTH var.) Garukhan's Flight - simply a must-have pair for this build. It alone grants 400 Maximum Life and 30% Movement Speed, on top of the other valuable bonuses (Gloves - BOTH var.) Garukhan's Flight - simply a must-have pair for this build. It alone grants 400 Maximum Life and 30% Movement Speed, on top of the other valuable bonuses |
| +(30-40) to Dexterity (320-380)% increased Evasion Rating 30% increased Movement Speed Immune to Burning Ground, Shocked Ground and Chilled Ground Regenerate 100 Life per second while moving +2 to Maximum Life per 10 Dexterity |
| Boot enchantment: 16% increased Attack and Cast Speed if you've Killed Recently |
 (Jewel - BOTH var.) Voices - you should get Voices on the right part of the Skill Tree to maximize the amount of Dexterity and Life you can get from Split Personality. You can also socket there another Large Cluster Jewel with two Jewel Sockets and same Passives as listed under the next Jewel below (Jewel - BOTH var.) Voices - you should get Voices on the right part of the Skill Tree to maximize the amount of Dexterity and Life you can get from Split Personality. You can also socket there another Large Cluster Jewel with two Jewel Sockets and same Passives as listed under the next Jewel below |
| Adds 3 Jewel Socket Passive Skills <Random empty passive skill node mod> |
 (Jewel - ELEMENTAL var.) Large Cluster Jewel - you should use at last one Large Cluster Jewel in this build with a mandatory two Jewel Sockets in it. You could also consider replacing Voices with another similar Large Cluster Jewel (Jewel - ELEMENTAL var.) Large Cluster Jewel - you should use at last one Large Cluster Jewel in this build with a mandatory two Jewel Sockets in it. You could also consider replacing Voices with another similar Large Cluster Jewel |
| Recommended affixes: 1 Added Passive Skill is Corrosive Elements 1 Added Passive Skill is Doryani's Lessons 1 Added Passive Skill is Prismatic Heart 2 Added Passives Skills are Jewel Sockets |
| (Jewel - PHYSICAL var.) Large Cluster Jewel - same goes for the Physical version, though you simply get to pick another Jewel type and different Passives |
| Recommended affixes: 1 Added Passive Skill is Deep Cuts 1 Added Passive Skill is Smite the Weak 2 Added Passives Skills are Jewel Sockets Optional affixes: 1 Added Passive Skill is Vicious Skewering 1 Added Passive Skill is Devastator |
 (Jewel - BOTH var.) Fluid Motion - you will need two or three of those to maximize your Dexterity. You can try getting Corrupted ones with Fire Damage Penetration for the ELEMENTAL character as they shouldn't be that expensive (Jewel - BOTH var.) Fluid Motion - you will need two or three of those to maximize your Dexterity. You can try getting Corrupted ones with Fire Damage Penetration for the ELEMENTAL character as they shouldn't be that expensive |
| +(16-24) to Dexterity Strength from Passives in Radius is Transformed to Dexterity |
 (Jewel - BOTH var.) Might of the Meek - you need two of those to increase the amount of Life and Resistances you get from around the Scion's starting point (Jewel - BOTH var.) Might of the Meek - you need two of those to increase the amount of Life and Resistances you get from around the Scion's starting point |
| 50% increased Effect of non-Keystone Passive Skills in Radius Notable Passive Skills in Radius grant nothing |
 (Jewel - BOTH var.) Watcher's Eye - Watcher's Eye with Physical to Fire Conversion is mandatory for the ELEMENTAL build, while Pride Jewel with extra 2 stacks of Impale is the BiS for the PHYSICAL one (Jewel - BOTH var.) Watcher's Eye - Watcher's Eye with Physical to Fire Conversion is mandatory for the ELEMENTAL build, while Pride Jewel with extra 2 stacks of Impale is the BiS for the PHYSICAL one |
| (4-6)% increased maximum Energy Shield (4-6)% increased maximum Life (4-6)% increased maximum Mana <Two or Three random aura modifiers> Recommended modifiers: (25-40)% of Physical Damage Converted to Fire Damage while affected by Anger (ELEMENTAL) Impales you inflict last 2 additional Hits while using Pride (PHYSICAL) |
|
Flasks for the ELEMENTAL Build:
|
     |
|
Flasks for the PHYSICAL Build:
|
   |
|
|
Let us know which version worked best for you, we felt that the PHYSICAL version was more reliable for end-game content and this is the one we may be updating further. We will also appreciate your feedback which you can post in the comments below. With your help, we will be able to improve our content.
Pictures used in this article are the intellectual property of Grinding Gear Games.
