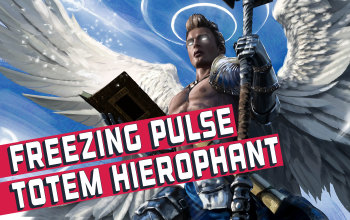
Freezing Pulse Totem "Low Life" Hierophant Build
One of the best end-game viable Totem builds for new Leagues for the Hierophant classFreezing Pulse Totem
"Low Life" Hierophant build
Updated for Patch 3.22
The Best Crafty Guides by Odealo
| Guide notes |
| August 22, 2022 -Updated for Patch 3.22 |
| Build overview | |||
| Tags: [TOTEM] [ELEMENTAL] [HYBRID] | |||
|
Budget: Defenses: |
|
Boss DPS: AoE: |
|
The Soul Mantle Unique Armour is a very important piece for nearly every Spell Totem Build, as it provides you an additional Support Gem for your main setup. It comes with a price, however. Every time your Totem dies a random Hex will be applied to you, so you have to get a way to become unaffected by those Curses. The first strategy can be done on a low budget, as all you need is the Viridi's Veil Helmet and a Magic Ring. It also provides a very useful defensive modifier that makes all Damage dealt by your Enemies Unlucky. The second method is more expensive, but you can gain far more damage that way. You can use the Sublime Vision Unique Jewel that makes you unaffected by Curses while you have the Zealotry Aura active.
With this, you can use the Heatshiver Helmet, which is a very powerful tool to double your Damage with any Cold Skill in the game. It synergizes very well with the Freezing Pulse, which can easily Freeze all your enemies. It deals the most Damage at the start of its trajectory, so you might need to resummon your Totems when the Boss moves away from them.
Having so many Curses on yourself can be turned into a benefit. The Self-Flagellation Jewel can grant you up to 140% increased Damage based on the amount of Curses on you, and the Coward's Legacy will enable the Low Life status which you can use to get 30% More Spell Damage from the Pain Attunement Keystone.
The build is not particularly tanky, but it can take a hit or two thanks to the high Life and Mana pool. The Mana is quite important here as you will redirect 30% of the Damage taken there. The Totem playstyle is naturally safe, even more so in this case as you will Freeze most enemies completely stopping them from attacking you.
You can also check our other Path of Exile builds right over here Odealo's Crafty Guides - Full List
1. Gameplay
Freezing Pulse with its fast Projectiles is the best choice as a spell for our Totems. This skill is more effective the closer enemies are to the source of the projectiles - totems in this case. It makes playing Freezing Pulse much safer than self-casting it. Ancestral Bond and Pursuit of Faith provided us with more Totems. Additional Mana will be required to smoothly run through the maps - with Mind Over Matter and the high cost of totem skill it's easy to run out of it in no time.
|
|
|
|

2. Build's PROS & CONS
| PROS |
|
| CONS |
|
3. Leveling tips
Holy Flame is an excellent leveling skill for this and many other Totem builds, it's available right from the start and doesn't require alternating your Passive Skill Tree in a significant way. It can carry you up to level 49 with just four links with no problem. Use it until you get yourself a Soul Mantle. Shortly after that, you'll be able to wear Coward's Legacy Belt. Wear Kikazaru - one or two of them so the Curses won't have a detrimental effect on you. While switching from Holy Flame Totem to Freezing Pulse it is important to look back at the Skills you're using. Adjust Gem links and Resistances.
Suggested leveling Gem setups:
| Holy Flame Totem setup | |
 |
Holy Flame Totem - a decent spell for leveling Totem builds. The Support Gems that will synergize with it are available right at the start of the game. Use it until you'll be able to wear Soul Mantle. |
| Combustion Support - use it to deal more Fire Damage and increase the Chance to Ignite. | |
 |
Added Fire Damage Support - adds more fire damage to your totems. |
 |
Controlled Destruction Support - reduces your Critical Strike Chance but grants tons of Spell Damage. |
| Flame Dash | |
 |
Herald of Ash - it is very powerful Herald for Fire Spells. Swap it to another Aura once you start using Freezing Pulse. |
 |
Hatred - grants powerful Cold Damage Multiplier. Use it with the Freezing Pulse setup. |
 |
Clarity - you will need this Aura to comfortably use your Skills without running out of Mana. |
 |
Vitality - high Life Regeneration can make a huge difference during the campaign. It is especially useful when completing the Labirynth. |
| Utility Gems | |
 |
Flammability - reduces Cursed Enemies' Fire Resistance, the type of damage you're dealing. Use the Frostbite if you use the Freezing Pulse. |
 |
Flame Dash - your main Mobility Skill, one of the best in the game. It offers instant relocation and holds up to three charges. |
Bandits:
Kill all the Bandits to be rewarded with 2 bonus Passive Skill Points.
Leveling Skill Trees:
32 Points Skill Tree
Priorities: 1) Holy Dominion & Light of Divinity 2) Quick Recovery 3) Ancestral Bond 4) Purity of Flesh 5) Divine Judgement 6) Devotion
63 Points Skill Tree
Priorities: 1) Annihilation 2) Heart and Soul 3) Shaman's Dominion 4) Mental Rapitidy 5) Frost Walker 6) Cruel Preparations 7) Deep Thoughts 8) Prodigal Perfection
Important: Do not take MoM until you're able to sustain Mana and do not take Pain Attunement until you have your Unique Belt.
Recommended leveling items:
 Le Heup of All - is a great leveling Ring, the stats it provides are much needed during leveling. Le Heup of All - is a great leveling Ring, the stats it provides are much needed during leveling. |
|
| (10-30)% increased Damage +(10-30) to all Attributes (10-30)% increased Rarity of Items found +(10-30)% to all Elemental Resistances |
 Goldrim - the best unique leveling Helmet you can get, mainly due to the Elemental Resistances in it. Goldrim - the best unique leveling Helmet you can get, mainly due to the Elemental Resistances in it. |
|
| +(30-50) to Evasion Rating 10% increased Rarity of Items found +(30-40)% to all Elemental Resistances Reflects 4 Physical Damage to Melee Attackers Level Requirement reduced by 100 (Hidden) |
 Tabula Rasa - 6-linked Body Armour you can use as soon as level 1. You can also look for ones with Corrupted Implicit that would increase your main Gem Level by 2. Tabula Rasa - 6-linked Body Armour you can use as soon as level 1. You can also look for ones with Corrupted Implicit that would increase your main Gem Level by 2. |
|
| Item has no level requirement and Energy Shield (Hidden) Item has 6 White Sockets and is fully linked (Hidden) |
 Kikazaru - you can mitigate the Hexes from the Soul Mantle with 2 of those Rings. It will also grant you decent Mana and Life Regeneration. Kikazaru - you can mitigate the Hexes from the Soul Mantle with 2 of those Rings. It will also grant you decent Mana and Life Regeneration. |
|
| +(20-30)% to Lightning Resistance +(10-15) to all Attributes (20-40)% increased Mana Regeneration Rate 60% reduced Effect of Curses on you Regenerate 3 Life per second per Level |
|
|
|
| (130-150)% increased Armour +(40-60) to maximum Life 0.5% of Life Regenerated per second 15% increased Area of Effect for Skills used by Totems 0.5% of Damage dealt by your Totems is Leeched to you as Life |
 Trolltimber Spire
4. Final Skill tree, Ascendancy Points, and Pantheon
Final Skill Tree:
103 Points Final Skill Tree (doesn't include Cluster or Unique Jewels)
121 Points Path of Building(PoB) link
Ascendancy points:
Preferably in the order:
- Pursuit of Faith
- Ritual of Awakening
- Conviction of Power
- Arcane Blessing
Pantheon:
Major God: Soul of the Brine King You cannot be Stunned if you've been Stunned or Blocked a Stunning Hit in the past 2 seconds; 100% chance to Avoid being Frozen
Minor God: Soul of Shakari 50% less Duration of Poisons on You, You cannot be Poisoned while there are at least 3 Poisons on you
5. Final Gems links
| [DPS] Freezing Pulse Totem setup | |
 |
Freezing Pulse - the Spell most suitable for this type of build. It shoots projectiles at very high speed, Pierces all targets, has high base damage and it's safe. |
 |
Hypothermia Support - synergizes well with Cold Spells. It increases your Damage against Chilled Enemies. |
 |
Added Cold Damage Support - adds additional Cold Damage to your Spells. The Awakened Version also raises the Gem Level of Freezing Pulse by 1. |
 |
increased Critical Damage Support - a massive boost to your Critical Strike Multiplier. |
 |
Greater Multiple Projectiles Support - greatly improves your Clear Speed, but lowers the Single-Target Damage. You can swap it to Cold Penetration Support in case of tough fights. |
 |
Multiple Totems Support - enables you to place one more Totem at one cast, and have more Totems placed at the same time. |
 |
Spell Totem Support - 7th link provided by Unique Body Armour Soul Mantle, makes Freezing Pulse a Totem Spell. |
| [UTILITY] Frost Bomb setup | |
 |
Frost Bomb - reduces Life Regeneration and applies Cold Exposure which reduces Cold Resistance. Useful for long fights with tough enemies. You can replace it later with Eldritch Implicit on Rare Gloves. |
| [MOBILITY] Flame Dash setup | |
|
Flame Dash - main mobility skill for faster movement through Maps. It's instant and can be used up to three times in rapid succession. |
| [UTILITY] Arcane Cloak | |
 |
Arcane Cloak - Guard Spell that grants a brief absorption of the incoming Damage, depending on the amount of Mana Spent. It also grants a bit of Lightning Damage to your Spells. |
 |
Sigil of Power - places a rune on the ground, spending Mana powers it up. It lowers the Damage of Enemies standing inside and grants you a bit of Lightning Damage. |
 |
Arcane Surge Support - the Arcane Blessing Notable grants you the permanent effect of this Gem, but only at the power of level 1 Gem. Using Arcane Cloak spends enough Mana to trigger the stronger version. |
 |
Increased Duration Support - increases the duration of all those buffs. |
| [UTILITY] Aura setup | |
 |
Zealotry - an Aura that increases your Spell Damage and Critical Strike Chance. It grants a similar amount of Damage as Hatred, so pick the one with the better Watcher's Eye or Sublime Vision Jewel available to you. |
 |
Eternal Blessing Support - allows you to use one Aura for free, but disables all other Auras. |
| [UTILITY] Cold Snap setup | |
 |
Cold Snap - creates a Chilled Ground effect that always applies a fixed amount of Chill. You can't deal Damage directly, so you have to resort to guaranteed effects. |
| Bonechill Support - increases the Cold Damage Taken by Enemies based on the intensity of Chill. | |
 |
Unbound Ailments Support - Increases the Chill effect of the Chilled Ground, and thus your Damage. |
| [UTILITY] Curse setup | |
 |
Arcanist Brand - the Anathema Ring allows you to use 4 Curses, but obviously you don't want to Cast them manually. This Brand will cast all linked Spells in succession. |
 |
Frostbite - this Curse lowers Cold Resistance and makes Enemies more susceptible to Freeze. |
 |
Assassin's Mark - grants you a lot of Critical Strike Chance and Multiplier against Marked Enemies. |
 |
Elemental Weakness - further lowers Elemental Resistances of affected foes. |
 |
Enfeeble - lowers the Damage dealt by Enemies. You can also use the Punishment Curse if you prefer even more Damage. You will have to Cast it manually unless you use a 2-handed Weapon. |
|
|
5. Gear Setup
Below you will find all the recommended and required gear for this build. Some of these items are absolutely mandatory and a few are heavily recommended. It leaves us with not so many items to cap Elemental Resistances and to gather as much Maximum Life as possible. You will have plenty of increased Damage from the Unique Jewel and your Passive Tree, so focus on getting Gem Levels, Cast Speed, and Critical Strike Multiplier. There are a few Unique Items that may change the whole gearing process, such as the Annihilation Light or Heatshiver, so chose your setup carefully. For starters, we recommend Virdi's Veil variation, as it is the most simple and still very effective one.
|
Stat priorities on items:
|
 (Weapon) Rare Wand - you can get Gem Levels, lots of Cast Speed and Critical Strike Chance for Spells, and Spell Damage here. The Critical Strike Multiplier or flat Cold Damage for Spells is also good. (Weapon) Rare Wand - you can get Gem Levels, lots of Cast Speed and Critical Strike Chance for Spells, and Spell Damage here. The Critical Strike Multiplier or flat Cold Damage for Spells is also good. |
|
| Min. requirements: 60% Increased Cold/Spell Damage +1 to Level of all Cold/Spell Skill Gems Optional affixes: Adds # to # Cold Damage to Spells Increased Cast Speed Critical Strike Chance for Spells Global Critical Strike Multiplier Increased Projectile Speed |
|
 (Weapon) Rare Shield - with the Shaper Influence you can get additional maximum Totem, which will considerably boost your Damage and AoE coverage. Other than that, try to look for Gem Levels, Critical Strike Chance for Spells, Cast Speed, or some defensive modifiers such as maximum Life or Resistances. (Weapon) Rare Shield - with the Shaper Influence you can get additional maximum Totem, which will considerably boost your Damage and AoE coverage. Other than that, try to look for Gem Levels, Critical Strike Chance for Spells, Cast Speed, or some defensive modifiers such as maximum Life or Resistances. |
|
| Min. requirements: +50 to maximum Life +1 to maximum number of Summoned Totems Optional affixes: +1 to Level of all Cold/Spell Skill Gems Critical Strike Chance for Spells Chance to deal Double Damage Increased Cast Speed Elemental Resistances |
|
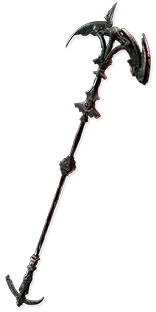 (Weapon) The Annihilating Light - it grants you an insane amount of Damage but makes capping your Resistances very hard. You will need a high amount of Resistances on every piece of Equipment and Jewels to make it worth it. (Weapon) The Annihilating Light - it grants you an insane amount of Damage but makes capping your Resistances very hard. You will need a high amount of Resistances on every piece of Equipment and Jewels to make it worth it. |
|
| +18% Chance to Block Attack Damage while wielding a Staff (70-60)% reduced Elemental Resistances Deal Triple Damage with Elemental Skills |
|
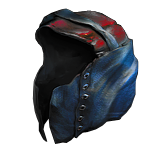
 (Helmet) Viridi's Veil - by equipping a Magic Ring on your right slot you become Hexproof, which means the Curses still apply to you, but they have no effect. You need at least one source of Curse Immunity in this Build. (Helmet) Viridi's Veil - by equipping a Magic Ring on your right slot you become Hexproof, which means the Curses still apply to you, but they have no effect. You need at least one source of Curse Immunity in this Build. |
|
| +(1–2) to Level of Socketed Gems (120–160)% increased Armour and Energy Shield +(15–25)% to all Elemental Resistances Damage of Enemies Hitting you is Unlucky while you have a Magic Ring Equipped You are Hexproof if you have a Magic Ring in right slot Take no Extra Damage from Critical Strikes if you have a Magic Ring in left slot |
|
| Helmet enchantments: #% Increased Freezing Pulse Damage #% increased Assassin's Mark Curse Effect |
|
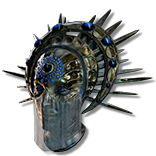
 (Helmet) Heatshiver - if you can solve the Curse issue via other means, you could use this Helmet to gain 130% of Cold Damage as Extra fire Damage against Frozen Enemies. (Helmet) Heatshiver - if you can solve the Curse issue via other means, you could use this Helmet to gain 130% of Cold Damage as Extra fire Damage against Frozen Enemies. |
|
| (80-100)% increased Evasion Rating 60% increased Mana Regeneration Rate +(20-30)% to Fire Resistance +(20-30)% to Cold Resistance Gain 1% of Cold Damage as Extra Fire Damage per 1% Chill Effect on Enemy Gain 100% of Cold Damage as Extra Fire Damage against Frozen Enemies |
|
 (Body Armour) Soul Mantle - mandatory Body Armour. Gives you increased Spell Damage, Totem Life, Energy Shield, and most importantly - Level 20 Spell Totem Support Gem. When Totem dies or gets overwritten by another Totem you will be inflicted with a random Hex. (Body Armour) Soul Mantle - mandatory Body Armour. Gives you increased Spell Damage, Totem Life, Energy Shield, and most importantly - Level 20 Spell Totem Support Gem. When Totem dies or gets overwritten by another Totem you will be inflicted with a random Hex. |
|
| Socketed Gems are Supported by Level 20 Spell Totem (20-25)% increased Spell Damage (100-120)% increased Energy Shield (20-30)% increased Totem Life Inflicts a random Hex on you when your Totems die |
|
 (Boots) Rare Boots - Look for Maximum Life and Elemental Resistances. It's also good to have Increased Movement Speed. (Boots) Rare Boots - Look for Maximum Life and Elemental Resistances. It's also good to have Increased Movement Speed. |
|
| Min. requirements: 70 maximum Life 70% Total Elemental Resistances 25% Movement Speed Optional affixes: Maximum Mana Cannot be Frozen Attributes |
|
 (Gloves) Rare Gloves - those should also provide lots of Maximum Life and Elemental Resistances, but you can also get a decent amount of Damage here. The Eldritch Implicits are also very important, and quite cheap to obtain on any pair. (Gloves) Rare Gloves - those should also provide lots of Maximum Life and Elemental Resistances, but you can also get a decent amount of Damage here. The Eldritch Implicits are also very important, and quite cheap to obtain on any pair. |
|
| Min. requirements: 70 maximum Life 70% Total Elemental Resistances Optional affixes: Maximum Mana increased Damage with Hits against Chilled Enemies (Alva's only) increased Damage during any Flask Effect chance to Unnerve Enemies for 4 seconds on Hit (Searing Exarch) Inflict Cold Exposure on Hit (Eater) |
|
 (Belt) Coward's Legacy - this Belt is required to benefit from the Paint Attunement Keystone for the 30% More Spell Damage bonus. It also makes it harder to bypass the downside of your Armour, so you need total immunity. (Belt) Coward's Legacy - this Belt is required to benefit from the Paint Attunement Keystone for the 30% More Spell Damage bonus. It also makes it harder to bypass the downside of your Armour, so you need total immunity. |
|
| +(15-20) to all Attributes (5-10)% increased Movement Speed 50% increased Effect of Curses on you You count as on Low Life while you are Cursed with Vulnerability You are Cursed with Vulnerability |
|
 (Amulet) The Pandemonius - gives you much-needed Dexterity, Cold Damage, Cold Resistance, Blinds Chilled enemies, and provides Penetration of Cold Resistance. (Amulet) The Pandemonius - gives you much-needed Dexterity, Cold Damage, Cold Resistance, Blinds Chilled enemies, and provides Penetration of Cold Resistance. |
|
| +(20-30) to Dexterity (20-30)% increased Cold Damage +(35-40)% to Cold Resistance Chill Enemy for 1 second when Hit, reducing their Action Speed by 30% Blind Chilled Enemies on Hit Damage Penetrates 20% Cold Resistance against Chilled Enemies |
|
| Recommended Anointments: Doom Cast |
|
 (Amulet) Rare Amulet - look for additional Gem Levels, Cast Speed, maximum Life, and possibly lacking Resistances and Attributes. You can also get Projectile Speed here, which will improve your Clear Speed a bit. (Amulet) Rare Amulet - look for additional Gem Levels, Cast Speed, maximum Life, and possibly lacking Resistances and Attributes. You can also get Projectile Speed here, which will improve your Clear Speed a bit. |
|
| Min. requirements: 70 maximum Life +1 to Level of all Cold Skill Gems 70% Total Elemental Resistances Optional affixes: Cast Speed increased Projectile Speed Critical Strike Multiplier +1 to Level of all Skill Gems Resistance |
|
 (Ring) Anathema - this Ring grants you 3 additional Curses basically for free, and you can easily add the 5th one if you want so. The Cast Speed is also quite useful. (Ring) Anathema - this Ring grants you 3 additional Curses basically for free, and you can easily add the 5th one if you want so. The Cast Speed is also quite useful. |
|
| +(30-40) to Intelligence (10-15)% increased Cast Speed (10-20)% chance to gain a Power Charge when you Cast a Curse Spell Your Curse Limit is equal to your maximum Power Charges |
|
 (Ring) Rare Ring - This is the Magic Ring you keep in your right Ring Slot. You can have only two mods on in so try to find the best ones. You should look for maximum Life, Resistances, Recoup, or Mana Regeneration here. You can also try to find a decent Synthesis Base. (Ring) Rare Ring - This is the Magic Ring you keep in your right Ring Slot. You can have only two mods on in so try to find the best ones. You should look for maximum Life, Resistances, Recoup, or Mana Regeneration here. You can also try to find a decent Synthesis Base. |
|
| Min. requirements: +70 to Maximum Life Optional affixes: Elemental or Chaos Resistance Attributes Mana Regeneration Minimum Frenzy Charge |
|
 (Jewel) Rare Jewels - here you can get a lot of Critical Strike Multipliers for your Cold Spells. It should also provide some defense, such as maximum Life or Resistance. (Jewel) Rare Jewels - here you can get a lot of Critical Strike Multipliers for your Cold Spells. It should also provide some defense, such as maximum Life or Resistance. |
|
| Recommended affixes: % to Critical Strike Multiplier with Cold Skills % to Critical Strike Multiplier with Elemental Skills increased Global Critical Strike Multiplier increased Maximum Life increased Maximum Mana Resistances |
|
 (Jewel) Rain of Splinters - It can be only obtained by Corrupting regular Jewels. It adds 2 additional Projectiles, so you can use Lesser Multiple Projectiles Support instead of Greater, which saves you from the 20% Less Damage modifier. (Jewel) Rain of Splinters - It can be only obtained by Corrupting regular Jewels. It adds 2 additional Projectiles, so you can use Lesser Multiple Projectiles Support instead of Greater, which saves you from the 20% Less Damage modifier. |
|
| (50-30)% reduced Totem Damage Totems fire 2 additional Projectiles |
|
 (Jewel) Self-Flagellation - free damage boost at all times, thanks to the Unique Belt and Unique Body Armour of yours (Jewel) Self-Flagellation - free damage boost at all times, thanks to the Unique Belt and Unique Body Armour of yours |
|
| (10-20)% increased Damage per Curse on you An additional Curse can be applied to you |
|
 (Jewel) Sublime Vision - it is another way to deal with Curses. It allows you to use the Heatshiver Helmet and a proper Rare Ring, but it is very expensive, as it only drops from the Uber Bosses. (Jewel) Sublime Vision - it is another way to deal with Curses. It allows you to use the Heatshiver Helmet and a proper Rare Ring, but it is very expensive, as it only drops from the Uber Bosses. |
|
| Unaffected by Curses while affected by Zealotry Aura Skills other than Zealotry are Disabled Auras from your Skills have (20-40)% increased Effect on you |
|
 (Jewel) Watcher's Eye - Look for Hatred or Zealotry bonuses on it. It's potentially the best possible Jewel you can get for this build, depending on your available budget. (Jewel) Watcher's Eye - Look for Hatred or Zealotry bonuses on it. It's potentially the best possible Jewel you can get for this build, depending on your available budget. |
|
| (4-6)% increased maximum Energy Shield (4-6)% increased maximum Life (4-6)% increased maximum Mana Recommended modifiers: +(1.2-1.8)% to Critical Strike Chance while affected by Hatred Damage Penetrates (10-15)% Cold Resistance while affected by Hatred (100-120)% increased Critical Strike Chance against Enemies on Consecrated Ground while affected by Zealotry Consecrated Ground you create while affected by Zealotry causes enemies to take (8-10)% increased Damage |
|
 (Jewel) Large Cluster Jewel - we recommend getting one Large Cluster Jewel with either Spell. Cold, or Elemental Damage bonuses. You can also use one with the increased effect of small Passives, but they can be very expensive. (Jewel) Large Cluster Jewel - we recommend getting one Large Cluster Jewel with either Spell. Cold, or Elemental Damage bonuses. You can also use one with the increased effect of small Passives, but they can be very expensive. |
|
| Recommended affixes: 1 Added Passive Skill is Blanketed Snow 1 Added Passive Skill is Blast-Freeze 1 Added Passive Skill is Disorienting Display |
|
 (Jewel) Medium Cluster Jewel - you should use two different Medium Clusters. One that grants you Onslaught via Totem Passives, and a second that increases your Projectile Damage. (Jewel) Medium Cluster Jewel - you should use two different Medium Clusters. One that grants you Onslaught via Totem Passives, and a second that increases your Projectile Damage. |
|
| Recommended affixes: 1 Added Passive Skill is Sleepless Sentries 1 Added Passive Skill is Snaring Spirits 1 Added Passive Skill is Eye to Eye 1 Added Passive Skill is Repeater |
|
 (Flask) Lavianga's Spirit - this Unique Flask recovers much more Mana than a regular Mana Flask. Remember, 30% of the Damage goes to your Mana instead of Life, so it is important to keep it at high levels. (Flask) Lavianga's Spirit - this Unique Flask recovers much more Mana than a regular Mana Flask. Remember, 30% of the Damage goes to your Mana instead of Life, so it is important to keep it at high levels. |
|
| (30-50)% increased Amount Recovered 100% increased Recovery rate Skills Cost no Mana during Effect |
|
| (30-15)% reduced Duration Consecrated Ground created by this Flask has Tripled Radius Consecrated Ground created during Effect applies (7-10)% increased Damage taken to Enemies (100-150)% increased Critical Strike Chance against Enemies on Consecrated Ground during Effect |
|
|
Other suggested Flasks:
|
|
    |
|
|
If you have any other build requests please leave that in the comments below. We are always open to suggestions and constructive feedback.
Pictures used in this article are the intellectual property of Grinding Gear Games.
