Explosive Trap Saboteur Build
A versatile Saboteur build that uses Explosive Traps to deal massive Fire AoE damage Explosive Trap
Saboteur Build
Updated for Patch 3.24
The Best Crafty Guides by Odealo
| Guide notes |
| March 29, 2024 -Build updated |
| Build overview | |||
| Tags: [TRAP] [ELEMENTAL] [LIFE] [STARTER] | |||
|
Budget: Defenses: |
|
Boss DPS: AoE: |
|
Explosive Trap is one of the most basic Traps you can get - it's a Trap that explodes upon activating, causing a number of smaller explosions right after the initial one. It deals Physical Spell Damage, but half of it is converted to Fire - arguably the hardest part of setting up the build is to convert the other half to Fire too. The Ascendancy you want to pick is of course Saboteur due to the abundance of Trap-related Keystones for offense as well as defense. There are no specific synergies between items or Skills, it's a very simple build that can be geared up in many ways - that's why it's heavily recommended for new players. It's an excellent league starter that also has a high potential later in the game, the build can achieve great highs but doesn't require particular Unique Items to get started.
It's a Life build with a high Life Regeneration Rate thanks to Pyromaniac and Evasion which is great when combined with Born in the Shadows. In the version presented in the gameplay footage, we've created an Evasion-oriented Saboteur with Ghost Dance, but you can also invest in Armour as your main defensive layer. Just pick Chain Reaction instead of Born in the Shadows, equip The Brass Dome, and alter some of the nodes on your Passive Skill Tree. For a weapon, you can use a Dagger, Mace, or a Wand with a Shield or a Staff - The Annihilating Light is a good candidate for any non-specific build dealing Elemental Damage. You will want to eventually include the Alternate Ailments into the Build, as the default Ignite doesn't contribute much to the Hit-based Build. On the other hand, Scorch can reduce all Elemental Resistances up to 30%, and you will apply Shock and Chill with your Skitterbots anyway.
Patch 3.23 introduced a transfigured version of this Skill which is an Explosive Trap of Shrapnel. It deals more damage and has a larger radius, but mechanically it's still very similar to the original. It is better in most situations, but it is not that important to have it as soon as possible.
You can also check our other Path of Exile builds right over here Odealo's Crafty Guides - Full List
1. Gameplay
You will be placing Traps ahead of you which should explode instantly killing any foe before it has a chance to spot you. Against bosses you want to apply a Curse and Fire Exposure on them - it can be done with just Arcanist Brand linked to a Flammability and Wave of Conviction. Bear Trap will immobilize, and make your opponent more vulnerable to Trap Damage. For a Guard Spell use Steelskin or Molten Shell, and as a Mobility Skill, it's good to have Dash, Flame Dash, or Frost Blink. You can use any Golem - Stone or Chaos Golem are the defensive ones. Ice and Flame Golems increase your DPS. For Auras use Herald of Ash, Skitterbots, Anger, Clarity, and Grace or Determination.
|
|
|
|

2. Build's PROS & CONS
| PROS |
|
| CONS |
|
3. Leveling tips
Start with Explosive Trap, you can pick up the Skill Gem right from the start. Leveling with this Skill as Saboteur should be fast and simple, just pick up the Spell Damage, Fire or Physical Damage, and Trap Damage nodes. For Defences go for Maximum Life and Elemental Resistances, especially after killing Kitava. Find a nearby Fire Cluster with Fire Mastery for a 40% Conversion - that's the easiest way to get it. You can also use Crafting Bench to Craft Fire Conversion on a part of Gloves. Use Essence of Hysteria on a Ring or Blet to get more Fire Damage.
Suggested leveling Gem setups:
| Explosive Trap setup | |
 |
Explosive Trap - It's a good leveling Trap, you can safely use it throughout your leveling process. |
 |
Swift Assembly Support - increased Trap Damage, and a chance to throw more than one Trap. |
 |
Trap and Mine Damage Support - Traps deal more Damage. |
 |
Added Fire Damage Support - adds Fire Damage based on Physical Damage of the Skill, it's great with Skills that Converts Physical Damage to Fire. |
| Utility skills | |
 |
Flammability - a Curse that lowers Fire Resistance. |
 |
Flame Dash - movement Spell that you can use to dash. |
 |
Clarity - makes you Regenerate Mana at a faster rate. |
 |
Herald of Ash - it's the most important passive Spell in the build as it grants you a lot of damage and improves the clear speed. |
Bandits:
Two Additional Passive Skill Points seem like the best option for this build
Leveling Skill Trees:
31 Points Skill Tree
Pick up the big Trap Cluster with some Maximum Life
66 Points Skill Tree
Continue getting more Life, Trap Damage, and Mana Reservation Efficiency
Recommended leveling items:
 Lifesprig - A generic Wand for Spell-casters. Lifesprig - A generic Wand for Spell-casters. |
|
| (8-12)% increased Spell Damage +1 to Level of Socketed Spell Gems (20-28)% increased Spell Damage (5-8)% increased Cast Speed +(15-20) to maximum Life +(15-20) to maximum Mana Regenerate (6-8) Life over 1 second when you Cast a Spell |
|
 Deerstalker - You can put any Spell or Attack there and turn it into a 5-link Trap setup. We recommend Burning Arrow as it has 100% Physical Damage Converted to Fire. Deerstalker - You can put any Spell or Attack there and turn it into a 5-link Trap setup. We recommend Burning Arrow as it has 100% Physical Damage Converted to Fire. |
|
| Socketed Gems are now Supported by level 15 Trap (160-200)% increased Evasion Rating 15% increased Movement Speed (14-18)% increased Trap Throwing Speed 15% increased Movement Speed for 9 seconds on Throwing a Trap |
|
 Goldrim - One of the best leveling Helmets, it grants a lot of Resistances. Goldrim - One of the best leveling Helmets, it grants a lot of Resistances. |
|
| +(30-50) to Evasion Rating 10% increased Rarity of Items found +(30-40)% to all Elemental Resistances Reflects 4 Physical Damage to Melee Attackers Level Requirement reduced by 100 (Hidden) |
 Tabula Rasa - Allows you to create a six-linked Gem setup. Tabula Rasa - Allows you to create a six-linked Gem setup. |
|
| Item has no level requirement and Energy Shield (Hidden) Item has 6 White Sockets and is fully linked (Hidden) |
|
4. Final Skill Tree, Ascendancy Points, and Pantheon
Final Skill Tree:
103 Points Final Skill Tree (doesn't include Cluster Jewels)
118 Points Path of Building (PoB) link
Ascendancy points:
Preferably in that order:
- Perfect Crime
- Pyromaniac
- Explosives Expert
- Born in the Shadows
Pantheon:
Major God: Soul of the Brine King: You cannot be Stunned if you've been Stunned or Blocked a Stunning Hit in the past 2 seconds
Minor God: Soul of Shakari: for You cannot be Poisoned while there are at least 3 Poisons on you; 50% less Duration of Poisons on You and additional Chaos Damage mitigation
5. Final Gems links
| [DPS] Explosive Trap setup | |
|
Explosive Trap - It's a Trap that Explodes a few times dealing Fire Spell Damage, converted from Physical Damage |
 |
Inspiration Support - Skill costs less Mana, has increased Elemental Damage, and Critical Strike Chance. |
 |
Increased Critical Damage Support - it greatly increases the Damage you deal with Critical Strikes. |
|
Added Fire Damage Support - adds Fire Damage that's sourced from Physical Damage before it gets Converted, later you can use the Awakened version that improves the Gem level of your Trap by 1. |
|
Trap and Mine Damage Support - Traps deal significantly more Damage but have reduced Throw Speed. |
 |
Cluster Traps Support - you will Throw 3 Traps at once, but each one deals Less Damage. You can use the Swift Assembly Support for pure Single-target scenarios. |
| [DPS] Auras setup | |
|
Herald of Ash - It's the most valuable Mana-reserving Skill as it adds a lot of Fire Damage to your Skills, and makes enemies deal AoE Burning Damage on death. |
 |
Summon Skitterbots - Skitterbots can Chill and Shock enemies, which is extremely valuable with Secrets of Suffering. You have also more Trap Damage |
|
Clarity - grants rapid Mana Regeneration so that you won't run out of it, which is especially important during Boss encounters. |
 |
Grace - It grants you an additional and increased Evasion Rating. If you prefer to use Armour instead, go for  Determination Determination |
 |
Enlighten Support - Linked Spells Reserve less Mana. You can use Clarity in a free Socket anywhere, it doesn't have to be linked here. |
| [UTILITY] Automation setup | |
 |
Enduring Cry - a Warcry that grants you a lot of Life Regeneration and generates Enduring Charges if enough Enemies are nearby. |
 |
Call to Arms Support - it will automatically trigger the linked Warcry in short intervals. |
| [UTILITY] Guard | |
 |
Steelskin - Guard Spell that reduces the damage you take from Hits for some time. Use Molten Shell instead if your Armour is high. It can be activated with CwDT too if you plan to use the Withering Step as the movement key. |
 |
Frost Shield - it is a Guard Skill that doesn't share its Cooldown with Steelskin. It creates an icy bubble that reduces the Damage you take from the outside and greatly improves your Critical Strike Chance. |
|
Cast when Damage Taken - if you use only the Steelskin, you can use the Automation Support for better uptime. However, the Frost Shield is not an Instant Cast, so you will need to use this Support instead. |
| [UTILITY] Flame Dash, Bear Trap, and Phase Run setup | |
 |
Frostblink - Dash-type Spell used to relocate and avoid dangerous situations. |
 |
Arcane Surge Support - Keep it at a level low enough so that a single cast of Frostblink will activate it. It grants you an improved Mana Regeneration Rate. |
 |
Bear Trap - immobilizes an enemy and makes it receive increased Damage from all Traps, it's useful during boss fights |
| [UTILITY] Shield Charge setup | |
 |
Shield Charge - it is a great Movement Skill that can be used without a Cooldown but requires some Attack Speed scaling and lots of Strength Attributes. |
 |
Faster Attack Support - improves the Attack Speed of your Shield Charge. |
| [UTILITY] Brand setup | |
|
Flammability - a Curse that reduces Fire Resistance which should be the only type of damage you deal. |
 |
Assassin's Mark - an important Mark that greatly improves your Critical Strike Chance and Damage against a singular Enemy. |
 |
Arcanist Brand - all linked Spells are activated every second as the Brand is attached to the opponent. |
 |
Lifetap Support - casting Curses is very Mana-intensive, so you might want to use this Support to not interrupt throwing out your Traps. |
|
|
6. Gear Setup
It's a Life build, so obviously increasing your Maximum Life is a priority if you want a more durable build. For more Damage look for Spell, Fire, or Physical Damage with Traps. There is no strict formula for the build to work, as it's very general - it doesn't require any Unique Items making it great as a league starter or for an SSF league. The recommended Unique Items are all cheap and there should be no problem with their acquisition. The most important part of the Build are Gloves, as they can provide you with Physical to Fire Damage conversion, which is very important for all your scaling. You should use the Evasion and Energy Shield-based Armour types, as it makes capping your Spell Suppression much easier.
Our recommended items will:
- Cap your resistances at 75%
- Provide you with enough DPS and Life to start mapping
|
Stat priorities on items:
|
 (Helmet) Rare Helmet - On a Helmet, there's one great offensive mod for when you're standing close to the opponents - it makes them take increased Fire Damage. Life, Spell Suppression Chance, Evasion, and Physical Damage taken as Elemental are other useful affixes. (Helmet) Rare Helmet - On a Helmet, there's one great offensive mod for when you're standing close to the opponents - it makes them take increased Fire Damage. Life, Spell Suppression Chance, Evasion, and Physical Damage taken as Elemental are other useful affixes. |
|
| Min. requirements: +80 to Maximum Life 40% Total Elemental Resistances Optional affixes: Nearby enemies take 9% increased Fire Damage Spell Suppression Chance Global Critical Strike Multiplier Mana Reservation Efficiency Attributes |
|
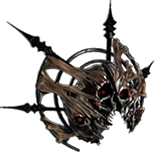 (Helmet) The Devouring Diadem - It's the most popular choice for this build as it allows you to fit in more Auras, and due to Eldritch Battery, you won't have to worry about Mana Cost of Skills anymore. (Helmet) The Devouring Diadem - It's the most popular choice for this build as it allows you to fit in more Auras, and due to Eldritch Battery, you won't have to worry about Mana Cost of Skills anymore. |
|
| +1 to Level of Socketed Gems Socketed Gems have 25% increased Reservation Efficiency Trigger Level 15 Feast of Flesh every 5 seconds (180-220)% increased Energy Shield 10% chance for Energy Shield Recharge to start when you use a Skill Eldritch Battery Veiled Suffix |
|
 (Weapon) Rare Sceptre or Wand - You can go for a setup with a weapon and a shield as it's much more defensive-oriented. Look for Fire Spell Damage and Critical Strike mods on a weapon, and at least one modifier for your Gem Levels. Alternating Sceptre has built-in Secrets of Suffering so keep an eye on these. (Weapon) Rare Sceptre or Wand - You can go for a setup with a weapon and a shield as it's much more defensive-oriented. Look for Fire Spell Damage and Critical Strike mods on a weapon, and at least one modifier for your Gem Levels. Alternating Sceptre has built-in Secrets of Suffering so keep an eye on these. |
|
| Min. requirements: 50% increased Fire Spell Damage 60% increased Critical Strike Chance for Spells Optional affixes: Global Critical Strike Multiplier +1 to Level of all Spell Skill Gems +1 to Level of all Fire Spell Skill Gems |
|
 (Weapon) Rare Shield - On a shield, look for offensive modifiers such as Gem Levels, Crit Chance for Spells, or Spell Damage. Defensive modifiers are also possible here, such as maximum Life, Spell Suppression, or lots of Energy Shield. (Weapon) Rare Shield - On a shield, look for offensive modifiers such as Gem Levels, Crit Chance for Spells, or Spell Damage. Defensive modifiers are also possible here, such as maximum Life, Spell Suppression, or lots of Energy Shield. |
|
| Min. requirements: +60% to Elemental Resistances +80 to maximum Life Optional affixes: Attributes Spell Suppression Chance Spell Damage Level to all Physical/Fire Spell Skill Gems |
|
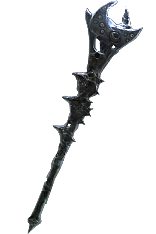
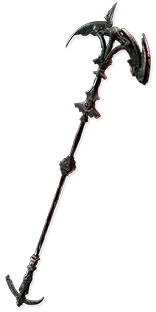 (Weapon) The Annihilating Light - It Triples the Elemental Damage of your Traps, it's definitely worth its price, but be careful, it will leave you with no Shield and a heavy penalty at your Resistances. (Weapon) The Annihilating Light - It Triples the Elemental Damage of your Traps, it's definitely worth its price, but be careful, it will leave you with no Shield and a heavy penalty at your Resistances. |
|
| +18% Chance to Block Attack Damage while wielding a Staff (60-70)% reduced Elemental Resistances Elemental Skills deal Triple Damage |
|
 (Body Armour) Rare Body Armour - it is a purely defensive piece, you should seek Spell Suppression, Resistances, and high Evasion and Energy Shield. You can avoid the Life modifiers here, and pick a Life Mastery for a 15% increased Maximum Life. (Body Armour) Rare Body Armour - it is a purely defensive piece, you should seek Spell Suppression, Resistances, and high Evasion and Energy Shield. You can avoid the Life modifiers here, and pick a Life Mastery for a 15% increased Maximum Life. |
|
| Min. requirements: Elemental Resistances 20% Chance to Suppress Spell Damage Optional affixes: +#% to Spell Critical Strike Chance +1 to Level of Socketed Active Skill Gems High Evasion Rating or Energy Shield Chaos Resistance |
|
 (Body Armour) Skin of the Lords - it is an amazing chest piece, it increases the Gem Level of its socketed setup granting much more Damage. It increases your Global Defences too, which will boost your Evasion and Energy Shield. (Body Armour) Skin of the Lords - it is an amazing chest piece, it increases the Gem Level of its socketed setup granting much more Damage. It increases your Global Defences too, which will boost your Evasion and Energy Shield. |
|
| Item has no level requirement and Energy Shield (Hidden) Sockets cannot be modified +2 to Level of Socketed Gems 100% increased Global Defences You can only Socket Corrupted Gems in this item Item has 6 Sockets and is fully linked (Hidden) <Random Keystone> |
|
 (Boots) Rare Boots - Maximum Life, Movement Speed, and Elemental Resistances are your top priorities here. Other than that you can aim for Action Speed which will improve your Trap Throwing Speed, or Effect of non-damaging Ailments. (Boots) Rare Boots - Maximum Life, Movement Speed, and Elemental Resistances are your top priorities here. Other than that you can aim for Action Speed which will improve your Trap Throwing Speed, or Effect of non-damaging Ailments. |
|
| Min. requirements: 30% Movement Speed +60 to Maximum Life 60% Total Elemental Resistances Optional affixes: Action Speed Effect of non-damaging Ailments Attributes Spell Suppression Chance |
|
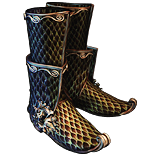
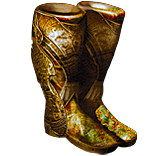 (Boots) Atziri's Step - A very cheap, and good pair of Boots with all the useful stats like Spell Suppression, but no Resistances. keep that in mind. (Boots) Atziri's Step - A very cheap, and good pair of Boots with all the useful stats like Spell Suppression, but no Resistances. keep that in mind. |
|
| 180% increased Evasion Rating +(55-75) to maximum Life 30% increased Movement Speed +(20-26)% chance to Suppress Spell Damage |
|
 (Gloves) Rare Gloves - Gloves can cost a little more since there are two mandatory mods - an Eldritch Ichor's Implicit (for 10% to 35%), and a Crafted or Unveiled counterpart, for a total of 50%. Having less will lower your Damage, but the difference between the worst-case scenario and the best is not that great. (Gloves) Rare Gloves - Gloves can cost a little more since there are two mandatory mods - an Eldritch Ichor's Implicit (for 10% to 35%), and a Crafted or Unveiled counterpart, for a total of 50%. Having less will lower your Damage, but the difference between the worst-case scenario and the best is not that great. |
|
| Min. requirements: +50 to maximum Life +40% to Elemental Resistances 50% of Physical Damage Converted to Fire Damage Optional affixes: Attributes increased Trap Throwing Speed Chance to Suppress Spell Damage |
|
 (Belt) Rare Belt - Try to get the basic defensive mods such as Life and Resistances. Strength will be needed too, you're using quite a few red gems that require this attribute. You can finish it up with a Crafted Trap Throwing Speed modifier. (Belt) Rare Belt - Try to get the basic defensive mods such as Life and Resistances. Strength will be needed too, you're using quite a few red gems that require this attribute. You can finish it up with a Crafted Trap Throwing Speed modifier. |
|
| Min. requirements: +80 to Maximum Life 90% Total Elemental Resistances Optional affixes: increased Maximum Life Attributes 12% increased Trap Throwing Speed (crafted) |
|
 (Amulet) Rare Amulet - There are a lot of useful mods to look for, the most valuable is the "increased Level of all Skill gems" that would affect your Explosive Trap. For a start just try to get Life, Resistances, and Crit. Chance (Amulet) Rare Amulet - There are a lot of useful mods to look for, the most valuable is the "increased Level of all Skill gems" that would affect your Explosive Trap. For a start just try to get Life, Resistances, and Crit. Chance |
|
| Min. requirements: +50 to maximum Life 30% increased Global Critical Strike Chance Attributes Optional affixes: +1 to Level of all Dexterity Skill Gems +1 to Level of all Fire Skill Gems Global Critical Strike Multiplier Non-Channelling Skills have -7 to Total Mana Cost (crafted) |
|
 (Amulet) Ashes of the Stars - it is a very powerful Amulet for this Build. It will increase the Gem levels of all your Active Skills, and the additional Quality on your Explosive Traps will add even more Explosions. It is also useful for your Utility Gems, such as Shield Charge or Curses. (Amulet) Ashes of the Stars - it is a very powerful Amulet for this Build. It will increase the Gem levels of all your Active Skills, and the additional Quality on your Explosive Traps will add even more Explosions. It is also useful for your Utility Gems, such as Shield Charge or Curses. |
|
| +(10-16) to all Attributes (5-10)% increased Experience Gain of Gems +1 to Level of all Skill Gems +(20-30)% to Quality of all Skill Gems |
|
 (Amulet) Replica Dragonfang's Flight - A massive boost to your Damage and Mana Reservation Efficiency makes it one of the best picks for this build. (Amulet) Replica Dragonfang's Flight - A massive boost to your Damage and Mana Reservation Efficiency makes it one of the best picks for this build. |
|
| +(10-16) to all Attributes +3 to Level of all <Random Skill> Gems +(5-10)% to all Elemental Resistances (5-10)% increased Reservation Efficiency of Skills Items and Gems have (10-5)% reduced Attribute Requirements |
|
| Recommended Anointments: Sovereignty Divine Judgement Heartseeker Written in Blood |
|
 (Ring) Rare Rings - Rings offer much the same mods as an Amulet, look for Life, Resistances, Spell Damage, Crit. Chance, Crit. Multiplier, and Attributes if you're missing some. If you have troubles with Mana, look for Mana Regeneration Rate and a possibility to Craft Reduced Mana Cost of Skills. (Ring) Rare Rings - Rings offer much the same mods as an Amulet, look for Life, Resistances, Spell Damage, Crit. Chance, Crit. Multiplier, and Attributes if you're missing some. If you have troubles with Mana, look for Mana Regeneration Rate and a possibility to Craft Reduced Mana Cost of Skills. |
|
| Min. requirements: +60 to maximum Life +60% to Elemental Resistances Non-channeling Skills have -7 to Total Mana Cost (crafted) Optional affixes: Critical Strike Multiplier Attributes |
|
 (Ring) Circle of Anguish - It's one of the best Rings to use. It has a few variants, look for one that improves your Damage and Buff Effect of the Herald of Ash. (Ring) Circle of Anguish - It's one of the best Rings to use. It has a few variants, look for one that improves your Damage and Buff Effect of the Herald of Ash. |
|
| <One to three random Synthesis implicit modifiers> +(20-30) to Strength Adds (20-25) to (26-35) Fire Damage +(20-30)% to Fire Resistance <Two Random Herald of Ash modifier> (40-60)% increased Fire Damage while affected by Herald of Ash Herald of Ash has (40-60)% increased Buff Effect |
|
 (Jewel) Rare Jewels - Maximum Life is the most important mod here, you can then look for the missing stats, and Critical Strike affixes. (Jewel) Rare Jewels - Maximum Life is the most important mod here, you can then look for the missing stats, and Critical Strike affixes. |
|
|
Recommended affixes: |
|
 (Jewel) The Interrogation - Secrets of Suffering makes you Scorch, Brittle, and Sap enemies with Critical Strikes, but you're unable to Chill, Ignite, and Shock on your own. You will inflict two of those Ailments via the Skitterbots anyway, and you will gain the 30% Elemental Resistance Reduction. (Jewel) The Interrogation - Secrets of Suffering makes you Scorch, Brittle, and Sap enemies with Critical Strikes, but you're unable to Chill, Ignite, and Shock on your own. You will inflict two of those Ailments via the Skitterbots anyway, and you will gain the 30% Elemental Resistance Reduction. |
|
| Adds Secrets of Suffering | |
 (Jewel) Large Cluster Jewel - Get the Elemental Damage Large Cluster Jewels with no more than eight or nine nodes and two or three useful Notables. The physical jewels are great too since you deal converted damage. (Jewel) Large Cluster Jewel - Get the Elemental Damage Large Cluster Jewels with no more than eight or nine nodes and two or three useful Notables. The physical jewels are great too since you deal converted damage. |
|
| Recommended affixes: 1 Added Passive Skill is Doryani's Lesson 1 Added Passive Skill is Prismatic Heart 1 Added Passive Skill is Smoking Remains 1 Added Passive Skill is Corrosive Elements 1 Added Passive Skill is Disorienting Display 1 Added Passive Skill is Battle-Hardened 1 Added Passive Skill is Force Multiplier 1 Added Passive Skill is Iron Breaker |
|
 (Jewel) Medium Cluster Jewel - the Guerilla Tactics is an excellent Notable that greatly improves your Damage and Trap Throwing Speed. Ideally, you should pair it with the Surprise Sabotage or Set and Forget, but any other Trap-related Notable will do just fine. (Jewel) Medium Cluster Jewel - the Guerilla Tactics is an excellent Notable that greatly improves your Damage and Trap Throwing Speed. Ideally, you should pair it with the Surprise Sabotage or Set and Forget, but any other Trap-related Notable will do just fine. |
|
| Recommended affixes: 1 Added Passive Skill is Guerilla Tactics 1 Added Passive Skill is Set and Forget 1 Added Passive Skill is Surprise Sabotage |
|
| 40% increased Damage Creates Consecrated Ground on Use (20-40)% increased Duration Consecrated Ground created by this Flask has Tripled Radius Consecrated Ground created during Effect applies (7-10)% increased Damage taken to Enemies (100-150)% increased Critical Strike Chance against Enemies on Consecrated Ground during Flask effect |
|
 (Flask) Taste of Hate - it grants you a lot of Physical Damage mitigation and adds a bit of your Physical Damage as Cold Damage, which will allow you to inflict a weak Brittle effect on your Enemies. (Flask) Taste of Hate - it grants you a lot of Physical Damage mitigation and adds a bit of your Physical Damage as Cold Damage, which will allow you to inflict a weak Brittle effect on your Enemies. |
|
| (10-15)% of Physical Damage from Hits taken as Cold Damage during Effect Gain (10-15)% of Physical Damage as Extra Cold Damage during effect 30% chance to Avoid being Chilled during Effect 30% chance to Avoid being Frozen during Effect |
|
|
Other suggested Flasks:
|
|
   |
|
|
If you have any other build requests please leave that in the comments below. We are always open to suggestions and constructive feedback.
Pictures used in this article are the intellectual property of Grinding Gear Games.
