Elemental Hit Totem Hierophant Build
Check out one of the most powerful Ballist Totem builds for Patch 3.13Elemental Hit Totem Ballista
Hierophant Starter build
Updated for Patch 3.13
The Best Crafty Guides by Odealo
Estimated budget: medium

| Guide notes |
| January 25, 2021 -Build created January 26, 2021 -Added gameplay video |
Totems and Ballistas are one of the things that were addressed in the most recent 3.13 Patch. Both Ballista Support Gem and Hierophant's Passives related to Totem playstyle were buffed. That makes it a perfect time to try out this type of build, and Elemental Hit Ballista/Totem is among the best ones out there. This build relies solely on the Fire Elemental Attack, and damage conversion from Cold to Fire and Avatar of Fire Passive, which lets you greatly scale your Damage with Elemental Hit. It also can be treated as a low-budget build, as none of the core Items are really that expensive. Your six links (Quill Rain) should be less than 1 Exalted Orb, and Kaom's Heart and Frostferno cost like 15 Chaos each. All the other equipment is cheap and easy to obtain. Not to mention, pretty much all of the Items except for the Helmet and Combat Focus Jewels can be replaced with random rares. The only thing that doesn't make it one of the best Starter builds out there, is the necessity to obtain those Jewels in the first place, which may not be that easy first day of the new League. Still, this is one of the most-budget friendly builds out there, offering massive DPS, great clear speed, and reasonable Dodge-based defenses. You can easily farm the majority of Bosses using this build even on a few Exalted Orb budget.
You can also check our other Path of Exile builds right over here Best PoE Builds by Odealo
1. Gameplay
This is yet another typical Totem build, where you plant all the Totems you have available and wait for them to finish off your enemy. In most cases, this will be accomplished with the very first hit, so you can progress quite fast using it. You will be using Point Blank so it's a good idea to place your Totem as close to the enemy as possible (mainly Bosses, most of the other stuff won't even stay alive long enough to make it matter). You will be also using Blood Rage and Sniper's Mark to increase your DPS, and a mobility skill of choice (Dash is recommended). Another interesting mechanic is the use of Lethal Pride Timeless Jewel which will make you generate Rage. And since you won't be hitting anything yourself, you are not going to lose it, so you can keep quite insane uptime on the Berserk Spell, which boosts all your stats significantly. For the defenses, this build offers decent Life and Dodge and uses Wind Dancer Passive. As you don't really need to directly face enemies yourself, this build feels very smooth and easy to play.
We didn't include it in the following guide, but it also might be a good idea to get extra pierce if you are looking to maximize your clear speed (there is a small node with it just below Acrobatics). You would have to skip some of the other Passives though (like the Cluster Jewel ones) or get a higher level than we did to allocate it.
|
|
|
|

2. Build's PROS & CONS
| PROS |
|
| CONS |
|
3. Leveling tips
For the leveling phase, you should be using the same skill as in the end-game; Elemental Totem Ballistas. Initially just use anything for the first few levels before this combination is accessible at level 12. You can use Freezing Pulse, Split Arrow, or even a regular Melee Attack - basically anything that you can use with your current weapon. It shouldn't matter initially. You are aiming to get to the Ancestral Bond as soon as possible, which will allow you to use extra Totem Ballistas, and then you will be forced to go all the way down through the Marauder/Duelist zones to the Bow nodes on the bottom right of the Tree. It's the point where things can get a little bit tricky, and you may be lacking some DPS without proper gear. Below you will find some basic leveling setups and several extremely useful Uniques that will help you get through the campaign with ease. You can also use Lightning Spire Trap or any other form or Trap/Mine to deal some extra damage, as your self-cast Spells and Attacks won't deal any damage with Ancestral Bond allocated
Suggested leveling Gem setups:
| Elemental Hit Ballista setup | |
 |
Elemental Hit - the primary Attack which is used in this build. It deals high base damage regardless of your Weapon, which makes it a great Skill to level up |
 |
Elemental Damage with Attacks - grants very high bonus DPS to your Elemental Hit |
 |
Ballista Totem Support - allows you to create Totems that will cast Elemental Hit for you |
 |
Elemental Focus Support - greatly increases Elemental Damage dealt, but makes it unable to inflict ailments |
| Lightning Spire Trap setup | |
| Lightning Spire Trap - a very powerful Trap Spell which is one of the best ways to deal extra damage when you are using Ancestral Bond Passive | |
|
Elemental Focus Support |
 |
Faster Casting Support - increases the frequency at which Lightning Spire Trap hits enemies |
 |
Trap and Mine Damage Support - greatly increases the damage of your Lightning Spire Trap |
| Utility Gems | |
 |
Sniper's Mark - the best Curse/Mark you can use for this build which increases the damage of your Elemental Hit's projectiles |
 |
Precision - grants increased Accuracy Rating and Critical Strike Chance. It's a must-have on lower levels to give you enough Chance to Hit with Bows |
 |
Dash - the recommended Mobility Spell used in this build |
 |
Summon Ice Golem - Ice Golem has a similar effect to Precision Aura, and it is the best Golem you can use for the leveling phase |
Bandits:
We recommend killing all the Bandits for two additional Passive Points
Leveling Skill Trees:
35 Points Skill Tree
Priorities: 1) Discipline and Training 2) Holy Dominion 3) Ancestral Bond 4) Purity of Flesh
59 Points Skill Tree
Priorities: 1) Bloodless 2) Panopticon 3) Golem's Blood 4) Point Blank
Recommended leveling items:
 Le Heup of All - these Rings provide everything you need during the leveling phase. It's recommended to use one of these for high Attribute bonuses that may be required to use all the Intelligence Gems and equipment Le Heup of All - these Rings provide everything you need during the leveling phase. It's recommended to use one of these for high Attribute bonuses that may be required to use all the Intelligence Gems and equipment |
|
| (10-30)% increased Damage +(10-30) to all Attributes (10-30)% increased Rarity of Items found +(10-30)% to all Elemental Resistances |
|
 Goldrim - one of the best leveling helmets in Path of Exile, will fix your Elemental Resistances for the entire Campaign Goldrim - one of the best leveling helmets in Path of Exile, will fix your Elemental Resistances for the entire Campaign |
|
| +(30-50) to Evasion Rating 10% increased Rarity of Items found +(30-40)% to all Elemental Resistances Reflects 4 Physical Damage to Melee Attackers Level Requirement reduced by 100 (Hidden) |
|
 Trolltimber Spire - a great low-level shield that grants a ton of extra defensive utility Trolltimber Spire - a great low-level shield that grants a ton of extra defensive utility |
|
| +(20-30) to maximum Life (130-150)% increased Armour +(40-60) to maximum Life You and your Totems Regenerate 0.5% of Life per second for each Summoned Totem 15% increased Area of Effect for Skills used by Totems 0.5% of Damage dealt by your Totems is Leeched to you as Life |
|
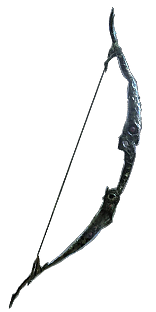
 Quill Rain - the best Bow for this entire build which also happens to be a cheap leveling weapon (obviously you want to get one ASAP) Quill Rain - the best Bow for this entire build which also happens to be a cheap leveling weapon (obviously you want to get one ASAP) |
|
| +(10-20) to Dexterity 100% increased Physical Damage 100% increased Attack Speed +2 Mana gained for each Enemy hit by Attacks (50-100)% increased Projectile Speed +(25-50) to Accuracy Rating 30% less Damage |
|
 Rain of Splinters - another core Uniques used in this build, which increases the number of your Totem Ballistas Projectiles, basically giving you an extra Support Gem as you don't need to use Greater/Lesser Multiple Projectiles in your primary setup Rain of Splinters - another core Uniques used in this build, which increases the number of your Totem Ballistas Projectiles, basically giving you an extra Support Gem as you don't need to use Greater/Lesser Multiple Projectiles in your primary setup |
|
| (50-30)% reduced Totem Damage Totems fire 2 additional Projectiles |
|
4. Final Skill Tree, Ascendancy Points, and Pantheon
Final Skill Tree:
115 Points Final Skill Tree
115 Points Path of Building(PoB) link
Ascendancy points:
Preferably in that order:
- Pursuit of Faith
- Ritual of Awakening
- Conviction of Power
- Any two small Mana Regeneration nodes
Pantheon:
Major God: Soul of Lunaris 1% additional Physical Damage Reduction for each nearby Enemy, up to 8%; 1% increased Movement Speed for each nearby Enemy, up to 8%
Minor God: Soul of Gruthkul 1% additional Physical Damage Reduction for each Hit you've taken Recently up to a maximum of 5%
5. Final Gems links
| [DPS] Elemental Hit Ballista Totem (socketed in Frostferno) |
|
|
Elemental Hit - primary Attack used in this build which deals very high damage with a randomly chosen Elementa. Thanks to the use of two Combat Focus Jewels, we will block the Cold and Lightning Elements but have their base DPS converted to Fire via Avatar of Fire and Cold to Fire Support Gem from the Frostferno Helmet |
|
Ballista Totem Support - allows you to summon a Ballist that will use linked Bow Attack; in our case, that's Elemental Hit. In this build, you should be able to summon up to 7 Ballistas |
| Combustion Support - grants high bonus Fire Damage, and enemies Ignited by Combustion will also have their Fire Resistance lowered | |
|
Elemental Damage with Attacks Support - greatly increases the Damage of your Elemental Hit |
| Gems granted by Frostferno Helmet: | |
 |
Cold to Fire Support - the Helmet grants a level 30 Cold to Fire, which allows you to convert 100% of the Cold Element to the main one; Fire |
| [UTILITY] Berserk/Dash | |
 |
Berserk - thanks to the use of Chainbreaker, you will have very high levels of Rage, which can be used to greatly buff your damage via Berserk Spell |
|
Dash - the main mobility skill used in this build |
 |
Second Wind Support - grants extra Dash charge, and reduces its cooldown |
| [UTILITY] Lightning Golem (in Malachai's Artifice) |
|
 |
Summon Lightning Golem - Lightning Golem increases your Attack and Cast Speed, but it will also proc Elemental Equilibrium if you socket it into your Malachai's Artifice Ring, greatly reducing Fire Resistance of affected enemies |
| [UTILITY] Various Gems (no links required) |
|
|
Precision - the most important Aura in this build as it helps you reach sufficient Accuracy Rating, and increases your chance to Critically Hit |
 |
Summon Skitterbots - summons two invincible Minions which will Chill and Shock enemies |
 |
Flesh and Stone - a great defensive Aura, which reduces your chance of getting Hit and the damage you take from enemies outside its radius |
 |
Blood Rage - increases your Attack Speed and generates Frenzy Charges which increase your overall DPS. It deals a moderate amount of damage to self, so don't use it when it's not really needed |
|
Sniper's Mark - greatly increases your DPS against marked targets, which is a great way to take down Bosses faster |
| [UTILITY] Immortal Call | |
 |
Immortal Call - grants solid defensive buffs for a short duration. Keep it at level 8 |
 |
Cast when Damage Taken Support - will auto-cast Immortal Call. Keep it at level 6 |
 |
Increased Duration Support - increases the duration of Immortal Call effect |
|
|
5. Gear Setup
Below you will find the recommended gear for our Elemental Hit Ballist Totem Hierophant build. Most of the items below are quite cheap and easy to obtain (not for SSF players though) making it an extremely powerful Starter build. You can easily deal with all of the content on just a few Exalted Orbs budget, making it one of the most effective builds we played in 3.13 so far, so if you wanted to play a Totem build at some point - now it's the perfect opportunity! We would also like to grab ours (opportunity, that is) and invite you to visit our Path of Exile marketplace where you can buy cheap Currency and Orbs from regular players with the use of real cash. Links to that section can be found on the top and right of this guide.
Our recommended items will:
- Cap your resistances
- Give you enough DPS/Life to start mapping successfully
|
Stat priorities on items:
|
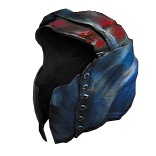 (Helmet) Frostferno - a mandatory Helmet for this build which greatly increases the level of your Elemental Hit and grants you a cheap 5th link to your setup (which combined works better than a regular 6-link in this case) (Helmet) Frostferno - a mandatory Helmet for this build which greatly increases the level of your Elemental Hit and grants you a cheap 5th link to your setup (which combined works better than a regular 6-link in this case) |
|
| +2 to Level of Socketed Fire Gems +2 to Level of Socketed Cold Gems Socketed Gems are Supported by Level 30 Cold to Fire (450-500)% increased Evasion Rating 60% increased Mana Regeneration Rate +(20-30)% to Fire and Cold Resistances |
|
| Helmet enchantments: Elemental Hit deals 40% increased Damage |
|
| (Weapon) Quill Rain - the best in the slot bow for this build, and at the same time, a 6 link shouldn't cost more than 1 Exalted Orb |
|
| +(10-20) to Dexterity 100% increased Physical Damage 100% increased Attack Speed +2 Mana gained for each Enemy hit by Attacks (50-100)% increased Projectile Speed +(25-50) to Accuracy Rating 30% less Damage |
|
 (Weapon) Rare Elemental DPS Bow - if for some reason you can't find Quill Rain, any Rare with high Attack Speed and bonuses to Elemental Damage with Attacks should do (Weapon) Rare Elemental DPS Bow - if for some reason you can't find Quill Rain, any Rare with high Attack Speed and bonuses to Elemental Damage with Attacks should do |
|
| Min. requirements: 1.7 Attacks Per Second 300 Elemental DPS Optional affixes: Critical Strike Chance Critical Strike Multiplier Damage Penetrates #% Fire/Elemental Resistances |
|
 (Quiver) Rare Quiver - aim for high Life and other bonuses. You can easily find a piece with additional Crit. Chance or Multi, and some Resistances on top of decent Life. The best base will be Penetrating Arrow Quiver for the extra Pierce (Quiver) Rare Quiver - aim for high Life and other bonuses. You can easily find a piece with additional Crit. Chance or Multi, and some Resistances on top of decent Life. The best base will be Penetrating Arrow Quiver for the extra Pierce |
|
| Min. requirements: 80 Maximum Life 30% Elemental Damage with Attacks Optional affixes: Critical Strike Chance Critical Strike Multiplier Attack Speed Elemental Resistances Added Cold/Fire Damage to Attacks |
|
 (Body Armour) Kaom's Heart - one of the best Body Armours for this build and at the same time an extremely cheap one compared to Rares which would give you similar results (Body Armour) Kaom's Heart - one of the best Body Armours for this build and at the same time an extremely cheap one compared to Rares which would give you similar results |
|
| Has no Sockets (20-40)% increased Fire Damage +500 to maximum Life |
|
 (Boots) Rare Boots - just grab the highest possible Life, and Movement Speed you can afford (Boots) Rare Boots - just grab the highest possible Life, and Movement Speed you can afford |
|
| Min. requirements: 70 maximum Life 30% Movement Speed Optional affixes: Elemental Resistances Chaos Resistance Attributes |
|
| Boot enchantment: 10% Chance to Dodge Attack Hits if you've taken a Critical Strike Recently 16% increased Attack and Cast Speed if you've Killed Recently |
|
 (Gloves) Rare Gloves - once again, mainly look for defensive stats (Gloves) Rare Gloves - once again, mainly look for defensive stats |
|
| Min. requirements: 80 maximum Life 100% Total Elemental Resistances Optional affixes: Attributes Projectile Attack Damage |
|
 (Belt) Rare Belt - either pick Leather Belt for maximum Life bonus, or Stygian Vise for the extra Abyssal Jewel (Belt) Rare Belt - either pick Leather Belt for maximum Life bonus, or Stygian Vise for the extra Abyssal Jewel |
|
| Min. requirements: 70 maximum Life 100% Total Elemental Resistances Optional affixes: Increased Damage/Fire Damage/Elemental Damage with Attacks |
|
 (Amulet) Marylene's Fallacy - this Amulet grants simply absurd bonus damage which make it one of the best options for this build. Sadly, it grants basically no defensive bonuses (Amulet) Marylene's Fallacy - this Amulet grants simply absurd bonus damage which make it one of the best options for this build. Sadly, it grants basically no defensive bonuses |
|
| +(20-30) to Intelligence +(80-120) to Accuracy Rating +(210-240)% to Global Critical Strike Multiplier +(80-100) to Evasion Rating (10-15)% increased Light Radius 40% less Critical Strike Chance Critical Strikes have Culling Strike |
|
 (Amulet) Rare Amulet (Amulet) Rare Amulet |
|
| Min. requirements: 60 maximum Life 150 Accuracy Rating 35% Elemental Damage with Attacks Optional affixes: Attributes Elemental Resistances |
|
| Recommended Anointments: Shaman's Dominion |
|
 (Ring) Rare Ring - just aim for extra Life, cap your Resistances with it, and possibly get some extra Elemental Damage with Attacks (Ring) Rare Ring - just aim for extra Life, cap your Resistances with it, and possibly get some extra Elemental Damage with Attacks |
|
| Min. requirements: 60 maximum Life 35% Elemental Damage with Attacks Optional affixes: Attributes Elemental Resistances |
|
 (Ring) Malachai's Artifice - allows you to use a Lightning Golem with Elemental Equilibrium which will greatly reduce the Fire Resistance of enemies it hits. The only downside is that it will have to be summoned manually and will die quite easily (Ring) Malachai's Artifice - allows you to use a Lightning Golem with Elemental Equilibrium which will greatly reduce the Fire Resistance of enemies it hits. The only downside is that it will have to be summoned manually and will die quite easily |
|
| Has 1 Socket Socketed Gems have Elemental Equilibrium -20% to all Elemental Resistances +(75-100)% to Fire Resistance when Socketed with a Red Gem +(75-100)% to Cold Resistance when Socketed with a Green Gem +(75-100)% to Lightning Resistance when Socketed with a Blue Gem All Sockets are White |
|
| (Jewel) Rain of Splinters - a mandatory Support Gem for this build which increases the number of your Elemental Hit Ballistas Projectiles |
|
| (50-30)% reduced Totem Damage Totems fire 2 additional Projectiles |
|
 (Jewel) Combat Focus (Viridian Jewel) - the Green/Viridian version blocks the Lightning Element of being chosen by Elemental Hit. It has to be socketed to the left of Marauder of Templar Starting Point (Jewel) Combat Focus (Viridian Jewel) - the Green/Viridian version blocks the Lightning Element of being chosen by Elemental Hit. It has to be socketed to the left of Marauder of Templar Starting Point |
|
| (10-15)% increased Elemental Damage with Attack Skills With 40 total Dexterity and Strength in Radius, Elemental Hit and Wild Strike cannot choose Lightning With 40 total Dexterity and Strength in Radius, Elemental Hit and Wild Strike deal 50% less Lightning Damage |
|
 (Jewel) Combat Focus (Crimson Jewel) - the Crimson Jewel blocks the Cold Element from getting chosen. Same as above, socket it in the other free space to the left of your Skill Tree (Jewel) Combat Focus (Crimson Jewel) - the Crimson Jewel blocks the Cold Element from getting chosen. Same as above, socket it in the other free space to the left of your Skill Tree |
|
| (10-15)% increased Elemental Damage with Attack Skills With 40 total Strength and Intelligence in Radius, Elemental Hit and Wild Strike cannot choose Cold With 40 total Strength and Intelligence in Radius, Elemental Hit and Wild Strike deal 50% less Cold Damage |
|
 (Jewel) Lethal Pride - this is mandatory if you want to use the Chainbreaker Passive for Rage generation and to benefit from the terrific Berserk's effects. Our Jewel had the command of over 10300 warriors under Akoya, but possibly plenty other combination can convert Iron Grip to Chainbreaker and even add better bonuses on nearby nodes (Jewel) Lethal Pride - this is mandatory if you want to use the Chainbreaker Passive for Rage generation and to benefit from the terrific Berserk's effects. Our Jewel had the command of over 10300 warriors under Akoya, but possibly plenty other combination can convert Iron Grip to Chainbreaker and even add better bonuses on nearby nodes |
|
| Commanded leadership over (10000-18000) warriors under (Akoya-Kaom-Rakiata) Passives in radius are Conquered by the Karui Historic |
|
 (Jewel) Medium Cluster Jewel - getting a Cluster Jewel with extra Totem Damage is an easy way to greatly increase your DPS and grant you the Onslaught buff (Jewel) Medium Cluster Jewel - getting a Cluster Jewel with extra Totem Damage is an easy way to greatly increase your DPS and grant you the Onslaught buff |
|
| Recommended affixes: 1 Added Passive Skill is Ancestral Echo 1 Added Passive Skill is Sleepless Sentries |
|
 (Jewel) Rare Jewels - they should provide extra Life and Damage bonuses (Jewel) Rare Jewels - they should provide extra Life and Damage bonuses |
|
| Recommended affixes: maximum Life Critical Strike Multiplier Optional affixes: Damage with Bows/Totem Damage |
|
 (Jewel) Abyss Jewel - just aim for extra Life and maybe some added Fire/Cold Damage to your Attacks on this one (Jewel) Abyss Jewel - just aim for extra Life and maybe some added Fire/Cold Damage to your Attacks on this one |
|
| Recommended affixes: maximum Life Critical Strike Multiplier Optional affixes: Added Fire/Cold Damage to Attacks |
|
| Creates Consecrated Ground on Use (30-50)% increased Duration Consecrated Ground created by this Flask has Tripled Radius +(1-2)% to Critical Strike Chance against Enemies on Consecrated Ground during Effect Consecrated Ground created during Effect applies (7-10)% increased Damage taken to Enemies |
|
Other suggested Flasks:
|
|
    |
|
|
If you have any other build requests please leave that in the comments below. We are always open to suggestions and constructive feedback.
Pictures used in this article are the intellectual property of Grinding Gear Games
