 Buy/Sell
 Log in

Double Throw Barbarian PD2 Build
Throw your weapons, hit half the screen. Double Throw turns Barbarian into a brutal ranged clearing machine.Double Throw Barbarian Build
Last Update: September 22, 2026
Introduction
Double Throw Barbarian is a fast Physical Damage dealer that clears entire packs by hurling two weapons at once and letting the projectiles bounce between nearby enemies. Unlike most ranged Builds, its Damage comes almost entirely from the weapons themselves, making high Enhanced Damage, Critical Strike, Deadly Strike, and Attack Rating much more important than additional Skill Levels. Frenzy plays an important supporting role by greatly improving Attack Speed and Movement Speed, while Grim Ward provides a substantial offensive boost once corpses become available. Thanks to its bouncing projectiles and strong scaling from physical modifiers, Double Throw can tear through dense Maps at an exceptional pace.
The Build is heavily dependent on the quality of its throwing Weapons, but it performs astonishingly well even before reaching fully optimized gear. Throwing Mastery provides Damage, Attack Rating, and Critical Strike, while Amplify Damage is one of the most valuable modifiers you can add to the setup because it greatly improves your performance against resistant enemies. The gameplay revolves around maintaining the Frenzy buff, staying at range, and continuously throwing into dense packs while refreshing Grim Ward whenever necessary. Once you equip powerful Rare or Crafted Throwing Weapons and see entire packs disappear through a chain of bouncing projectiles, it becomes immediately clear why this Build has become so popular among Project Diablo 2 players.
Recommended Breakpoints
- Faster Hit Recovery (FHR): 27% minimum, 48% recommended
- Attack Speed (IAS): Aim to reach the 6-frame Double Throw breakpoint with fully stacked Frenzy
- Attack Rating: Aim for at least 10,000 AR, with roughly 12,000-15,000+ being a comfortable endgame target
Stat Allocation
- Strength: Enough to meet gear attribute requirements
- Dexterity: Enough to meet gear requirements and reach a comfortable Attack Rating
- Vitality: Invest all
- Energy: Nothing
Vitality remains the main destination for your remaining Stat Points, but Dexterity is more valuable here than on most builds because it also improves Attack Rating and throwing Damage. You should still avoid sacrificing too much Life just to inflate AR, especially once your equipment, Charms, Throwing Mastery, and Grim Ward already provide reliable hit chance.
Pros
- Massive Physical AoE through bouncing projectiles
- Barbarian offers plenty of defensive utility
- Excellent Life and Mana sustain through leech
- Very strong scaling
Cons
- Requires good Attack Rating
- Physical-resistant enemies require Amplify Damage or other support
You can also visit this page to check our other Project Diablo 2 Builds
Skill Trees
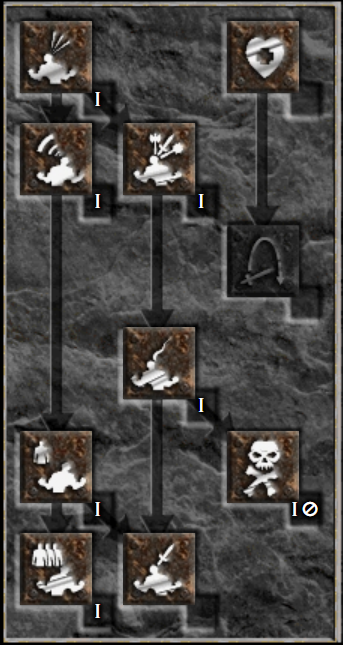
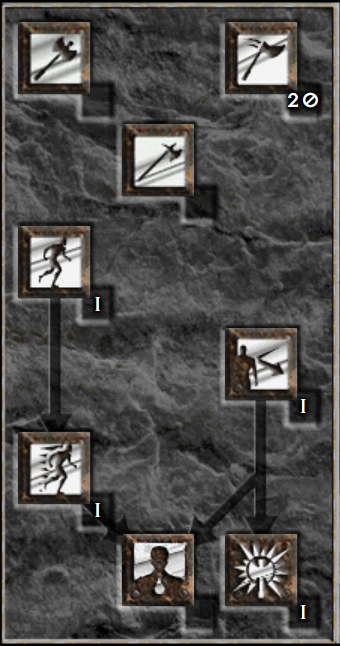
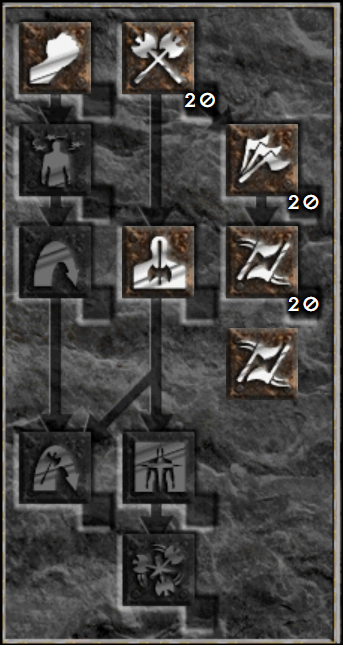
Leveling the Double Throw Barbarian is mostly about getting access to decent throwing weapons as early as possible. You can use Double Swing during the opening levels, but once Double Throw becomes available, there is little reason to stay in melee for regular clearing. From that point onward, every upgrade to your weapons is immediately noticeable, so during progression it is often more important to replace an outdated throwing weapon than to chase another +Skill item. Throwing Mastery should be developed alongside your main attack to keep both Damage and Attack Rating at a comfortable level.
Frenzy becomes the main tool for keeping the build fast. You only need to enter melee briefly to build its charges, after which the increased Attack Speed and Movement Speed make Double Throw feel much smoother. Grim Ward becomes more valuable later, once enemies survive long enough for its Damage and Attack Rating bonuses to matter. Around 10 hard Points is already a very effective investment for the standard setup, and any remaining Points can continue improving it after the main offensive Skills are completed.
Your long-term priorities are Double Throw, Throwing Mastery, Frenzy, and Grim Ward, all of which should eventually be maxed. After that, invest into Grim Ward, while keeping useful utility Skills such as Battle Orders, Battle Command, Battle Cry, Natural Resistance, Increased Speed, and Leap at one Point. If you prefer additional survivability, some of the later Points can also be moved from Grim Ward into Battle Orders.
Gear
The most important part of the Double Throw Barbarian setup is the Weapon pair. High-end Ethereal Rare or Crafted Throwing Weapons, especially Ghost Glaives or Winged Harpoons, are the main endgame goal. Look for very high Enhanced Damage, useful IAS, Deadly Strike, Maximum Damage, and ideally Amplify Damage. Lacerator remains one of the best affordable options and works very well when paired with a strong Crafted Weapon.
Raekor's Virtue is one of the best Helmets for the Build, offering Damage, Mana Leech, Dexterity, extra Double Throw levels, and an additional Curse slot. Veil of Steel is a more straightforward Damage option with high Enhanced Damage and Resistances, while Giant Skull offers solid physical bonuses and useful Knockback.
For Body Armour, Fortitude is an excellent choice for maximizing raw Physical Damage. Enigma sacrifices some Damage for better Mapping utility and repositioning, while Tyrael's Might offers strong mobility and defensive value. The Build benefits much more from physical modifiers and utility than from stacking Skill Levels.
Soul Drainer is one of the strongest Gloves thanks to Life and Mana Leech together with Enemy Physical Resistance Reduction. Steelrend offers more raw Damage, while strong Crafted Gloves with IAS, Leech, and useful offensive modifiers can also perform very well.
For the Belt, Nosferatu's Coil is a strong offensive choice thanks to IAS, Deadly Strike, and Life Leech. String of Ears provides better sustain and Physical Damage Reduction, while Verdungo's Hearty Cord is ideal when you want more survivability.
War Traveler is one of the best all-around Boots because its flat Damage scales extremely well with the Build's high Enhanced Damage. Gore Rider offers more physical offensive stats, while good Rare Boots can help cover Faster Run/Walk and Resistances.
Highlord's Wrath is the most straightforward offensive Amulet, combining IAS and a large amount of Deadly Strike. Saracen's Chance provides a more balanced mix of Attributes and Resistances, while a strong Rare or Crafted Amulet with flat Damage and Attack Rating can outperform both in optimized setups.
For Rings, Raven Frost is one of the most useful choices, providing Cannot Be Frozen together with valuable Attack Rating and Dexterity. The second slot is usually best filled by a strong Rare or Crafted Ring with flat Minimum or Maximum Damage, Attack Rating, Life or Mana Leech, Attributes, and Resistances. Bul-Kathos' Wedding Band can also be used as a simple all-around option, but for a Physical Damage setup a well-rolled Rare Ring will usually provide more relevant offensive and defensive stats.
Charms
Charms for the Double Throw Barbarian should focus almost entirely on improving Physical Damage and Attack Rating. A Barbarian Hellfire Torch and Annihilus are the obvious starting points, mainly for their Attributes and Resistances rather than the additional Skill Levels. After that, prioritize Maximum Damage + Attack Rating Charms, ideally with Life as the third modifier. This is one of the Builds where a well-developed inventory of Damage Charms can make a very noticeable difference to your final Damage output.
You can use Small, Large, or Grand Charms depending on the rolls you have available; the important part is the combination of flat Maximum Damage and Attack Rating rather than a specific Charm size. High-end examples with Maximum Damage, Attack Rating, and Life are especially valuable. Any remaining inventory space can be used for Life, Resistances, or Faster Hit Recovery if your equipment does not already cover those requirements. Unlike many Barbarian Builds, Skill Grand Charms are not a priority here, as Double Throw benefits far more from direct physical Damage modifiers.
Mercenary
The Act 4 Dark Mercenary is one of the best choices for the Double Throw Barbarian, mainly because he casts Amplify Damage on enemies. This is especially valuable before you acquire a strong throwing Weapon with its own Amp proc, as reducing enemy Physical Resistance has a major impact on your clear speed and helps deal with Physical Immunes. Additional Faster Cast Rate on his equipment improves how frequently he can apply his utility.
Another strong option is an Act 1 Mercenary equipped with Wrath, which provides frequent Amplify Damage procs while remaining safely at range. Act 5 Mercenaries can also work well with Might and suitable curse-supporting equipment, but for a standard Double Throw setup the most important thing is simply having a reliable source of Amplify Damage if your own Weapons do not already provide it.
- Memory or another high-FCR Staff (Weapon, Act 4 Dark)
- Wrath (Weapon, Act 1 alternative)
- Vampire Gaze or Andariel's Visage (Helmet)
- Shaftstop, Fortitude, or Innocence (Armour)
- Dracul's Grasp or durable Rare/Crafted Gloves (Gloves)
- String of Ears or Verdungo's Hearty Cord (Belt)
- Rare Boots with Resistances and defensive modifiers (Boots)
Final Thoughts
The Double Throw Barbarian stands out because nearly every meaningful upgrade can be felt immediately, especially when improving your Weapons and Damage Charms. Once its Attack Rating, Frenzy uptime, and Physical Resistance reduction are properly handled, the Build becomes an extremely fluid ranged fighter capable of shredding dense packs without sacrificing the durability and utility normally associated with a Barbarian. Its reliance on exceptional throwing Weapons also gives it a particularly satisfying progression from inexpensive starter gear to highly optimized endgame equipment.
We will continue updating this guide with future Project Diablo 2 changes and expand our PD2 content with more builds and strategies.
If you have suggestions or would like to see other builds covered, feel free to share your feedback - it helps us improve and deliver better guides.
Images used in this article are the intellectual property of Blizzard Entertainment or its corresponding owners.