Crushing Hand Spiritborn Build for Diablo 4
Arguably the best Build currently in the game that uses a combination of certain Unique Items to deal a ridiculous amount of DamageCrushing Hand
Spiritborn Build for Diablo 4
Last Update: October 17, 2024
| Build notes: |
| October 17, 2024 -Build created |
Build Overview
The Crushing Hand is one of the best offensive Skills in the Spiritborn arsenal. It deals decent Damage on its own, and by smart positioning, you can Hit the same Enemy twice. The true strength of this Skill lies in various Unique and Legendary Items, which in combination with certain Passive bonuses on your Skill Tree can make your Crushing Hand deal insane amounts of Damage. The most important Unique here is the Rod of Kepeleke that makes your Core Skills count also as Basic Skills and be free to use, although slightly reduces their Damage. However, if you accumulate your main resource to full, your next Core Skill will consume it all to guarantee a Critical Strike, remove the Damage penalty, and increase its Critical Strike Damage by up to 3% per Vigor spend. Another piece of this combination is the Banished Lord's Talisman which causes your next core Skill to Overpower after spending 275 Vigor, and Critical Strikes that overpower deal more Damage. Lastly, you will use the Ring of Midnight Sun to recover all your Vigor spent upon landing the (guaranteed) Critical Strike. With this combo, you will have an endless supply of Vigor, which will cause your Crushing Hand to deal an insane amount of Critical and Overpower Damage.
The ridiculous Damage is not the only strong perk of this Build. It also features great durability thanks to the multitude of Barriers, various Damage Reduction Buffs, Block or Dodge Chance, and the new Resolve mechanic, which is a stackable Buff that reduces the first instance of incoming Damage by 20%. Your Block Chance also grants you plenty of Damage thanks to the Redirected Force aspect, so you can effectively boost defense and offense at the same time. On top of that, you are also very fast and mobile. You will have tons of dashes, jumps, and Unstoppable effects, allowing you to very quickly travel through the field of battle. This Build truly has it all!
You can also check our other Diablo 4 Builds
 Pros Pros |
 Cons Cons |
| Great Area coverage |
Requires certain Unique Items |
| Insane amounts of Damage |
Makes playing other Classes obsolete |
| Supreme mobility and durability |
Skills
|
CRUSHING FIST [5/5] |
|
Your main Skill to use. It creates two overlapping waves of Damage. Thanks to its upgrades it will also generate massive amounts of Barrier for you, and deal significantly more Damage if you have Resolve stacks. Modifiers:
|
|
THE HUNTER [1/5] |
|
It is your Ultimate Ability with a quite long Cooldown, but you will have a 40% chance to reset the Cooldown if you kill an Enemy, making it available to use very often. It is used primarily for Movement and to generate Feriocity stacks that grant you Attack Speed. Modifiers:
|
|
SCOURGE [1/5] |
|
A defensive Skill with a short Cooldown that Slows and Fears nearby Enemies, as well as grants you Damage against Crowd Controlled Enemies and improves your Life Steal. Modifiers:
|
|
RAVAGER [1/5] |
|
A buff that grants you an extra source of Damage, causes you to Dash to your target when you use a Core Skill and improves your Vigor Generation. Modifiers:
|
|
VORTEX [1/5] |
|
A powerful utility Skill that Pulls all nearby Enemies knocks them down, and empowers your next Ability. Use it to group up packs of Enemies but also to increase your Damage against Bosses. Modifiers:
|
|
ARMORED HIDE [1/5] |
|
This Skill passively grants you Resolve Stacks every 5 seconds. Activating it makes you Unstoppable and increases your Chance to Block incoming Damage by 100%, which in this setup also increases your Critical Damage. Modifiers:
|
|
COUNTERATTACK [1/5] |
|
You won't actively use this Skill, but the Passive bonuses are definitely worth it. Allocating this Skill grants you a 10% chance to Dodge, and counters with a bit of Damage when you Dodge an Attack. It also increases your Critical Strike Damage per nearby Enemy. Modifiers:
|


Passive Skills
|
Balanced Exertion [3/3] |
| Increases your Damage but also raises the Vigor Costs of your Skills. You will restore your Vigor based on the amount spent. |
|
Apex [3/3] |
| Greatly improves your Damage against Vulnerable Elite enemies. |
|
Unrestrained Power [3/3] |
| Being under the effect of Unstoppable or Unhindered improves your Damage. |
|
Perseverance [3/3] |
| Each stack of Resolve also grants you global Damage Reduction. |
|
Patient Guard [1/3] |
| Grants you a 10% Chance to Block. Investing more points doesn't raise the Block Chance. |
|
Resilient [3/3] |
| Increases your maximum Life by 10%, as you will always be casting a Gorilla Skill. |
|
Dominant [3/3] |
| Improves your Damage against knocked Down Enemies and grants you a chance to instantly Execute Non-Boss foes. |
|
Potent [3/3] |
| Hitting an Enemy with a Jaguar Skill increases all Damage taken by the Enemy, You will stack it up very quickly thanks to Ravager. |
|
Furnace [3/3] |
| Improves your Critical Strike Damage with Jaguar Skills. |


Key Passive
|
PRODIGY'S TEMPO |
| A very important Notable, it greatly reduces the Cooldowns of all your Skills and raises their Ranks. Remember that your Crushing Hand counts as both a Basic and Core Skill. |

Spirit Hall
|
Jaguar |
| Turns all your Skills into Jaguar Skills, allowing you to benefit from various effects. It also deals a bit of extra Damage every 15 Skills used. |
|
Gorilla |
| Increases your maximum Resolve by 2 and makes you Unstoppable if you have at least 5 stacks of Resolve. |


Items
|
The Build relies on certain Unique Items, although currently, the Spiritborn is strong enough to comfortably farm lower difficulties with any setup. On your Gear, you should look for defensive bonuses such as maximum Life, Damage Reduction, and cap your Resistance and Armour. To improve the Damage you shall seek All Stats, Attack Speed, Critical Strike Damage, and Resource Generation. You will also need to raise your Maximum Resources to be able to spend 275 Vigor at once. Socket the Emeralds to raise your Dexterity. For jewelry use Skulls to improve your Armour, but you can also use other Gems to cover lacking Resistance. The Runewords are very flexible, so you should use a setup that suits your gameplay preference the most. We recommend the Poc&Que to trigger Druid's Earthen Bulwark when you spend your Resources and complete it with the Xol&Xal combo to regenerate 20% of your maximum Life when you activate the Bulwark. |
|
|
MANDATORY UNIQUE ITEMS |
|
|
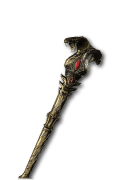
Rod of Kepeleke (Weapon) - an absurdly strong Weapon, it allows you to spam Core Skills for free or make them insanely powerful when you accumulate Maximum Vigor.
|
+[80.0 - 100.0]% Critical Strike Damage +[12 - 24] Maximum Resource +[2 - 4] Velocity +[26.0 - 35.0]% Chance for Core Skills to Hit Twice Your Core Skills are now additionally Basic Skills, free to cast, and deal up to 30% less damage based on their cost. When cast at Maximum Vigor, your Core Skills consume all Vigor to return to full damage, cast at their largest Size, and become guaranteed Critical Strikes, with [1.00 - 3.00]%[x] increased Critical Strike Damage for each point of Vigor spent this way. |
|
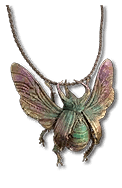
Harmony of Ebewaka (Helmet) - with this Helmet your Crushing Hand will deal up to 90% more Damage. It also offers useful generic modifiers, such as All Stats or Damage Reduction.
|
+ [47-65] All Stats + [8.0-12.5]% Movement Speed + [8.0-10.0]% Damage Reduction + [2-3] to Velocity According to your secondary Spirit Hall choice, your Skills are all additionally Jaguar, Eagle, Gorilla, or Centipede Skills. Your skills deal [10 - 30]%[x] increased damage per Spirit type they have. (Spiritborn Only) |
|
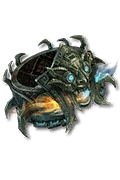
Ring of the Midnight Sun (Ring) - with this Ring, you will recover up to 50% of the spent Vigor when you land a Critical Strike. Thanks to Resource Generation bonuses on your other Items you can Recover 100% Vigor, making your Skills effectively free to use.
|
+[107 - 121] Dexterity [8.1 - 8.8]% Cooldown Reduction +[40.0 - 50.0]% Critical Strike Damage +[2 - 3] to Mirage (Spiritborn Only) When you Critically Strike, you regain [20 - 50]%[+] of the Vigor you've spent in the last 2 seconds. Gain Counterattack's Passive Effect. (Spiritborn Only) |
|
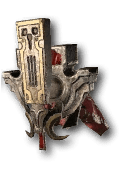
Banished Lord's Talisman (Amulet) - with the aforementioned Weapon, you will spend all your Resources at once and make it always Crit. With this Amulet it will also Overpower, and deal significantly more Damage.
|
[8.0 - 10.0]% Maximum Life +[60.0 - 70.0]% Overpower Damage +[8.3 - 10.0]% Attack Speed +[1 - 2] to Core Skills After you spend 275 of your Primary Resource, your next Core Skill is guaranteed to Overpower. Your Critical Strikes that Overpower deal [20 - 60]%[x] increased damage. |
|
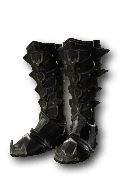
Yen's Blessing (Boots) - the Unique Effect of those Boots is useful to have, as you will randomly trigger Extra Skills, but they are used mostly for their generous modifiers, such as All Resistances and Resource Generation.
|
+[17.5 - 23.0] Movement Speed +[51 - 65]% All Stats +[8.5 - 12.0]% Resource Generation +[26.0 - 35.0]% Resistance to All Elements Casting a Skill has a [40 - 60]% chance to cast a Non-Mobility, Non-Ultimate Skill that is currently on Cooldown. Can only occur once every 8 seconds. |
|
CODEX OF POWER |
|
|
Mandatory/Heavily recommended Aspects
Optional Aspects
|
|
Paragon
|
1st Board - Starting Board Nodes - Here you should path through Prime and Spiritual first If you have points to spare, pick up Tenacity and nearby nodes. Glyphs - Colossal Glyph slightly increases the Damage you deal for every 5 points of Strength within range but also improves your Damage for each Resolve you have. |
|
2nd Board - Viscious Shield Nodes - There are a few very potent Nodes here. You will want the Fearless for extra Damage, and Raptor for tons of Critical Strike Damage. empower them with the Outmatch Glyph. Other than that you should also pick up the Primal Ward for extra Barrier Generation, Sentinel to be more Lucky, and Bristle for good bonuses to your offense and defense. Glyphs - The Outmatch Glyph greatly empowers nearby Rare nodes and grants extra Damage against regular Enemies. |
|
3rd Board - Sapping Board Nodes - the Resilience and Denial both grant you decent defensive modifiers. The Opportunist and Eagerplay improve your Resource generation, while the Blessing and Concentrated boost your Damage. The Magic Nodes near the Glyph Soket grant you extra Vigor and a bit of Damage. Glyphs - Similar to the previous Board, you will want to use Hubris to empower nearby Magic Nodes in the range. |
|
4th Board - Revealing Board Nodes - you won't pick up that many nodes here, although the ones you pick are fairly strong. The Artifice, Venom Weaver, and Grounded grant you plenty of Damage. The only interesting defensive Node here is the Haven. Glyphs - The Fitness Glyph grants an insane amount of Critical Strike Damage based on the amount of Dexterity nodes in its range. |
|
5th Board - In-Fighter Board Nodes - the Rampage and Master grant you a simple Damage boost. The Training and Primal Rage offer a bit of defensive bonuses. You can also pick up the Incombustible to raise your Fire Resistance. Glyphs - Spirit Glyph not only grants you a lot of Critical Strike Damage, but it also causes Critical Strike against Enemies to increase the Damage they take from you. |
|
END NOTE This is the official version of our Crushing Hand Spiritborn for Diablo 4. The Expansion Vessel of Hared has just launched so we expect all of the Guides will require constant updates when we get to test all the builds properly. Make sure to check out the Guides regularly to keep track of all the changes! If you have any Build requests, please post them in the Comments section below. We will be happy to cover your most requested builds in the future! Also, we hope that you have found this guide useful and informative. Also, we will be happy to receive constructive criticism that will help us improve our future work, so don't hesitate to give us your feedback. |
Pictures used in this article are the intellectual property of Blizzard Entertainment