 Buy/Sell
 Log in

Corpse Explosion Necromancer Build Guide for PD2
Turn every corpse into a chain reaction and clear dense Maps with one of Necromancer’s most explosive caster builds.Corpse Explosion Necromancer Build
Last Update: September 30, 2026
Introduction
The Corpse Explosion Necromancer is a powerful Fire and Physical caster built around turning fallen enemies into chain reactions that can wipe out entire packs in seconds. Corpse Explosion deals both Fire and Physical Damage, while Desecrate provides a reliable supply of corpses and removes the need to wait for the first enemy to die before the Build can begin its main Damage cycle. This makes the setup especially effective in dense Maps, where a single well-placed explosion can quickly trigger a much larger cascade across the entire pack.
The Build combines Amplify Damage, strong Corpse Explosion Skill Levels, Fire Damage scaling, and fast repositioning through Blood Warp to maintain constant pressure from pack to pack. Because part of Corpse Explosion remains Physical, Amplify Damage adds significant value against tougher enemies and helps the Build deal with targets that resist its Fire portion more heavily. At the same time, Desecrate keeps the gameplay consistent in areas where corpses are scarce or where you need to start dealing Damage immediately.
Defensively, the Necromancer has access to several strong utility options, including Revives, Bone-based protection, and Curse support, which makes the Build surprisingly safe despite its aggressive Mapping pace. Once the core Skills and gear are in place, Corpse Explosion becomes one of the most satisfying screen-clearing setups available to the class, combining huge area coverage, mixed Damage, strong mobility, and a chain-reaction playstyle that scales especially well with monster density.
Recommended Breakpoints
- Faster Hit Recovery (FHR): 39% minimum, 56% recommended
- Faster Cast Rate (FCR): 75% minimum, 125% recommended for the smoothest Corpse Explosion, Desecrate, and Blood Warp rotation
Stat Allocation
- Strength: Enough to meet gear attribute requirements
- Dexterity: Enough to meet gear attribute requirements
- Vitality: Invest enough for a comfortable Life pool during progression
- Energy: Invest most remaining Points in optimized endgame setups
Necromancers gain considerable value from Energy, as every Point strengthens Bone Armor's Physical Damage absorption while also improving Mana and Mana regeneration. During progression, keeping more Points in Vitality is safer; once Resistances, Life from gear, and Bone Armor are established, shifting heavily toward Energy provides better overall efficiency.
Pros
- Deals both Fire and Physical Damage, giving it strong resistance coverage
- Can add Revives for extra protection without changing the core playstyle
- Strong physical protection through Energy-scaled Bone Armor
- Amplify Damage greatly improves the Physical portion and helps against Physical-resistant enemies
Cons
- Boss Damage generally requires more setup and support than the Build's Mapping performance
- 125% FCR greatly improves gameplay but can restrict high-end gearing choices
You can also visit this page to check our other Project Diablo 2 Builds
Skill Trees
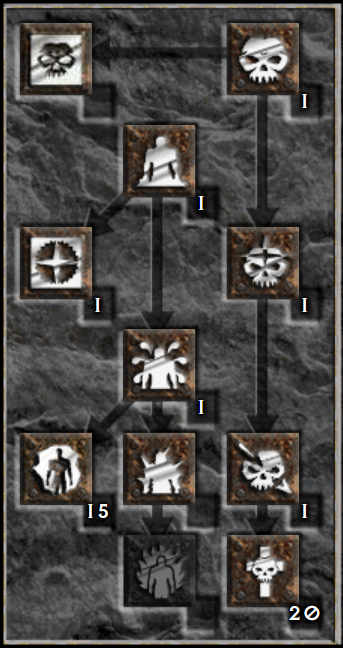
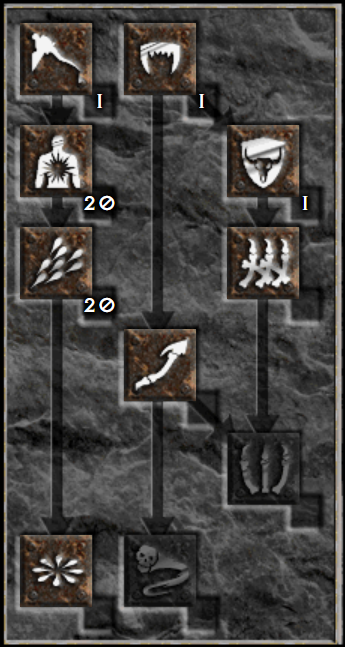
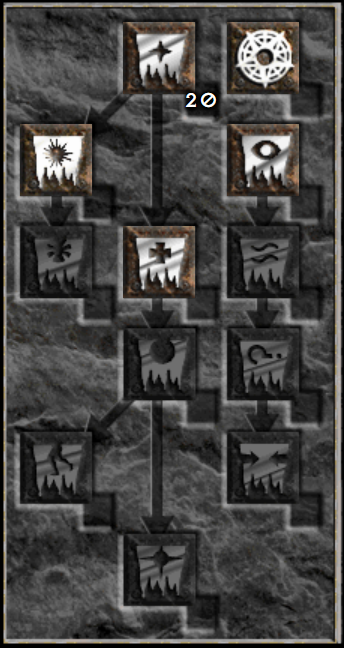
The Corpse Explosion Necromancer is usually easier to level with a more conventional Necromancer setup before transitioning fully into CE. Early on, focus on Desecrate, basic Curse utility, and a few Summons or Bone skills to create reliable first kills while your Corpse Explosion Damage is still developing. The Build becomes much smoother once you have enough Points to invest heavily into both Corpse Explosion and its main synergies.
As you move through Nightmare and into Hell, start building toward the full Corpse Explosion / Desecrate / Amplify Damage / Revive core. Desecrate becomes especially important because it gives you corpses on demand, while Amplify Damage noticeably improves the Physical portion of each explosion. Revives add both direct synergy and a useful defensive screen, making progression through tougher areas considerably safer.
By the time you enter Maps, aim to have Corpse Explosion and Desecrate maxed, with Amplify Damage and Revive well developed. From there, finish the remaining synergies and place spare Points into Blood Warp for faster movement between packs. At that stage, additional +Skills, Faster Cast Rate, Fire Damage scaling, and Enemy Fire Resistance reduction become the main sources of endgame progression.
Gear
For the Weapon, a strong White Wand made in a +Corpse Explosion base is one of the best value choices and can carry the Build deep into endgame. Death's Web is an excellent premium option thanks to its sustain and socket potential, while Heart of the Oak is a strong balanced alternative when you need FCR and Resistances.
For the Shield, Boneflame is one of the strongest offensive choices, while Homunculus offers a more defensive and comfortable setup with Block, Resistances, and Mana support. A good Splendor in a +Corpse Explosion Necromancer Head is also a very strong progression option.
For the Helmet, Kira's Guardian works well in Fire-focused setups and can hold Facets, while Harlequin Crest provides an easy mix of Skills, Life, Mana, and Damage Reduction. A high-end Rare or Crafted Necromancer Circlet with +2 Skills, FCR, sockets, and Resistances can outperform both in optimized setups.
For Body Armour, Atma's Wail and Que-Hegan's Wisdom are excellent because their FCR makes the 125% breakpoint much easier to reach. Skin of the Vipermagi remains one of the best progression options thanks to its FCR and Resistances.
For Gloves, Magefist is the default choice because FCR and Fire-oriented bonuses both fit the Build perfectly. Trang-Oul's Claws are a solid alternative during progression or when using additional Trang-Oul pieces.
For the Belt, Arachnid Mesh is the strongest general option thanks to +1 Skill and FCR. A strong Crafted Caster Belt can also be excellent when you need additional FCR, Life, Mana, or Resistances.
For Boots, Silkweave provides excellent Mana sustain through Mana after Kill, while Waterwalk works very well for Max Block variants. Strong Rare or Crafted Boots with Faster Run/Walk, FHR, Life, and Resistances are also easy to fit into the final setup.
For the Amulet, a Magic +3 Poison and Bone Skills Amulet provides the highest simple Skill bonus. A Rare or Crafted +2 Necromancer Amulet with FCR, Life, Attributes, and Resistances is usually the more flexible endgame option.
For Rings, use Stone of Jordan or another +Skill Ring when your FCR is already covered. Otherwise, strong Rare or Crafted FCR Rings with Life, Mana, Resistances, or Attributes are often needed to reach the 125% breakpoint.
Charms
For the Corpse Explosion Necromancer, Poison and Bone Skill Grand Charms are the most reliable offensive choice. They increase levels of Corpse Explosion together with Desecrate and Bone Armour, making them valuable throughout both progression and endgame.
Start with a Necromancer Hellfire Torch and Annihilus, then fill most of the remaining inventory with Poison and Bone Skillers. Skillers with Life or Faster Hit Recovery are especially valuable once the basic setup is complete.
Use Small Charms to finish Life, Resistances, Mana, and FHR requirements. Once defensive needs are covered, additional Life and Mana provide the most consistent value for aggressive Blood Warp Mapping.
Mercenary
An Act 2 Mercenary with Infinity is one of the strongest general support options for Corpse Explosion. Conviction reduces enemy Fire Resistance, strengthening the Fire half of every explosion while also helping against resistant Map monsters. This complements Amplify Damage, which already supports the Physical portion of Corpse Explosion.
A defensive aura such as Defiance works particularly well because the Build already provides its own mobility through Blood Warp and benefits from additional survivability during aggressive positioning.
- Infinity (Weapon)
- Andariel's Visage, Vampire Gaze, or another durable Mercenary Helmet (Helmet)
- Fortitude, Shaftstop, or Templar's Might (Armour)
- Steelrend or strong Rare/Crafted Gloves (Gloves)
- String of Ears or Verdungo's Hearty Cord (Belt)
- Strong Rare Boots with Resistances and defensive modifiers (Boots)
Final Thoughts
Corpse Explosion becomes more rewarding as Map density increases. Desecrate gives you the first corpses, Amplify Damage prepares the pack, and a few explosions can quickly spread across an entire screen while Blood Warp carries you toward the next group.
The Build also scales smoothly from inexpensive +Skill gear into heavily optimized 125% FCR setups with Fire Pierce and premium Necromancer equipment. Revives provide a useful defensive screen throughout the process, leaving Corpse Explosion free to focus on what it does best: turning dense Maps into continuous chain reactions.
We will continue updating this guide with future Project Diablo 2 changes and expand our PD2 content with more builds and strategies.
If you have suggestions or would like to see other builds covered, feel free to share your feedback - it helps us improve and deliver better guides.
Images used in this article are the intellectual property of Blizzard Entertainment or its corresponding owners.