 Buy/Sell
 Log in

Bone Necromancer Build Guide for PD2
Three Bone spells, three different jobs - this Necromancer rewards players who know exactly which tool to use and when.Bone Necromancer Build
Last Update: September 23, 2026
Introduction
Bone Necromancer is a fast Magic Damage caster that uses an entire arsenal of Bone Skills rather than relying on a single spell. Teeth releases a wide spread of projectiles that can sweep through large groups at once, making it the Build's primary tool for clearing open areas and dense Maps. Bone Spear provides much more concentrated Damage in narrow corridors or against tougher packs, while Bone Spirit offers a powerful homing projectile for bosses and other high-Life targets. Because all three Skills share the same core synergies, you can switch between them freely depending on the situation without compromising the rest of the Build.
One of the biggest advantages of the Build is its Magic Damage, which is resisted by relatively few monsters and allows the Bone Necromancer to farm an extremely wide range of content without constantly worrying about elemental immunities. Blood Warp provides excellent mobility, while Bone Skills such as Bone Armor add another layer of protection to an otherwise traditional caster playstyle. The Build also performs surprisingly well on inexpensive equipment and scales heavily with additional Skill Levels, Faster Cast Rate, and Magic Skill Damage, making it an excellent choice both for early progression and highly optimized Mapping. Once properly geared, the constant transition between wide Teeth volleys, piercing Bone Spears, and tracking Bone Spirits gives it one of the most active and versatile caster playstyles available to the Necromancer.
Recommended Breakpoints
- Faster Hit Recovery (FHR): 39% minimum, 56% recommended
- Faster Cast Rate (FCR): 75% minimum, 125% recommended
Stat Allocation
- Strength: Enough to meet gear attribute requirements
- Dexterity: Enough for gear, or additional Points if building around Max Block
- Vitality: Invest all
- Energy: Nothing
A standard Bone Necromancer should place nearly everything into Vitality after meeting equipment requirements. Dexterity only becomes a significant investment if you deliberately choose a Max Block setup with an appropriate Necromancer Shield.
Pros
- Deals primarily Magic Damage, avoiding most immunity problems
- Very fast and responsive with 125% FCR
- Excellent mobility through Blood Warp
- Engaging, non-monotonous gameplay with different Skills for different situations
Cons
- Requires high FCR to reach its full Mapping potential
- Magic Damage has fewer ways to reduce enemy Resistance than elemental Damage
You can also visit this page to check our other Project Diablo 2 Builds
Skill Trees
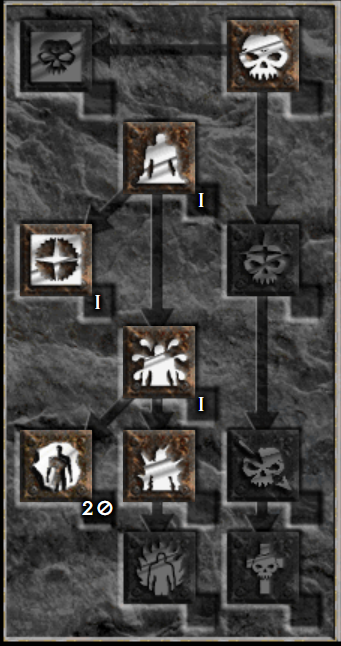
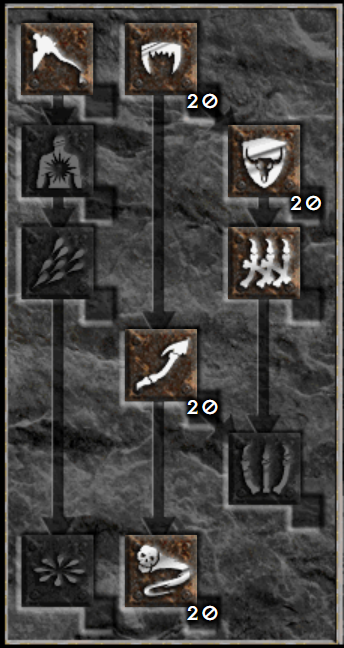
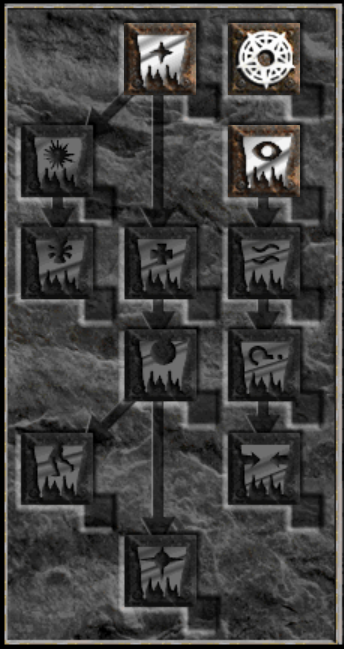
The Bone Necromancer is a very smooth Build to level because its core Damage Skills come online early and continue scaling together throughout progression. Teeth should carry the early game and remains your best tool for clearing large groups, while Bone Spear becomes increasingly useful against tougher enemies and in narrow areas. Once Bone Spirit becomes available, use it mainly for bosses and high-Life targets.
Your main progression goal is to max Teeth, Bone Spear, Bone Spirit, and Bone Armor. These Skills reinforce each other through synergies, so investing into the full Bone package improves both clear speed and single-target Damage at the same time. Bone Armor is especially valuable because it increases your offensive scaling while also providing strong protection against Physical Damage.
Take Blood Warp as soon as possible for mobility, but one Point is enough during leveling. After the four core Bone Skills are completed, invest your remaining Points into Blood Warp to reduce its cooldown and improve Mapping speed. If you prefer a safer setup, a few of those later Points can instead go into Golem Mastery or Revive for a stronger frontline.
Gear
Boneshade is one of the strongest endgame Weapons for the Bone Necromancer, as additional levels to Teeth, Bone Spear, and Bone Spirit directly improve every part of the Build. A high-end Rare or Crafted Wand with several levels to the main Bone Skills can potentially outperform it, but such Weapons are extremely difficult to obtain. For progression, White made in a good Necromancer Wand base is exceptionally strong and remains one of the best budget options thanks to its large bonus to Bone Skills and Faster Cast Rate.
For the Shield slot, Boneflame is an excellent offensive option thanks to its Necromancer Skill Levels, Resistances, and mobility. A high-end Rare or Crafted Necromancer Head with +Necromancer or Poison and Bone Skills, additional levels to Teeth or Bone Spear, and Faster Cast Rate can become the ultimate endgame choice. Splendor in a strong +Bone Skill base is one of the best inexpensive alternatives and pairs especially well with White during progression.
Harlequin Crest is one of the most reliable Helmets for the Build, providing additional Skills, Life, Mana, and useful defensive value. At higher investment, a strong Rare or Crafted Necromancer Circlet with +2 Skills and Faster Cast Rate can be better if it helps maintain the 125% FCR breakpoint while freeing other equipment slots for additional Damage or survivability.
For Body Armour, Skin of the Vipermagi is one of the best all-around choices because it combines Skill Levels, Faster Cast Rate, and Resistances in a single slot. This makes reaching 125% FCR considerably easier without sacrificing too much Damage. More specialized endgame setups can use a strong Crafted Caster Armour or another high-Skill option, but Vipermagi remains extremely efficient and continues to appear in practical Bone Necro setups.
Trang-Oul's Claws are the standard Gloves choice thanks to their Faster Cast Rate and useful defensive bonuses. Magefist can also be used if you prefer additional Mana regeneration, but Bone Skills do not benefit from the Fire Skill bonus, making Trang's generally the more natural option.
Arachnid Mesh is usually the best Belt because it provides both an additional Skill Level and Faster Cast Rate, two of the most important offensive stats for the Build. If your 125% FCR breakpoint is already secured elsewhere, a more defensive Belt can be considered, but giving up Arachnid usually requires exceptionally strong gear in other slots.
Boots are mainly used to solve utility requirements. Silkweave is particularly useful if Mana sustain is a problem because Mana After Each Kill works extremely well with the rapid pack clearing of Teeth. War Traveler provides Magic Find and useful Attributes, while strong Rare Boots with Faster Run/Walk, Faster Hit Recovery, and multiple Resistances are often the best choice once your offensive setup is complete.
For the Amulet, additional Skill Levels are the main priority. Mara's Kaleidoscope is an excellent balanced option with +Skills, Attributes, and Resistances, while a Magic +3 Poison and Bone Skills Amulet provides more raw Damage. The best endgame option is usually a strong Rare or Crafted Necromancer Amulet combining +2 Skills with Faster Cast Rate, Resistances, and Life, especially when the extra FCR allows you to reach 125% without compromising other slots.
For Rings, Stone of Jordan is one of the strongest offensive options thanks to its additional Skill Level and large Mana bonuses. Bul-Kathos' Wedding Band is another solid choice when you prefer additional Life. If your other equipment does not provide enough Faster Cast Rate, Rare or Crafted FCR Rings with Resistances, Life, Mana, and Attributes are often necessary to complete the 125% breakpoint. The final Ring combination therefore depends heavily on how much FCR you already have from your Weapon, Shield, Armour, Belt, and Amulet.
Charms
The Bone Necromancer gets excellent value from additional Skill Levels, so an Annihilus, Necromancer Hellfire Torch, and Poison and Bone Skill Grand Charms form the core of the inventory. Grand Charms with extra Life are ideal, while Faster Hit Recovery can be useful if it helps you reach your preferred breakpoint. Because the Build deals Magic Damage, conventional elemental damage Charms offer very little compared to simply increasing your Bone Skills.
Use the remaining slots for Small Charms with Life, Resistances, Mana, or Faster Hit Recovery. Teeth can consume Mana very quickly during prolonged Mapping, so additional Mana is more useful here than on many other caster Builds. Once Resistances and FHR are comfortable, prioritize Life and Skillers for the best overall balance.
Mercenary
The Act 4 Light Mercenary is one of the most synergistic choices for a Bone Necromancer because his Sanctuary Aura reduces enemy Magic Resistance, directly increasing the Damage of Teeth, Bone Spear, and Bone Spirit. He also provides healing support, while an Insight Staff solves much of the Build's heavy Mana consumption. The main drawback is that Sanctuary has a fairly limited radius and the Mercenary can be fragile, so keeping him close with Blood Warp and using Golems as a frontline helps considerably.
An Act 1 Meditation Mercenary is a safer budget alternative when Mana sustain matters more than maximizing Damage. She tends to remain out of danger and provides reliable regeneration without requiring expensive equipment. If you find the Act 4 Mercenary too difficult to keep alive, this is a perfectly reasonable option for progression.
- Insight (Weapon)
- Vampire Gaze or Andariel's Visage (Helmet)
- Shaftstop, Fortitude, or another durable Armour (Armour)
- Dracul's Grasp or defensive Rare/Crafted Gloves (Gloves)
- String of Ears or Verdungo's Hearty Cord (Belt)
- Rare Boots with Resistances and defensive modifiers (Boots)
Final Thoughts
The Bone Necromancer is at its best when you actively switch between its different spells, matching them with situations. Teeth dominates open packs, Bone Spear rewards good positioning, and Bone Spirit gives the Build a reliable answer to tougher targets. Combined with Magic Damage, strong mobility, and relatively accessible gearing, this creates a very flexible caster that feels effective long before reaching perfect endgame equipment. It is a perfect choice for players who enjoy using the most effective tool for each situation instead of relying on a single Skill for everything.
We will continue updating this guide with future Project Diablo 2 changes and expand our PD2 content with more builds and strategies.
If you have suggestions or would like to see other builds covered, feel free to share your feedback - it helps us improve and deliver better guides.
Images used in this article are the intellectual property of Blizzard Entertainment or its corresponding owners.