 Buy/Sell
 Log in

Blessed Hammer Paladin Build Guide for PD2
The Hammerdin needs little introduction - this legendary Paladin Build has defined Diablo 2 caster gameplay for decades.Blessed Hammer Paladin Build
Last Update: September 22, 2026
Introduction
Hammerdin is one of Diablo 2's most iconic caster Builds, but in Project Diablo 2 it has always carried one frustrating weakness: its signature Blessed Hammers could disappear the moment they clipped a wall. Season 14 finally changes that. Hammers can now travel through terrain, removing a decades-old collision problem and allowing the Build to maintain its spiraling field of Magic Damage even in cramped corridors and enclosed Maps. Instead of constantly repositioning to avoid wasting casts, you can focus on creating dense overlapping Hammer patterns while Concentration amplifies every projectile that passes through the fight.
What makes the Build so appealing is how much control it gains from that one mechanical change. Blessed Aim and Vigor provide the core Damage synergies, Concentration remains the essential active Aura, and Joust or other mobility tools help place the Paladin directly where his Hammer pattern is most effective. The result is a Magic Damage caster with very few resistance problems, excellent scaling from Skill Levels and Faster Cast Rate, and a much more consistent Mapping rhythm than previous versions of the Build. Hammerdin may still demand careful positioning to get the most out of its spiral pattern, but with walls no longer deleting its projectiles, one of the oldest and most famous Paladin Builds suddenly feels far more at home in modern Project Diablo 2.
Recommended Breakpoints
- Faster Hit Recovery (FHR): 27% is a comfortable baseline, while 48% is recommended
- Faster Cast Rate (FCR): 75% minimum, 125% recommended
- Block Chance: 75% Max Block is highly recommended for the standard Shield setup with Holy Shield
Stat Allocation
- Strength: Enough to meet gear attribute requirements
- Dexterity: Enough to reach 75% Block Chance with Holy Shield active
- Vitality: Invest all remaining Points
- Energy: Nothing
A Max Block setup is especially attractive on Hammerdin because you often position close to enemies to make the Hammer spiral overlap correctly. Holy Shield makes reaching 75% Block much cheaper in terms of Dexterity, so cast it before checking your final block value. After that, almost every remaining Stat Point should go into Vitality.
Pros
- Deals Magic Damage, avoiding most immunity problems
- 125% FCR allows extremely dense Hammer fields
- Excellent defensive potential with Holy Shield and Max Block
- Season 14 Hammers passing through walls greatly improves Mapping consistency
Cons
- Feels noticeably worse below the 75% / 125% FCR breakpoints
- Single-target Damage depends on placing yourself correctly
You can also visit this page to check our other Project Diablo 2 Builds
Skill Trees
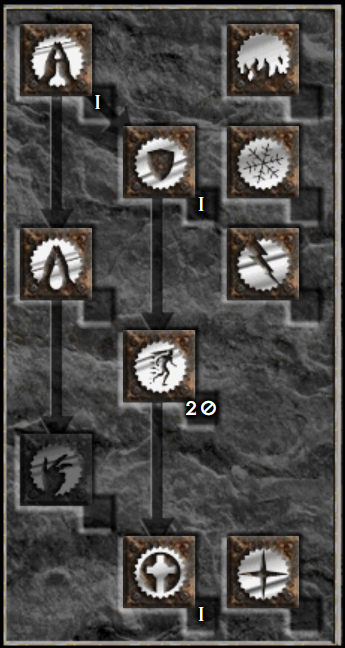
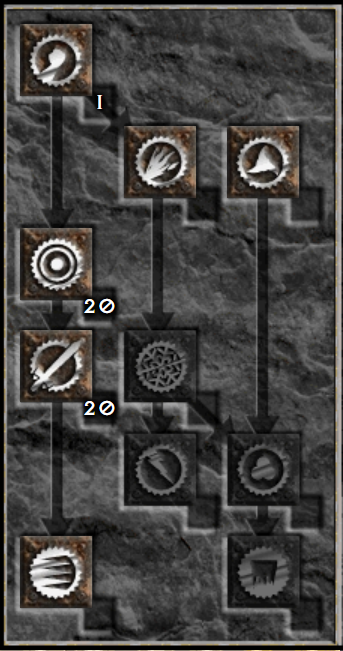
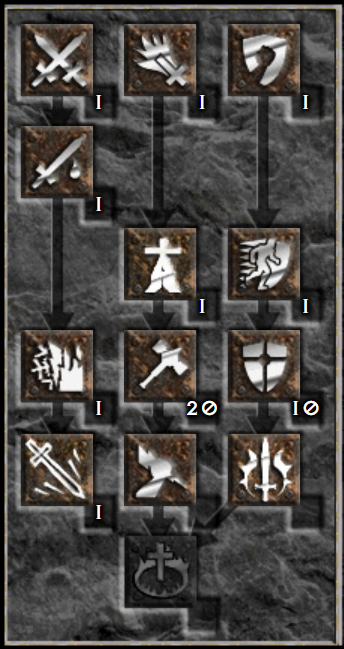
The Hammerdin is one of the easiest Paladin caster Builds to progress once Blessed Hammer becomes available, but the first levels are usually smoother with a simpler leveling setup such as Holy Fire or another early melee option. Once you transition into Hammers, start investing heavily into Blessed Hammer and use Concentration as your main Aura. Blessed Aim and Vigor should then be developed alongside it, as both are direct Damage synergies and form the core of the final setup.
Your main priority is to max Blessed Hammer, Blessed Aim, Vigor, and Concentration. Take Holy Shield early with a single Point for the immediate Block and Defense boost, but leave heavier investment for later. Joust is also worth taking as soon as it becomes available, since fast repositioning is especially valuable for placing your Hammer spiral correctly. One Point in Redemption provides excellent sustain between packs and can be used briefly after combat to recover Life and Mana.
After the four offensive Skills are completed, spend the remaining Points into Holy Shield. Around 10 hard Points already gives a strong defensive return, while additional levels continue improving Block efficiency and Defense. The Build therefore progresses from a straightforward caster into a highly durable Max Block setup, with endgame gameplay centered around moving into the right position, activating Concentration, and filling the area with overlapping Blessed Hammers.
Gear
Akarat's Devotion is one of the best Weapons for a true PD2 Hammerdin. The ideal version is the on Casting variant with a high bonus to Blessed Hammer, as every cast can generate additional Hammers and significantly increase screen coverage. A good FCR corruption is especially valuable because reaching 125% FCR with this Weapon requires careful itemization. Heart of the Oak remains a simpler and more defensive alternative with excellent FCR and Resistances, while Plague in a strong Paladin Scepter base can also work if it rolls well.
For the Shield, Herald of Zakarum is still one of the strongest all-around choices thanks to Skills, Block, Attributes, and Resistances. A good FCR corruption makes it particularly attractive for 125% setups. If reaching the breakpoint is difficult, a high-FCR caster Shield can be used instead, but HoZ remains the more balanced option for Damage and Max Block.
Enigma is still extremely valuable on Hammerdin because positioning directly affects how efficiently your Hammer spiral connects with enemies. Even with Joust, Blink gives you a reliable way to place yourself exactly where you want and reposition your Mercenary. Skin of the Vipermagi is the best straightforward alternative when you need FCR and Resistances, while Steel Carapace is a much tankier option for players who can reach their casting breakpoint elsewhere.
For the Helmet, a strong Rare or Crafted Circlet with +2 Paladin Skills and 20% FCR is usually the premium choice because it helps solve the difficult 125% breakpoint while still providing Life, Resistances, FHR, or sockets. Harlequin Crest is an excellent balanced alternative if your FCR is already covered, while Crown of Ages is a strong defensive choice for tankier setups.
For Gloves, Occultist is extremely attractive because of its Faster Cast Rate and large Mana bonus. Trang-Oul's Claws or Magefist are easier alternatives when you simply need a reliable 20% FCR slot. High-end Hammerdins may prefer a useful FCR corruption here if it allows more offensive choices elsewhere.
Arachnid Mesh remains the natural Belt because it combines +1 Skill with Faster Cast Rate. Its current FCR roll is lower than in older versions, so a strong corruption can be very important when building around 125%. Verdungo's Hearty Cord is a defensive alternative only if the rest of the setup already provides enough casting speed.
Boots are mostly a utility slot. High-quality Rare Boots with Faster Run/Walk, Faster Hit Recovery, and multiple Resistances are usually the most efficient choice. Waterwalk provides Life and Dexterity for Max Block, while War Traveler is useful when you want additional Magic Find rather than pure defensive stats.
For the Amulet, a Rare or Crafted +2 Paladin Amulet with FCR is usually the best endgame option because the Build is so dependent on reaching 125%. Life, Resistances, Attributes, and Life After Each Kill are all excellent secondary modifiers. A Magic +3 Combat Skills Amulet offers more raw Hammer Damage, but usually makes the FCR puzzle much harder. High-end setups commonly use around 15-20% FCR from this slot.
For Rings, Constricting Ring is especially valuable because its high Faster Cast Rate can make the 125% breakpoint considerably easier to reach. Strong Rare or Crafted FCR Rings are also excellent, ideally combining FCR with Life, Mana, Resistances, and Attributes. Bul-Kathos' Wedding Band can be used when you already have enough FCR and want another Skill Level, but Hammerdin generally gets more practical value from solving the casting breakpoint first.
Charms
For the Hammerdin, the strongest offensive Charms are Paladin Combat Skill Grand Charms, as additional levels to Blessed Hammer directly increase your main Damage. Start with a Paladin Hellfire Torch and Annihilus, then add Combat Skillers with Life whenever possible. Skill Grand Charms should make up most of the offensive inventory.
Use the remaining space for Small Charms with Life, Resistances, Faster Hit Recovery, or Mana depending on what your gear is missing. Since Hammerdin often sits close to enemies to maximize Hammer overlap, maintaining capped Resistances and a comfortable FHR breakpoint is more valuable than filling every slot with pure Damage.
Mercenary
For the Hammerdin, the best fit is an Act 4 Light Mercenary. His Sanctuary Aura reduces enemy Magic Resistance, which directly supports Blessed Hammer and can even help against Magic-resistant enemies. That makes him unusually synergistic with this Build compared to the generic aura or curse Mercenaries used by many other setups. He also casts healing spells, which is useful because Hammerdin often fights close to enemies to maximize Hammer overlap.
- Insight or another strong Staff with useful caster stats (Weapon)
- Vampire Gaze or Andariel's Visage (Helmet)
- Shaftstop, Fortitude, or Innocence (Armour)
- durable Rare/Crafted Gloves (Gloves)
- String of Ears or Verdungo's Hearty Cord (Belt)
- Rare Boots with Resistances and defensive modifiers (Boots)
Final Thoughts
The Hammerdin has always had excellent Damage on paper, but Season 14 finally removes one of the biggest obstacles to actually delivering it. With Blessed Hammers no longer disappearing into walls, the Build can maintain its rotating field of Magic Damage far more consistently in tight Maps and enclosed areas. Add strong mobility, Max Block, and very few resistance problems, and Hammerdin becomes a much smoother and more dependable mapper than in previous versions, while still rewarding players who learn how to position themselves for maximum Hammer overlap.
We will continue updating this guide with future Project Diablo 2 changes and expand our PD2 content with more builds and strategies.
If you have suggestions or would like to see other builds covered, feel free to share your feedback - it helps us improve and deliver better guides.
Images used in this article are the intellectual property of Blizzard Entertainment or its corresponding owners.