
Bleed Rake Blood Mage POE2 Build
A Bleed Build for Blood Mage that uses Rake, Blood Hunt, and Lightning Spear and excels in one-shotting BossesTangletongue Bleed Rake
Blood Mage Build
Updated for Path of Exile 2 Early Access
The Best Crafty Guides by Odealo
| Guide notes |
| May 13, 2025 - Created for Early Access. |
| Build Overview | |||
| Tags: [MELEE] [PHYSICAL] [DOT] [LIFE] | |||
|
Budget: Defenses: |
|
Boss DPS: AoE: |
|
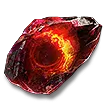
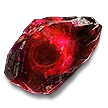
It's the most powerful Bleed build as of 0.2. It makes use of few distinct characteristics tied to the ascendancy, skills, and items. The Blood Mage's Blood Barbs passive causes your Bleed Damage to be scaled off of any Elemental Damage, not only Physical Damage. We will take advantage of that by using the fan-favourite Lightning Spear boosted by Volt to clear packs of enemies. The single-target damage is increased with Infernal Cry which adds tons of Fire Damage to the next single Attack. We can also benefit from Elemental Ailments by adding damage to Attacks or using various Support Gems. The second thing that a Blood Mage excels at is Critical Damage. In PoE2, the Bleed Damage is tied directly to how much damage you've dealt with your Hit. How much damage has the enemy received - because of that, the Crit Damage does affect your Bleed Damage. To gain a lot Critical Damage Bonus, allocate Gore Spike, lots of passives for Crit Damage, and most importantly, equip Tangletongue. This Unique Spear has the property that causes Critical Hits to roll twice, in which case the Crit Bonus is applied twice. Its Crit Chance is also high which helps you reach 100% Critical Hit Chance.
The Skill with which you'll Bleed out bosses is Rake. It just makes the most sense - the skill is built to support this Bleed archetype with its 100% Chance to cause Bleeding and bonus damage to it. In most cases, the undoubtedly challenging fight ends here, but if you're up against pinnacles or some kind of anomalous map boss, you may hit them immediately after with Blood Hunt. This Attack consumes Bleeding debuff to trigger a powerful explosion, the damage of which is tied to Bleeding Damage that the opponent has already suffered. With high-end gear, you will slay the most difficult enemies with one or two of these cycles.
The durability of this build stems from high Maximum Life and Life Recovery from Life Remnants. To boos it further, you can allocate Crimson Power - that would get you even more Maximum Life. There's not much else here, just the basic Resistances to not die instantly. It's not a tough build, but it doesn't need to be.
You can also check our other Path of Exile 2 builds right over here Odealo's Crafty Guides - Full List
1. Gameplay
Use Lightning Spear against normal and magic enemies, and Rake against rare and unique ones. If the enemy's tough, place Orb of Storms to gain Rage, Disengage for Shocking Ground, Attack with Rake again, and then use Infernal Cry to empower your next Attacks, which is Blood Hunt. That should kill anything. Your passive Skills are Life Remnants (remember to pick up these orbs), Herald of Thunder, Blasphemous Temporal Chains, and Combat Frenzy.
|
|
|
|

2. Build's PROS & CONS
| PROS |
|
| CONS |
|
3. Leveling tips
This is a late-game build that works poorly until you reach capped or nearly-capped Crit Chance, obtain Tangletongue, and be at least level 70 or 80. Blood Mage is also the worst ascendancy to level up as. What we recommend doing instead, is starting as the current most starter-friendly Witch build, and changing the ascendancy later. As of 0.2, it will probably be the Essence Drain Lich, but you can start with whatever you're already familiar with.
4. Final Skill Tree, Ascendancy Points, and Pantheon
Final Skill Tree:
 |
|
Click on the image to open the Passive Tree preview in a new window Or import the build into PoB: |
Ascendancy points:
Preferably in this order:
- Sanguimancy
- Blood Barbs
- Grasping Wounds
- Gore Spike or Crimson Power
5. Final Gems links
| [DPS] Rake setup | |
 |
Rake - The main skill with which you'll bleed rare enemies out. It has a guaranteed 100% Chance to inflict Bleeding which a 100% more Magnitude. |
 |
Deep Cuts - 75% more Magnitude of Bleeding, but less initial Hit Damage. |
 |
Momentum - 40% more Damage if you've travelled over two metres with Rake. Try to meet this condition. |
 |
Concoct - Consumes your Life Flask Charges to increase Bleeding Magnitude. Aim for a Life Flask with a lot of Charges. |
 |
Ambrosia - Consumes your Mana Flask Charges to add damage as extra Lightning Damage. Aim for a Mana Flask with a lot of Charges. |
 |
Concentrated Effect - Less AoE, but much more Area Damage. |
| [DPS] Lightning Spear setup | |
 |
Lightning Spear - The main skill with which you'll bleed regular enemies out, in bulk. It has great clear potential, and its Lightning Damage Contributes to Bleeding Magnitude thanks to Blood Barbs. |
 |
Volt - Builds up Voltaic Charges when you move, and releases them as you use the skill. These Charges grant extra damage and chains. |
 |
Martial Tempo - 20% more Attack Speed. |
 |
Lacerate - 50% additional chance to inflict Bleeding. |
 |
Fork - Projectiles Fork, but deal less damage after Forking. |
 |
Perpetual Charge - gives you a Chance to not consume the Frenzy Charge. |
| [DPS] Blood Hunt setup | |
 |
Blood Hunt - consumes the Blood Loss suffered by the Enemy to cause an explosion. The Damage of Blood Loss is unscalable with regular modifiers, but it can Critically Hit. |
 |
Inevitable Critical - Builds up Crit Chance over time when you don't attack with this skill. The count resets if you deal a Critical Hit. |
 |
Supercritical - Less Crit Chance but much more Crit Damage. |
 |
Overextend - Even more Crit Damage, but Critically hitting an enemy Dazes you. |
 |
Blindside - grants Critical Strike Chance and Damage against Blinded Enemies. |
| [UTILITY] Herald of Thunder setup | |
 |
Herald of Thunder - Since all damage Contributes to Bleeding, you may implement Herald of Thunder for a much faster mapping, especially with Lightning Spear. It Hits enemies on occasions. |
 |
Innervate - Gain 35% of damage as Extra Lightning Damage for 5 seconds after killing a Shocked enemy. |
 |
Electrocute - Lightning Damage from storms contributes to Electrocution buildup. |
 |
Neural Overload - Electrocute primed enemies. |
 |
Lightning Infusion - Gain 25% of damage as Extra Lightning Damage. |
 |
Deadly Herald - 30% more Damage. If you don't have Spirit for it, use Longshot instead. |
| [UTILITY] Life Remnants setup | |
 |
Life Remnants - A Persistent buff you have access to via Sanguimancy. Upon critically hitting or killing an enemy it spawns a Remnant. Pick it up to gain Life; it can Overflow. |
 |
Dissipate - Remnants last only 3 seconds, but are 35% more effective. |
 |
Magnetism - Remnants can be picked up from further away. |
 |
Warm Blooded - 50% less Freeze duration on you. It may be replaced with Cannibalism. |
 |
Precision - 30% increased Accuracy Rating. Very important. |
| [UTILITY] Temporal Chains setup | |
 |
Temporal Chains - Slows the target down, and causes your Bleeding to expire slower too. |
 |
Blasphemy - The Curse is always inflicted on enemies near you, but it now Reserves 60 Spirit. |
 |
Ritualistic Curse - 50% increased Area of Effect. |
 |
Encumbrance - 15% increased Slow Magnitude of Temporal Chains. |
| [UTILITY] Infernal Cry setup | |
 |
Infernal Cry - Use it to empower your Blood Hunt while nearby a tough enemy. It adds tons of Fire Damage to the next, only one, empowered attack. |
 |
Premeditation - 15% more damage to Empowered Attacks. |
 |
Raging Cry - Gain Rage per power. |
 |
Enraged Warcry - Up to 30% more damage to Empowered Attacks if the Warcry has consumed 10 Rage. |
| [UTILITY] Orb of Storms setup | |
 |
Orb of Storms - Its role is to Strike Critically (to create Remnants) and empower you with its Font-type Support Gems. |
 |
Font of Rage - Grants 2 Rage per second. |
 |
Font of Blood - Grants 2% Life Regeneration per second. |
| [UTILITY] Combat Frenzy setup | |
 |
Combat Frenzy - Gain a Frenzy Charge when you Electrocute an enemy. You Electrocute with Herald of Thunder. Charges are spent on Lightning Spear, meaning you won't need this skill when fighting pinnacles. You may replace it with Wind Dancer there. |
 |
Profusion - 50% chance to gain one extra Frenzy Charge. |
| [MOBILITY] Disengage setup | |
 |
Disengage - Rake with Momentum encourages you to build up distance from the enemy. Use it before you strike them. It will also create Shocked Ground with Shocking Leap. |
 |
Shocking Leap - Creates Shocked Ground on Critical Hit. |
 |
Overcharge -50% increased Magnitude of Shocked Ground. |
 |
Magnified Effect - increases the Area of Shocked Ground. |
|
|
6. Gear Setup
The build is hard to assemble on account of its very high Attribute requirements. On top of that, you will have to look for Resistances and Critical Hit modifiers on most rare items' Suffixes, with Maximum Life and Added Damage on most Prefixes. Runes may be very helpful in such cases. Damage scales well with Gem Level for Rake and added Damage of all types since your unique weapon does not have much of it. Accuracy, Critical Hit Chance, Critical Damage Bonus, Magnitude of Bleeding, and increased Spell Damage will all affect your damage - try to gain as much of it as possible. Rings, Gloves, and the Amulet may play a big role here. Your defensive layer is basic Maximum Life. Recovery is obtained from Blood Remnants and Grasping Wounds. If that's not enough, you may go for a Body Armour high in Energy Shield, and allocate Crimson Power instead of Gore Spike. Get the missing 49 Spirit, it's obtainable from a Body Armour alone. Your mandatory unique items are Tangletongue and Crown of Eyes. Other uniques are optional.
|
Stat priorities on items:
|
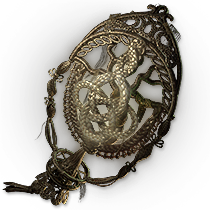
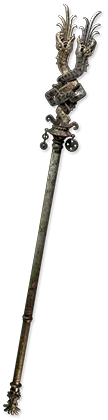 (Weapon) Tangletongue - "Fork Critical Hits" is what makes this weapon so good. It can cap your Crit Chance at 100% and double your Critical damage. Look for god rolls on Crit Chance and added damage. (Weapon) Tangletongue - "Fork Critical Hits" is what makes this weapon so good. It can cap your Crit Chance at 100% and double your Critical damage. Look for god rolls on Crit Chance and added damage. |
|
| Grants Skill: Spear Throw Adds (14-18) to (30-36) Physical Damage +(10-20)% to Critical Hit Chance +(15-25) to Intelligence Forks Critical Hits 10% of Skill Mana Costs Converted to Life Costs |
|
 (Off-hand) Rare Shield, Buckler, or Focus - Regular Shields or Bucklers can roll Maximum Life and Block Chance, while Focus can get you increased Spell and Fire Damage, making them more damage-oriented. Pick one you deem more suited (Off-hand) Rare Shield, Buckler, or Focus - Regular Shields or Bucklers can roll Maximum Life and Block Chance, while Focus can get you increased Spell and Fire Damage, making them more damage-oriented. Pick one you deem more suited |
|
| Min. requirements: Elemental Resistance Optional affixes: Maximum Life increased Spell Damage increased Fire Damage Increased Block Chance Attributes |
|
 (Off-hand) Threaded Light - grants you a massive amount of Spell Damage, further converted into Attack Damage. It is very effective here, as most of your Passive Tree focuses on Critical Strikes, so you will barely have any increases to your Damage otherwise. Try to Corrupt it to get even more Spell Damage per Spirit. (Off-hand) Threaded Light - grants you a massive amount of Spell Damage, further converted into Attack Damage. It is very effective here, as most of your Passive Tree focuses on Critical Strikes, so you will barely have any increases to your Damage otherwise. Try to Corrupt it to get even more Spell Damage per Spirit. |
|
| (50–70)% increased Energy Shield (30–40)% increased Mana Regeneration Rate 20% increased Light Radius (8–12)% increased Spell Damage per 10 Spirit |
|
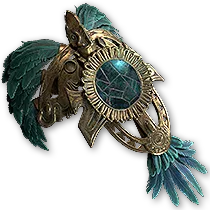
 (Helmet) Crown of Eyes - You will come across increases to Spell Damage on a Skill Tree, Focus, and Jewels, and maybe even Doedre's Tenure Gloves. That results in increased Attack Damage. (Helmet) Crown of Eyes - You will come across increases to Spell Damage on a Skill Tree, Focus, and Jewels, and maybe even Doedre's Tenure Gloves. That results in increased Attack Damage. |
|
| (100–140)% increased Energy Shield +(150–200) to Accuracy Rating +(10–15) to all Attributes -10% to Fire Resistance Increases and Reductions to Spell damage also apply to Attacks |
|
 (Gloves) Rare Gloves - Gloves are important. They shall increase your Critical Damage Bonus, add Maximum Life, Level to all Melee Skills, and Damage to Attacks. (Gloves) Rare Gloves - Gloves are important. They shall increase your Critical Damage Bonus, add Maximum Life, Level to all Melee Skills, and Damage to Attacks. |
|
| Min. requirements: Maximum Life +# to Level of all Melee Skills Added Damage to Attacks increased Critical Damage Bonus Optional affixes: Elemental Resistance Attributes |
|
 (Boots) Rare Boots - On your Boots you will only need Maximum Life, Movement Speed, and Resistances, maybe Attributes if there's a lot of them. (Boots) Rare Boots - On your Boots you will only need Maximum Life, Movement Speed, and Resistances, maybe Attributes if there's a lot of them. |
|
| Min. requirements: Maximum Life Elemental Resistance increased Movement Speed Optional affixes: Attributes |
|
 (Amulet) Rare Amulet - Amulets are abundant in great modifiers. Prioritize Maximum Life, Level of Melee Skills, Attributes, Crit Damage Bonus, Resistances, and Attributes. (Amulet) Rare Amulet - Amulets are abundant in great modifiers. Prioritize Maximum Life, Level of Melee Skills, Attributes, Crit Damage Bonus, Resistances, and Attributes. |
|
| Min. requirements: Maximum Life +# to Level of all Melee Skills Optional affixes: Elemental Resistance Attributes increased Critical Damage Bonus Accuracy Rating |
|
 (Ring) Rare Ring - On Rings you will find Maximum Life and all types of damage added to Attacks. That's Prefixes; for Suffixes seek Attributes and Resistances. (Ring) Rare Ring - On Rings you will find Maximum Life and all types of damage added to Attacks. That's Prefixes; for Suffixes seek Attributes and Resistances. |
|
| Min. requirements: Maximum Life Added Damage to Attacks Optional affixes: Elemental Resistance Attributes Life per Enemy Killed |
|
 (Belt) Ingenuity - It can be as good as your Rings, so it's a rather late-game upgrade. Rings are very valuable in this build. (Belt) Ingenuity - It can be as good as your Rings, so it's a rather late-game upgrade. Rings are very valuable in this build. |
|
| 20% of Flask Recovery applied Instantly Has (1-3) Charm Slots (20-30)% increased bonuses gained from Equipped Left Ring (20-30)% increased bonuses gained from Equipped Right Ring (-20-20)% increased Charm Charges Gained (-10-10)% reduced Charm Charges Used |
|
 (Belt) Rare Belt - A regular Belt is an opportunity to get more Maximum Life, Resistances, and Strength. (Belt) Rare Belt - A regular Belt is an opportunity to get more Maximum Life, Resistances, and Strength. |
|
| Min. requirements: Maximum Life Optional affixes: Elemental Resistance Strength |
|
 (Body Armour) Rare Body Armour - On a Body Armour seek the most regular Maximum Life, Attributes, Resistances, and Spirit. Later on, you can switch to Crimson Power and find yourself a pure Energy Shield Armour - that would grant you tons of Maximum Life. (Body Armour) Rare Body Armour - On a Body Armour seek the most regular Maximum Life, Attributes, Resistances, and Spirit. Later on, you can switch to Crimson Power and find yourself a pure Energy Shield Armour - that would grant you tons of Maximum Life. |
|
| Min. requirements: Maximum Life Attributes Elemental Resistance Optional affixes: Spirit high Maximum Energy Shield (good with Crimson Power) |
|
 (Body Armour) Morior Invictus - The socket mods you're after are: extra Spirit (not needed if it's on Amulet already), extra Maximum Life, and in addition to that, Resistances, or Attributes. (Body Armour) Morior Invictus - The socket mods you're after are: extra Spirit (not needed if it's on Amulet already), extra Maximum Life, and in addition to that, Resistances, or Attributes. |
|
| (200–300)% increased Armour, Evasion and Energy Shield <3 random socket modifiers> Has 4 Rune Sockets (Hidden) |
|
 (Jewel) Rare Jewels - Critical Hit and Ailment Magnitude is what to look for on Jewels. They're plentiful on all types of Jewels. Even Time-Lost radius Jewels may be good - there's a spot for them near Acrobatics where they affect 3 notables. (Jewel) Rare Jewels - Critical Hit and Ailment Magnitude is what to look for on Jewels. They're plentiful on all types of Jewels. Even Time-Lost radius Jewels may be good - there's a spot for them near Acrobatics where they affect 3 notables. |
|
| Optional affixes: increased Critical Hit Chance for Attacks increased Critical Damage Bonus for Attack Damage increased Critical Damage Bonus increased Magnitude of Damaging Ailments you inflict with Critical Hits increased Magnitude of Damaging Ailments you inflict increased Magnitude of Ailments you inflict increased Magnitude of Bleeding you inflict increased Accuracy Rating |
|
|
If you have any other build requests please leave that in the comments below. We are always open to suggestions and constructive feedback.
Pictures used in this article are the intellectual property of Grinding Gear Games.