Artillery Ballista Deadeye Starter Build
100% Elemental Damage Conversion Bow build based on the newly added Artillery Ballista Attack Totem SkillArtillery Ballista
Deadeye Starter build
Updated for Patch 3.9
The Best Crafty Guides by Odealo
Estimated budget: medium

| Guide notes |
| December 13, 2019 -Build created December 17, 2019 -Added gameplay video December 27, 2019 -Changed Blast Rain to Ensnaring Arrow for more utility |
Patch 3.9 brings as a set of new Bow-related Skill Gems and also heavily addresses Ranged Attack Totems which are now called Ballistas. This build is oriented around using one of the new Ballista Skills for solid AoE Damage and amazing clear speed. With the current changes to Passive Skill Tree, you will be able to summon up to 5 Ballistas, which will deal massive Fire Damage in a sequence of fiery explosions. On the other hand, we keep the standard Ranger's defensive mechanics which give us solid Life Pool, high Evasion Rating, and great mobility. Not only you can focus on kiting incoming spells and attacks, but at the same time, you will be dealing your maximum DPS via Totems.
As a Totem build, you expect it to be very budget-friendly. You will still need to get a high Physical DPS Weapon to deal with end-game Bosses, but overall, there are no specific Item requirements to play this particular Deadeye build.
You can also check our other PoE builds right here: Odealo's Crafty Guides - Full List
1. Gameplay
This build is based on Totem playstyle, which requires you to place your Ballista Totems to deal damage while avoiding incoming enemies and applying debuffs. We recommend getting Elemental Focus Support for your Ballista Totems so that it doesn't Ignite. Then you link Combustion Support to another Attack of choice which will be used to reduce monster's Fire Resistance, apply Supported Curse via Curse on Hit, and cast Wave of Conviction linked with Cast on Critical Strike Support to debuff monsters thanks to Fire Exposure. This combined will let you sustain heavy DPS while easily kiting monsters around your Ballistas. This is also a perfect setup for farming, thanks to Ballistas being Area Attack which covers a decent area with each Attack.
|
This video was recorded on a level 91 Champion on Standard |
|
|

2. Build's PROS & CONS
| PROS |
|
| CONS |
|
3. Leveling tips
Leveling as a Ballista Ranger is really smooth. You get to deal solid damage from a distance with your regular Bow Attacks, and Ballistas will dish out some serious DPS even on lower levels. If you get to stack decent Life pool early on, you will also get to stay in close range to benefit from the Point Blank or you can only place your Ballistas near enemies to have them gain all Point Blank benefits without risking your own Life. You can pick any Bow Skill for your regular Attack, but we would recommend getting Split Arrow which has received a significant bonus in Patch 3.9 and as always offers good AoE even on lower levels. You can use Siege Ballistas initially, and later on, switch to Artillery Ballistas when the Gem becomes available to you. Both will do just fine, though the final build is obviously oriented around 100% Damage Conversion to Fire Element.
Suggested leveling Gem setups:
| Spit Arrow setup | |
 |
Split Arrow - one of the first Bow Attacks that you will find in the Path of Exile. It now has flat added Physical Damage at all levels making it a great choice for early levels |
 |
Mirage Archer Support - allows you to progress through campaign while Mirage Archer uses Split Arrow to take down enemies |
 |
Vicious Projectiles Support - increases Physical Damage dealt by Projectiles |
| Siege Ballista setup | |
 |
Siege Ballista - the first Ballista Skill available after you reach level 4. It has very high added Damage Effectiveness and Pierce, which makes it a great tool to take down stronger enemies |
 |
Lesser Multiple Projectiles Support - great choice of Support Gem if you need faster pack clearing when leveling |
|
Vicious Projectiles Support |
 |
Chance to Bleed Support - with high Damage Effectiveness this will greatly increase your Ballistas DPS |
| Artillery Ballista setup | |
 |
Artillery Ballista - the new Ballista Attack Skill which offers 100% Damage Conversion to Fire and very solid AoE DPS caused by a sequence of fiery explosions |
 |
Elemental Focus Support - grants very high bonus Damage, though you will need to include Intelligence Attribute on your equipment to be able to use it |
 |
Added Fire Damage Support - another great Support Gem for Artillery Ballistas |
|
Elemental Damage with Attacks - since it's a 100% Damage Conversion Skill, this is a must-have in this setup |
| Utility Gems | |
 |
Lightning Golem - the recommended Golem for this build which increases your Attack and Cast Speed |
 |
Assassin's Mark - the recommended Curse for this build |
 |
Herald of Ash - grants high bonus Fire Damage based on your Physical Damage and causes AoE Fiery explosions when killing enemies |
Bandits:
We recommend killing all the Bandits for two additional Passive Points or if you are high level enough you may want to switch to Alira for the extra Crit. Multiplier
Leveling Skill Trees:
35 Points Skill Tree
Priorities: 1) Finesse 2) Watch Towers 3) Herbalism 4) Master Fletcher 5) Point Blank
60 Points Skill Tree
Priorities: 1) Surveillance 2) Panopticon 3) Golem's Blood 4) Lethal Assault 5) Resourcefulness
Recommended leveling items:
 Meginord's Girdle - grants very high bonus Damage and Life making it one of the best leveling Belts in PoE Meginord's Girdle - grants very high bonus Damage and Life making it one of the best leveling Belts in PoE |
|
| +(25-35) to Strength +25 to Strength Adds 5 to 15 Physical Damage to Attacks 10% increased maximum Life +(10-20)% to Cold Resistance 25% increased Flask Life Recovery rate |
|
 Victario's Flight - an amazing pair of Boots which provide high Movement Speed bonuses, extra Int, and Mana Recovery Victario's Flight - an amazing pair of Boots which provide high Movement Speed bonuses, extra Int, and Mana Recovery |
|
| +15 to Dexterity +15 to Intelligence (100-150)% increased Evasion Rating 5% increased Movement Speed (5-10)% of Damage taken gained as Mana over 4 seconds when Hit 10% increased Movement Speed 10% increased Movement Speed for you and nearby Allies |
|
 Karui Ward - amazing DPS and Movement Speed bonuses makes it one of the best leveling Amulets for Bow builds Karui Ward - amazing DPS and Movement Speed bonuses makes it one of the best leveling Amulets for Bow builds |
|
| +(20-30) to Dexterity +(20-30) to Strength +100 to Accuracy Rating 30% increased Projectile Speed 10% increased Movement Speed 30% increased Projectile Damage |
|
 Silverbranch - a great leveling Bow, which on top of solid base DPS, increase to the level of Gems, it grants Mana Recovery which is essential for low-level Rangers Silverbranch - a great leveling Bow, which on top of solid base DPS, increase to the level of Gems, it grants Mana Recovery which is essential for low-level Rangers |
|
| +1 to Level of Socketed Bow Gems (80-100)% increased Physical Damage 10% increased Attack Speed +10 Mana gained on Kill +30 to Accuracy Rating |
|
 Goldrim - the best leveling Helmet in Path of Exile which fixes your Elemental Resistances for at least a few entire Acts Goldrim - the best leveling Helmet in Path of Exile which fixes your Elemental Resistances for at least a few entire Acts |
|
| +(30-50) to Evasion Rating 10% increased Rarity of Items found +(30-40)% to all Elemental Resistances Reflects 4 Physical Damage to Melee Attackers Level Requirement reduced by 100 (Hidden) |
|
4. Final Skill tree, Ascendancy Points, and Pantheon
Final Skill Tree:
114 Points Final Skill Tree
114 Points Path of Building(PoB) link
Ascendancy points:
Preferably in that order:
- Far Shot
- Endless Munitions
- Gathering Winds
- Fast and Deadly
Pantheon:
Major God: Soul of the Brine King You cannot be Stunned if you've been Stunned or Blocked a Stunning Hit in the past 2 seconds
Minor God: Soul of Garukhan +5% chance to Evade Attacks if you've taken a Savage Hit recently
5. Final Gems links
| [DPS] Artillery Ballista | |
|
Artillery Ballista - the primary Totem/Ballista Skill used in this build which will deal massive Fire Damage in a sequence of Explosions |
 |
Inspiration Support - reduces the Mana Cost of your Artillery Ballistas and increases their Elemental Damage |
 |
Concentrated Effect Support - grants very high bonus DPS at the cost of reduced Ballista explosions radius |
 |
Elemental Damage with Attacks Support |
|
Elemental Focus Support |
 |
Vicious Projectiles Support - increases your Projectile Physical Damage which is fully converted to Fire |
| [UTILITY] Ensnaring Arrow setup | |
 |
Ensnaring Arrow - used to apply debuffs mainly. If you feel like it's consuming too much Mana, you may as well use a level 1 Gem here, but it shouldn't be an issue |
| Combustion Support - makes enemies Ignited by Ensnaring Arrow and Wave of Conviction to have reduced Resistance to Fire Damage | |
 |
Greater Multiple Projectiles - increases the number of Ensnaring Arrow's Projectiles |
|
Assassin's Mark - the recommended Curse for this build which generates Power Charges and increases your chance to Critically Hit enemies |
| Cast on Critical Strike Support - will cause Ensnaring Arrow to also occasionally cast Wave of Conviction which will apply Fire Exposure to monsters and your linked Curse | |
 |
Wave of Conviction - will be triggered by CoC Support and will apply Fire Exposure to monsters reducing their Fire Resistance |
| [UTILITY] Auras | |
 |
Precision - grants increased Crit. Chance and Accuracy Rating. It can be used at low levels (1-4) so that it doesn't Reserve too much Mana but that will depend on your actual Items |
|
Herald of Ash - grants added Fire Damage to your Attacks |
 |
Anger - if you are comfortable enough with your Mana pool when using Anger (and you can afford Enlighten) you should consider adding it to your build |
 |
Enlighten Support - reduces the amount of Mana Reserved by Supported Skills |
| [UTILITY] Vaal Haste and Steel Skin | |
 |
Vaal Haste - increases your Movement and Attack Speel while active. You should only use the Vaal part of this Skill |
 |
Steelskin - a decent Guard Skill which grants a protective Shield that will mitigate some of the incoming damage. It will be triggered automatically. Use this Gem on level 14 |
 |
Cast when Damage Taken Support - will trigger Steelskin automatically after you take enough damage. Keep this Gem at level 8 |
 |
Increased Duration Support - increases the duration of both Vaal effects |
| [UTILITY] Golem setup | |
|
Cast when Damage Taken Support - will automatically resummon your Golem after you take a certain amount of damage |
|
Summon Lightning Golem - grants increased Attack and Cast Speed |
| [MOBILITY] Blink Arrow | |
 |
Blink Arrow - your main mobility skill. It's great for avoiding big damage spikes and Bosses' abilities |
| [UTILITY] Blood Rage | |
 |
Blood Rage - grants you increased Attack Speed, Life Leech, and generates Frenzy Charges when you kill enemies |
|
|
5. Gear Setup
Below you will find the recommended gear for our Artillery Ballista Deadeye build. Since it's one of our top recommendations for 3.9's Starter build, you can easily replace any of the items listed with random rares - but for obvious reasons, we are primarily including the optimal Item choices for the final version of this build.
The recommended items from our list will:
- Help you cap your resistances
- Give you enough DPS and Life to start mapping successfully
- You will save at least a couple of hours since all the item requirements are listed
|
Stat priorities on items:
|
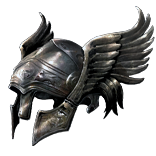
 (Helmet) Starkonja's Head - very solid Helmet which grants very high defensive utility and is relatively cheap (Helmet) Starkonja's Head - very solid Helmet which grants very high defensive utility and is relatively cheap |
|
| 50% reduced Damage when on Low Life +(50-70) to Dexterity 10% increased Attack Speed 25% increased Global Critical Strike Chance (100-130)% increased Evasion Rating +(80-100) to maximum Life 150% increased Global Evasion Rating when on Low Life |
|
 (Helmet) Devoto's Devotion - another great budget option which will let you maximize your clear speed (Helmet) Devoto's Devotion - another great budget option which will let you maximize your clear speed |
|
| 10% reduced Physical Damage +(50-65) to Dexterity 16% increased Attack Speed (150-200)% increased Armour and Evasion +(15-25)% to Chaos Resistance 20% increased Movement Speed Mercury Footprints |
|
| Helmet enchantment: Artillery Ballista Projectiles fall in two perpendicular lines instead |
|
 (Weapon) Rare Shaper Bow - basically aim for high base Physical DPS and extra Fire/Elemental Damage bonuses (Weapon) Rare Shaper Bow - basically aim for high base Physical DPS and extra Fire/Elemental Damage bonuses |
|
| Min. requirements: 400 Physical DPS Optional affixes: Global Critical Strike Multiplier Added Fire Damage |
|
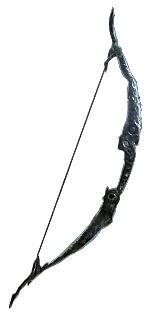
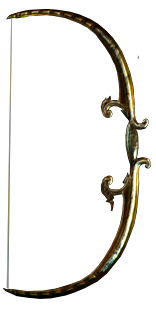 (Weapon) Lioneye's Glare - this Bow has solid base DPS and makes your Attacks never miss allowing you to skip Accuracy Rating entirely (Weapon) Lioneye's Glare - this Bow has solid base DPS and makes your Attacks never miss allowing you to skip Accuracy Rating entirely |
|
| (20-24)% increased Elemental Damage with Attack Skills (150-175)% increased Physical Damage Adds (6-12) to (20-32) Physical Damage (10-20)% increased Attack Speed +(80-100) to maximum Mana Hits can't be Evaded Far Shot |
|
 (Quiver) Rare Quiver - the most convenient choice as it can grant high bonus Life, Elemental Resistances, and Crit. Multiplier which are all very important in this build (Quiver) Rare Quiver - the most convenient choice as it can grant high bonus Life, Elemental Resistances, and Crit. Multiplier which are all very important in this build |
|
| Min. requirements: 80 Maximum Life 80% Total Elemental Resistances 30% Elemental Damage with Attacks Optional affixes: Global Critical Strike Multiplier Added Physical/Fire Damage to Attacks |
|
 (Body Armour) Loreweave - this Armour grants all the important stats for this build including All Attributes which come in handy when trying to fit Intelligence and Strength Gems into your build (Body Armour) Loreweave - this Armour grants all the important stats for this build including All Attributes which come in handy when trying to fit Intelligence and Strength Gems into your build |
|
| Has 6 Sockets +(8-24) to all Attributes Adds (4-10) to (14-36) Physical Damage to Attacks (20-60)% increased Global Critical Strike Chance +(15-50) to maximum Energy Shield +(20-60) to maximum Life +(20-50) to maximum Mana (6-30)% increased Rarity of Items found (15-50)% increased Elemental Damage Your Maximum Resistances are (76-78)% |
|
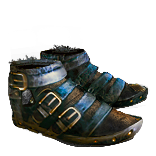
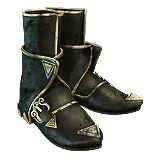 (Boots) Rare Boots - primarily look for high bonus Life and Movement Speed, then just try to add missing Resistances and possibly Chaos Resistance (Boots) Rare Boots - primarily look for high bonus Life and Movement Speed, then just try to add missing Resistances and possibly Chaos Resistance |
|
| Min. requirements: 65 maximum Life 30% increased Movement Speed Optional affixes: Elemental Resistances Chaos Resistance high Evasion Rating |
|
| Boot enchantment: 16% increased Attack and Cast Speed if you've Killed Recently Adds 45 to 68 Fire Damage if you've Killed Recently |
|
 (Belt) Stygian Vise - Abyssal Socket makes this Belt the best possible choice for this build (Belt) Stygian Vise - Abyssal Socket makes this Belt the best possible choice for this build |
|
| Min. requirements: 70 maximum Life 35 Strength 30% Elemental Damage with Attacks Optional affixes: Elemental Resistances Chaos Resistance |
|
 (Amulet) Rare Amulet - the best choice for this build unless you want to make your other Rare equipment much more expensive (Amulet) Rare Amulet - the best choice for this build unless you want to make your other Rare equipment much more expensive |
|
| Min. requirements: 60 maximum Life 30 Intelligence 28% Global Critical Strike Multiplier 30% increased Elemental Damage with Attack Skills Optional affixes: Elemental Resistances Strength added Fire/Physical Damage to Attacks |
|
Recommended Anointments:
|
|
 (Ring) Rare Rings - preferably Opal or Diamonds Rings which grants high bonus damage via their Implicit modifier (Ring) Rare Rings - preferably Opal or Diamonds Rings which grants high bonus damage via their Implicit modifier |
|
| Min. requirements: 60 maximum Life 90% All Elemental Resistances Optional affixes: increased Elemental Damage with Attack Skills added Physical/Fire Damage to Attacks |
|
 (Gloves) Rare Gloves - just aim for high defensive stats and possibly high Accuracy Rating (Gloves) Rare Gloves - just aim for high defensive stats and possibly high Accuracy Rating |
|
| Min. requirements: 60 maximum Life 300 Accuracy Rating 60% Total Elemental Resistances |
|
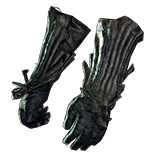 (Gloves) Tombfist - amazing pair of gloves even after the most recent nerfs. It provides up to two Abyssal Sockets, and each of them can provide powerful bonuses. If you choose to use Tombfists, you will need to manually cast your Golem and skip the Increased Duration in your Vaal Haste setup (Gloves) Tombfist - amazing pair of gloves even after the most recent nerfs. It provides up to two Abyssal Sockets, and each of them can provide powerful bonuses. If you choose to use Tombfists, you will need to manually cast your Golem and skip the Increased Duration in your Vaal Haste setup |
|
| Has 2 Abyssal Sockets (4-6)% increased maximum Life With a Murderous Eye Jewel Socketed, Intimidate Enemies for 4 seconds on Hit with Attacks With a Searching Eye Jewel Socketed, Maim Enemies for 4 seconds on Hit with Attacks |
|
 (Jewels) Rare Abyss Jewels - with high flat Physical/Fire Damage added to Attacks/Bow Attacks and Life (Jewels) Rare Abyss Jewels - with high flat Physical/Fire Damage added to Attacks/Bow Attacks and Life |
|
| Recommended affixes: maximum Life added Physical/Fire Damage to Attacks/Bow Attacks increased Critical Strike Multiplier Optional affixes: increased Damage if you have Killed recently |
|
 (Jewels) Rare Jewels - this should provide extra Life and damage bonuses (Jewels) Rare Jewels - this should provide extra Life and damage bonuses |
|
| Recommended affixes: increased maximum Life increased Damage with Bows/Projectile Damage increased Global Critical Strike Multiplier Optional affixes: Attributes |
|
 (Flask) Atziri's Promise - one of the best Flasks in the game which grants very high bonus DPS and Life Leech while costing near to nothing (Flask) Atziri's Promise - one of the best Flasks in the game which grants very high bonus DPS and Life Leech while costing near to nothing |
|
| +35% to Chaos Resistance 2% of Chaos Damage Leeched as Life during Flask effect Gain (15-20)% of Physical Damage as Extra Chaos Damage during effect Gain (10-15)% of Elemental Damage as Extra Chaos Damage during effect |
|
 (Flask) The Wise Oak - assuming your Fire Resistance is the highest, this Flask will provide a solid DPS bonus. If not, just go for a Stibnite Flask to boost your defenses (Flask) The Wise Oak - assuming your Fire Resistance is the highest, this Flask will provide a solid DPS bonus. If not, just go for a Stibnite Flask to boost your defenses |
|
| +35% to all Elemental Resistances During Flask Effect, 10% reduced Damage taken of each Element for which your Uncapped Elemental Resistance is lowest During Flask Effect, Damage Penetrates (10-15)% Resistance of each Element for which your Uncapped Elemental Resistance is highest |
|
Suggested Flasks:
|
|
    |
|
|
If you have any other build requests please leave that in the comments below.
Pictures used in this article are the intellectual property of Grinding Gear Games.
