
Armageddon Brand Inquisitor Build
One of the best Brand builds in the game, Armageddon Brand Inquisitor.Armageddon Brand
Inquisitor Build
Updated for Patch 3.21
The Best Crafty Guides by Odealo
| Guide notes |
| October 03, 2022 -Build created May 07, 2023 -Updated for Patch 3.21 |
| Build Overview | |||
| Tags: [CASTER] [ELEMENTAL] [LIFE] [LOW LIFE] [STARTER] | |||
|
Budget: Defenses: |
|
Boss DPS: AoE: |
|
Brands are a distinctive type of Spells, they can serve multiple utility purposes, but could also be used as the main damaging ability. Their distinguishing feature is the ability to attach to an enemy and continuously Cast a Spell. Armageddon Brand is a Fire-oriented Brand - while attached to an enemy, it creates meteors (not projectiles) that hit the ground, damaging not only the branded enemy but a lot more foes gathered around it. The Brand conjures these meteors dealing Fire Damage every 1.5 seconds, but this interlude can be shortened by getting more Cast Speed, making it more similar to a regular Spell Caster-type build. One of the best classes to deal Elemental Spell Damage are Elementalists and Inquisitors, you can even check the Elementalist version we've made by clicking here. Elementalist would be better suited for an Ignite build, this one, however, is an on-hit Critical Strike build, and its Burning Damage is insignificant. Due to Righteous Providence, you can easily reach a 100% Critical Strike Chance, and with Inevitable Judgement, these hits will Ignore all Elemental Resistances.
Inquisitors are also quite durable because of Sanctuary and Pious Path Keystones, guaranteeing nearly-permanent Consecrated Ground that regenerates your Energy Shield as well as Life. It can be a great foundation for a hybrid build (Life and Energy Shield are both underlying defensive layers). This consecrated Ground has increased effectiveness, and because of that, the effect of all Curses on you is reduced by 75%. Due to the rapid regeneration of Energy Shield and Life, you can play as a low-life build, such as is the case here. It would enable the Petrified Blood, Pain Attunement, and allow you to fit more Auras into the build for even more damage. The build has high Maximum Elemental Resistances, Block Chance, and a lot of Armour. Assembling it is rather easy, there are no required unique items, and the rare ones are also very accessible. It can be played as a starter build, and it's also great for SSF leagues. The flexibility allows for some uniquely advanced and expensive compositions of items and skills for the most optimal performance.
You can also check our other Path of Exile builds right over here Odealo's Crafty Guides - Full List
1. Gameplay
The Armageddon Brand is supported by a Runebinder Keystone, allowing you to attach two Brands to a single enemy, which is great against bosses - it basically doubles your damage. Brands that are not attached will quickly find the nearest opponent to attach to, their attachment range can be easily improved by Brand masteries, or by using Brand Recall occasionally. It'd recall all brands to your location. For a Curse this build uses Assassin's Mark, it enhances your Critical Strikes. Remember that Flammability is nearly useless with Inevitable Judgement. To boost your Spell Damage for a short time we recommend using Vaal Rightous Fire. For a Guard Spell use Molten Shell, and for mobility - Flame Dash. The Auras we've used are Clarity, Petrified Blood, and Vitality to reserve half of Maximum Life, and Zealotry, Determination, and Anger as the regular Mana-reserving Auras.
|
|
|
|

2. Build's PROS & CONS
| PROS |
|
| CONS |
|
3. Leveling tips
As a Templar, you have a straightforward start as there are many Elemental Damage Spells to choose from, and the numerous nodes right outside of your starting location make it much more intuitive, and accessible to progress quickly. You can start with Brands right away, but we would recommend waiting until level 28 so that you can equip Armageddon Brand. Until then, use any Fire Damage Skill. Rolling Magma or Fireball can be both great. The transition to the final form is very gradual, at any point you can replace any piece of equipment with a better one. Look for added or increased Spell or Fire Damage and Maximum Life. Try to have your Elemental Resistances capped at 75% at all times, and get yourself a pair of boots with increased Movement Speed. After dealing with the last Labyrinth you can pick up the Inevitable Judgement keystone which changes a lot, as you will no longer need Fire Penetration as much as previously, instead, you should focus on Critical Strike Chance. At this point, you should be able to equip most of the Unique Items. The last step of finishing the build is to achieve a 100% Critical Strike Chance.
Suggested leveling Gem setups:
| Fireball/Armageddon Brand setup | |
 |
Fireball - Fireball is as simple Fire Spell as you can get, a Fiery Projectile that explodes on contact. At level 28 switch to  Armageddon Brand. Armageddon Brand. |
 |
Arcane Surge Support - Grants you more Spell Damage and Mana Regeneration Rate after spending some Mana on the linked Spell. |
 |
Pierce Support - Your Fireballs Pierce more targets. After switching to Armageddon Brand, replace it with  Swiftbrand Support. Swiftbrand Support. |
 |
Elemental Focus Support - Makes you unable to cause Ignite, but rewards you with more Spell Damage. |
 |
Fire Penetration Support - Penetrates a big chunk of Fire Resistance, so after allocating Inevitable Judgement, switch to  Increased Critical Strikes Support. Increased Critical Strikes Support. |
 |
Concentrated Effect Support - Makes your Spells concentrated for more Damage, but less Area of Effect. If that's not what you're looking for, use  Faster Casting Support. Faster Casting Support. |
| Mana Reservation setup | |
 |
Anger - Use Anger for added Fire Damage to Spells and Attacks. |
 |
Purity of Elements - Grants Elemental Resistances and protects you from every Elemental Ailment. |
 |
Clarity - Regenerates your Mana at a steady pace. |
| Utility Gems | |
 |
Flammability - Lowers Fire Resistance of affected enemies. After allocating Inevitable Judgement replace it with  Assassin's Mark. Assassin's Mark. |
 |
Wave of Conviction - Applies Elemental Exposure to lower Fire Resistance, redundant later on. You can link it with |
 |
Flame Dash - A simple movement Spell. |
Bandits:
you should kill all three Bandits for two additional Skill Points, but Helping Alira might be alluring if you need Resistances, Critical Strike Multiplier, and Mana Regeneration.
Leveling Skill Trees:
27 Points Skill Tree
Start with Spell / Fire Damage and some Maximum Life. After you've started using Armageddon Brand, allocate the Runebinder.
64 Points Skill Tree
Get more Maximum Life, Mana Reservation Efficiency, Fire Damage, and Brand Clusters. From this point on you can go for the outer Jewel Sockets and put Cluster Jewels there, get more Spell Damage, Critical Strike nodes, or head for the Pain Attunement Keystone.
Recommended leveling items:
 Le Heup of All - Use it for Attributes, Damage, and Resistances. Le Heup of All - Use it for Attributes, Damage, and Resistances. |
| Adds 1 to 4 Physical Damage to Attacks +(10-30) to all Attributes (10-30)% increased Damage (10-30)% increased Rarity of Items found +(10-30)% to all Elemental Resistances |
 Goldrim - Offers a lot of Elemental Resistances which are very important at all stages of the game. Goldrim - Offers a lot of Elemental Resistances which are very important at all stages of the game. |
| +(30-50) to Evasion Rating 10% increased Rarity of Items found +(30-40)% to all Elemental Resistances Reflects 4 Physical Damage to Melee Attackers Level Requirement reduced by 100 (Hidden) |
 Praxis - One of the best leveling Rings for Spell-casters due to its Mana-related qualities. Praxis - One of the best leveling Rings for Spell-casters due to its Mana-related qualities. |
| +(20-30) to maximum Mana +(30-60) to maximum Mana Regenerate (3-6) Mana per second -(8-4) to Total Mana Cost of Skills 8% of Damage taken Recouped as Mana |
 Atziri's Foible - If you're using Tabula Rasa you probably also need some additional Mana Sustain, if that's the case, use this Amulet. Atziri's Foible - If you're using Tabula Rasa you probably also need some additional Mana Sustain, if that's the case, use this Amulet. |
| (20-30)% increased Mana Regeneration Rate +100 to maximum Mana (16-24)% increased maximum Mana (80-100)% increased Mana Regeneration Rate Items and Gems have 25% reduced Attribute Requirements |
 Abberath's Horn - At level 6 you can equip this Wand for more Fire Damage with Spells. Abberath's Horn - At level 6 you can equip this Wand for more Fire Damage with Spells. |
| 10-14)% increased Spell Damage (20-30)% increased Fire Damage Adds (4-6) to (8-12) Fire Damage to Spells (40-60)% increased Global Critical Strike Chance Gain 10 Life per Ignited Enemy Killed 25% reduced Ignite Duration on Enemies |
 Ashcaller - It adds tons of Fire Damage to Spells, and triggers Raging Spirits that might be of use. Ashcaller - It adds tons of Fire Damage to Spells, and triggers Raging Spirits that might be of use. |
| (18-22)% increased Spell Damage 25% chance to Trigger Level 10 Summon Raging Spirit on Kill Adds (20-24) to (38-46) Fire Damage Adds (20-24) to (38-46) Fire Damage to Spells 10% chance to Cover Enemies in Ash on Hit |
 Doedre's Tenure - If you have a lot of added Spell Damage from the Wands mentioned above, we recommend also increasing it. These Gloves might be useful. Doedre's Tenure - If you have a lot of added Spell Damage from the Wands mentioned above, we recommend also increasing it. These Gloves might be useful. |
| +(20-50) to Intelligence 100% increased Spell Damage (25-15)% reduced Cast Speed |
 Tabula Rasa - Use Tabula for the six, white, linked sockets. Tabula Rasa - Use Tabula for the six, white, linked sockets. |
|
| Item has no level requirement and Energy Shield (Hidden) Item has 6 White Sockets and is fully linked (Hidden) |
|
4. Final Skill Tree, Ascendancy Points, and Pantheon
Final Skill Tree:
92 Points Final Skill Tree (doesn't include Items, Unique, or Cluster Jewels)
119 Points Path of Building (PoB) link
Ascendancy points:
Preferably in that order:
- Sanctuary
- Pious Path
- Rightous Providence
- Inevitable Judgement
Pantheon:
Major God: Soul of Solaris: 6% additional Physical Damage Reduction while there is only one nearby Enemy; 20% chance to take 50% less Area Damage from Hits
Minor God: Soul of Yugul: 50% chance to Reflect Hexes, You and your Minions take 50% reduced Reflected Damage; 30% reduced Effect of Curses on you
5. Final Gems links
| [DPS] Armageddon Brand setup | |
|
Armageddon Brand - A Brand that deals Fire Damage via meteors. These are not Projectiles despite their appearance. It's important to get level 21 of this Gem. |
|
Swiftbrand Support - The Brand last for a shorter time, but has a much higher Activation frequency. |
 |
Hypothermia Support - If your Hits consistently Chill by having added Cold Damage, use Hypothermia for more Damage. If that's not the case, use Elemental Focus Support. |
 |
Inspiration Support - Inspiration greatly reduces Mana Cost of Skills, increases Critical Strike Chance, and Elemental Damage. |
 |
Empower Support - It increases Gem Level, which is one of the best ways to gain more Damage. |
|
Increased Critical Strikes Support - Increases Critical Strike Chance. If it's already nearly 100%, use  Increased Critical Damage, or Concentrated Effect Support Gems. Increased Critical Damage, or Concentrated Effect Support Gems. |
| [UTILITY] Life-reserving setup | |
|
Clarity - Regenerates your Mana, use it to adjust your Reserved Life to be just slightly more than 50% by increasing or lowering the Level of this Gem. |
 |
Vitality - Vitality Regenerates your Life over Time. |
 |
Petrified Blood - As you're always below 50% of your Maximum Life, use Petrified Blood to make a big portion of Damage from hits to be taken as Damage over Time. |
 |
Arrogance Support - Arrogance makes all Auras reserve Life instead of Mana and increases their effect. |
 |
Enlighten Support - Linked Spells have increased Mana Reservation Efficiency |
| [UTILITY] Mana-reserving setup | |
 |
Zealotry - Use Zealotry for more Spell Damage and increased Critical Strike Chance. |
 |
Determination - Determination grants more Armour and increases the existing one. |
|
Anger - Adds a lot of Fire Damage to your Spells and Attacks. |
|
Enlighten Support |
| [UTILITY] Brand Recall and Flame Dash setup | |
 |
Brand Recall - Recalls all your Brands to your Locations, they have increased the Attachment Range after that. |
 |
Enhance Support - Increasing the Quality of Brand Recall provides you with even more Attachment Range and also Cooldown Recovery for Flame Dash. |
|
Arcane Surge Support - Arcane Surge buff grants more Spell Damage and Mana Regeneration. Keep it at a low level. |
|
Flame Dash - Use it to teleport at a rapid pace. |
| [UTILITY] Vaal Righteous Fire setup | |
 |
Vaal Righteous Fire - Use Vaal Rightous Fire to gain more Spell Damage at the cost of your Life. The Divergent version would grant you even more of it. |
 |
Increased Duration Support - Increases the Duration of Vaal Rightous Fire. |
| [UTILITY] Molten Shell | |
 |
Molten Shell - Protects you from Hit Damage for a short time, it's more effective the more Armour you have. |
| [UTILITY] Assassin's Mark | |
|
Assassin's Mark - The most effective Curse, it increases your Critical Strike Chance and Multiplier against a Marked opponent. |
|
|
6. Gear Setup
No unique Items are mandatory, but some are heavily recommended. The Annihilating Light and Mark of the Shaper are extremely good for their prices so you should definitely consider them. As for other Uniques, these are mainly centered around granting extra Skill Gem Level or obtaining extra Energy Shield via Corrupted Soul. Some of them are very expensive, as is the case with Hands of the High Templar with multiple useful modifiers, but ultimately Rare Items will serve the build as good, if not better than the unique ones. From your Rare gear pieces try to obtain a 100% Critical Strike Chance, it can be done not only from the direct Critical Strike modifiers, but also from Strength and Intelligence, or Watcher's Eye modifiers. Mana Reservation Efficiency and reduced Mana Cost of Skills can be valuable too. Remember that all of your Elemental Damage will Penetrate Resistances fully, so it's recommended and encouraged to add Cold or Lightning Damage too to cause Ailments like Chill and Shock. For defenses seek Maximum Life, Energy Shield, and Armour.
Our recommended items will:
- Cap your resistances at 75%
- Provide you with enough DPS and Life to start mapping
|
Stat priorities on items:
|
 (Helmet) Rare Helmet - Blizzard Crown would be great as it adds Cold Damage to Spells, which will penetrate all Resistances as much as Fire Damage. It will make Armageddon Brand apply Chill to the enemies so that you can get more damage from Hypothermia Support. Try to get Life, Resistances, and Mana Reservation Efficiency (Helmet) Rare Helmet - Blizzard Crown would be great as it adds Cold Damage to Spells, which will penetrate all Resistances as much as Fire Damage. It will make Armageddon Brand apply Chill to the enemies so that you can get more damage from Hypothermia Support. Try to get Life, Resistances, and Mana Reservation Efficiency |
|
| Min. requirements: +80% to Elemental Resistances +70 to maximum Life Optional affixes: increased Mana Reservation Efficiency of Skills Adds Cold / Fire Damage to Spells Dexterity |
|
 (Helmet) Crown of the Inward Eye - If you have a decent amount of Energy Shield or Maximum Mana, you can use this Helmet to gain more Damage. It increases your Armour, Energy Shield, Maximum Life, and Mana. (Helmet) Crown of the Inward Eye - If you have a decent amount of Energy Shield or Maximum Mana, you can use this Helmet to gain more Damage. It increases your Armour, Energy Shield, Maximum Life, and Mana. |
|
| 333% increased Armour and Energy Shield (9-21)% increased maximum Life, Mana and Global Energy Shield Transfiguration of Soul Transfiguration of Body Transfiguration of Mind |
|
| Helmet enchantments: Armageddon Brand enchantment |
|
 (Weapon) Rare Staff - We recommend using a Staff rather than a Shield with a one-handed Weapon. You can seek the modifiers for added Gem Level, added or increased Fire Spell Damage, and Critical Strike modifiers. (Weapon) Rare Staff - We recommend using a Staff rather than a Shield with a one-handed Weapon. You can seek the modifiers for added Gem Level, added or increased Fire Spell Damage, and Critical Strike modifiers. |
|
| Min. requirements: +1 to Level of Socketed Gems 100% increased Spell Damage Adds around 100 Fire Damage to Spells Optional affixes: Global Critical Strike Modifiers increased Cast Speed increased Mana Regeneration Rate +3 to Level of all Fire Spell Skill Gems |
|
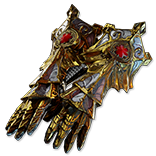
 (Weapon) The Annihilating Light - The Annihilating Light is one of the best Weapons in the game for nearly all Elemental Damage builds, the inordinate amount of damage it grants is balanced out by lower Elemental Resistances, which shouldn't be much of a problem here. (Weapon) The Annihilating Light - The Annihilating Light is one of the best Weapons in the game for nearly all Elemental Damage builds, the inordinate amount of damage it grants is balanced out by lower Elemental Resistances, which shouldn't be much of a problem here. |
|
| +18% Chance to Block Attack Damage while wielding a Staff (70-60)% reduced Elemental Resistances Deal Triple Damage with Elemental Skills |
|
 (Body Armour) Rare Body Armour - Rare Body Armour can potentially provide you with a lot of Elemental Resistances and Maximum Life, but also local modifiers to the Gem Level of Skills, Critical Strike Chance, and Attributes (Body Armour) Rare Body Armour - Rare Body Armour can potentially provide you with a lot of Elemental Resistances and Maximum Life, but also local modifiers to the Gem Level of Skills, Critical Strike Chance, and Attributes |
|
| Min. requirements: +90 to maximum Life +90% to Elemental Resistances Optional affixes: Attributes +1 to Level of Socketed Active Skill Gems Energy Shield increased effect of Non-Curse Auras from your Skills +#% to Spell Critical Strike Chance |
|
 (Body Armour) Skin of the Lords - Skin of the Lords can potentially be the best-in-slot Armour, given that you have sockets of the right color and a useful or at least useless Keystone. Pain Attunement would save you a lot of Passive Skill Points. (Body Armour) Skin of the Lords - Skin of the Lords can potentially be the best-in-slot Armour, given that you have sockets of the right color and a useful or at least useless Keystone. Pain Attunement would save you a lot of Passive Skill Points. |
|
| Item has no level requirement and Energy Shield (Hidden) Sockets cannot be modified +2 to Level of Socketed Gems 100% increased Global Defences You can only Socket Corrupted Gems in this item Item has 6 Sockets and is fully linked (Hidden) <Random Keystone> |
|
 (Boots) Rare Boots - Maximum Life, Elemental Resistances, and Movement Speed are all mandatory, but for the most effective upgrades look for Onslaught, Tailwind, and Elusive modifiers. (Boots) Rare Boots - Maximum Life, Elemental Resistances, and Movement Speed are all mandatory, but for the most effective upgrades look for Onslaught, Tailwind, and Elusive modifiers. |
|
| Min. requirements: +50% to Elemental Resistances +60 to Maximum Life 25% increased Movement Speed Optional affixes: chance to gain Onslaught for 4 seconds on Kill You have Tailwind if you have dealt a Critical Strike Recently chance to gain Elusive on Critical Strike Attributes |
|
| Min. requirements: +70 to Maximum Life +50% to Elemental Resistances Optional affixes: Attributes increased Spell Damage Adds Fire Damage if you've dealt a Critical Strike Recently |
|
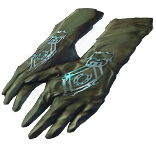
 (Gloves) Hands of the High Templar - You can use these Gloves for their useful Corrupted Implicits which are: increased Cast Speed, Maximum Life, Maximum ES, and extra Spell Critical Strike Chance. (Gloves) Hands of the High Templar - You can use these Gloves for their useful Corrupted Implicits which are: increased Cast Speed, Maximum Life, Maximum ES, and extra Spell Critical Strike Chance. |
|
| Can be modified while Corrupted Can have up to 5 Implicit Modifiers while Item has this Modifier (150-200)% increased Armour and Energy Shield (7-12)% increased maximum Life +(20-30)% to Fire and Lightning Resistances |
|
 (Belt) Rare Belt - Besides Maximum Life, Resistances, and Attributes such as Strength, a belt can be useful for its multiple Flask modifiers. (Belt) Rare Belt - Besides Maximum Life, Resistances, and Attributes such as Strength, a belt can be useful for its multiple Flask modifiers. |
|
| Min. requirements: +90 to Maximum Life +90% to Elemental Resistances Strength Optional affixes: Flask modifiers Maximum Life increased Attributes Attributes |
|
 (Belt) The Burden of Truth - If you have some Energy Shield, and you find recovering a lot of Life and Energy Shield from Flasks an appealing perspective, you are more than encouraged to equip this Belt. (Belt) The Burden of Truth - If you have some Energy Shield, and you find recovering a lot of Life and Energy Shield from Flasks an appealing perspective, you are more than encouraged to equip this Belt. |
|
| +(60-80) to maximum Energy Shield (30-40)% increased Life Recovery from Flasks 33% of Chaos Damage taken does not bypass Energy Shield 33% of Non-Chaos Damage taken bypasses Energy Shield Gain (5-10)% of Maximum Life as Extra Maximum Energy Shield Supreme Decadence |
|
 (Belt) Replica Soul Tether - If you have a lot of Maximum Life, you can also gain a lot of Energy Shield by equipping Replica Soul Tether. It can be good in the right circumstances but lacks any Resistances. (Belt) Replica Soul Tether - If you have a lot of Maximum Life, you can also gain a lot of Energy Shield by equipping Replica Soul Tether. It can be good in the right circumstances but lacks any Resistances. |
|
| (15-25)% increased Stun and Block Recovery +(20-40) to Strength Gain (4-6)% of Maximum Life as Extra Maximum Energy Shield Corrupted Soul |
|
 (Amulet) Rare Amulet - An Amulet is a great opportunity to gain various upgrades like Extra Gem Level of all Fire Skills, Critical Strike modifiers, or lower Mana Cost of Skills. (Amulet) Rare Amulet - An Amulet is a great opportunity to gain various upgrades like Extra Gem Level of all Fire Skills, Critical Strike modifiers, or lower Mana Cost of Skills. |
|
| Min. requirements: +50 to Maximum Life +70% to Elemental Resistances +1 to Level of all Fire Skill Gems Optional affixes: increased Global Critical Strike Chance +#% to Global Critical Strike Multiplier Non-Channelling Skills have -# to Total Mana Cost (crafted) |
|
 (Amulet) Ashes of the Stars - Ashes of the Stars is unsurprisingly one of the best Amulets in the game even for this build, but its price sadly reflects its value. (Amulet) Ashes of the Stars - Ashes of the Stars is unsurprisingly one of the best Amulets in the game even for this build, but its price sadly reflects its value. |
|
| +(10-16) to all Attributes (5-10)% increased Experience Gain of Gems (10-20)% increased Reservation Efficiency of Skills +1 to Level of all Skill Gems +(20-30)% to Quality of all Skill Gems |
|
| Recommended Anointments: Charisma Coom Cast, Assassination, Heartseeker for Critical Strikes Utmost Might, Utmost Intellect for Attributes |
|
 (Ring) Rare Rings - Rings can be used for extra Resistances, Maximum Life, Maximum Energy Shield, Attributes, and reduced Mana Cost of Skills. Try to gain a significant amount of Strength and Intelligence here. (Ring) Rare Rings - Rings can be used for extra Resistances, Maximum Life, Maximum Energy Shield, Attributes, and reduced Mana Cost of Skills. Try to gain a significant amount of Strength and Intelligence here. |
|
| Min. requirements: +60 to Maximum Life +70% to Elemental Resistances Strength and Intelligence Optional affixes: Non-Channelling Skills have -# to Total Mana Cost (crafted) Extra Power Charge Chaos Resistance Attributes Maximum Energy Shield |
|
 (Ring) Mark of the Shaper - If the Elder influences your other Ring, you can gain an outstanding bonus to your Spell Damage. This Ring increases your Life, Energy Shield, triggers Volatile Anomaly, and adds Lightning Damage to Spells, which is all very useful. (Ring) Mark of the Shaper - If the Elder influences your other Ring, you can gain an outstanding bonus to your Spell Damage. This Ring increases your Life, Energy Shield, triggers Volatile Anomaly, and adds Lightning Damage to Spells, which is all very useful. |
|
| (15-25)% increased Elemental Damage 20% chance to Trigger Level 20 Summon Volatile Anomaly on Kill Adds (13-18) to (50-56) Lightning Damage to Spells (6-10)% increased maximum Energy Shield (6-10)% increased maximum Life (60-80)% increased Spell Damage if your other Ring is an Elder Item Cannot be Stunned by Spells if your other Ring is a Shaper Item |
|
 (Jewel) Rare Jewels - Maximum Life, Resistances, Attributes, and Critical Strike modifiers are the most valuable assets a Jewel can present itself with. (Jewel) Rare Jewels - Maximum Life, Resistances, Attributes, and Critical Strike modifiers are the most valuable assets a Jewel can present itself with. |
|
| Recommended affixes: Elemental or Chaos Resistances Added Fire Damage to Spells Attributes Maximum Life Critical Strike modifiers |
|
 (Jewel) Thread of Hope - We've used a Thread of Hope with a Very Large Ring to gain four Notables by allocating it near Instability. (Jewel) Thread of Hope - We've used a Thread of Hope with a Very Large Ring to gain four Notables by allocating it near Instability. |
|
| Only affects Passives in Very Large Ring Passives in Radius can be Allocated without being connected to your tree -(20-10)% to all Elemental Resistances |
|
 (Jewel) Impossible Escape - Impossible Escape can be used here to gain Soul of Steel and Prismatic Skin for extra Maximum Elemental Resistances. It has to be tied to Imbalanced Guard Keystone. (Jewel) Impossible Escape - Impossible Escape can be used here to gain Soul of Steel and Prismatic Skin for extra Maximum Elemental Resistances. It has to be tied to Imbalanced Guard Keystone. |
|
| Passive in Radius of Imbalanced Guard can be Allocated without being connected to your tree | |
 (Jewel) Glorious Vanity - You can use this Jewel to transform one of your Keystones into a Corrupted Soul for a true hybrid build experience. It would grant you a lot of Energy Shield, but be careful if you already have The Burden of Truth Belt, it'd make 83% of your non-chaos damage go past your Energy Shield. (Jewel) Glorious Vanity - You can use this Jewel to transform one of your Keystones into a Corrupted Soul for a true hybrid build experience. It would grant you a lot of Energy Shield, but be careful if you already have The Burden of Truth Belt, it'd make 83% of your non-chaos damage go past your Energy Shield. |
|
| Bathed in the blood of (100-8000) sacrificed in the name of Doryani Passives in radius are Conquered by the Vaal Historic |
|
  (Jewel) Forbidden Flesh & Forbidden Flame - As a Templar, you have access to some of the best Ascendancy Keystones. Sign of Purpose, Radiant Faith, Augury of Penitence, and Searing Purity are extremely good. (Jewel) Forbidden Flesh & Forbidden Flame - As a Templar, you have access to some of the best Ascendancy Keystones. Sign of Purpose, Radiant Faith, Augury of Penitence, and Searing Purity are extremely good. |
|
| Allocates <Random Ascendancy Notable> if you have the matching modifiers on Forbidden Flesh Allocates <Random Ascendancy Notable> if you have the matching modifiers on Forbidden Flame |
|
 (Jewel) Watcher's Eye - You're using Vitality, Clarity, Zealotry, Determination, and Anger. There are many modifiers you can get to upgrade this build. We recommend Critical Strike Multiplier from Anger, reduced Mana Cost while affected by Clarity, or nearly any Zealotry modifier. (Jewel) Watcher's Eye - You're using Vitality, Clarity, Zealotry, Determination, and Anger. There are many modifiers you can get to upgrade this build. We recommend Critical Strike Multiplier from Anger, reduced Mana Cost while affected by Clarity, or nearly any Zealotry modifier. |
|
| (4-6)% increased maximum Energy Shield (4-6)% increased maximum Life (4-6)% increased maximum Mana <Two or Three random aura modifiers> |
|
 (Jewel) Large Cluster Jewel - A Fire or Elemental Damage-oriented Large Cluster Jewel can be used for more Damage as well as Elemental Resistances. It is worth getting one if it grants 3 Notables and no more than 10 nodes. (Jewel) Large Cluster Jewel - A Fire or Elemental Damage-oriented Large Cluster Jewel can be used for more Damage as well as Elemental Resistances. It is worth getting one if it grants 3 Notables and no more than 10 nodes. |
|
| Recommended affixes: 1 Added Passive Skill is Cremator 1 Added Passive Skill is Doryani's Lesson 1 Added Passive Skill is Prismatic Heart 1 Added Passive Skill is Sadist 1 Added Passive Skill is Widespread Destruction |
|
 (Jewel) Medium Cluster Jewel - There are Medium Cluster Jewels designed specifically for Brand builds, you should get some of them. (Jewel) Medium Cluster Jewel - There are Medium Cluster Jewels designed specifically for Brand builds, you should get some of them. |
|
| Recommended affixes: 1 Added Passive Skill is Brand Loyalty 1 Added Passive Skill is Grand Design 1 Added Passive Skill is Remarkable |
|
 (Flask) Bottled Faith - Bottled Faith is the perfect Flask for this build, it grants Damage, and has Consecrated Ground effects to extract even more Damage from this build that heavily relies on Critical Strikes. (Flask) Bottled Faith - Bottled Faith is the perfect Flask for this build, it grants Damage, and has Consecrated Ground effects to extract even more Damage from this build that heavily relies on Critical Strikes. |
|
| 40% increased Damage Creates Consecrated Ground on Use (30-15)% reduced Duration Consecrated Ground created by this Flask has Tripled Radius Consecrated Ground created during Effect applies (7-10)% increased Damage taken to Enemies (100-150)% increased Critical Strike Chance against Enemies on Consecrated Ground during Flask effect |
|
|
Other suggested Flasks:
|
|
    |
|
|
If you have any other build requests please leave that in the comments below. We are always open to suggestions and constructive feedback.
Pictures used in this article are the intellectual property of Grinding Gear Games.
