 Buy/Sell
 Log in


Wilting Beam Selena 1 Build - Torchlight: Infinite
Clear T8 with Wilting Beam Selena 1! Channel on the move, stack Affliction, and finish tougher enemies with Reaping.Wilting Beam Selena 1 Build - Torchlight: Infinite
Last Update: October 26, 2026
Introduction

Hero: Tide Whisper Selena
Hero Trait: Sing with the Tide (Selena 1)
Main Skill: Wilting Beam
Damage: Persistent Erosion Damage, Affliction and Reaping
Season: SS14 Tartarus
Wilting Beam Selena 1 is a mobile caster built around an Erosion beam that cuts through packs while Selena moves across the map. Sing with the Tide allows her to channel Spell skills in Bard form without stopping, turning Wilting Beam into a comfortable farming skill. The damage continues ticking on enemies, while the beam's built-in Reaping accelerates the fight whenever channeling reaches its maximum stacks.
Affliction is especially important against bosses. The longer an enemy takes persistent damage, the more valuable its Affliction buildup becomes. Entangled Pain curses durable enemies, increasing the Damage Over Time they take while Selena keeps Wilting Beam focused on them.
The setup is suitable for progressing through Timemark 7 and into T8 with crafted Erosion scepters and a mix of defensive and offensive equipment. A complete Timemark 7 five-link combines Cataclysm, Spell Concentration, Channeled Depths, Guard and Shortened Duration. Aim, Entangled Pain and Stoneskin add damage and protection, while Wilting Beam: Reflection (Magnificent) and Rapid Completion (Noble) develop the beam and Reaping package for T8. Stronger scepters and Energy Shield gear remain useful well after the first T8 maps.
Pros
- Constant Erosion pressure while channeling on the move
- Effective Affliction buildup and built-in Reaping for elites
- Useful defensive options with Energy Shield, Blur and recovery
- Full T7 five-link with Aim and Entangled Pain for stronger boss damage
Cons
- Long boss fights require good beam uptime and positioning
- Two major damage auras require Sealed Mana Compensation and careful resource management
Explore our other Torchlight: Infinite Builds for more character options.
1. Sing with the Tide Hero Traits and Memories
Selena has two distinct forms. Bard allows movement during Spell channeling and automatically channels the Main Skill as she travels. Loud Song strengthens Tide effects at the cost of movement and casting speed. Wilting Beam benefits enormously from the freedom of Bard, so the trait choices below focus on keeping useful Tides under enemies while maintaining the beam.

| Unlock | Trait | Function |
|---|---|---|
| Base | Sing with the Tide | Allows moving Spell channeling in Bard form and introduces Bard Song, bubbles and Tides. |
| Level 45 | Wave Aria | Creates a Tide along Selena's route and near enemies she touches in Bard form, with additional damage against enemies on the Tide. |
| Level 60 | Idyll of the Tide | Grants a growing damage bonus as Selena moves through Tide areas. |
| Level 75 | Murmurs of the Distant Tide | Increases Tide Effect in Bard form, with shorter Tide Duration. |
Wave Aria makes the movement pattern particularly rewarding. Running through the enemy group lays down useful Tides before Wilting Beam finishes the pack. Against a boss, move through the Tide regularly to maintain the benefits of Idyll of the Tide.
Murmurs of the Distant Tide rewards constant activity. Its shorter Tide Duration means standing in one position for too long loses part of the advantage. The beam still needs to remain on the target long enough to trigger its own Reaping, so the best movement is controlled and deliberate.
2. Talents and Passive Tree
The 105-point talent setup uses Goddess of Deception (24), Psychic (27), Shadowmaster (24) and Lich (30). Affliction and Windwalk increase the pressure of persistent damage on tougher enemies, while Shadowmaster boosts the level of Wilting Beam. Lich strengthens the full support links and provides useful resource-related talents.
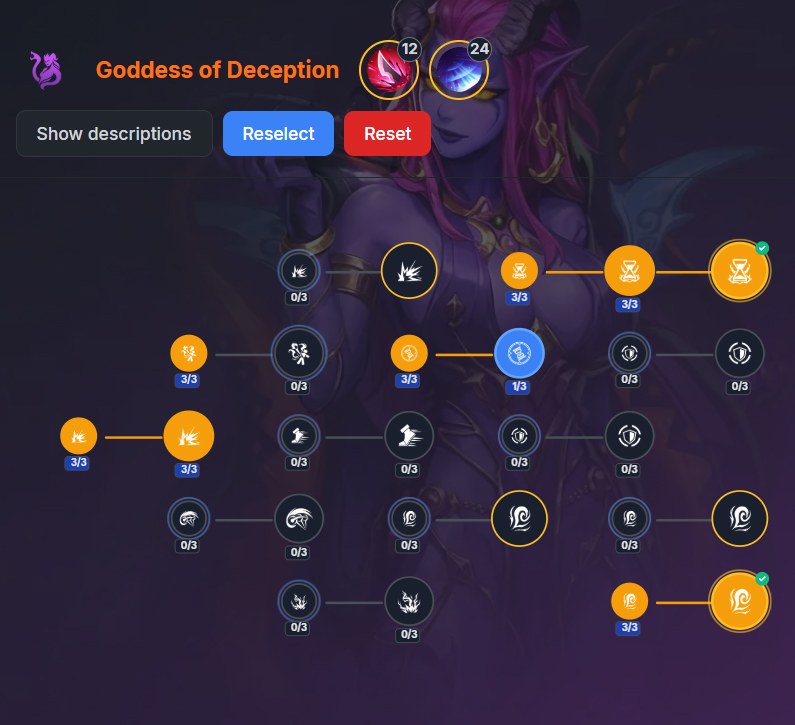
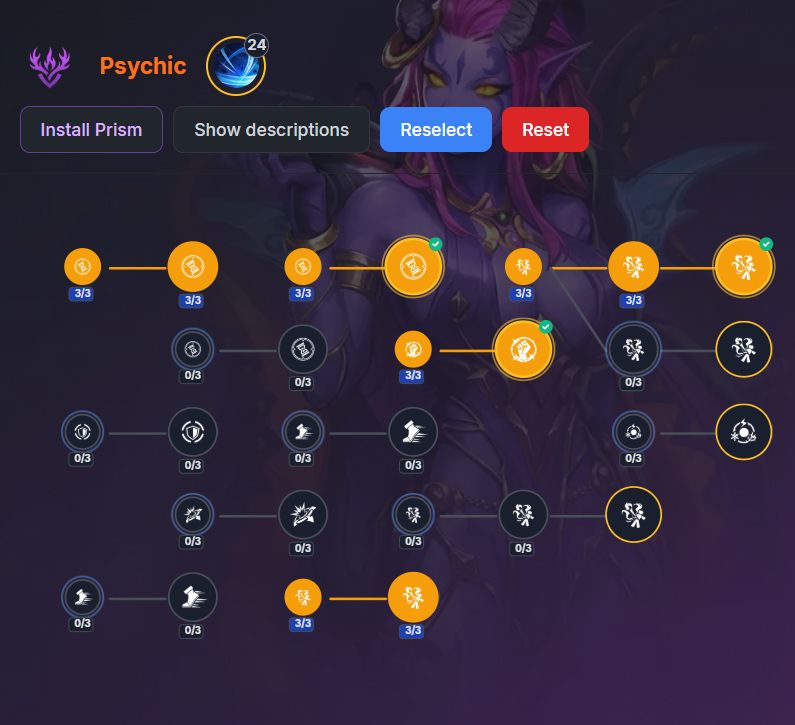
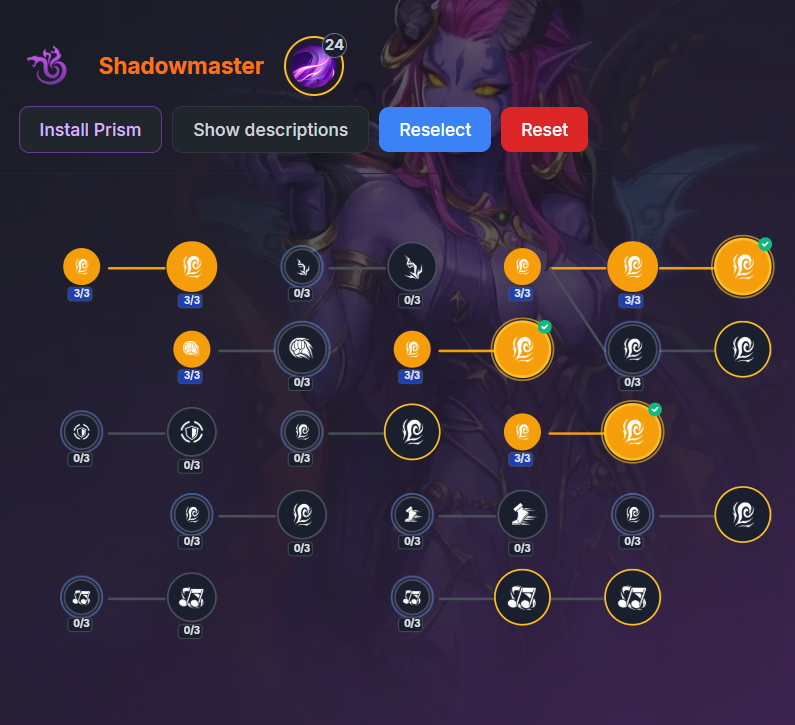
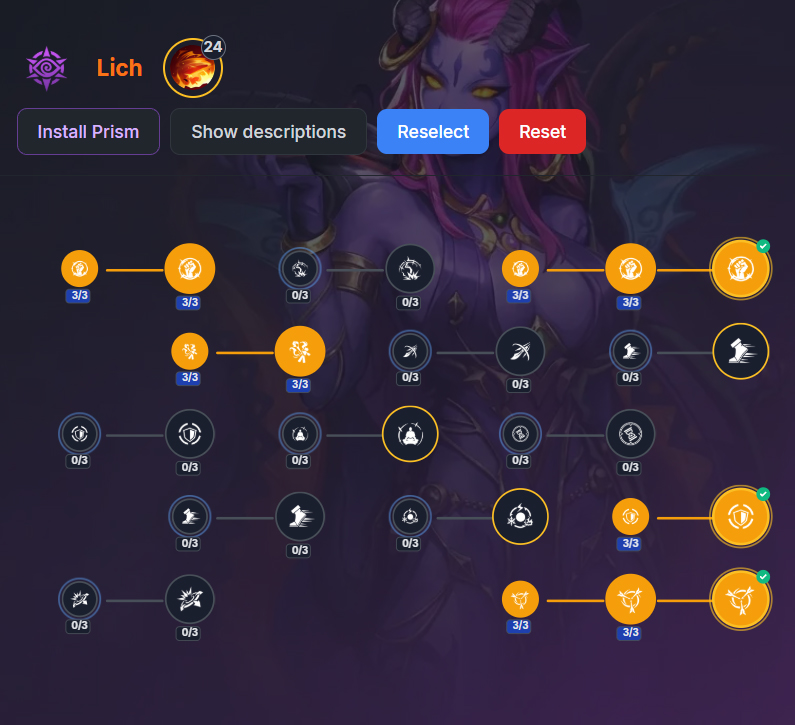
| Talent Tree | Points | Major Talents and Their Role |
|---|---|---|
| Goddess of Deception | 24 | Affliction (12) improves Affliction application and effect. Subtle Impact (24) grants additional Damage Over Time while Blur is active. The selected route also strengthens persistent damage. |
| Psychic | 27 | Windwalk (24) grants a temporary Damage Over Time bonus against targets that reach maximum Affliction. Selected supporting nodes improve Affliction, damage uptime and Reaping. |
| Shadowmaster | 24 | Twisted Belief (24) provides +3 Erosion Skill Levels at the cost of -5% Max Erosion Resistance. Erosion Damage and suitable supporting talents round out the tree. |
| Lich | 30 | Off The Beaten Track (24) provides +4 Support Skill Levels and fixes Support Skill Mana Multipliers at 95%. The additional points reinforce damage, skill efficiency and survivability. |
| Total | 105 | A complete Erosion Damage Over Time setup with Affliction, Reaping, higher Erosion Skill Levels and stronger linked supports. |
Goddess of Deception - Affliction and Subtle Impact
Affliction increases Affliction inflicted per second and its effect, helping persistent Erosion Damage build pressure against durable enemies. Subtle Impact adds 30% additional Damage Over Time while Blur is active. The supporting Damage Over Time and Affliction nodes strengthen Wilting Beam throughout longer encounters.
Psychic - Windwalk and Reaping
Windwalk grants a strong, short-lived Damage Over Time bonus when an enemy reaches maximum Affliction. Strong Affliction application and steady beam uptime help reach that point, particularly against elites and bosses. The supporting Affliction and Reaping talents improve the damage cycle as Selena maintains Wilting Beam on her target.
Shadowmaster - Twisted Belief
Twisted Belief grants three additional Erosion Skill Levels, making it especially valuable for Wilting Beam and other Erosion skills. Its drawback is a 5% reduction to maximum Erosion Resistance. Strong Erosion Resistance rolls and reliable Energy Shield recovery are important when tackling dangerous T7 and T8 encounters. The selected Erosion Damage nodes further improve the beam's persistent damage.
Lich - Off The Beaten Track
Off The Beaten Track increases Support Skill Levels by four and fixes their Mana multipliers at 95%. This supports the complete Wilting Beam five-link and Selena's utility skills. The remaining points develop damage, resource efficiency and defenses, helping the character accommodate stronger supports and auras.
3. Active Skills and Support Links
Wilting Beam deals persistent Erosion Damage and Reaps enemies whenever the channel reaches its maximum stacks. In Bard form, Selena can keep the beam active while moving through Tide areas. A complete five-link, Entangled Pain and a supported Aim provide the damage to handle Timemark 7, while Stoneskin and Swiftness Dew support the mobile playstyle.

[Main DPS] Wilting Beam
The main beam hits enemies with persistent Erosion Damage, builds Affliction and triggers Reaping as channel stacks are completed. Cataclysm helps Affliction develop during sustained damage. Spell Concentration increases damage against enemies within the beam's reduced area, and Channeled Depths adds maximum channel stacks. Guard supplies additional channeling damage and grants a Barrier through repeated skill use.
Reflection occupies the third slot, adding a second beam in the opposite direction. It makes covering large packs easier while Selena moves through them. Rapid Completion occupies the fifth slot and provides additional damage and Reaping Recovery Speed based on the number of extra beams. The two special supports strengthen repeated Reaps during sustained channeling.
Guard is especially comfortable for T7 and T8 mapping, when dangerous packs can interrupt a long channel. The extra Barrier adds protection alongside Energy Shield and Stoneskin. Shortened Duration remains a useful regular damage support before the fifth-slot Noble gem becomes available.

[Damage Over Time Curse] Entangled Pain
Entangled Pain increases the Damage Over Time taken by cursed enemies. At level 20, it provides 39% additional Damage Over Time taken, making it valuable against T7 Traveler bosses and durable T8 enemies. The curse strengthens the persistent Erosion Damage that Wilting Beam maintains on the target.
Apply Entangled Pain before channeling against tougher enemies. Deepened Curse grants an extra damage-taken bonus once the curse has lasted two seconds, while Extended Duration helps maintain coverage through prolonged fights. Preparation provides a stored cast for repeated engagements.

[Offensive Empower] Aim
Aim grants additional damage to Beam Skills, making it a valuable buff for Wilting Beam during elite and boss encounters. The skill also lowers Attack and Cast Speed while active, so increased Empower Effect and steady buff uptime are the main benefits of its support package.
Well-Fought Battle increases Aim's effect over successive casts. Preparation and Extended Duration help keep the buff available during longer fights, while Mass Effect expands its coverage.

[Defensive Skill] Stoneskin
Stoneskin absorbs incoming Hit Damage and gives Selena a safer window to keep channeling near dangerous enemies. It complements Guard's Barrier and Energy Shield recharge from Twilight Vestment, particularly when an elite pack survives long enough to strike back.

[Movement Elixir] Swiftness Dew
Swiftness Dew grants a temporary burst of Movement Speed and can accumulate charges from defeated enemies. It helps Selena sweep the beam across packs and maintain good positioning in Bard form without using another combat skill slot on ordinary movement.
Hyper Metabolism restores Elixir charging progress over time, and Extended Duration keeps the movement bonus available for longer. The extra speed also helps Selena travel through Tide areas and refresh the benefits of Idyll of the Tide.
4. Passive Skills and Auras
Deep Pain and Erosion Amplification form the core offensive aura package for a developed Wilting Beam character. Each seals 50% Mana before compensation. Restrain, sufficient reservation efficiency and the support multiplier benefits from Off The Beaten Track help the character accommodate both auras. Precise versions become attractive as more currency and Skill Energy are available.

[Main DoT Aura] Deep Pain / Precise: Deep Pain
Deep Pain increases Damage Over Time, directly strengthening Wilting Beam's persistent Erosion Damage. Precise: Deep Pain grants a stronger DoT bonus and additional Affliction inflicted per second, improving boss pressure and the consistency of Windwalk.
Base Sealed Mana: 50%. The Precise version is a worthwhile upgrade when the rest of the reservation package is stable.

[Erosion Damage Aura] Erosion Amplification / Precise: Erosion Amplification
Erosion Amplification increases the Erosion Damage dealt by Wilting Beam. Decaying Blessing increases this aura's effect, making it valuable when the necklace is equipped. The Precise variant grants a stronger damage bonus and suits a completed T8 character.
Base Sealed Mana: 50%. The exact Mana left for channeling depends on Sealed Mana Compensation, including the penalty from Decaying Blessing.

[Defensive Aura Alternative] Energy Fortress
Energy Fortress is useful when the Energy Shield pool is insufficient for sustained T8 fights. It occupies a large part of the reservation budget and can replace Erosion Amplification during difficult encounters until crafted gear provides better protection.

[Optional Movement Aura] Swiftness
Swiftness provides additional Movement Speed and works well with Selena's Bard form. It is an optional passive for characters with sufficient Mana compensation after the main damage auras are active.
5. Timemark 7 and 8 Progression
Wilting Beam becomes a comfortable Netherrealm farmer with a completed main-skill five-link, high Erosion Skill Levels and enough recovery to channel through dangerous encounters.
Entering Timemark 7 - Complete the Main Skill
Equip Cataclysm, Spell Concentration, Channeled Depths, Guard and Shortened Duration on Wilting Beam. Craft two Erosion scepters with compatible Persistent Damage and Reaping affixes, and strengthen the Energy Shield base. Keep the channel active while crossing Tide areas to maintain Selena's Hero Trait damage bonuses.
Timemark 7 Traveler - Build the Full Skill Package
Support Aim with Preparation, Well-Fought Battle, Mass Effect and Extended Duration. Use Entangled Pain with Deepened Curse, Extended Duration and Preparation to increase the Damage Over Time enemies take. Stoneskin and Guard improve protection against hits, and Swiftness Dew provides frequent Movement Speed bursts. Maintaining these buffs matters more on bosses than on ordinary packs.
Established T7 - Improve Auras and Recovery
Develop Deep Pain and Erosion Amplification with Restrain and Aura Amplification. Additional Sealed Mana Compensation becomes particularly important with Decaying Blessing. Upgrade Entangled Pain and Aim along with the beam, and acquire reliable Blur uptime to benefit from Subtle Impact.
Entering Timemark 8 - Add the Special Supports
Install Wilting Beam: Reflection (Magnificent) in the third support slot and Wilting Beam: Rapid Completion (Noble) in the fifth. The additional beam gives better pack coverage and strengthens the Reaping Recovery Speed contribution. For stationary bosses, Dispirit and Set Course offer a more concentrated damage arrangement.
Established T8 - Refine the Damage and Defense
Improve the two scepters, high-level Wilting Beam, Hero Memories and Reaping modifiers. Precise: Deep Pain and Precise: Erosion Amplification are powerful later aura upgrades. Twilight Vestment helps Energy Shield recharge when Reaping occurs, while additional Beam effects from Polygonal Enclosure or Revered Light support Rapid Completion. Resistance and recovery remain vital for continuous channeling.
6. Gear Setup and Stat Priorities
Wilting Beam benefits most from persistent Erosion damage, reliable Affliction and frequent Reaping. A pair of well-crafted scepters supplies the main damage scaling, while Energy Shield, Blur and reservation efficiency keep Selena comfortable during T7-T8 farming. Several Legendary items can improve the beam itself or strengthen the Reaping cycle.
- Elemental Resistances, Erosion Resistance and enough Energy Shield to survive continuous channeling
- Wilting Beam Skill Levels, applicable Erosion Damage and Damage Over Time
- Reaping Recovery Speed, Reaping Duration and Affliction Effect
- Blur generation and Blur Effect for Subtle Impact
- Additional Beams, Beam Skill Levels and Beam Length for Wilting Beam
- Sealed Mana Compensation and Aura Effect for Deep Pain and Erosion Amplification
- Movement Speed, Cast Speed and the attributes required by gear
Recommended Equipment

Weapons - Two Crafted Erosion Scepters
Use two high-level rare scepters with Erosion Damage, Damage Over Time and Skill Levels that apply to Wilting Beam. Reaping Duration and Reaping Recovery Speed are excellent additions for prolonged fights. Scepter bases can already provide either of those Reaping bonuses, making them a useful starting point for an advanced craft.
Prioritize the strength of the persistent beam and its Reaping cycle. Direct-hit Critical Strike Damage has little value for the main source of damage.
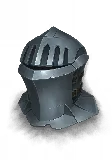
Helmet - Crafted Energy Shield Rare / Cold Breath
A crafted Intelligence helmet is a strong all-round choice. Look for high Energy Shield, resistances, Affliction Effect and Reaping Recovery Speed or Reaping Duration where available. An advanced helmet can also help with Sealed Mana Compensation, giving Selena more room for her damage auras.
Cold Breath is a Legendary helmet that adds a portion of Max Mana as Energy Shield. It is useful for characters with a substantial Mana pool, but the regular version lowers Cold Resistance significantly. Make sure that the extra Energy Shield compensates for the resistance and other stats lost from a crafted rare.

Body Armour - Twilight Vestment / High-ES Rare
Twilight Vestment provides +1 Active Skill Level and starts Energy Shield recharge whenever Selena Reaps an enemy. Its Reaping Duration bonus further supports Wilting Beam. A well-rolled corroded version also prevents Energy Shield charging from being interrupted for a short time after Reaping, making it particularly valuable in difficult fights.
A crafted high-ES chest remains a good choice when it offers much stronger defenses or fills important resistance gaps.

Necklace - Decaying Blessing / Chain behind the Curtain / Strange Snow
Decaying Blessing grants Erosion Damage and a substantial bonus to Erosion Amplification Aura Effect. Its negative Sealed Mana Compensation makes reservation efficiency especially important when running two large auras.
Chain behind the Curtain offers Max Energy Shield and Erosion Resistance. Movement generates Blur Rating, which in turn grants additional Affliction Effect. This is an excellent pairing with Subtle Impact and a Blur-focused ring.
Strange Snow is another Necklace option. It provides Life and Affliction Effect, consumes part of Max Life at Full Life to inflict Affliction on nearby enemies, and restores Life when Selena is not at Full Life. The effect suits close-range mapping, but its Life interaction and lack of Energy Shield need to be accounted for.
Only one of these Necklaces can be equipped. Choose Decaying Blessing for the aura package, Chain behind the Curtain for Blur and defense, or Strange Snow for additional nearby Affliction.
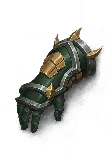
Gloves - Crafted ES Rare / Aeterna Martyr / Malevolent Hand
Crafted Intelligence gloves with Energy Shield, resistances and Reaping Recovery Speed are a dependable choice for T7-T8. Aeterna Martyr is a higher-budget Legendary option with a very large Reaping Recovery Speed bonus and reduced Physical Damage taken. Its Critical Strike and Trauma-related modifiers are secondary for Wilting Beam.
Malevolent Hand applies Ominous to nearby enemies and allows one additional Curse, making it useful alongside Entangled Pain. However, it also applies a large Erosion Resistance penalty. Combined with Twisted Belief, that drawback can be dangerous unless the rest of the equipment covers it.
Malevolent Hand is most useful for the two-curse arrangement. Aeterna Martyr or rare gloves offer a more straightforward Reaping and defensive setup.

Belt - Polygonal Enclosure / Light Hunter Belt / Crafted Rare
Polygonal Enclosure adds an additional Beam and substantially increases Beam Length. The extra Beam benefits the wide coverage of Wilting Beam and works with the additional-Beam scaling of Rapid Completion (Noble). Max Life and Max Energy Shield bonuses make it useful beyond its offensive effect.
Light Hunter Belt is a defensive alternative with a large Max Energy Shield bonus and uninterrupted Energy Shield charging. A crafted rare belt can cover Max Energy Shield, resistances and reservation efficiency when more flexibility is needed.
Polygonal Enclosure is especially attractive once Rapid Completion is equipped in the fifth support slot.

Rings - Revered Light / Folklore of Locking Fingers / Traceless Pain
Revered Light provides +1 Beam Skill Level and an additional Beam, directly improving Wilting Beam. It is a strong offensive ring for a setup using Reflection and Rapid Completion.
Folklore of Locking Fingers improves Blur Effect and adds Damage Over Time based on Blur Rating. In the right Ring slot, it grants Blur Rating over time; the left-slot effect helps regain Blur after it ends. This makes it a useful source of damage and Blur support for Subtle Impact.
Traceless Pain supplies a large Damage Over Time bonus and periodically Reaps nearby enemies at maximum Affliction. It is a specialized option for players investing heavily in Affliction and Reaping. Crafted rare rings remain valuable for Energy Shield, resistances, Intelligence and Sealed Mana Compensation.

Boots - Crafted ES Rare / King's Boon / Feline Steps
Rare Energy Shield boots with Movement Speed and resistances are a reliable choice for mobile channeling. King's Boon supplies Energy Shield, Cold Resistance, Movement Speed and a periodic Reap when dealing Damage Over Time. It also applies Ominous to nearby enemies. An additional Curse slot is needed if Entangled Pain and Ominous are to remain active together.
Feline Steps provides high Evasion, Movement Speed and Reaping Recovery Speed for each active Blessing stack, but reduces Blessing Duration. It is a strong choice only when the character generates and maintains enough Blessings to benefit from its Reaping bonus.
King's Boon already applies Ominous, so its curse effect overlaps with Malevolent Hand. A pair of crafted rare boots is often the easiest way to balance defenses and movement.
7. Hero Memories, Divinity Slates and Pactspirits
Skill levels and basic equipment establish the character. Memories, Slates and Pactspirits then improve Affliction, Reaping and the defenses needed for continuous channeling.
Prioritize effective Sing with the Tide levels, applicable Persistent Damage, Erosion Damage, Reaping Recovery Speed and defensive rolls. Good fixed bonuses often provide more value than a collection of weaker random offensive stats.
Damage Over Time, Reaping Duration, Reaping Recovery Speed and Affliction Effect fit the build. Blur-related bonuses are useful when Subtle Impact is active, while Energy Shield and resistance stats provide extra room for aggressive channeling.
Seek Pact bonuses that strengthen persistent Erosion Damage, Affliction and Reaping. Defensive Pactspirits remain useful through early T8, especially when the offensive equipment occupies several important slots.
A higher-level Wilting Beam, well-rolled exclusive supports and enough reservation compensation to run the preferred auras are strong late-game improvements. Upgrade these alongside Energy Shield and boss damage.
Playing Around Reaping
The beam's Reap settles a portion of the active Damage Over Time immediately. Keep repositioning within Tide areas while maintaining enough channel uptime to repeat the cycle. More Reaping Recovery Speed becomes useful as beam cycles accelerate.
Final Thoughts
Wilting Beam Selena 1 combines comfortable moving casts with steady Erosion Damage and repeated Reaping. Affliction gives the beam extra pressure against bosses, while Sing with the Tide lets Selena reposition throughout the fight. The progression from ordinary support gems into Reflection and Rapid Completion provides a satisfying upgrade path through T7 and T8.
Invest in good scepters, keep Energy Shield and resistance stable, and develop Reaping alongside Damage Over Time. With those pieces working together, Wilting Beam remains a rewarding choice for players who enjoy mobile Erosion casters.
Torchlight: Infinite and its game assets are trademarks and intellectual property of XD Inc.