
Reap Blood Mage POE 2 Build
A very strong Setup for the Blood Mage that uses the special Reap Spell to cut through hordes of Enemies with ease!Reap
Blood Mage Build
Updated for Path of Exile 2 Early Access
The Best Crafty Guides by Odealo
| Guide notes |
| October 11 2025 - Created for Early Access Patch 0.3.0 |
| Build Overview | |||
| Tags: [SPELL] [CRIT] [LIFE] [STAFF] | |||
|
Budget: Defenses: |
|
Boss DPS: AoE: |
|
The Reap is a very special Spell that can be found only on specific Staffs. It is a Spell, but its animation and playstyle resemble a melee sweeping attack with a scythe, which makes it truly unique compared to all other Skills in the game. It deals heavy Physical Damage in a small area in front of you, and applies Critical Weakness Debuff, which significantly improves your Critical Strike Chance against that target. It also Culls Enemies and restores a hefty amount of Life upon doing so. Since it is a Weapon-specific Skill, it has a Mana Cost of 0, which makes it very smooth to play.
The best way to improve its Damage is by specialising heavily in Critical Strikes. As a Blood Mage, you can set the Base Critical Hit Chance of all your Spells to 15%, and the Critical Weakness adds another 5 to 10% depending on your Cast Speed. Thanks to this, you will have no problems scaling it all the way up to guaranteed 100% Crit Chance. Of course, you will also greatly improve your Critical Damage Bonus to match that, leading to absurd amounts of DPS.
The Reap is a great tool against Bosses, but it lacks Clear Speed potential. You could use some other Physical Spell, such as Bone Cage, and turn it into a long-range Nova, or fire Chaining or Forking Bonestorm Projectiles. The best solution, however, is to use the Trampletoe Boots to explode your Enemies with Overkill Damage, which will easily obliterate whole packs of monsters in an instant. The downside of this solution is the quite low Movement Speed compared to regular Rare Boots, but it makes killing enemies much faster, which easily outweighs the running speed.
The Blood Mage specialises in maximum Life as its main defensive aspect. You can quickly Recover and Overflow your Life with Remnants, Leech Life with Spells, and 25% of the incoming Damage will be delayed over 4 seconds, which makes it easy to outregenerate with the previously mentioned tools. Your Life can also be used offensively, to power up the Gore Spike's Critical Damage bonus, or to increase your Spell Damage with the Desecrated modifier on your Weapon.
You can also check our other Path of Exile 2 builds right over here Odealo's Crafty Guides - Full List
1. Gameplay
Use Reap to obliterate all Enemies. You can use the Bone Cage to pacify dangerous Enemies from a long distance. Against Bosses, use Temporal Chains or Enfeeble to weaken them, and put down the Sigil of Power to enhance your Spell Damage.
|
|
|
|

2. Build's PROS & CONS
| PROS |
|
| CONS |
|
3. Leveling tips
The Reap is simply impossible to get during early leveling due to the Weapon Requirements, and the early versions of this Skill are quite weak without proper scaling. We recommend using other Physical Spells to level up, such as the Bonestorm, or you can choose the comfortable and reliable Essence Drain and Contagion route.
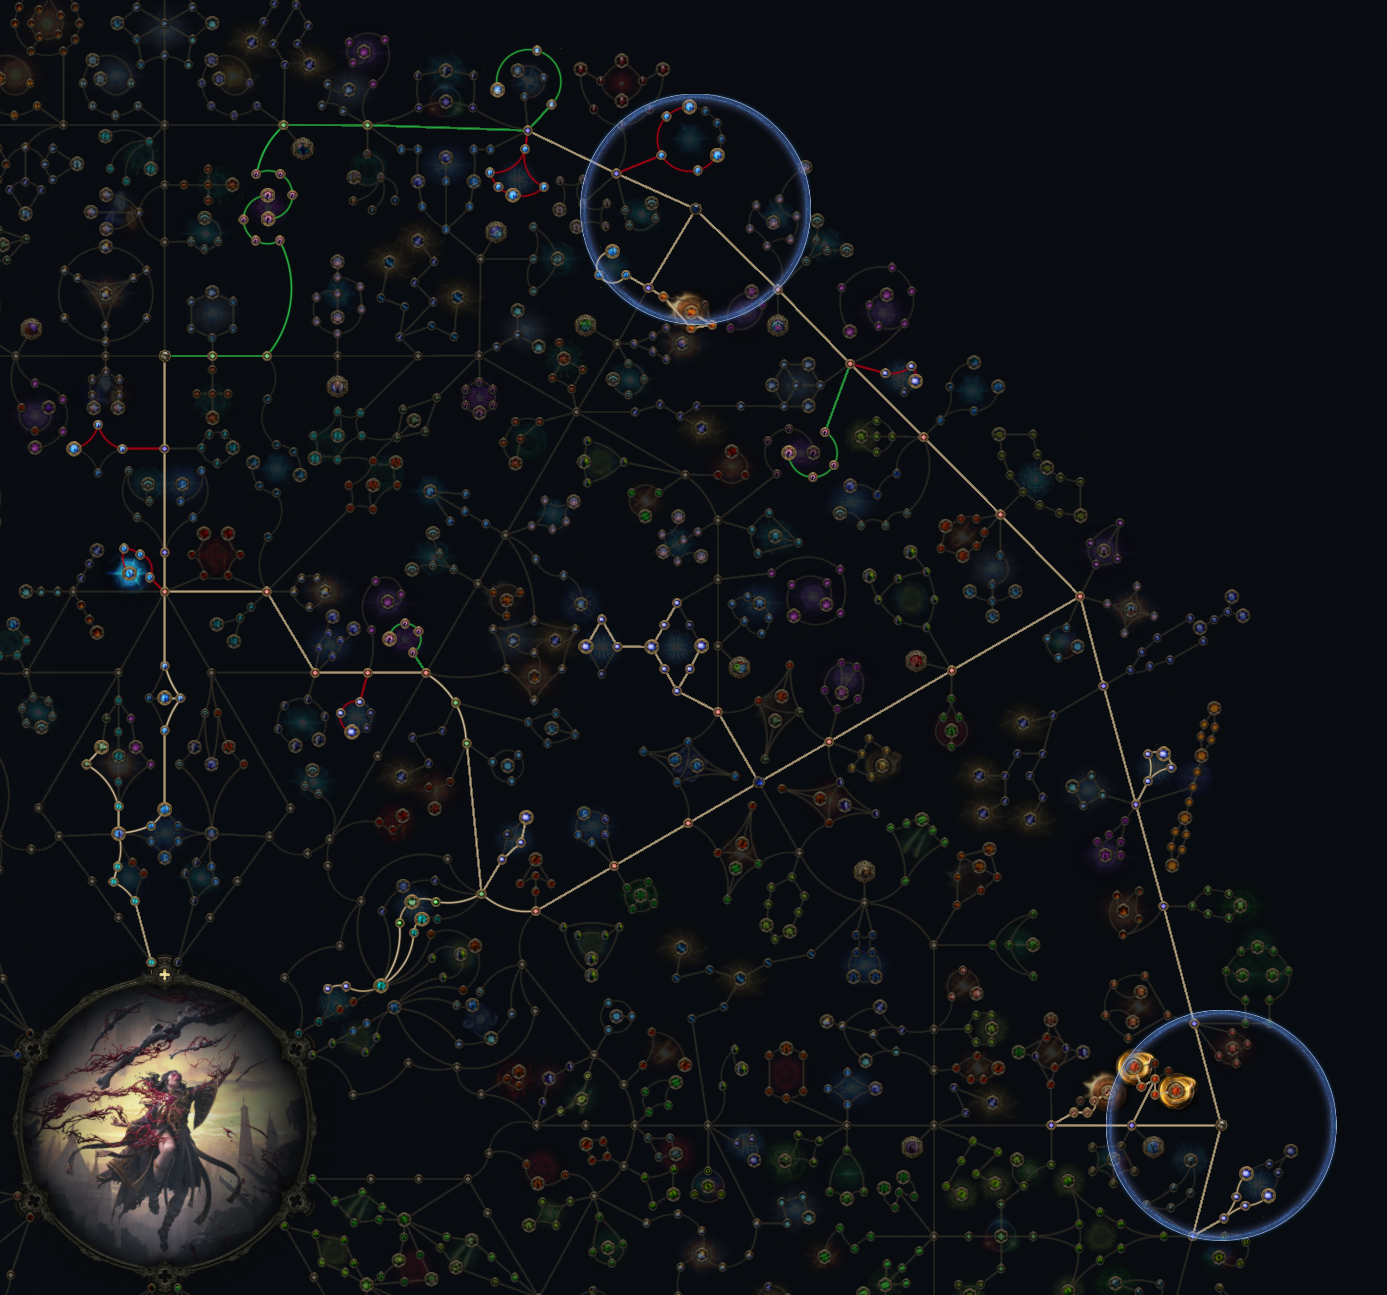
4. Final Skill Tree, Ascendancy Points, and Pantheon
Final Skill Tree:
 |
|
Click on the image to open the Passive Tree preview in a new window, or use the Path of Building (PoB) tool. |
Ascendancy points:
Preferably in this order:
- Sanguimancy
- Vitality Siphon
- Sunder the Flesh
- Gore Spike
- Grasping Wounds
5. Final Gems links
| [DPS] Reap setup Weapon Set 1 |
|
 |
Reap - a Weapon-specific Spell that creates a Bloody Scythe that deals Physical Damage in front of you and applies Critical Weakness Debuff. |
 |
Heft |
 |
Considered Casting |
 |
Concentrated Area |
 |
Deliberation |
 |
Zenith II |
| [DPS] Bone Cage setup Weapon Set 1 |
|
 |
Bone Cage - to deal with Enemies at long distances, use Bone Cage. It also Pins Enemies, locking them in place. |
 |
Astral Projection - with this Support, you can create the Bone Cage wherever you want. |
 |
Spell Cascade |
|
Considered Casting |
 |
Unleash |
 |
Atalui's Bloodletting |
| [UTILITY] Sigil of Power setup Weapon Set 2 |
|
 |
Sigil of Power - another Staff-only Spell, it creates a Sigil on the ground that boosts your Spell Damage. You don't spend Mana, so it caps at first Stage only. |
 |
Prolonged Duration II |
 |
Magnified Area II |
 |
Rapid Casting II |
 |
Cooldown Recovery II |
 |
Second Wind III |
| [UTILITY] Curse setup Weapon Set 2 |
|
 |
Temporal Chains - slows down Enemies, making it easier to dodge their attacks. It also prolongs the Critical Weakness Debuff. |
 |
Heightened Curse |
|
Prolonged Duration II |
 |
Doedre's Undoing |
 |
Lifetap |
 |
Efficiency II |
| [UTILITY] Voltaic Mark setup Weapon Set 2 |
|
 |
Voltaic Mark - improves your chances to inflict Shock, and allows you to Break Armours with your Hits. |
|
Prolonged Duration II |
 |
Mark for Death |
| [UTILITY] Life Remnants setup | |
 |
Life Remnants - this Skill is granted by your Ascendency. By Hitting Enemies, you will create Remnants that restore and Overflow your Life. |
 |
Remnant Potency I |
 |
Harmonic Remnants II |
|
|
6. Gear Setup
The Rare Reaping Staff is necessary to get the Reap Skill, and its modifiers are extremely impactful on your overall Damage. You will need lots of additional Gem Levels, increases to your Spell Damage, Critical Strike bonuses, and Cast Speed. For defense, you should focus on maximum Life, which also gives you Critical Damage Bonus thanks to Blood Mage Asendency. The biggest source of it will be Kaom's Heart. You could use the Veil of the Night Helmet for a massive bonus to your Life as well, but the Resistance tradeoff is usually not worth it.
|
Stat priorities on items:
|
 (Weapon) Rare Reaping Staff - the Gem Sockets are based on the base Gem Level; you will need level 20 to unlock its full potential. Raising your Gem Levels is also the best way to improve your Damage. You should also get increases to Spell Damage, Cast Speed, or Crits. (Weapon) Rare Reaping Staff - the Gem Sockets are based on the base Gem Level; you will need level 20 to unlock its full potential. Raising your Gem Levels is also the best way to improve your Damage. You should also get increases to Spell Damage, Cast Speed, or Crits. |
|
| Min. requirements: Grants Skill: Level 20 Reap 130% increased Spell Damage +5 to Level of all Physical Spell Skills 35% increased Cast Speed Optional affixes: Gain #% of Damage as Extra Damage of Lightning/Cold/Fire 5% increased Spell Damage per 100 Maximum Life % increased Critical Hit Chance for Spells |
|
 (Weapon) Rare Chiming Staff - your other Weapon should provide the Sigil of Power Spell to improve your Damage against Bosses. It will also be used to Cast Curses, so a bit of Cast Speed can be helpful. (Weapon) Rare Chiming Staff - your other Weapon should provide the Sigil of Power Spell to improve your Damage against Bosses. It will also be used to Cast Curses, so a bit of Cast Speed can be helpful. |
|
| Min. requirements: Grants Skill: Level (1-20) Sigil of Power Optional affixes: +# to Level of all Spell Skills #% increased Cast Speed |
|
 (Amulet) Rare Amulet - it is the least source of additional Spell Gem Levels. It should also provide plenty of Cast Speed. Other than that, try to get Resistances, maximum Life, or Crit Bonuses. (Amulet) Rare Amulet - it is the least source of additional Spell Gem Levels. It should also provide plenty of Cast Speed. Other than that, try to get Resistances, maximum Life, or Crit Bonuses. |
|
| Min. requirements: +80 to maximum Life +3 to Level of all Spell Skills +25% increased Cast Speed Optional affixes: % total Elemental and Chaos Resistance % increased Critical Hit Chance % increased Critical Damage Bonus % increased Rarity of Items found +# to Attributes |
|
 (Ring) Rare Ring - your Rings provide tons of Cast Speed. Fill the rest modifiers with the usual Life, Resistance, and Attribute bonuses. (Ring) Rare Ring - your Rings provide tons of Cast Speed. Fill the rest modifiers with the usual Life, Resistance, and Attribute bonuses. |
|
| Min. requirements: +25% increased Cast Speed +80 to maximum Life +40% total Elemental and Chaos Resistance Optional affixes: % increased Rarity of Items found +# to Attributes |
|
 (Belt) Rare Belt - a Belt can provide tons of maximum Life, Resistances, and Strength. Additional Charms Slots are also useful to deal with Ailments. (Belt) Rare Belt - a Belt can provide tons of maximum Life, Resistances, and Strength. Additional Charms Slots are also useful to deal with Ailments. |
|
| Min. requirements: +100 to maximum Life +80% total Elemental Resistance Optional affixes: +# Charm slots +# to Strength |
|
 (Belt) Ingenuity - if you have very good Rings, you can use this Belt to get extra Cast Speed, which is usually unobtainable here, while still providing some defense. (Belt) Ingenuity - if you have very good Rings, you can use this Belt to get extra Cast Speed, which is usually unobtainable here, while still providing some defense. |
|
| Has (1–3) Charm Slot 20% of Flask Recovery applied Instantly (-20–20)% reduced Charm Charges gained (-10–10)% reduced Charm Charges used (20–30)% increased bonuses gained from left Equipped Ring (20–30)% increased bonuses gained from right Equipped Ring |
|
 (Belt) Darkness Enthroned - another option to get tons of Cast Speed, but this one doesn't provide any defensive bonuses. You can also use the Body Armour variant to get % incease maximum Life instead. (Belt) Darkness Enthroned - another option to get tons of Cast Speed, but this one doesn't provide any defensive bonuses. You can also use the Body Armour variant to get % incease maximum Life instead. |
|
| This item gains bonuses from Socketed Items as though it was Gloves (50–100)% increased effect of Socketed Items Has 2 Rune Sockets |
|
 (Helmet) Rare Helmet - the Helmet can improve your Critical Strike Chance a bit. It should also provide the usual defensive modifiers, or Attributes and Rarity. (Helmet) Rare Helmet - the Helmet can improve your Critical Strike Chance a bit. It should also provide the usual defensive modifiers, or Attributes and Rarity. |
|
| Min. requirements: +100 to maximum Life +30% increased Critical Hit Chance +40% total Elemental and Chaos Resistance Optional affixes: % increased Rarity of Items found +# to Attributes |
|
 (Body Armour) Kaom's Heart - this armour provides a huge amount of maximum Life, and you can Corrupt it to make it even larger. The downside is pretty considerable, too, but there are not many useful Spirit Skills anyway. (Body Armour) Kaom's Heart - this armour provides a huge amount of maximum Life, and you can Corrupt it to make it even larger. The downside is pretty considerable, too, but there are not many useful Spirit Skills anyway. |
|
| (30–40)% increased Stun Threshold +1500 to maximum Life You have no Spirit |
|
 (Gloves) Rare Gloves - the regular Gloves can improve your Critical Damage bonus, but you can also get a lot of Cast Speed via the Desecrated modifier that grants Arcane Surge, or use the Fenumus Runes of Spinning. (Gloves) Rare Gloves - the regular Gloves can improve your Critical Damage bonus, but you can also get a lot of Cast Speed via the Desecrated modifier that grants Arcane Surge, or use the Fenumus Runes of Spinning. |
|
| Min. requirements: +100 to maximum Life +30% increased Critical Damage Bonus +40% total Elemental and Chaos Resistance Optional affixes: % chance to Gain Arcane Surge when you deal a Critical Hit 100% increased Effect of Socketed Items % increased Rarity of Items found +# to Attributes |
|
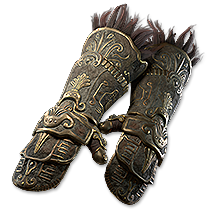
 (Boots) Trampletoe - the Overkill explosions are your primary source of AoE Coverage in this Setup. It works very well with hard-hitting Reap to generate massive Overkills. Sources of Extra Damage will help Chaining this effect through packs of monsters. (Boots) Trampletoe - the Overkill explosions are your primary source of AoE Coverage in this Setup. It works very well with hard-hitting Reap to generate massive Overkills. Sources of Extra Damage will help Chaining this effect through packs of monsters. |
|
| 15% increased Movement Speed (50–100)% increased Armour 50% increased Attribute Requirements Deal 30% of Overkill damage to enemies within 2 metres of the enemy killed |
|
 (Jewel) Against the Darkness - it is a very popular source of Extra Damage for any Build. The Lightning Damage is the best as it allows you to Shock Enemies eventually. (Jewel) Against the Darkness - it is a very popular source of Extra Damage for any Build. The Lightning Damage is the best as it allows you to Shock Enemies eventually. |
|
| <2 Random Jewel Modifiers> Recommended modifiers: Notable Passive Skills in Radius also grant: Gain (2-4)% of Damage as Extra Cold/Fire/Lightning Damage |
|
 (Jewel) Heart of the Well - this Jewel is even better, as on top of the Extra Damage it can grant you Instant Leech. Even a small portion of it will be enough to quickly Recover your Life with each Hit. (Jewel) Heart of the Well - this Jewel is even better, as on top of the Extra Damage it can grant you Instant Leech. Even a small portion of it will be enough to quickly Recover your Life with each Hit. |
|
| Recommended modifiers: Gain (9–15)% of Damage as Extra Cold/Fire/Lightning Damage 10% of Leech is Instant |
|
 (Jewel) Rare Jewel - Your Jewels can provide tons of Critical Damage Bonus via two separate Suffix modifiers. Finding a useful Prefix on top of that might be challenging or very expensive. (Jewel) Rare Jewel - Your Jewels can provide tons of Critical Damage Bonus via two separate Suffix modifiers. Finding a useful Prefix on top of that might be challenging or very expensive. |
|
| Min. requirements: 15% increased Critical Damage Bonus 15% increased Critical Spell Damage Bonus Optional affixes: % increased Critical Hit Chance % increased Spell Damage #% increased Area of Effect Recover #% of maximum Life on Kill |
|
 (Jewel) Rare Time-lost Jewel - a very similar option, provides a lot of stats indirectly by boosting nearby Notables. There are two spots with 4 Notables in radius, making it more efficient than a regular Jewel. (Jewel) Rare Time-lost Jewel - a very similar option, provides a lot of stats indirectly by boosting nearby Notables. There are two spots with 4 Notables in radius, making it more efficient than a regular Jewel. |
|
| Min. requirements: Notable Passive Skills in Radius also grant 8% increased Critical Damage Bonus Notable Passive Skills in Radius also grant 8% increased Critical Spell Damage Bonus Optional affixes: Small Passive Skills in Radius also grant #% increased Spell Damage Notable Passive Skills in Radius also grant #% increased Area of Effect |
|
|
If you have any other build requests please leave that in the comments below. We are always open to suggestions and constructive feedback.
Pictures used in this article are the intellectual property of Grinding Gear Games.