Buy/Sell
 Log in


Plasma Blast Blood Mage POE 2 Build
Possibly the strongest Bleeding Build out there that uses Elemental Damage to inflict powerful Bleeds with the Plasma BlastBleed Plasma Blast
Blood Mage Build
Updated for Path of Exile 2 Early Access
The Best Crafty Guides by Odealo
| Guide notes |
| July 07 2026 - Updated the Build in preparation for Patch 0.5.0 |
| Build Overview | |||
| Tags: [ATTACK] [BLEED] [LIFE] [CROSSBOW] | |||
|
Budget: Defenses: |
|
Boss DPS: AoE: |
|




The Plasma Blast is a Crossbow Skill that fires a piercing laser in a long line. It deals an insane amount of base Damage, but comes with a problem of very long Attack Time. It is an ideal Skill for the Bleed Archetype, which focuses on single, yet powerful Hits to inflict a long-lasting DoT. The Bleed Damage is directly correlated to your Hit Damage. By default, an Aggravated Bleed inflicts 150% of the initial Physical Damage before Mitigation over 5 seconds, and you can greatly improve that amount with the Magnitude Effect found on the Passives and Gear. The Bleed bypasses Energy Shield, Armour, or Resistances of your target, but still can benefit from Shock. For this reason, you won't need Elemental Weakness Curse. Instead, you can include the Repulsion Curse, which will automatically spawn Living Lightning Minions to trigger itself and apply Bleed. It is not strong enough to kill stronger foes by itself, but it greatly helps with your Clear.
The best way to scale Bleed is to focus on Critical Strikes. It naturally improves your initial Damage, but you can also benefit from the very powerful modifier that improves your Ailments inflicted with Critical Strikes. To make sure your lengthy Plasma Blast always Critically Strikes, we implemented the Maligar's Virtuosity Gloves, which allow you to use Pinpoint Critical Gem without any downside. You can also use the Charge Regulation together with the Thaumaturgic Generator to generate Power Charges passively, granting you 25% More Critical Hit Chance in return. You will generate mostly Frenzy Charges, which can be converted to Power Charges with the Resonance Keystone. To help with that, you should also use the Soul Core that grants you additional Frenzy Charges, since it applies to the base Charges you obtain.
The Plasma Blast is great against single opponents, but using it against hordes of Enemies is nearly impossible. To supplement it, we recommend another Lightning-themed Crossbow Skill, the Galvanic Shards. The reason is simple: it offers the best AoE coverage and deals a decent amount of Damage. You can also use the regular Crossbow Shot against slightly stronger Enemies, but not strong enough to justify charging up the Plasma Blast. You will also want to use the Herald of Blood, which causes enemies to explode on death, and Mirage Archer as an additional source of passive Damage.
This Build has 2 potential Second Weapon Setups. All Damage dealt by Bleed is called Blood Loss, which is important for other Skills. One of them is the Blood Hunt, a Melee Spear Attack. It is an excellent finisher Skill that consumes all Blood Loss accumulated on the target and causes an explosion that deals 25% of it as unscalable Damage, allowing you to swiftly execute dangerous Bosses. Wielding Spear still allows you to use Focus, so can use Effigy of Cruelty to apply Critical Weakness to double your Critical Chance against Bosses. Pick the variant that suits your gameplay the most. Alternatively, you can wield any Talisman and use Rend before firing your Plasma Blast. It grants you 50% Extra Lightning Damage for almost half a minute. You will generate Power Charges anyway for the Charge Regulation Skill.
The Blood Loss can also be used with the Bloodhound's Mark to Stun Enemies. It will render enemies defenseless while they quickly bleed to their death, which is a massive boost for your survivability, especially against dangerous pinnacle Bosses that become more dangerous the longer the fight goes on. However, this ability often fails to activate properly. Instead, you can use Sniper's Mark to generate Power charge for the Crit Chance.
The Blood Mage Ascendency solves two very important nuances: it automatically Aggravates Bleed on Cursed Enemies, and allows you to inflict Bleed with Elemental Damage. Other features of this Ascendency allow you to get much more Life, delay 25% of the incoming Damage, and force Enemies to Reserve 15% of their maximum Life with a Curse.
You can also check our other Path of Exile 2 builds right over here Odealo's Crafty Guides - Full List
1. Gameplay
Use Galvanic Shards to slay hordes of Enemies. Against Bosses, switch to Plasma Blast and use Emergency Reload to Empower your next Bolt. Ideally, you should charge up your Bolt before the Boss can attack you, and release it as soon as the Blasphemy Curse takes effect. At earlier stages, you can use Entangle to raise your Crit Chance, use the Bloodhound's Mark to Stun Enemies, and execute them with Blood Hunt. Alternatively, opt for the Rend for simple 50% Extra Lightning Damage Buff.
|
|
|
|


2. Build's PROS & CONS
| PROS |
|
| CONS |
|
3. Leveling tips
The Plasma Blast requires a high level to unlock, while Bleed and Critical Strikes need a lot of Passive Points to be worth it. You should start with a typical Hit-based approach. Remember to upgrade your Weapons, Rings, and Gloves very often so they always provide the highest amount of Added Damage possible for your level. You can also level up using the Essence Drain and Contagion Setup, and respec the entire Passive Tree once you reach Maps.
4. Final Skill Tree, Ascendancy Points, and Pantheon
Final Skill Tree:
 |
|
Click on the image to open the Passive Tree preview in a new window, or use the Path of Building (PoB) tool, |
Ascendancy points:
Preferably in this order:
- Sanguimancy
- Blood Barbs
- Whispers of the Flesh
- Grasping Wounds
- Crimson Power
5. Final Gems links
| [DPS] Plasma Blast setup Weapon Set 1 |
|
 |
Plasma Blast - charge up to Crossbow to fire a devastating, piercing beam that deals an immense amount of Damage. |
 |
Pinpoint Critical |
 |
Bleed III |
 |
Deep Cuts II |
 |
Concoct II |
 |
Rageforged II - if you don't have the Eternal Rage yet, use Elemental Armament II instead. |
| [DPS] Galvanic Shards setup Weapon Set 1 |
|
 |
Galvanic Shards - fires multiple Bolts in a cone that create Chaining Beams upon hitting a Shocked Enemy. It is your main Skill against multiple Enemies. |
 |
Nimble Reload - you can also use the Ratha's Assault to automatically reload 4 Bolts with each Dodge instead. |
|
Pinpoint Critical |
|
Bleed III |
|
Deep Cuts II |
 |
Fork |
| [UTILITY] Blood Hunt optional setup Weapon Set 2 |
|
 |
Blood Hunt - consumes accumulated Blood Loss to deal 25% of it as additional, unscalable Damage once again. Use it to execute Bosses. You can also try to execute Rare Enemies to steal their modifiers. |
 |
Rapid Attacks III |
 |
Impale |
 |
Culling Strike II |
 |
Einhar's Beastrite |
| [UTILITY] Entangle optional setup Weapon Set 2 |
|
 |
Entangle - you can use Entangle to quickly apply Critical Weakness Debuff, which more than doubles your Critical Hit Chance against Bosses, which saves you tons of investment on the Passive Tree. At a higher budget, you should aim to reach 100% Critical Hit Chance naturally. |
|
Pinpoint Critical |
 |
Prolonged Duration II |
 |
Unleash |
 |
Magnified Effect II |
 |
Blazing Critical |
| [UTILITY] Rend optional setup Weapon Set 2 |
|
 |
Rend - you can use any Talisman to get the Rend Skill, which allows you to spend Power Charges to gain a powerful Buff that grants you 50% Extra Lightning Damage. Keep in mind losing all Power Charges is detrimental for your Crit Chance. |
|
Blazing Critical |
|
Pinpoint Critical |
|
Prolonged Duration II |
|
Rapid Attacks III |
 |
Perpetual Charge |
| [UTILITY] Herald of Blood setup | |
 |
Herald of Blood - Bleeding Enemies explode on death, dealing Damage based on the Blood Loss. It cannot inflict Bleed by itself, but it can trigger other explosions that apply Bleed just fine. |
 |
Armour Explosion |
 |
Armour Break III |
|
Bleed III |
|
Magnified Effect II |
 |
Uruk's Smelting |
| [UTILITY] Bloodhound's Mark setup | |
 |
Bloodhound's Mark - while under the influence of this Mark, the Blood Loss causes Heavy Stun Buildup, which eventually leads to a Stun. Currently, it often fails to activate if you deal too much Damage. You can use the Sniper's Mark to generate Power Charge instead. |
|
Prolonged Duration II |
| [UTILITY] Repulsion setup | |
 |
Repulsion - a Curse that triggers Attacks when you Hit Enemies, dealing Damage based on the Gem Level. It is not very strong, but good enough to kill weaker enemies on its own. |
 |
Blasphemy - inflict Socketed Curse to all Enemies around you. It bypasses the Ward Cost of the Repulsion Gem. |
 |
Living Lightning II |
|
Bleed III |
|
Deep Cuts II |
|
Pinpoint Critical |
| [UTILITY] Mirage Archer setup | |
 |
Mirage Archer - Dodge-rolling creates a Mirage Archer that uses linked Skill for a few seconds. It can even use Plasma Blast, but it is not very practical. |
 |
Siege Cascade - this Skill has the second highest unconditional Damage among the Crossbow Skills, but it is also fast to perform and covers a wide area. |
|
Pinpoint Critical |
|
Bleed III |
|
Deep Cuts II |
 |
Elemental Armament II |
| [UTILITY] Emergency Reload setup | |
 |
Emergency Reload - reloads your ammunition and Empowers your next shot to deal significantly More Damage. |
|
Prolonged Duration II |
 |
Cooldown Recovery II |
| [UTILITY] Life Remnants setup | |
 |
Life Remnants - restores and Overflows your Life when you pick up the Remnants. This Skill is granted by your Ascendancy. |
 |
Mana Remnants - you can redirect a portion of the incoming Damage to be taken from Mana first. Mana Remnants will help you recover and overflow it. |
 |
Remnant Potency I |
 |
Harmonic Remnants II |
 |
Precision I |
| [UTILITY] Eternal Rage setup | |
 |
Eternal Rage - generates Rage over time. This Skill should be granted by your Rare Absent Amulet. |
| [UTILITY] Charge Regulation setup | |
 |
Charge Regulation - grants you 25% More Critical Hit Chance if you have Power Charge active, but consumes them every few seconds. You should anoint the Thaumaturgic Generator to generate them passively. |
|
|
6. Gear Setup
The Maligaro's Virtuosity Gloves allow you to focus on Critical Strike Chance and pick penalties to Critical Damage Bonuses without a real downside. The Alpha's Howl is a very efficient source of Spirit, which you will need in large quantities. The rest of the gear is very typical for an Attack Build; you will need high amounts of Added Damage, Skill Gems, and Critical Strike Chance. For defense, you will rely mostly on high maximum Life, supplemented by Energy Shield and Mana. You will need plenty of Attributes on your Gear, especially Intelligence for Gem and Armour Requirements.
|
Stat priorities on items:
|
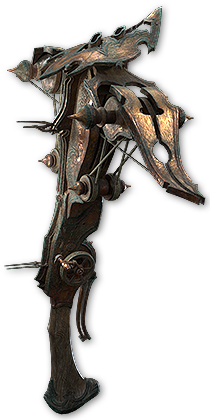 (Weapon) Rare Crossbow - look for very high Critical Hit Chance for better consistency, and as much DPS as you can get for your budget. You should also include bonus Skill Levels and increases for Elemental Damage. Use the Soul Core of Assault to improve your Frenzy Charge Generation, which will be converted to Power Charge via Resonance Keystone. (Weapon) Rare Crossbow - look for very high Critical Hit Chance for better consistency, and as much DPS as you can get for your budget. You should also include bonus Skill Levels and increases for Elemental Damage. Use the Soul Core of Assault to improve your Frenzy Charge Generation, which will be converted to Power Charge via Resonance Keystone. |
|
| Min. requirements: +9% Critical Hit Chance +400 DPS Optional affixes: Gain #% of Damage as Extra Damage of Lightning/Cold/Fire +# to Level of all Projectile/Attack Skills % increased Elemental Damage with Attacks |
|
 (Weapon) Rare Spear - to execute Enemies with Blood Hunt, you will need any Spear. Its Damage is irrelevant for the Blood Loss explosion; you can focus on Attack Speed and Dexterity for Gem Requirements. (Weapon) Rare Spear - to execute Enemies with Blood Hunt, you will need any Spear. Its Damage is irrelevant for the Blood Loss explosion; you can focus on Attack Speed and Dexterity for Gem Requirements. |
|
| Optional affixes: +#% increased Attack Speed +# to Dexterity |
|
 (Weapon) Effigy of Cruelty - a very potent source of Critical Weakness Debuff, which adds up to 10% Base Critical Hit Chance against affected Enemies. You can quickly stack it up using Entangle. (Weapon) Effigy of Cruelty - a very potent source of Critical Weakness Debuff, which adds up to 10% Base Critical Hit Chance against affected Enemies. You can quickly stack it up using Entangle. |
|
| +(20—30) to maximum Energy Shield (40—50)% increased Spell Damage +10 to Intelligence +(7—13)% to Chaos Resistance Critical Hits with Spells apply (1—3) Stacks of Critical Weakness |
|
 (Weapon) Amor Mandragora - you can use Wyvern's basic Attack to gain 50% Extra Lightning Damage for all your other Skills. You can use any Talisman, but Amor Mandragora grants a bit of Skill Effect Duration for better uptime on the Buff. (Weapon) Amor Mandragora - you can use Wyvern's basic Attack to gain 50% Extra Lightning Damage for all your other Skills. You can use any Talisman, but Amor Mandragora grants a bit of Skill Effect Duration for better uptime on the Buff. |
|
| Adds (16—20) to (23—27) Physical Damage +(8—15) to Intelligence (10—15)% increased Skill Effect Duration Enemies in your Presence are Hindered Gain 1 Druidic Prowess for every 20 total Rage spent |
|
 (Amulet) Rare Amulet - the Absent Amulet with the Eternal Rage Skill grants you 30% More Damage by itself, as there is no other reliable source of Rage for Ranged Builds. You should look for one with additional Projectile Skill Levels, but you can settle for simple defenses too. (Amulet) Rare Amulet - the Absent Amulet with the Eternal Rage Skill grants you 30% More Damage by itself, as there is no other reliable source of Rage for Ranged Builds. You should look for one with additional Projectile Skill Levels, but you can settle for simple defenses too. |
|
| Min. requirements: Grants Skill: Level (1-20) Eternal Rage Optional affixes: +# to Level of all Projectile Skills +# to maximum Life % total Elemental and Chaos Resistance % increased Critical Hit Chance % increased Rarity of Items found +# to Attributes |
|
 (Ring) Rare Ring - the Rings should provide you with Added Damage for Attacks. The maximum Life modifier is optional here, as it competes with the Damage Prefixes. (Ring) Rare Ring - the Rings should provide you with Added Damage for Attacks. The maximum Life modifier is optional here, as it competes with the Damage Prefixes. |
|
| Min. requirements: Adds 50 Elemental Damage to Attacks Optional affixes: % total Elemental and Chaos Resistance +# to maximum Life % increased Rarity of Items found +# to Attributes |
|
 (Belt) Rare Belt - use this slot to get as many Resistances as possible, so you can fit in more Damage modifiers on your other Gear pieces. Maximum Life and Mana are also important. (Belt) Rare Belt - use this slot to get as many Resistances as possible, so you can fit in more Damage modifiers on your other Gear pieces. Maximum Life and Mana are also important. |
|
| Min. requirements: +100 to maximum Life +80% total Elemental and Chaos Resistance Optional affixes: +# to maximum Mana +# Charm slots +# to Strength |
|
 (Helmet) Alpha's Howl - you will need plenty of Spirit, and this Helmet is the best source of it. You can look for a Corrupted outcome that grants extra Spirit, but an additional Socket is useful too. (Helmet) Alpha's Howl - you will need plenty of Spirit, and this Helmet is the best source of it. You can look for a Corrupted outcome that grants extra Spirit, but an additional Socket is useful too. |
|
| (80—100)% increased Evasion Rating +100 to Spirit +(50—75)% to Cold Resistance Presence Radius is doubled |
|
 (Body Armour) Rare Armour - Crimson Power Notable grants you additional maximum Life based on the Energy Shield of your Body Armour, but mixing in regular maximum Life is usually cheaper. You should also include a modifier to redirect a portion of incoming Damage to Mana. You will also need 25 Spirit to include Mana Remnants, but it can be skipped. (Body Armour) Rare Armour - Crimson Power Notable grants you additional maximum Life based on the Energy Shield of your Body Armour, but mixing in regular maximum Life is usually cheaper. You should also include a modifier to redirect a portion of incoming Damage to Mana. You will also need 25 Spirit to include Mana Remnants, but it can be skipped. |
|
| Min. requirements: +300 to Energy Shield +150 to maximum Life +40% total Elemental and Chaos Resistance Optional affixes: % of Damage is taken from Mana before Life +# to Spirit +# to Attributes |
|
 (Gloves) Maligaro's Virtuosity - with those Gloves, you can skip or ignore Critical Damage Bonuses and penalties, and focus on Critical Hit Chance instead. (Gloves) Maligaro's Virtuosity - with those Gloves, you can skip or ignore Critical Damage Bonuses and penalties, and focus on Critical Hit Chance instead. |
|
| (60–80)% increased Evasion Rating (20–30)% increased Critical Hit Chance 5% increased Attack Speed +(10–20) to Dexterity Your Critical Damage Bonus is 250% |
|
 (Boots) Rare Boots - your Boots need to provide a high amount of Movement Speed, and some of the usual defensive modifiers such as Life, Resistances, or Energy Shield. (Boots) Rare Boots - your Boots need to provide a high amount of Movement Speed, and some of the usual defensive modifiers such as Life, Resistances, or Energy Shield. |
|
| Min. requirements: +100 to maximum Life +30% increased Movement Speed +40% total Elemental and Chaos Resistance Optional affixes: % increased Rarity of Items found +# to maximum Mana +# to Attributes |
|
 (Jewel) Rare Jewel - you should aim to get both Ailment Magnitude modifiers, ideally boosted by Liquid Ferocity for enhanced Prefix modifiers. For a cheaper approach, pick Faster Ailments and add Crit Chance through Liquid Despair. You will also need to include at least one modifier to Recover Life and Mana on Kill. (Jewel) Rare Jewel - you should aim to get both Ailment Magnitude modifiers, ideally boosted by Liquid Ferocity for enhanced Prefix modifiers. For a cheaper approach, pick Faster Ailments and add Crit Chance through Liquid Despair. You will also need to include at least one modifier to Recover Life and Mana on Kill. |
|
| Min. requirements: 10% increased Magnitude of Ailments you inflict 15% increased Magnitude of Damaging Ailments you inflict with Critical Hits Optional affixes: % increased Critical Hit Chance for Attacks Damaging Ailments deal damage #% faster Recover #% of maximum Life on Kill Recover #% of maximum Mana on Kill % increased Effect of Prefix Modifiers |
|
 (Jewel) Heart of the Well - any source of Extra Damage is very valuable for this Setup. Try to get at least two Extra Damage modifiers, paired with Recovery on Kill or faster Ailment. (Jewel) Heart of the Well - any source of Extra Damage is very valuable for this Setup. Try to get at least two Extra Damage modifiers, paired with Recovery on Kill or faster Ailment. |
|
| Recommended modifiers: Gain #% of Damage as Extra Cold/Lightning/Fire Damage Recover #% of maximum Life/Mana on Kill Damaging Ailments deal damage #% faster |
|
|
If you have any other build requests please leave that in the comments below. We are always open to suggestions and constructive feedback.
Pictures used in this article are the intellectual property of Grinding Gear Games.