
Molten Blast Accuracy Stacking Ritualist POE2 Build
One of the fastest builds in the game currently, which can achieve over 500% Increased Attack SpeedAccuract Stacking
Molten Blast/Boneshatter Ritualist Build
Updated for Path of Exile 2 Early Access
The Best Crafty Guides by Odealo
| Guide notes |
| September 22, 2025 - Created for Early Access. |
| Build Overview | |||
| Tags: [ATTACK] [ACCURACY] [ELEMENTAL] [LIFE] | |||
|
Budget: Defenses: |
|
Boss DPS: AoE: |
|
The Ritualist has often been seen as one of the weaker ascendancies in Path of Exile 2, offering little more than an extra ring slot and scaling bonuses. At first glance, that doesn’t sound like much compared to the raw power of other classes. However, after extensive testing, we’ve found a setup that turns this limitation into a real advantage.
By focusing on Attribute and Accuracy stacking, stats that are most effectively scaled through Rings, the Ritualist finally finds its niche. This approach transforms the class from an underwhelming choice into a powerhouse capable of reaching over 500% increased attack speed, making it one of the fastest builds in the game.
This guide will walk you through the full setup, explain why it works so well, and show you how to recreate it for yourself. If you’ve ever dismissed the Ritualist as underpowered, this build may just change your mind.
The Ritualist is one of the least popular classes in Path of Exile 2, with no clear archetype. It’s usually chosen only for the extra Ring slot and improved Jewelry bonuses. To make such a setup viable, a heavy investment in rare and expensive items is required. Even then, most builds would perform better with a different ascendancy that offers more direct advantages. We found one path where the Ritualist truly excels: Attribute and Accuracy stacking. Rings and Amulets are the main sources of these stats, which perfectly complement the class’s unique advantage. With passives and the Hand of Wisdom and Action claws, Attributes convert into Accuracy Rating and Attack Speed, pushing this build beyond 500% increased Attack Speed.
To reach these numbers, the passive tree must be dedicated almost entirely to Attributes and Accuracy, leaving no room for typical Attack nodes. This is where the Constricting Command helmet comes in, making you count as Surrounded at all times. It grants over 200% increased Attack Damage, high Evasion, Attack Speed, and various other bonuses from nodes in the lower part of Passive Tree. The build also makes use of Defy Support, letting you ignore Mana costs on main attacks and granting lucky damage rolls. Offensively, you clear with Molten Blast, move through zones at lightning speed with Boneshatter, and melt bosses with The Last Lament crossbow. Defenses are strong too, with ~3,000 Life, high Evasion and Deflection, plus excellent Life Recovery.
You can also check our other Path of Exile 2 builds right over here Odealo's Crafty Guides - Full List
1. Gameplay
This is a very fast-paced setup and a true one-button build. You can just move around and kill enemies with Molten Blast - which, on its own, is a delightful experience, but you can go even faster if you jump between packs using Boneshatter. Boneshatter can also be used to generate Trinity Resonance and Rage quickly, but at the same time, it's quite easy to get stuck using it, so you should adjust your playstyle accordingly. It's recommended to keep the Last Lament crossbow on your weapon swap, when you face Bosses, just place your Banner, Compose Requiem, and take down any Boss in the game in seconds. Optionally, you can also use Freezing Mark against Bosses, but usually that's just needed when you are running it on a low budget.
|
|
|
|

2. Build's PROS & CONS
| PROS |
|
| CONS |
|
3. Leveling tips
It is almost impossible to level up a Ritualist using one of its end-game builds. With the current state of the game, it's recommended to level up using Lightning Arrow and Lightning Rod, and pick the standard Bow/Projectile Damage nodes on the Tree. Below you will find some basic Skill setup and recommended low/mid-level Uniques that can be used to make the experience smoother. For the Tree, you can follow this standard Path: Ritualist - Leveling with Lightning Arrow Tree
Leveling Skill Setup
| [DPS] Lightning Arrow setup | |
 |
Lightning Arrow - the most popular skill in the game currently, which is available quite early. On top of dealing high damage, it chains to nearby enemies for extra clear speed |
 |
Rapid Attacks - grants More Attack Speed |
 |
Elemental Armanent II - increases Elemental Damage with supported skills |
 |
Innervate - grants extra Lightning Damage after you kill shocked enemies |
| [DPS] Lightning Rod setup | |
 |
Lightning Rod - another Lightning Bow ability which is used against Bosses and tougher enemies. Your Lightning Arrow attacks can chain to it for extra damage |
 |
Magnified Effect - increases the Area of Effect |
 |
Lightning Attunement - grants extra Lightning Damage |
| [UTILITY] other gems | |
 |
Herald of Thunder - fires extra Bolts after killing shocked enemies |
 |
Elemental Focus |
 |
Overreach |
Recommended Leveling Uniques
 (Weapon) Silvertongue - a very good mid-level Bow with built-in Leech and Fork. With the extra added damage from your Rings (or other sources), it works great even on lower-tier maps (Weapon) Silvertongue - a very good mid-level Bow with built-in Leech and Fork. With the extra added damage from your Rings (or other sources), it works great even on lower-tier maps |
|
| Adds (40–48) to (65–72) Physical Damage +(4–6)% to Critical Hit Chance Leeches (5–8)% of Physical Damage as Life Leeches (4–7)% of Physical Damage as Mana Arrows Fork Arrows Pierce all targets after Forking |
|
 (Boots) Wake of Destruction - a great pair with added Lightning Damage to Attacks and Shocking Ground that enhances your damage against all enemies constantly (Boots) Wake of Destruction - a great pair with added Lightning Damage to Attacks and Shocking Ground that enhances your damage against all enemies constantly |
|
| (30–60)% increased Armour and Energy Shield Adds 1 to (30–50) Lightning damage to Attacks Drop Shocked Ground while moving, lasting 8 seconds |
4. Final Skill Tree, Ascendancy Points, and Pantheon
Final Skill Tree:
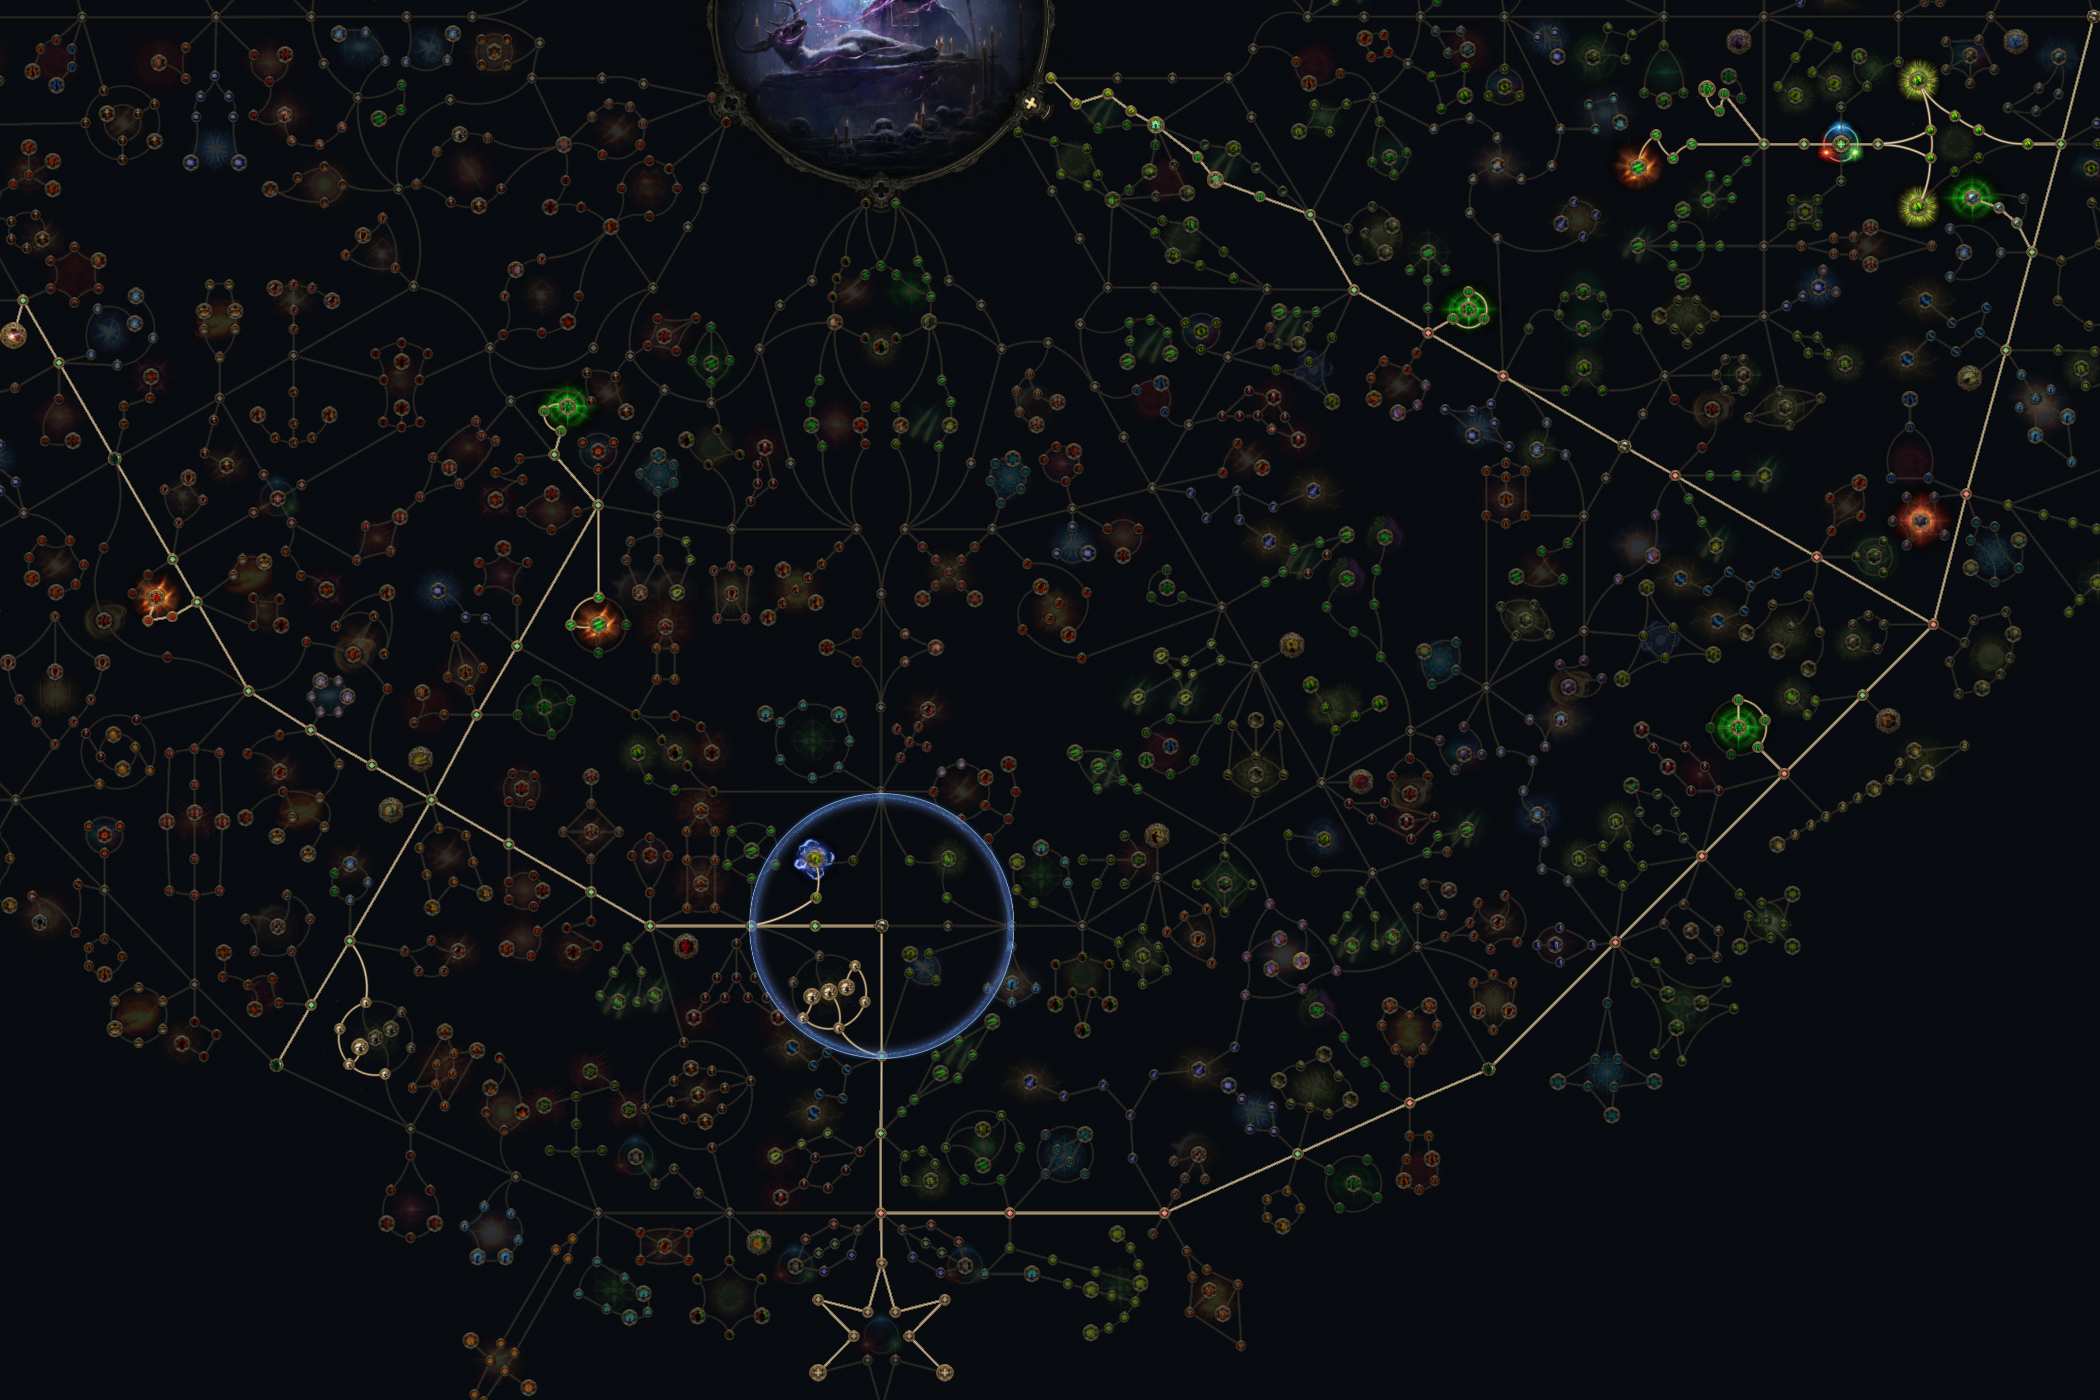 |
|
Click on the image to open the Passive Tree preview in a new window Or import the build into PoB: |
Ascendancy points:
Preferably in this order:
- Unfurled Finger
- Mystic Attunement
- Intricate Sigils
- Corrupted Life Force (minor extra DoT damage) or Wildwood Presence (better sustain)
5. Final Gems links
| [DPS/UTILITY] Boneshatter setup | |
 |
Boneshatter - Boneshatter in this build is used primarily as a movement skill, so you are looking to maximize its Attack Speed. Support it with Rigwald's Ferocity in Weapon Set I, Rage III, Rapid Attacks II, and Heightened Accuracy II. Defy II is also mandatory, allowing you to ignore the Mana Cost of this skill. Due to high Attack Speed, it can also be used to quickly generate Rage and Resonance Stacks |
 |
Rage III |
 |
Rapid Attacks II |
 |
Defy II |
 |
Heightened Accuracy II |
 |
Rigwald's Ferocity |
| [DPS] Molten Blast | |
 |
Molten Blast - Molten Blast is your primary Attack and DPS source. It is an Attack that fires projectiles all around you, offering insane clear speed and AoE. It is used mainly for clearing Maps all over your screen, and to maximize its potential, support it with Stoicism II, Heightened Accuracy II, Defy II, Ricochet II, and Nova Projectiles. You could replace Stoicism with Rakiata's Flow for more consistent and higher DPS, but it's very expensive to even have a single one |
 |
Stoicism II |
|
Defy II |
 |
Ricochet II |
|
Heightened Accuracy II |
 |
Nova Projectiles |
| [DPS] Requiem | |
 |
Requiem - Requiem is a Crossbow Attack that doesn't use ammunition, and it's exclusive to the Last Lament Crossbow. It is used only against Bosses, offering massive burst DPS. Make sure you have enough Mana to use Compose Requiem before the Boss, and try avoiding Stuns, which can cancel the ability entirely. If you continue attacking without it, it will quickly drain your Life. Support it with Rakiata's Flow, Rapid Attacks II, Heightened Accuracy II, and Concentrated Area for maximum DPS |
 |
Rakiata's Flow |
|
Rapid Attacks II |
|
Heightened Accuracy II |
 |
Concentrated Area |
| [UTILITY] Herald of Thunder setup | |
|
Herald of Thunder - fires additional Bolts with your Attacks after you kill Shocked enemies. Improves your clear speed. The support Gems should directly boost Elemental Damage with Projectile Attacks, and the top recommendations are Elemental Armament II, Elemental Focus, Magnified Area I, Longshot II, and Lightning Attunement |
 |
Elemental Armament II |
|
Elemental Focus |
 |
Magnified Area I |
 |
Longshot II |
|
Lightning Attunement |
| [UTILITY] War Banner setup | |
 |
War Banner - a Banner skill that, when planted, grants Aura, which increases your Attack Damage, Accuracy Rating, and Attack Speed. It can be used against Bosses and against bigger, tougher packs like Abyss or Rituals. You should support it with Precision I or II for extra Accuracy. While two Auras of the same Tier don't stack, you can use both Precision I and II |
 |
Daresso's Passion |
|
Magnified Area II |
 |
Prolonged Duration II |
 |
Precision I |
| [UTILITY] Trinity | |
 |
Trinity - Trinity is a very powerful Persistent buff skill which allows you to generate Resonance of one of the three Elemental Damage types, depending on which dealt the highest damage with a hit. If you set up your gear correctly by adjusting the Runes in your Weapon, off-hand Weapon type, Passive Skills, and flat Added Damage on your Gloves and Rings, you can easily build maximum Resonance of each type within seconds, offering up to 70% More Elemental Damage and 30% Skill Speed. You should support it with Diallas Desire and Uhtred's Omen. Alternatively, the first of those Gems can be replaced with any Elemental Mastery Gems |
 |
Uhtred's Omen |
 |
Dialla's Desire or Fire/Cold/Lightning Mastery |
| [UTILITY] Wind Dancer setup | |
 |
Wind Dancer - a Persistent buff skill that grants a big bonus to Evasion Rating. It breaks when you take a hit and knock back nearby enemies and deal moderate damage. You can use the other Precision Aura here for extra Accuracy, and support it with Magnified Area II, Maim, Knockback or Blind II, depending on the number of your available Sockets |
 |
Precision II |
|
Magnified Area II |
 |
Maim |
 |
Knockback |
 |
Blind II |
| [UTILITY] Blood Boil | |
 |
Blood Boil - Blood Boil is one of the Ritualist's exclusive Skills granted by an Ascendency node. It debuffs nearby enemies, which, when slain, apply the Corrupted Blood debuff on nearby enemies. It slightly boosts your clear speed and is quite decent when leveling. At higher levels, and given the nature of this entire build, its effects or negligible - so if you have additional Life Recovery from gear or Passives, it may be better to pick Wildwood Persistence instead. Support it with Swift Affliction II, Physical Mastery, Brutality III, Prolonged Duration II, and Acrimony |
 |
Swift Affliction II |
 |
Physical Mastery |
 |
Brutality III |
|
Prolonged Duration II |
 |
Acrimony |
| [UTILITY] Freezing Mark setup | |
 |
Freezing Mark - Freezing Mark makes enemies easier to freeze. You can use it against tougher enemies when you don't have your build fully set up yet, making it easier to stay alive while waiting for consecutive uses of the Compose Requiem skill. Support it with Lifetap as you won't have Mana for anything, Mark for Death to break Armour, Efficiency II, and Prolonged Duration II |
 |
Lifetap |
 |
Mark for Death |
 |
Efficiency II |
|
Prolonged Duration II |
|
|
6. Gear Setup
This build is oriented around stacking Attributes and Accuracy Rating, so you want it on basically all your gear pieces. Naturally, you are also going to need Resistances, and possibly Evasion Rating and Deflection, which will allow you to effortlessly farm high-tier maps and Bosses. Overall, all these requirements make it one of the most expensive builds on our website, but also the most likely to be the most enjoyable one. If you have too much currency lying around, you can turn this character into a real monster. The gear listed in the PoB cost us "only" 80 Divines, so there is a lot of room for improvements, and you can easily stack more Attributes and flat Damage, increasing your damage exponentially.
This build also requires two specific Unique Items, with one being quite expensive. These are Constricting Command, Hand of Wisdom and Action. The Last Lament is highly advised as it allows you to quickly take down Bosses, but using Molten Blast, this is also possible, but simply takes longer. Astramentis is not mandatory, but the raw amount of stats it provides it's just hard to replace.
|
Stat priorities on items:
|
 (Helmet) Constricting Command - You want it to roll 5 on the Surrounded requirement to be always Surrounded, even with no enemies around. This allows you to permanently benefit from all the Passive Tree bonuses and Defy II Support in your damaging setups (Helmet) Constricting Command - You want it to roll 5 on the Surrounded requirement to be always Surrounded, even with no enemies around. This allows you to permanently benefit from all the Passive Tree bonuses and Defy II Support in your damaging setups |
|
| +(80–120) to maximum Life +(10–15) to all Attributes (8–12) Life Regeneration per second Require (2–5) fewer enemies to be Surrounded |
|
 (Weapon) Rare One-Handed Mace - for this build, you want a Rare Weapon with the highest possible DPS - Physical is most important, but all the other types are also valuable, and may help you get corresponding Resonance types. It's also nice to have +# Level to All Melee Skills, extra Accuracy Rating, or the Onslaught buff (Weapon) Rare One-Handed Mace - for this build, you want a Rare Weapon with the highest possible DPS - Physical is most important, but all the other types are also valuable, and may help you get corresponding Resonance types. It's also nice to have +# Level to All Melee Skills, extra Accuracy Rating, or the Onslaught buff |
|
| Min. requirements: +4 to the Level of all Melee Skills 450 Physical DPS Optional affixes: Added Cold or Lightning Damage Accuracy Rating chance to gain Onslaught on Killing Hits with this Weapon (Essence Suffix) Gain #% of Damage as Extra # Damage (Essence Prefix) |
|
 (Weapon) Olrovasara - another very interesting choice for the main weapon, which grants tons of extra Lightning Damage based on the power of enemies you hit. With the Attack Speed this build offers, you easily get the maximum, but it's just for this one type and requires adjustments for Trinity (Weapon) Olrovasara - another very interesting choice for the main weapon, which grants tons of extra Lightning Damage based on the power of enemies you hit. With the Attack Speed this build offers, you easily get the maximum, but it's just for this one type and requires adjustments for Trinity |
|
| Adds 1 to (60–80) Lightning Damage +(300–400) to Accuracy Rating (5–30)% increased Attack Speed On Hitting an enemy, gains maximum added Lightning damage equal to the enemy's Power for 6 seconds, up to a total of 500 |
|
 (Weapon) Guiding Palm of the Eye/Mind - you will need one of those Unique Maces as your off-hand stat stick. In most cases, you will be using the Cold or Lightning Variant depending on your damage rolls. This also grants additional Spirit, allowing you to use Trinity on top of the other valuable Persistent buff skills (Weapon) Guiding Palm of the Eye/Mind - you will need one of those Unique Maces as your off-hand stat stick. In most cases, you will be using the Cold or Lightning Variant depending on your damage rolls. This also grants additional Spirit, allowing you to use Trinity on top of the other valuable Persistent buff skills |
|
| Grants Skill: Level # Purity of Ice Gain 25% of Damage as Extra Cold Damage Allies in your Presence deal (15–23) to (28–35) added Attack Cold Damage 50% of your Base Life Regeneration is granted to Allies in your Presence +(20–30) to Intelligence 25% increased Light Radius Grants effect of Guided Freezing Shrine |
|
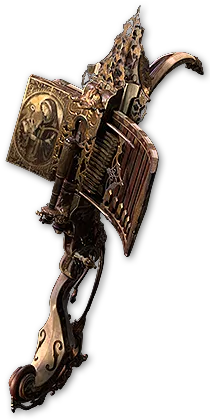 (Weapon) The Last Lament - this Unique Crossbow offers insane single-target burst. And since none of the Passives on your tree are connected to a single specific weapon type, you don't even need to change any of the Passives for it to work. Just use the Compose Requiem shortly before the Boss fight starts, and see it melt within seconds. Please note that the effect ends when you are stunned. Make sure to stop firing when that happens, or it will quickly drain your Life (Weapon) The Last Lament - this Unique Crossbow offers insane single-target burst. And since none of the Passives on your tree are connected to a single specific weapon type, you don't even need to change any of the Passives for it to work. Just use the Compose Requiem shortly before the Boss fight starts, and see it melt within seconds. Please note that the effect ends when you are stunned. Make sure to stop firing when that happens, or it will quickly drain your Life |
|
| Grants Skill: Level # Requiem (250–300)% increased Physical Damage (10–20)% increased Attack Speed Leeches (5–10)% of Physical Damage as Life (10–20)% chance to load a bolt into all Crossbow skills on Kill Sacrifice 300 Life to not consume the last bolt when firing (40–60)% reduced Reload Speed |
|
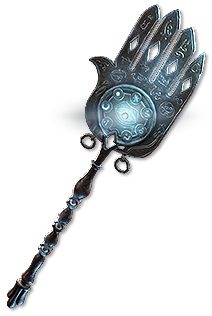
 (Gloves) Hand of Wisdom and Action - a mandatory part of this build which adds tons of added Lightning Damage to Attacks, Attack Speed, and extra Attributes. It's also quite cheap nowadays, so getting it with additional Rune sockets is easy, and you can use Talismans with extra Accuracy here as well (Gloves) Hand of Wisdom and Action - a mandatory part of this build which adds tons of added Lightning Damage to Attacks, Attack Speed, and extra Attributes. It's also quite cheap nowadays, so getting it with additional Rune sockets is easy, and you can use Talismans with extra Accuracy here as well |
|
| +(15–25) to Dexterity +(15–25) to Intelligence 1% increased Attack Speed per 20 Dexterity Adds 1 to 10 Lightning Damage to Attacks per 20 Intelligence |
|
 (Boots) Rare Boots - Boots shall have Movement Speed, Evasion Rating, and Deflection. You can try getting the Essence Suffix to maximize the effect of Socketed Runes too, and get additional Resistance and Attribute Suffixes and Runes here (Boots) Rare Boots - Boots shall have Movement Speed, Evasion Rating, and Deflection. You can try getting the Essence Suffix to maximize the effect of Socketed Runes too, and get additional Resistance and Attribute Suffixes and Runes here |
|
| Min. requirements: 30% Increased Movement Speed 400 Evasion Rating Gain Deflection Rating equal to #% of Evasion Rating Optional affixes: 100% increased effect of Socketed Items (Essence Suffix) Resistances Attributes |
|
 (Amulet) Astramentis - Astramentis is the best in slot item for this build. It offers simply massive raw Attributes, and in this build, we don't really care about any other bonuses. Any Rare that gets close to this Amulet will be much more expensive, and not necessarily better. We recommend Anointing Volcanic Skin for extra Fire Damage and Resistance (which is hard to cap for this build) (Amulet) Astramentis - Astramentis is the best in slot item for this build. It offers simply massive raw Attributes, and in this build, we don't really care about any other bonuses. Any Rare that gets close to this Amulet will be much more expensive, and not necessarily better. We recommend Anointing Volcanic Skin for extra Fire Damage and Resistance (which is hard to cap for this build) |
|
| +(5–7) to all Attributes +(50–100) to all Attributes -4 Physical Damage taken from Attack Hits Recommended Anointment: Volcanic Skin |
|
 (Ring) Rare Rings - Rings are the most important part of this build, and you should certainly invest in them the most. By default, you are looking to cap all your Resistances and stack as many Attributes as possible. When that's covered, just check your budget and decide if you can afford extra Flat Added Damage to Attacks, or bonus Accuracy Rating (Ring) Rare Rings - Rings are the most important part of this build, and you should certainly invest in them the most. By default, you are looking to cap all your Resistances and stack as many Attributes as possible. When that's covered, just check your budget and decide if you can afford extra Flat Added Damage to Attacks, or bonus Accuracy Rating |
|
| Min. requirements: 400 Accuracy Rating 80% Total Resistances or 80 Total Attributes Optional affixes: Added Damage to Attacks (check Resonance) Maximum Life Evasion Rating |
|
 (Belt) Ingenuity - this Unique further improves the effectiveness of your Rings by up to 30% each. If you have invested in your Rings properly, this will be the BiS item for this setup, and it's quite cheap nowadays (Belt) Ingenuity - this Unique further improves the effectiveness of your Rings by up to 30% each. If you have invested in your Rings properly, this will be the BiS item for this setup, and it's quite cheap nowadays |
|
| Has (1–3) Charm Slot 20% of Flask Recovery applied Instantly (-20–20)% reduced Charm Charges gained (-10–10)% reduced Charm Charges used (20–30)% increased bonuses gained from left Equipped Ring (20–30)% increased bonuses gained from right Equipped Ring |
|
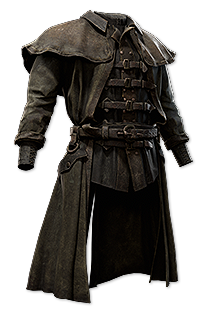 (Body Armour) Rare Body Armour - Nothing exotic on a Body Armour, just a lot of Life, Resistances, and Evasion. The defensive stats are quite cheap; it's another story if you want extra Resistance or Attribute suffixes on top of that, so make sure you can afford it (Body Armour) Rare Body Armour - Nothing exotic on a Body Armour, just a lot of Life, Resistances, and Evasion. The defensive stats are quite cheap; it's another story if you want extra Resistance or Attribute suffixes on top of that, so make sure you can afford it |
|
| Min. requirements: 200 Maximum Life 2000 Evasion Rating Gain Deflection Rating equal to #% of Evasion Rating Optional affixes: Resistances Attributes Life Regeneration per second |
|
 (Jewel) Heart of the Well - one of the best end-game Jewels introduced in Patch 0.3, which has 4 random modifiers. It is the best way to gain extra added Elemental Damage of each type, making it the best item to balance your DPS and Resonance generation (Jewel) Heart of the Well - one of the best end-game Jewels introduced in Patch 0.3, which has 4 random modifiers. It is the best way to gain extra added Elemental Damage of each type, making it the best item to balance your DPS and Resonance generation |
|
| Recommended modifiers: Gain (9–15)% of Damage as Extra Lightning Damage Gain (9–15)% of Damage as Extra Fire Damage Gain (9–15)% of Damage as Extra Cold Damage (40–60)% increased Evasion Rating from Equipped Body Armour (4–8)% increased Skill Speed |
|
 (Jewel) Megalomaniac - this Jewel can grant you 2-3 Notable Passives, and there is a bunch of useful ones on the Tree. The Great Boar is our first choice as it saves you a number of useless Passive points you would need to allocate to get it, and other than that, just look for Attack Damage/Attribute Passives as extras (Jewel) Megalomaniac - this Jewel can grant you 2-3 Notable Passives, and there is a bunch of useful ones on the Tree. The Great Boar is our first choice as it saves you a number of useless Passive points you would need to allocate to get it, and other than that, just look for Attack Damage/Attribute Passives as extras |
|
| Recommended modifiers: Allocates The Great Boar Allocates Last Stand Allocates Finesse Allocates Giantslayer Allocates All Natural Allocates Killer Instinct |
|
 (Jewel) Against the Darkness - this Jewel can grant you a lot of increased Attributes or added Damage as Extra Elements. It can be allocated near Thrill of Battle, to affect up to 4 Notable Passives (Jewel) Against the Darkness - this Jewel can grant you a lot of increased Attributes or added Damage as Extra Elements. It can be allocated near Thrill of Battle, to affect up to 4 Notable Passives |
|
| Recommended modifiers Notable Passives in Radius also grant #% Increased Dexterity Notable Passives in Radius also grant #% Increased Strength Notable Passive Skills in Radius also grant Gain #% of Damage as Extra Cold/Fire/Lightning Damage |
|
 (Jewel) Rare Jewels - Jewels can be obtained quite easily. Just find Jewels with Accuracy Rating, increased Attack Damage, or Evasion Rating, and an open Suffix. Desecrating such a Jewel guarantees you get 1-2% Increased Attribute of a random type. Naturally, you would prefer to get Dexterity here, but all others should be fine as well (Jewel) Rare Jewels - Jewels can be obtained quite easily. Just find Jewels with Accuracy Rating, increased Attack Damage, or Evasion Rating, and an open Suffix. Desecrating such a Jewel guarantees you get 1-2% Increased Attribute of a random type. Naturally, you would prefer to get Dexterity here, but all others should be fine as well |
|
| Recommended affixes: Increased Attack Damage Increased Evasion Rating Increased Accuracy Rating 1 open Suffix for Desecrated mod |
|
|
If you have any other build requests please leave that in the comments below. We are always open to suggestions and constructive feedback.
Pictures used in this article are the intellectual property of Grinding Gear Games.