
Lightning Spear Deadeye POE2 Build
Lightning Spear and Wind Serpent's Fury build for the DeadeyeLightning Spear
Deadeye Build
Updated for Path of Exile 2 Early Access
The Best Crafty Guides by Odealo
| Guide notes |
| April 12, 2025 - Created for Early Access. |
| Build Overview | |||
| Tags: [RANGED] [ELEMENTAL] [LIFE] | |||
|
Budget: Defenses: |
|
Boss DPS: AoE: |
|
Lightning Spear is right now the most popular skill in the game. It's a Ranged Spear Attack that releases many Lightning Bolts on impact. The initial Spear can only Split, and it does if it consumes a Frenzy Charge, but the Lightning Bolts it creates are Projectiles too, and those can Chain, Pierce, and Fork. Add to that 20% Gem Quality and the Volt Support Gem. Now, with a single throw, you will create 3 Spears, each splitting into up to 11 Bolts, each of them Chaining up to 3 times. Their range is also screen-wide. That's more than enough to clear a pack of monsters of any size. These Attacks are also powerful, enough so to slay a Rare enemy in one or two hits. Against an exceptionally strong opponent, you will use Wind Serpent's Fury. It's a Melee Attack that conjures a snake for every Frenzy Charge consumed. With 6 Maximum Frenzy Charges, there is no better ability to fill this role.
The limiting factor of this build is its Frenzy Charge retention. It's not an issue while mapping since Kitoko's Current Gloves combined with Combat Frenzy Skill will grant you a Charge for pretty much each enemy hit. During boss fights you will rely more on Primal Strikes and Sniper's Mark. It gives you a Charge on Critical Strike. To gain more Charges in such situations, we recommend linking the Mark Skill with Profusion and wearing Serpent's Egg Amulet. You may also use the Buckler and Disengage to Parry, but we've opted for Dance with Death Keystone which encourages having an empty off-hand.
For the ascendancy, one can select the Amazon, which is the more popular choice, or a Deadeye. Deadeye is overall a better pick for boss fights due to the Avidity and Thrilling Chase. These passives are major boosts to your Frenzy Charge retention and grant straight up more damage since all your Skill that consume Frenzy Charges behave as consuming twice as many. You may then allocate Gathering Winds and Wind Ward to get much more Movement Speed, Skill Speed, Evasion Rating, and to take less damage.
You can also check our other Path of Exile 2 builds right over here Odealo's Crafty Guides - Full List
1. Gameplay
Lightning Spear can kill all the weak monsters and even rares in one hit. This damage will build up enough Electrocution to generate Frenzy Charges while mapping. Don't use it too often, you have to build up Volt stacks by moving. Wind Seprent's Fury has extremely high damage if it consumes your Frenzy Charges, so use it against bosses. Primal Strikes combined with Sniper's Mark are the source of Frenzy Charges during boss fights. Your passive skills are Herald of Thunder and Wind Dancer.
|
|
|
|

2. Build's PROS & CONS
| PROS |
|
| CONS |
|
3. Leveling tips
Begin with Rake with Stomping Ground. That combination is excellent for clearing and deals high Bleeding Damage. It requires a fair bit of Strength early on. Enhance it with Bleed-related Support Gems such as Herald of Blood and Blood Hunt. For single targets have the basic Spear attack ready. It's quite strong and costs no Mana. Swap to Lightning Damage if you can no longer keep up with strong enemies or if you find a suitable weapon.
| [DPS] Spear Stab setup | |
 |
Spear Stab - The default Spear Attack. May be replaced with Blood Hunt later. |
 |
Martial Tempo - More Attack Speed. |
 |
Bloodlust - More Damage against Bleeding enemies, but cannot inflict Bleeding itself. |
 |
Rage - Grants Rage on Hit for more damage. |
| [DPS] Rake setup | |
 |
Rake - A Travel ability that inflicts powerful Bleeding on hit. |
 |
Stomping Ground - Creates a Shockwave con taking a step. Its damage scales up with Strength. |
 |
Brutality - More Physical Damage, but disables Chaos and Elemental Damage. |
 |
Blood in the Eyes - More Physical Hit Damage against Bleeding enemies. |
| [UTILITY] other gems | |
 |
Herald of Blood - Bleeding enemies will explode on kill. |
4. Final Skill Tree, Ascendancy Points, and Pantheon
Final Skill Tree:
 |
|
Click on the image to open the Passive Tree preview in a new window Or import the build into PoB: |
Ascendancy points:
Preferably in this order:
- Gathering Winds
- Avidity
- Thrilling Chase
- Wind Ward
5. Final Gems links
| [DPS] Lightning Spear setup | |
 |
Lightning Spear - It's the main skill for nearly all content, except bosses. It's a Spear Throw that deals Lightning Damage, consumes Frenzy Charge, and Splits on impact. |
 |
Perpetual Charge - 35% Chance for the Skill to not consume a Frenzy Charge. |
 |
Innervate - 35% of Damage as extra Lightning Damage for 5 seconds on killing a Shocked enemy. |
 |
Longshot - More Damage against enemies far from you. |
 |
Twofold - 20% Chance for Lightning Spear to act as if consuming two Charges. That's 3 extra splinters and 50% more Damage. |
 |
Volt - The most important Gem. It causes Bolts from Lightning Spear to Chain up to three more times and deal more damage. |
| [DPS] Wind Serpent's Fury setup | |
 |
Wind Serpent's Fury - Use it against bosses. It's stronger the more Frenzy Charges it has consumed, which you have a lot of. |
 |
Lightning Infusion - Grants 25% of damage as extra Lightning Damage. |
 |
Inevitable Critical - Over time it guarantees a Critical Strike Chance. You use it rarely so it fits here well. |
 |
Ambrosia - Adds Lightning Damage to the Attack by draining Charges from the Mana Flask. |
 |
Hourglass - 30% more Damage and +10 second Cooldown. If you can regain charges quicker than in 10 seconds, replace Hourglass with Pursuit. |
 |
Primal Armament - 25% more Elemental Damage with Attacks. |
| [UTILITY] Herald of Thunder setup | |
 |
Herald of Thunder - Improves your clear speed with Lightning Bolts and Converts all damage to Lightning. |
 |
Neural Overload - Herald will Electrocute enemies that have some of the Electrocution built up already. |
 |
Lightning Mastery - Additional Gem Level for Herald of Thunder for more damage. |
 |
Execute - Deals 50% more damage to enemies on Low Life. |
 |
Concentrated Effect - Lowers Area of Effect but grants more Area Damage. |
 |
Lightning Penetration - Penetrates a big portion of Lightning Resistance which results in more damage. |
| [UTILITY] Primal Strikes setup | |
 |
Primal Strikes - A Melee Attack that doesn't consume Frenzy Charges. Combined with Sniper's Mark it'll generate Frenzy Charges during boss fights. Its damage is rather low. It also inflicts Lightning Exposure on the Final Hit. |
|
Martial Tempo - 20% more Attack Speed. |
|
Rage - It gets you 3 Rage on Hit. Rage grants more damage. |
 |
Crescendo - The Final Strike of Primal Strikes can be powerful, even more so if the enemy is Shocked. Crescendo lets you attack with the Final Strike twice in a row. |
 |
Close Combat - More Damage against enemies close to you. |
 |
Elemental Focus - Inability to inflict Shock and Electrocute, but grants more damage instead. Primal Strikes is not an effective way to apply Ailments anyhow. |
| [UTILITY] Sniper's Mark setup | |
 |
Sniper's Mark - The next Critical Hit removes the Mark from the enemy to grant you a Frenzy Charge and deal more damage. It's the main source of Frenzy Charges during boss fights. |
 |
Profusion - 50% chance to grant you one extra Frenzy Charge. You could move it to the Combat Frenzy setup, but here it plays a more important role. |
 |
Ingenuity - Lowers Cooldown for the Mark which is 2 seconds by default. |
 |
Arcane Tempo - 20% more Cast Speed. |
| [UTILITY] Wind Dancer setup | |
 |
Wind Dancer - More Evasion until you get hit. Then, it breaks and hits nearby foes. |
 |
Blind - Wind Dancer Blinds; your Evasion is more effective against Blinded enemies. |
 |
Maim - Maims on Hit. Maimed enemies move slower. |
 |
Culling Strike - With a bit of luck it may Cull Rare or Unique enemies, killing them if they're very low on life. |
| [UTILITY] Combat Frenzy setup | |
 |
Combat Frenzy - Grants you a Frenzy Charge when you Electrocute an enemy. |
 |
Precision - 30% increased Accuracy Rating. It may not be needed with the right gear. |
| [UTILITY] Disengage setup | |
 |
Disengage - Very useful with a Buckler to consume Parry and gain a Frenzy Charge. Can be used to move too. |
 |
Unyielding - Recoups a portion of Life taken while using Disengage. |
 |
Magnified Effect - 30% more Area of Effect. |
| [UTILITY] Rhoa Mount setup | |
 |
Rhoa Mount - If you have some extra Spirit saved you may mount a Rhoa to move much faster. |
 |
Meat Shield - Rhoa takes 35% less damage. |
|
|
6. Gear Setup
Spear is your Priority. It has to have high Damage - Physical mixed with Lightning. To get more damage seek Critical Hit Chance and increased effect of Shock. Electrocute buildup speed may be great as you're supposed to wear Kitoko's Current Gloves. To deal more damage against bosses look for a way to generate Frenzy Charges more efficiently. Here, we have equipped Serpent's Egg to achieve it. Lightning Penetration and Attack Speed are good, but don't go out of your way to get them. Movement Speed is beneficial to charge Volt stacks faster. Spirit should not be needed at all unless you want to have a Companion, ride on a Rhoa, or even link Deadly Herald Support. Your defences are Maximum Life and Evasion. Maybe Block Chance.
|
Stat priorities on items:
|
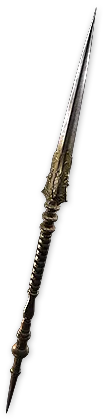 (Weapon) Rare Spear - It doesn't even need Attack Speed, just raw per-hit damage. Physical Damage (later Converted) and Lightning Damage with Gem Level for relevant (Melee for Serpent) Skills or Crit modifiers will be the best. (Weapon) Rare Spear - It doesn't even need Attack Speed, just raw per-hit damage. Physical Damage (later Converted) and Lightning Damage with Gem Level for relevant (Melee for Serpent) Skills or Crit modifiers will be the best. |
|
| Min. requirements: increased Physical Damage added Physical Damage increased Elemental Damage with Attacks Optional affixes: Added Lightning Damage with Attacks Critical Damage Bonus Critical Hit Chance increased Attack Speed +# to Level of all Melee Skills |
|
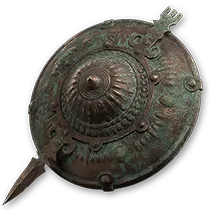 (Off-hand) Rare Buckler - If you haven't allocated Dance with Death you can benefit from an off-hand. Buckler will be good, but you can wield regular Shields as well. Go for basic Max Life/Resistances with either more Evasion or Block Chance. (Off-hand) Rare Buckler - If you haven't allocated Dance with Death you can benefit from an off-hand. Buckler will be good, but you can wield regular Shields as well. Go for basic Max Life/Resistances with either more Evasion or Block Chance. |
|
| Min. requirements: Maximum Life Elemental Resistance Optional affixes: Increased Block Chance increased Evasion Rating Dexterity Maximum Elemental Resistances |
|
 (Helmet) Rare Helmet - Besides Maximum Life and Resistances, a Helmet offers Intelligence, Dexterity, Accuracy, and Critical Hit Chance. (Helmet) Rare Helmet - Besides Maximum Life and Resistances, a Helmet offers Intelligence, Dexterity, Accuracy, and Critical Hit Chance. |
|
| Min. requirements: Maximum Life Elemental Resistance Optional affixes: Attributes Accuracy Rating Increased Critical Hit Chance |
|
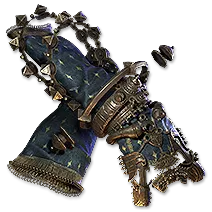 (Gloves) Kitoko's Current - Electrocution is a very desirable Lightning Ailment that renders your enemies completely incapacitated. Put on these Gloves to apply it. (Gloves) Kitoko's Current - Electrocution is a very desirable Lightning Ailment that renders your enemies completely incapacitated. Put on these Gloves to apply it. |
|
| (30-50)% increased Energy Shield +(10-20) to Dexterity (10-15)% reduced Attack and Cast Speed Lightning Damage from Hits contributes to Electrocution Buildup |
|
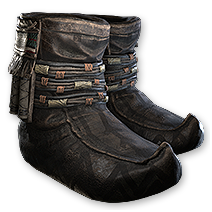 (Boots) Rare Boots - Your Boots shall increase your Movement Speed and grant you additional Maximum Life with Resistances of any type. (Boots) Rare Boots - Your Boots shall increase your Movement Speed and grant you additional Maximum Life with Resistances of any type. |
|
| Min. requirements: increased Movement Speed Elemental Resistance Maximum Life Optional affixes: Attributes Evasion Rating |
|
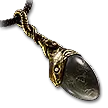 (Amulet) Serpent's Egg - Frenzy Charge retention is the most important merit when fighting bosses. Use this Amulet to gain more of them. (Amulet) Serpent's Egg - Frenzy Charge retention is the most important merit when fighting bosses. Use this Amulet to gain more of them. |
|
| (12-20) to increased Rarity of items found +(10-20) to all Attributes +(17-23)% to Chaos Resistance (20-30)% increased Mana Regeneration Rate Gain an additional Charge when you gain a Charge |
|
 (Ring) Rare Ring - Rings' Suffixes can get you a lot of Resistances and Attributes. Prefixes may roll Maximum Life and added Damage to Attacks. There's also Accuracy and Life on Kill which can be good. (Ring) Rare Ring - Rings' Suffixes can get you a lot of Resistances and Attributes. Prefixes may roll Maximum Life and added Damage to Attacks. There's also Accuracy and Life on Kill which can be good. |
|
| Min. requirements: Maximum Life Resistances Attributes Optional affixes: Accuracy Evasion Rating Added Physical or Lightning Damage Life per Enemy Killed |
|
 (Belt) Rare Belt - Not many particularly useful mods on a Belt; mostly Maximum Life and Resistances again. (Belt) Rare Belt - Not many particularly useful mods on a Belt; mostly Maximum Life and Resistances again. |
|
| Min. requirements: Elemental Resistance Maximum Life Optional affixes: Charm Slots Strength Flask or Charm modifiers |
|
 (Belt) Ingenuity - Ingenuity is still a good Belt, but only with equally good Rigns. Try to get one with good rolls and two extra Charm Slots. (Belt) Ingenuity - Ingenuity is still a good Belt, but only with equally good Rigns. Try to get one with good rolls and two extra Charm Slots. |
|
| 20% of Flask Recovery applied Instantly Charm Slots: (2-3) (20-30)% increased bonuses gained from Equipped Left Ring (20-30)% increased bonuses gained from Equipped Right Ring +(1-2) Charm Slots (-20-20)% increased Charm Charges Gained (-10-10)% reduced Charm Charges Used |
|
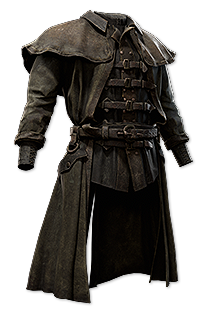 (Body Armour) Rare Body Armour - If you want more Spirit, you can get it on a Body Armour. There are no other exotic mods to seek, just plain Evasion with Maximum Life and Resistances. Quatl's Molt may be a temporary substitute. (Body Armour) Rare Body Armour - If you want more Spirit, you can get it on a Body Armour. There are no other exotic mods to seek, just plain Evasion with Maximum Life and Resistances. Quatl's Molt may be a temporary substitute. |
|
| Min. requirements: Maximum Life Elemental Resistance Optional affixes: Evasion Rating Spirit |
|
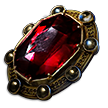 (Jewel) Rare Ruby Jewels - Here look mainly for Rage on Hit with any other mods that appear suitable. (Jewel) Rare Ruby Jewels - Here look mainly for Rage on Hit with any other mods that appear suitable. |
|
| Optional affixes: Rain 1 Rage on Melee Hit increased Melee Damage increased Elemental Damage |
|
 (Jewel) Rare Emerald Jewels - Emeralds present themselves with typical for builds of that type mod pool. Look for ones listed below. (Jewel) Rare Emerald Jewels - Emeralds present themselves with typical for builds of that type mod pool. Look for ones listed below. |
|
| Optional affixes: increased Damage with Spears increased Critical Hit Chance increased Critical Damage Bonus increased Lightning Damage increased Electrocute Buildup |
|
|
If you have any other build requests please leave that in the comments below. We are always open to suggestions and constructive feedback.
Pictures used in this article are the intellectual property of Grinding Gear Games.