Devouring Orb/Smite
End Game Void Knight Build
Updated for Patch 0.7.10c
| Build notes: |
November 24, 2020
-Build created |
Build Overview
This build will allow you to turn your once-holy Sentinel into a paragon of the void. Thanks to Skills like Devouring Orb and Anomaly, darkness will manifest around you and consume your enemies. Those who survive will fall victim to your warped Smite that now deals Void Damage. There will be no escape from you, as you will be able to charge around the battlefield with Shield Rush. Your Ring of Shields, a memory of your past devotion, will ensure that enemy attacks won't have a visible effect on you... This build is fully capable of clearing through the end-game content with ease, especially when supported by high-end gear. If you are looking for a dynamic build with high damage output, great AoE potential, and solid movement options, look no further.
To make our Void Knight build as effective as possible, we have focussed on making our chosen skills more convenient to use - both Devouring Orb and Anomaly now follow the character which means that they can be set to auto-cast. To increase Damage Output, we have stacked Void Damage, Critical Chance, and Critical Multiplier. Because we've opted to swap sword and board for a more offensive Staff, we have also taken some essential defensive passives and modified Wall of Shields (and Shield Rush, to some extent) in a way that increases survivability.
You can also check our other Last Epoch builds and character guides
 Pros Pros |
 Cons Cons |
 Very versatile; good in melee and at long range Very versatile; good in melee and at long range |
 Less tanky than your average Sentinel-based build Less tanky than your average Sentinel-based build |
 High Damage Output High Damage Output |
 Somewhat reliant on good gear Somewhat reliant on good gear |
 Good Mobility thanks to Shield Rush Good Mobility thanks to Shield Rush |
|
 Very fun to play Very fun to play |
|
Passive Skill Trees

Sentinel Skill Tree (20 Points) |
|
Notable Passives:
- Juggernaut [8/8] - This improves your Strength by 8 when maxed out and provides some resistances (24% of Void and Fire res) as well; A good place to start.
- Armour Clad [5/5] - Damage taken from nearby enemies is reduced by 10% and your Armor is increased by 75. A very solid defensive passive that helps damage with mitigation.
- Iron Mastery [2/5] - Whenever you kill an enemy or whenever you are hit, you have a chance to gain Iron Mastery (5% with 2/5) - a buff that increases your Armor and Damage. 2 points spent here equal 16% bonus Damage and Armor when Iron Mastery kicks in.
- Time and Faith [5/5] - When you use Rive, Vengeance, or Smite, you regain 25 Health and 10 Mana. Smite is your main offensive ability and this passive makes it even better.
|
|

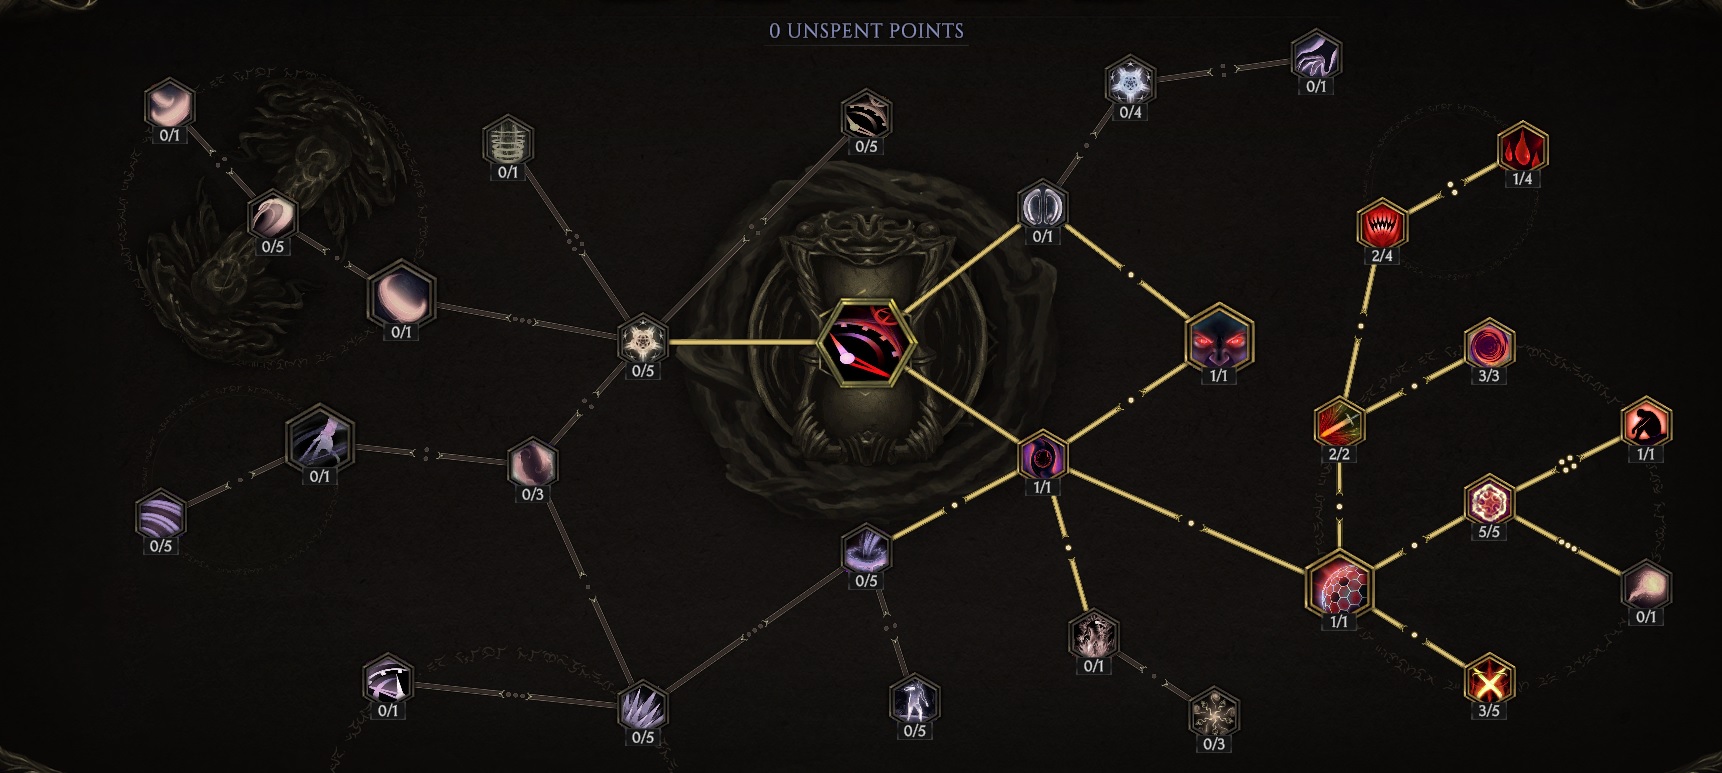
Void Knight Skill Tree (73 Points)
|
|
Notable Passives:
- Temporal Corruption [5/5] - Your Smite's Damage is converted to Void Damage and your attacks, as well as spells, now deal additional Void Damage. 5/5 points spent here increase your Void Damage by +10. The downside is, your Smite can no longer be used for healing.
- Sorrow and Steel [10/10] - A simple passive that increases Physical and Void Damage dealt by 70%
- World Eater [8/8] - This provides some much-needed Life Leech to your Melee Attacks and spells that deal Void Damage. With 8/8 points spent here, you will Leech 12% of your Meele and Void Damage dealt as Health.
- Void Bolts [8/8] - This increases your Throwing Void Damage and Spell Void Damage by +16.
- Void Corruption [1/1] - With this Talent, each point spent in the Void Knight passive tree also gives you +1% to Critical Multiplier. For this build, it provides 73% additional Crit Multiplier.
- Future Strike [10/10] - With this, each of your Hits will proc a Future Attack that will hit your target, 2 seconds after you have struck it, for 50 Void Damage.
- Echoing Strikes [5/5] - This gives your Void Spells, Melee Attacks, and Throwing Attacks a 10% chance to be echoed 1 second later. This does not affect Anomaly or movement skills.
- Time Legion [10/10] - Additional 10% chance for Echo, 30% increased Melee Attack Speed, and +20% Time Rot Chance (Time Rot reduces Cast and Attack Speed of enemies by 15%, increases Stun Duration by 25%, and deals Void Damage over time).
- Avatar of Regret [1/1] - This passive increases your chance to Echo by a further 10%, but at the cost of 10% increased Mana Cost of Spells and 10% Reduced Attack Speed.
- Dread [15/15] - With 15 out of 15 this gives you +15% movement speed and +120% Void Damage.
|

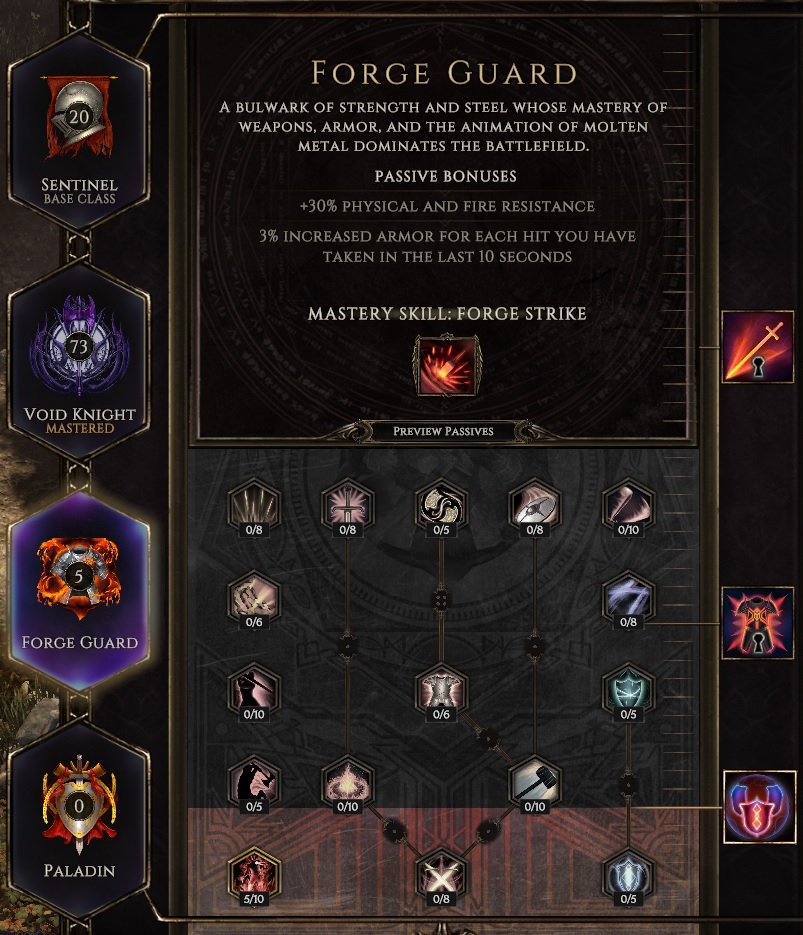
Forge Guard Skill Tree (5+ Points) |
|
Notable Passives:
- Battle Hardened [5/10] - Your Armor and Physical Resistance is increased for 4s after you are Hit by an Enemy. With 5/10 you gain 30% Armor and 15% Physical Resistance from this. If you have more points, you can spend them here.
|
|
As you can see, this build focuses on maximizing Void Damage and your chance to Echo your Attacks and Void Spells which results in outstanding offensive capabilities. This offensive power gives you solid survivability when paired with Life Leech. While the build does not focus on the defense, some essential defensively-focused passives were also secured.
|
Skills
Note: Left-Clicking on any of the ability trees below will open the full-size version in a new window.
|

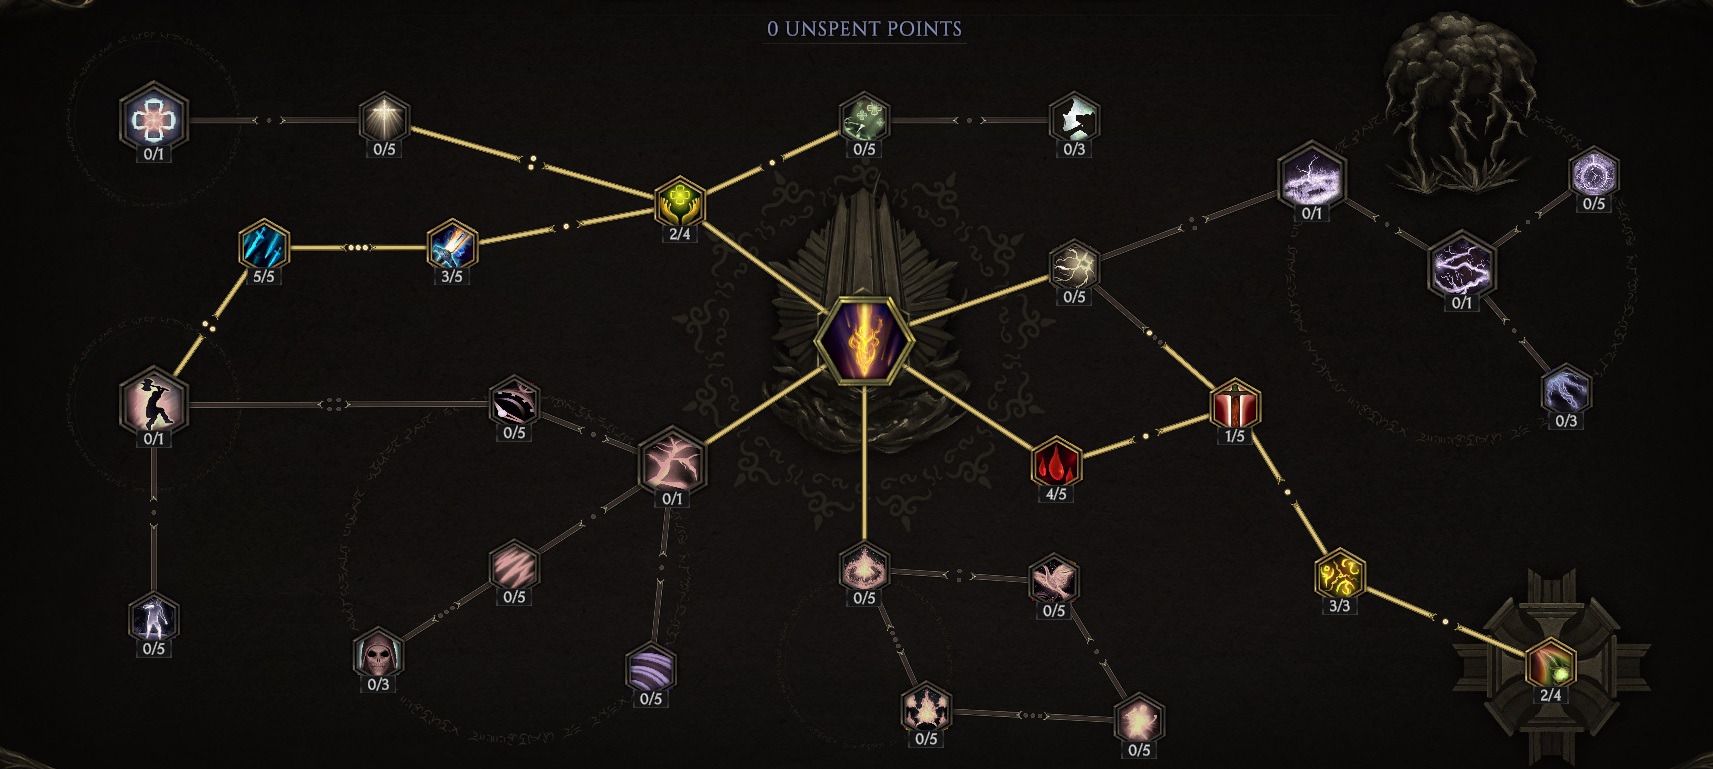
Ring of Shields - A solid defensive ability that protects you from incoming projectiles and draws enemy attention. With the below-mentioned upgrades, it will hold for longer, become more cost-efficient, will absorb more incoming Damage, and provide you with some nice healing over time effects.
- Banding [5/5] - This makes your shields much more cost-efficient by increasing their Health and Physical Resistance.
- Enduring Defense [3/3] - With this, your shields last for 6 additional seconds which increases the ability's efficiency even further.
- Reinforcement [2/2] - The more Shields, the better. This also synergizes with Banding quite well.
- Healing Shields [2/4] - Your Shields now also Heal nearby allies every 3 seconds (with 2/4 you gain +10 Health healed per each Shield).
- Phalanx [5/5] - You and your Allies now also gain +50% Armor for 4 seconds when you are Healed by your Shields. This effect does not stack.
- On the Path [3/3] - Using Warpath makes your Shields spin 150% faster and take 30% less Damage.
|
 |
|

Smite - The build's main offensive ability. Baseline, this is a Holy ability that strikes the Target and heals all allies within range. Here, it works quite differently because of the Temporal Corruption Passive - with this, it no longer Heals and deals Void Damage instead of Holy.
- Holy Weave [2/4] - This is needed to unlock further upgrades. It also increases Smite's Heal Area by 50%.
- Righteous Fury [3/5] - After hitting an enemy with a Smite, you deal additional 9 Fire Damage in melee (this effect lasts for 4 seconds).
- Righteous Flurry [5/5] - Your Attack and Cast speed is increased for 4 seconds after you Smite an enemy. 5/5 gives 50% increased Attack and Cast Speed.
- Sacrifice [4/5] - This greatly increases Damage dealt by Smite, but also makes you sacrifice some of your Health each time you use it. With this, Smite deals +200% Damage but takes away 12% of your Current Health. This is one of the reasons we've taken World Eater passive.
- Atonement [1/5] - More Crit Chance at the cost of slightly reduced casting speed.
- Conviction [3/3] - This makes Sacrifice much better by decreasing the Health Cost by 60%.
- Deep Impact [2/4] - +50% to Smite's Critical Strike Multiplier. Everybody likes big critical numbers.
|
 |
|

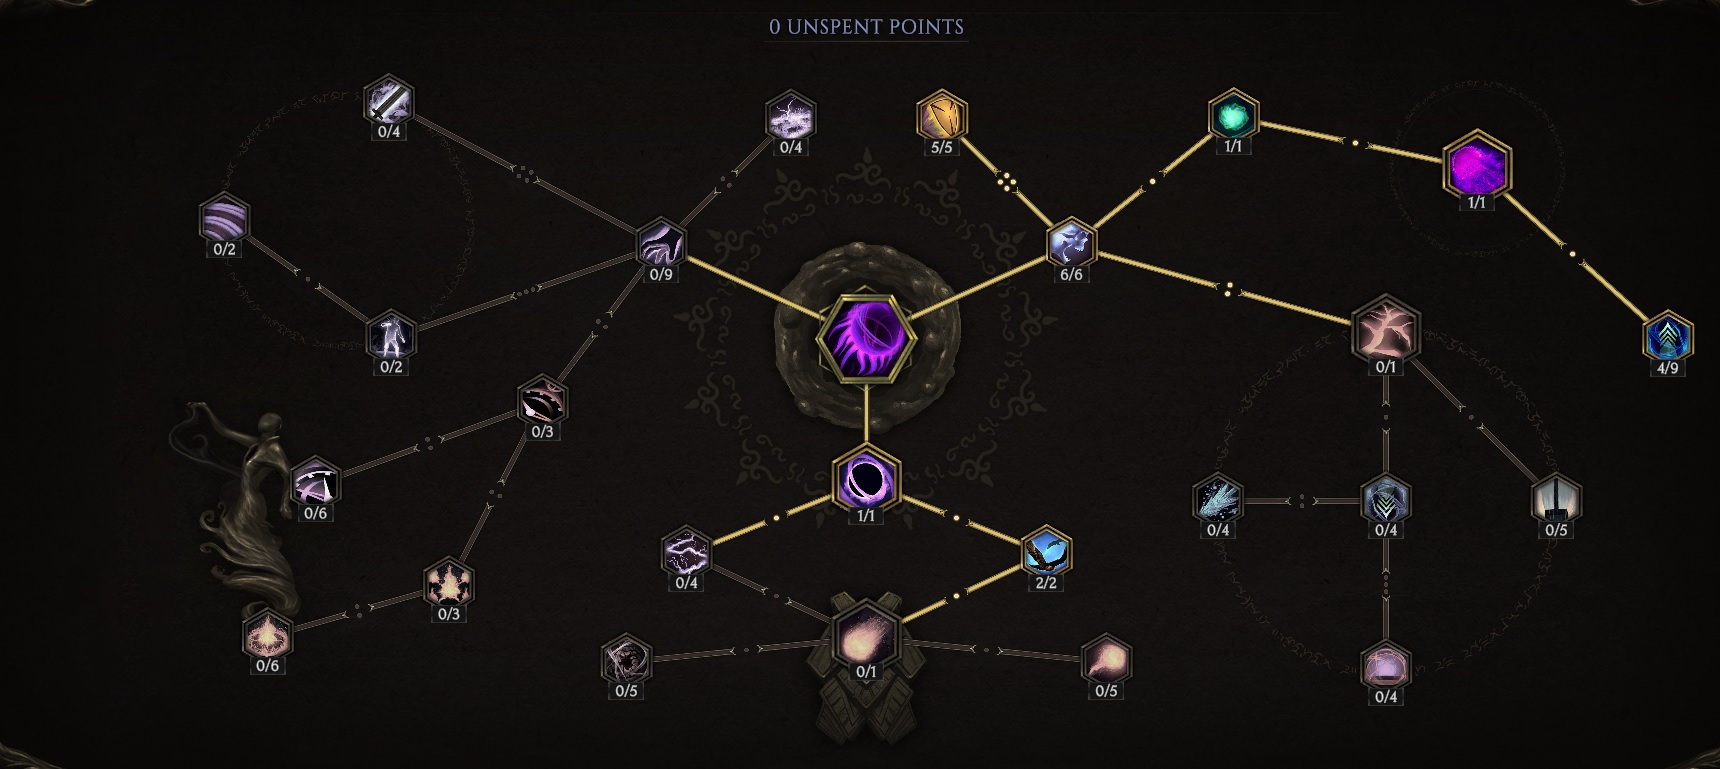
Devouring Orb - This ability makes your AoE damage spiral out of control when fighting groups of enemies. Devouring Orb creates Void Rifts at the target location each time an enemy dies within range. Void Rifts deal AoE Void Damage and each successive Rift has 12% increased DPS, capped at +100%. With the Dark Moon upgrade, Devouring Orb orbits you, instead of being a ground-based ability, which makes it much more convenient to use and makes the build much more mobile.
- Dark Moon [1/1] - Devouring Orb costs 400% of its normal cost, Void Rifts Deal 50% less Damage, and their Area of influence is reduced by 50%. BUT the Devouring Orb now orbits you which makes it proc out of every Enemy that dies near you.
- Abyssal Rush [2/2] - When Orb is active, your movement speed is increased by 20%.
- Void Adept [6/6] - This makes you deal 60% more Damage while the Orb is active. Keep it active at all times.
- Abyssal Juggernaut [5/5] - With this, you gain some extra Void Resistance (+75%, in fact).
- Hollow Orb [1/1] - This makes your Orb last for longer which makes it much more cost-efficient. The downside is, Void Rifts no longer scale in Damage or area of influence.
- Abyssal Emission [1/1] - This makes your Devouring Orb create an Abyssal Orb every 3 seconds. Abyssal Orb is a homing projectile that seeks nearby enemies and detonates after hitting them, dealing AoE Void Damage.
- Dark Torrent [4/9] - This makes Abbysal Orbs spawn 120% more frequently.
|
 |
|

Anomaly - An interesting skill that allows you to manipulate time. Using it sends enemies 5 seconds into the future, reactivating it makes them come back to your timeline early. This has some interesting consequences, including triggering delayed effects quicker. Thanks to the Immediacy upgrade, Anomaly works instantly instead of sending enemies forward in time.
- Void Touched [1/1] - Anomaly now also inflicts Time Rot debuff on all affected enemies.
- Immediacy [1/1] - This makes effects that would be triggered when enemies return back in time trigger immediately.
- Time Bubble [1/1] - Anomaly now also spawns a Time Bubble that slows enemies for 5s and makes them take increased Void Damage for the duration.
- Manipulation [2/2] - Time Bubble now also buffs you and your Allies, providing +20% Attack and Cast speed.
- Swiftrest [3/3] - Your Cooldown Recovery Speed is increased by 30% when inside Time Bubble.
- Time Eater [2/4] - Time Bubble grants Life Leech.
- Void Maw [1/4] - this increases your Life Leech by 50% when you're in the Time Bubble. This has great synergy with some of your passives.
- Temporal Mastery [5/5] - This makes Time Bubble last for 10 seconds.
- Time Lord [1/1] - This makes Time Bubble manifest on you (so, it follows you just like your Devouring Orb).
- Decimation [3/5] - Time Bubble grants you +90% Critical Chance. This passive makes you hit extremely hard and is a reason why you should use your Anomaly as often as required to keep the Time Bubble up.
|
 |
|

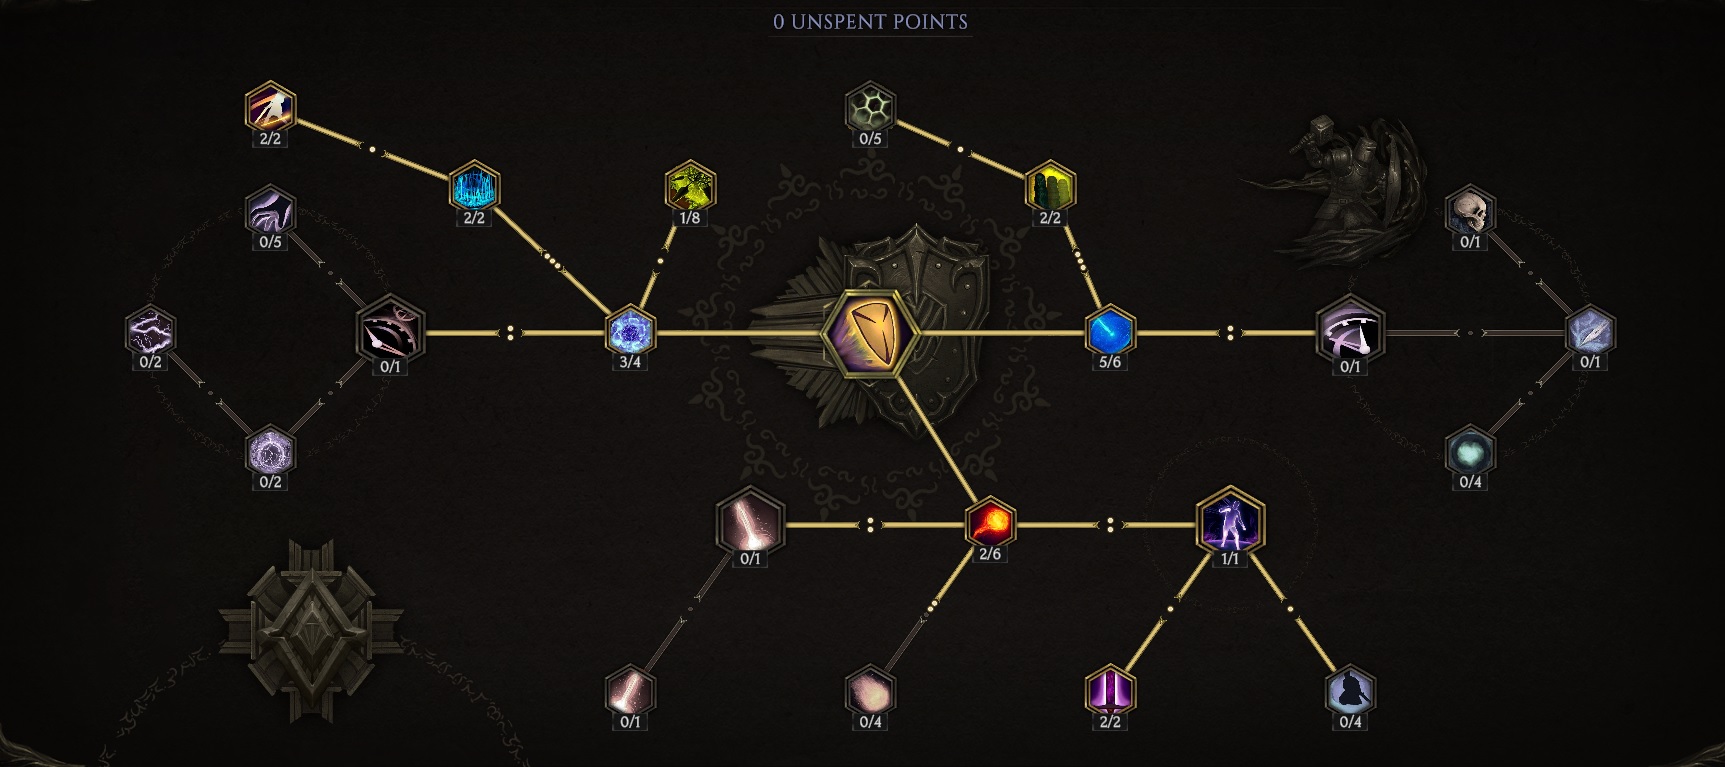
Shield Rush - A movement ability that allows you to charge through enemies in the target direction. Normally, this requires a shield, but thanks to the Dark Rush upgrade this requirement no longer applies.
- Consuming Path [2/6] - 50% extra Damage from Shield Rush.
- Dark Rush [1/1] - Shield Rush costs 30% more mana, but does not require Shield anymore. It now also deals +5 additional base Void Damage.
- Void Breaker [2/2] - Makes the final hit of your Shield Rush deal +10 base Void Damage.
- Rush Mastery [5/6] - This increases the mana efficiency of Shield Rush by 100%.
- Protective Shield [2/2] - With this, you take 20% less Damage while Shield Rush is active.
- Warrior's Entrance [3/4] - Increases the AoE of Shield Rush's final attack by 105%.
- Critical Rush - Flat 8% Crit Chance increase for the last hit of Shield Rush.
- Obliterating Rush - The final hit of Shield Rush deals 80% increased damage.
- Splintering Impact - Another Damage bonus for the last hit of Shield Rush, this time +20%.
|
 |
Items
|
Stat priority:
Offensively, you want to focus on the Spell Crit Chance and Adaptive Spell Damage; doing this will make your main offensive spells, Smite and Devouring Orb, much more effective. Getting Idols that boost your Devouring Orb and Smite is also a great idea. Getting some additional Strength is also a good idea. For this reason, you should get yourself a Staff. When it comes to defense, you should try to get cap your resistances and get some much-needed Armor.
- Adaptive Spell Damage
- Spell Crit Chance
- Strength
- Armor
- Resistances
|
|
Recommended Unique Items:

Decayed Skull - This powerful Unique Helmet increases your Void Damage by 80%, making it a must-have as it affects all of your main damage sources. It also converts 20% of Void and Necrotic Damage taken to Physical.

Valeroot - this offensively-focused piece of Armor increases your Base Spell Damage by 40-60%, provides 40-60 additional Health and Mana, reflects 40-60 Damage to attackers, and has a 10% chance of summoning a Vale Spirit when you cast a physical or buff spell.
|
|
END NOTE
This is the beta version of our End-game Void Knight build for Last Epoch. It's one of the most fun-to-play and well-rounded builds we have tested. If you are looking for a dynamic, versatile, and fast-clearing build, this one will suit your needs perfectly. Obviously, as the game gets new content updates, we will be updating this guide regularly, though it may be impossible to be done after each Patch.
|
Pictures used in this article are the intellectual property of Eleventh Hour Games
 Pros
Pros Cons
Cons Very versatile; good in melee and at long range
 Less tanky than your average Sentinel-based build
  High Damage Output
 Somewhat reliant on good gear
 Good Mobility thanks to Shield Rush
 Very fun to play