 Buy/Sell
 Log in


Frost Terra Selena 2 Build - Torchlight: Infinite
Turn Selena into a mobile Cold DoT powerhouse! Frost Terra clears packs as you move, with strong Energy Shield recovery for T8.Frost Terra Selena 2 Build - Torchlight: Infinite
Last Update: October 22, 2026
Introduction

Hero: Tide Whisper Selena
Hero Trait: Dance of the Deep (Selena 2)
Main Skill: Frost Terra
Damage: Persistent Cold Damage, Affliction and Frostbite
Season: SS14 Tartarus
Frost Terra Selena 2 clears maps with a moving circle of icy ground. Packs enter her Terra, start taking persistent Cold Damage and disappear as she walks onward. By the time the character reaches Timemark 7, a good share of the fighting happens almost automatically. The trick is to make the area large enough to catch stragglers, then give its damage time to build against tougher enemies.
Dance of the Deep anchors the main Terra to Selena, while the level-45 trait Silencing Severance supplies its automatic activation. We carry that convenient playstyle into the endgame, developing Affliction, Blur and Energy Shield together. A complete Timemark 7 setup brings in Phantom Trace, Ice Bond and Deep Pain alongside her regular DoT supports. Later, Snow Shell (Magnificent) strengthens Energy Shield recovery and Cohesion (Noble) concentrates the Terra's damage against tougher enemies.
This version emphasizes steady T7-T8 mapping with an accessible equipment ladder. You can begin on straightforward rares, introduce several useful legendaries and eventually invest in specialized Blur scaling. The late game opens another interesting door through Reap, though that version requires a different Hero Trait arrangement and a matching damage setup.
Pros
- Comfortable mapping while moving through packs
- Reliable Cold Damage Over Time and broad area coverage
- Strong Energy Shield recovery options in the developed setup
- Progression from affordable rares into distinct endgame upgrades
Cons
- Bosses need enough time inside the Terra for full damage
- Automated activation and Mana sealing require planning
You can also visit this page to check our other Torchlight: Infinite Builds.
1. Hero Traits and Memories
Selena's second Hero Trait is the reason Frost Terra feels so fluid. The main Terra follows her footsteps, and later selections let it activate by itself or exchange resources for extra damage. We use the Silencing Severance branch as our main path; it establishes a stable farmer before we begin buying powerful support gems.

| Stage | Trait choice | What it brings |
|---|---|---|
| Base | Dance of the Deep | Places the main Terra on Selena and makes it travel with her. Trait levels also improve its damage. |
| Level 45 | Silencing Severance | Supports the Main Terra with Activation Medium: Terra, adding a Terra Charge and Sealed Mana Compensation as the trait is leveled. |
| Level 60 | Drenched Hem | Lets the built-in activation seal Life and grants damage according to the portion sealed. Best suited to an established Energy Shield setup. |
| Further trait investment | Crimson Endless Dance, where available | Adds rotating Dance Step states. Review the choices available on your character's trait screen as Memories raise trait levels. |
Selena's most noticeable improvement arrives at level 45. Activation Medium: Terra begins handling the main skill, leaving you free to steer the moving area through enemies. More Terra Charges help fuel its damage, and a higher trait level softens some of the reservation burden. An extra source of Movement Speed becomes especially welcome once the character is juggling several active effects.
Drenched Hem shifts part of that resource cost to Life. Its damage bonus scales with the amount of Life sealed, so a well-equipped Energy Shield character can make good use of it. Build up your ES pool and recovery before embracing this route. At that point, managing the remaining Life becomes a gearing choice with real consequences.
2. Talents and Passive Tree
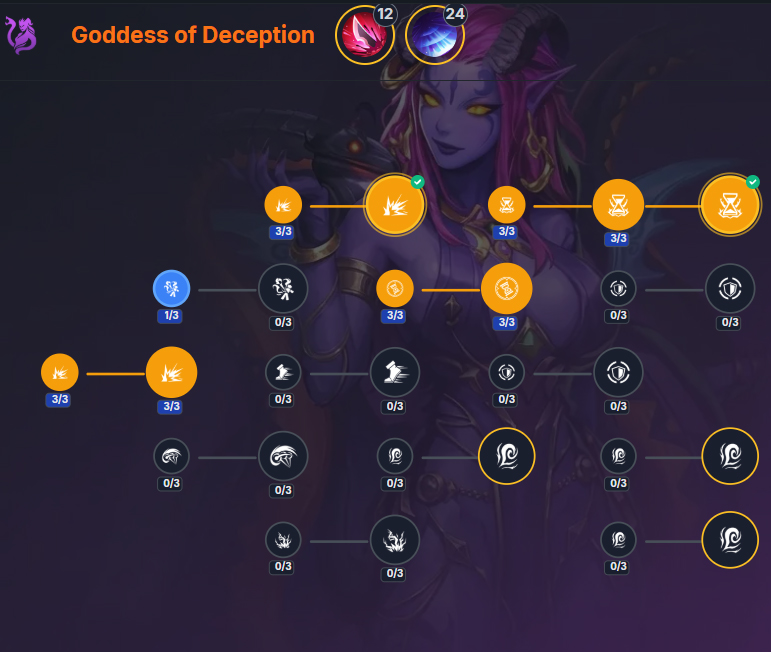
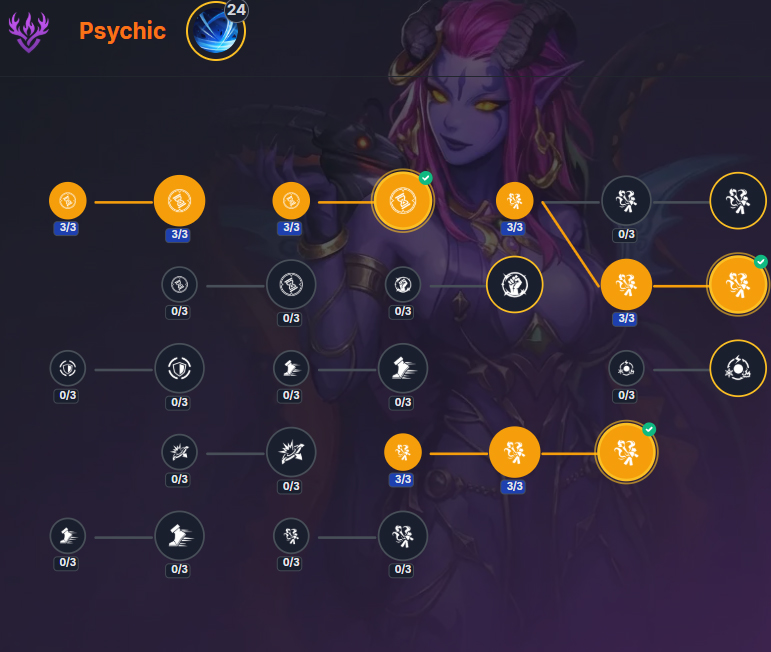
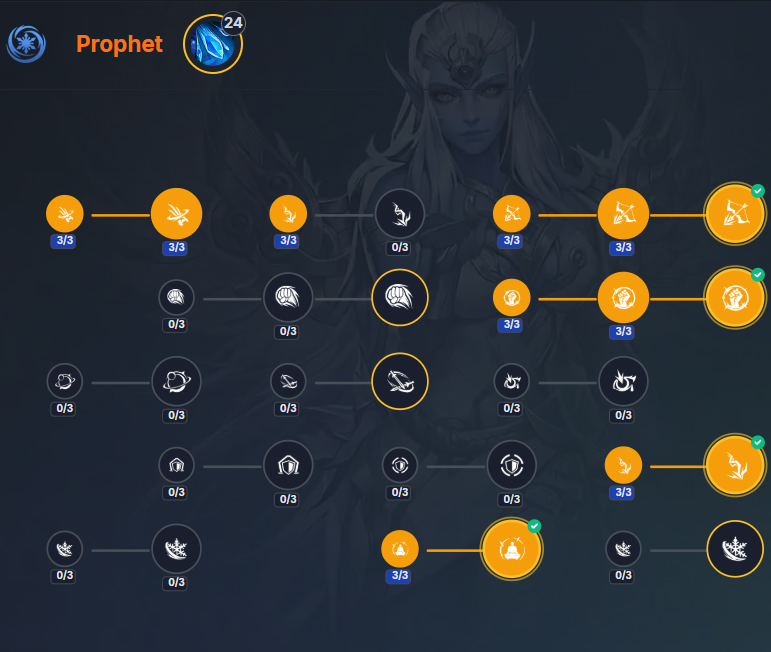
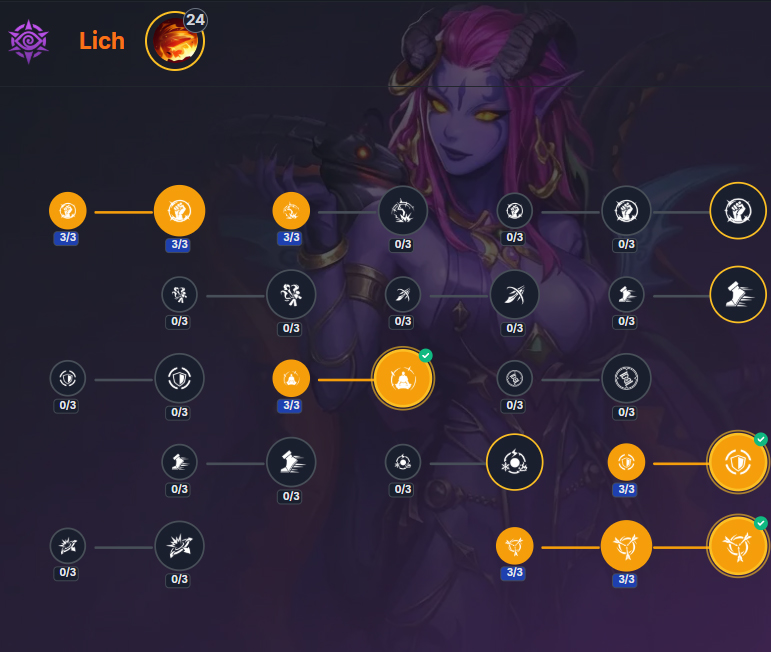
Our four-tree foundation uses Goddess of Deception, Psychic, Prophet and Lich. The distribution below follows an established 103-point progression structure: 24 / 24 / 31 / 24. The major talents serve our Affliction, Cold DoT and ES/Blur setup. The attached screenshots remain the basis for the 103-point allocation.
| Talent Tree | Points | Major talents and preferred stats |
|---|---|---|
| Goddess of Deception | 24 | Affliction (12) and Subtle Impact (24). Path through Damage Over Time, Affliction application, Energy Shield and useful area nodes. |
| Psychic | 24 | Windwalk (24) for a strong, temporary DoT bonus after reaching maximum Affliction on a target. Look for Affliction, ES, Blur and Reaping-related small talents that suit your stage. |
| Prophet | 31 | Frozen Lotus (24) for additional Cold Damage and removal of ordinary skill Mana costs. Favor Cold Damage, ES and compatible duration bonuses. |
| Lich | 24 | Ward (24) converts a portion of Sealed Mana and Sealed Life into Energy Shield. Select efficient defense and Affliction nodes leading to it. |
Goddess of Deception - Affliction and Subtle Impact
Affliction improves the frequency and effect of Affliction applied by the build. Cataclysm builds on that mechanic, and an equipped Ice Bond adds a further Cold damage benefit once Frostbite is active. At 24 points, Subtle Impact rewards Blur uptime with additional Damage Over Time. Phantom Trace can supply Blur during T7, with jewelry taking over that job as the third Frost Terra support slot changes to Snow Shell.
Psychic - Windwalk and a Stronger ES Base
Windwalk rewards the moment an enemy reaches maximum Affliction, adding a brief burst of DoT damage to that target. This is most noticeable on elites and bosses, where Selena can maintain a Terra long enough to build the stacks. Psychic also contains useful Energy Shield, Reaping and Blur Effect nodes. Their value shifts if you eventually adopt a dedicated Reap trait path.
Prophet - Cold Damage from Frozen Lotus
Frozen Lotus increases Cold Damage and removes skill Mana costs. Frost Terra benefits directly from the damage bonus. The reservation created by auras and automatic activation remains a separate part of the resource calculation, so the trait and passive selections still deserve attention. Cold Damage and defensive nodes round out the rest of this tree.
Lich - Ward for an Energy Shield Farmer
Ward adds Energy Shield based on Sealed Mana and Sealed Life. With Silencing Severance, Drenched Hem and several auras involved, it becomes an attractive way to recover offensive value from resources already reserved. Players investing heavily in support levels can investigate Off The Beaten Track later, though that choice changes the major talent and calls for a separate reservation check.
3. Active Skills and Support Links
By Timemark 7, Selena has more room to specialize than her campaign skill bar suggests. Frost Terra handles the steady Cold Damage, Ice Bond improves damage against Frostbitten enemies, and Black Hole helps gather packs while building Affliction. Blink and Compound Tonic cover movement and recovery. The skill groups below describe an equipped midgame character, followed by the more expensive T8 changes.

[Main DPS] Frost Terra
Selena's permanent damage field follows her through Dance of the Deep and builds a stronger Cold DoT when Terra Charges are spent. Persistent ticks also inflict Frostbite, setting up additional damage through Ice Bond. At T7, Phantom Trace is particularly useful: Frost Terra's continuous damage supplies Blur, supporting Subtle Impact and an early ES-based defensive package.
Shortened Duration strengthens the persistent damage. Ground Divide improves the Terra Charge engine, while Cataclysm develops Affliction. The final Increased Area support maintains comfortable coverage when navigating wide maps. On compact boss arenas, Spell Concentration is a possible fifth-slot alternative for more damage and a smaller field.
Snow Shell belongs in slot three and gives an Energy Shield recovery benefit while Selena stands on her Terra. Once it replaces Phantom Trace, Blur must come from talents and equipment such as Chain behind the Curtain, Folklore of Locking Fingers, or another functioning source. Cohesion occupies slot five, increasing damage as the Terra persists and gradually narrowing its area. Its concentrated field is especially useful against bosses that remain close to Selena.
Alternative special supports: Rime (Magnificent) competes with Snow Shell in the third slot for an offensive, Freeze-oriented setup. Winter's Bite (Noble) takes Cohesion's fifth slot and converts Terra Charge scaling into a Cold-damage-taken effect. These choices change how the build deals damage and are best compared on long-lived targets.

[Cold Empower] Ice Bond
Place an Ice Sentry near a boss or a sturdy elite to gain Euphoria. The buff gives Selena's other skills additional Cold Damage against Frostbitten enemies, a condition Frost Terra can sustain itself. Its beam also offers an additional source of Cold hits. Recast the sentry as the fight moves away from its area.
Mass Effect and Well-Fought Battle develop the Empower side of Ice Bond through additional charges and accumulated effect. This is one of the more valuable utility upgrades to explore once the main five-link is finished. In an early setup, a modestly supported Ice Bond already provides its fundamental Euphoria bonus.

[Affliction and Control] Black Hole
Black Hole draws monsters together and applies Affliction through its damage-over-time effect. It also provides an Euphoria bonus that increases damage dealt to enemies caught inside the field, with the reward rising alongside their Affliction. This makes it useful against clustered elites and bosses that remain in place for several seconds.
Cast it as a tougher enemy enters your Terra, then remain close enough to keep both areas overlapping. The shortened cooldown helps when encounters are spaced only a few seconds apart.

[Mobility] Blink
Blink is the emergency step across hazardous ground or through a boss's telegraphed attack. It also makes awkward map layouts easier to navigate while the damage field stays attached to Selena.
Prioritize a responsive cooldown. The moving Terra already handles ordinary pack clearing, so Blink can remain available for dangerous terrain and boss mechanics.

[Recovery] Compound Tonic
Compound Tonic restores resources during the move toward an Energy Shield-heavy character. Snow Shell and ES recharge eventually cover much of the routine damage; the tonic remains useful during bursts that briefly overwhelm those layers.
The tonic is an easy slot to keep functional while the main damage links and expensive utility gems receive most of the investment.
4. Passive Skills and Auras
For established Timemark 7 mapping, the most interesting offensive addition is Deep Pain. Its Damage Over Time bonus applies directly to Frost Terra, and the Precise version later adds a useful source of Affliction. Ice Focus remains an efficient Cold passive; Frigid Domain, Energy Fortress and Swiftness give the character room to shift between damage, protection and map speed as the Mana-sealing setup develops.

[Main DoT Aura] Deep Pain / Precise: Deep Pain
Deep Pain raises damage from the persistent effects that carry Frost Terra through Netherrealm. It is a strong first large aura for the Affliction route. Precise: Deep Pain brings a larger damage bonus and additional Affliction inflicted per second, helping Windwalk and other Affliction-based effects develop faster during a boss fight.

[Cold Passive] Ice Focus
Ice Focus provides additional Cold Damage and contributes its own Focus mechanic during combat. The Cold damage bonus benefits Frost Terra directly, making this a convenient addition when the reservation budget allows.

[Alternate Damage Aura] Frigid Domain
Frigid Domain increases Cold Damage and works particularly well with Ice Bond's bonus against Frostbitten enemies. Use it as the principal 50% aura while leveling Cold scaling, or compare it against Deep Pain when the character's Affliction and DoT multipliers are better developed. The Precise version becomes attractive at higher budgets.

[Defensive Aura] Energy Fortress
Energy Fortress increases the base Energy Shield pool, making percentage-based recovery from Snow Shell more valuable. It is a sensible large-aura substitution for harder Timemark stages, particularly during the transition from mixed defenses to a proper ES build.

[Mapping Speed] Swiftness
Swiftness keeps travel brisk and helps Selena carry her Terra from one pack to the next. The low reservation is convenient after Silencing Severance and the main DoT aura are already functioning.
5. Leveling and Recommended Progression
Frost Terra becomes a moving damage field early, but its support skills are what turn it into a comfortable Timemark farmer. Aim for a complete regular five support slots by T7, then introduce the specialized gems as the character's Energy Shield and Blur sources become stronger.
Campaign: Get Frost Terra Moving
Use Frost Terra from the start, initially with Ground Divide, Cataclysm and any efficient area or persistent-damage supports you can equip. Movement Speed, a working caster weapon and elemental resistances carry the campaign. At level 45, Silencing Severance automates the main Terra and makes movement itself the basis of combat.
T5-T6: Establish Affliction and Energy Shield
Unlock the key damage-over-time talents, improve Terra Charge recovery and start collecting Energy Shield gear. Black Hole helps keep difficult packs together while Affliction develops. A functional Deep Pain or Frigid Domain aura provides another sizeable improvement once its reservation fits.
Timemark 7: Complete the Five-Link
Use Shortened Duration, Ground Divide, Phantom Trace, Cataclysm and Increased Area on Frost Terra. Phantom Trace supplies the Blur needed for Subtle Impact, and Ice Bond adds a meaningful Cold-damage Euphoria during boss fights. Develop Ice Bond with Empower-effect supports when Skill Energy permits. A good ES chest and reliable resistances should be in place before attempting sustained T8 mapping.
Early Timemark 8: Add Specialized Recovery
Snow Shell (Magnificent) replaces Phantom Trace in the third support slot when a larger Energy Shield pool makes its recovery attractive. By this point the character benefits from a stable alternative source of Blur, often through the Chain behind the Curtain and Folklore of Locking Fingers combination. Keep Black Hole and Ice Bond available for prolonged boss encounters.
Established T8: Focus the Damage
Frost Terra: Cohesion (Noble) occupies the fifth support slot and narrows the damage area while rewarding longer Terra uptime. Improving Skill Area on equipment can make the change more comfortable during mapping. Precise: Deep Pain and more effective Affliction scaling give the finished DoT configuration a convincing bossing direction.
Profound: ES, Blur and Optional Reap
Continue developing Energy Shield, Blur Effect, Cold DoT and damage duration. The Paradise I Curse / The Cycle I Resist route offers a different way to turn Terra replacement into Reaps and makes Crit Rating and Reaping mechanics much more important. It is an option for a later full trait change; the main setup here keeps the automatic Terra and steady Cold damage.
6. Gear Setup and Stat Priorities
For our Frost Terra variant, equipment needs to solve three problems: persistent Cold Damage, comfortable area coverage and defenses that work while Selena is moving. Early rares cover attributes and resistances. The stronger pieces gain value after Snow Shell, Blur and the automatic Terra are already operating together.
Recommended Equipment and Alternatives

Weapons - Cold / Persistent Damage Caster Weapons
Begin with two caster weapons that increase applicable Cold Damage, Persistent Damage, Skill Levels and other useful caster stats. At T7, a high-level rare with useful Cold and persistent-damage modifiers can carry the main five-link for a long time. Later weapons can devote more affixes to Cold scaling once rings and armor provide the essential resistances.
Check whether a modifier affects Frost Terra itself. Generic Spell Hit Critical Strike scaling belongs to other versions of Selena.

Helmet - Corrupted Marrow / High-ES Rare
Corrupted Marrow gives a convenient Terra-related package and improves the character's movement after casting. Its reduction to Terra Charge restoration can become inconvenient once the automatic setup is working. A high-ES rare helmet with resistances and useful level or damage affixes is our longer-term preference.
Corrupted Marrow is an accessible bridge; check how its Charge trade-off feels before keeping it in T8.

Body Armour - High-ES Rare / Twilight Vestment
A crafted Energy Shield chest is a dependable foundation for Snow Shell. Twilight Vestment brings skill levels and triggers Energy Shield recharge when Reaping; that interaction is valuable once the character has a reliable Reap source. The fully automated, non-Reap route can remain on a strong defensive rare.
The Reap-oriented option becomes much more attractive with the Paradise/Cycle variant and related Psychic nodes.

Necklace - Rare Cold Amulet / Chain behind the Curtain
Chain behind the Curtain improves Energy Shield and lets movement build Blur Rating. Its Blur-based Affliction Effect is a useful scaling route for our Deception and Psychic talents. Start with a rare amulet that fixes attributes and elemental resistances, then consider this specialized option when Blur uptime is established.
An upgraded chain works best with meaningful Blur Rating, so judge it together with rings and belt.

Gloves - Crafted ES and Cold Damage Rares
Use this slot for Energy Shield, resistance corrections, Cold Damage and applicable skill modifiers. Gloves can support the damage plan while leaving enough room for defenses elsewhere. Exceptional crafted affixes become more useful after all main skill supports are equipped.

Belt - Defensive Rare / Eternal Sea Fog
Eternal Sea Fog makes Blur Rating improve Movement Speed and adds Blur generation around evasion. Its negative Blur Effect roll can reduce the value of Subtle Impact and other Blur modifiers, so inspect the actual item carefully. A good rare defensive belt is often the easier choice during T7.
A higher-quality Fog belt belongs in a developed Blur package, where its movement gain can be used consistently.

Rings - ES Rares / Folklore of Locking Fingers
Crafted rings cover Energy Shield, resistances, Intelligence and Cold scaling. Folklore of Locking Fingers offers Max Life/ES, Blur Effect and a damage-over-time benefit tied to Blur Rating. In the left ring slot, it can restore Blur shortly after the buff ends.
The left-slot effect is particularly appealing for maintaining Subtle Impact while clearing maps.

Boots - Movement Speed and Energy Shield
Prioritize a movement roll that makes Selena comfortable to steer through dense packs, plus Energy Shield, resistance and appropriate defensive stats. Air Treaders work as an early convenience option; a good crafted pair has more room to balance mobility with late-stage survival.
7. Hero Memories, Divinity Slates and Pactspirits
By T7 the build has its automatic Terra, a regular five-link and supporting skills that develop Affliction and Cold damage. Hero Memories and Divinity Slates become the next sizeable upgrades. This is a good place to reinforce an existing advantage: larger Energy Shield, more Affliction, stronger Cold damage and enough area to exploit Cohesion.
Look for Dance of the Deep trait levels and modifiers that benefit your automatic-Terra and Energy Shield route. Meaningful bonuses to Cold Damage, Skill Area and resource management are valuable as the trait develops.
Prioritize appropriate Cold/Persistent Skill bonuses, Affliction Effect, Energy Shield, Blur Effect and useful defensive improvements. A Slate that reinforces the chosen major talents is a more sensible purchase than an isolated high-tier affix.
Begin with available defensive or damage companions. Cold-related bonuses, Energy Shield and general Damage Over Time effects suit this setup. Specialized Pactspirits can come later, once the skill and armor package are complete.
Reliable defensive buffs and enemy debuffs are welcome in long encounters. Check the actual combination equipped on the Follower; a debuff that rarely lands will make less difference than steady ES recovery.
How the Reap Version Changes the Build
A more technical alternative uses The Paradise I Curse with The Cycle I Resist. Enemies inside the Terra receive Ominous, and overlapping Terra casts can Reap part of their remaining Damage Over Time. Reaping-related Psychic nodes and Twilight Vestment gain a new purpose in that configuration. It rewards a closer look at Crit Rating conversion into Terra duration and the rate at which new Terras replace older ones.
That is a substantial change to the damage and activation loop. Reserve it for a full respec built around those exact Hero Traits and Memories. The Snow Shell/Cohesion setup above develops the T7 farmer through improved ES recovery and more concentrated Cold DoT.
Final Thoughts
Frost Terra Selena 2 is an excellent choice for players who want powerful Cold Damage with very little stopping between packs. Dance of the Deep keeps the damage field moving, Affliction improves pressure on sturdy targets, and Snow Shell gives an Energy Shield character welcome staying power. Cohesion then turns that comfortable farming setup into something more threatening during extended fights.
A complete T7 Frost Terra setup, supported by Ice Bond and Black Hole, forms a strong foundation for the later Snow Shell and Cohesion upgrades. There is plenty of room for refinement later, particularly for anyone drawn to Selena's Reap interactions.