Fire Whirlwind Berserker Torchlight Infinite Build
One of the best beginner-friendly Melee setups for the Rehan the BerserkerFire Whirlwind Berserker Build
Last Updated: 01 December 2022
Build Overview
Whirlwind is a great AoE melee skill that can deal tons of damage if set up properly. It is one of the strongest abilities in the game, which is clearly shown by the following build's popularity! Below, we feature our take on the Whirlwind Berserker Build.
This following Fire Whirlwind Berserker Build tries to unlock the full potential of Whirlwind by converting as much of its Damage from Physical to Fire and stacking 4 minimum Channeled Energy to fully benefit from the Steep Strikes/Raging Slash combo. With the following setup, which includes three support Skills (Bull's Rage, Bloodthirst, and Compound Source), optimized passives, and min-maxed gear, its Damage numbers get to ridiculous levels (to the point where Recount just breaks on a target dummy, and shows 99,999,999 Damage which is the max it can actually display...). For mobility, the build utilizes the Leap Attack with Quick Mobility upgrade, which is one of the more ridiculous skills in the game as well.
Note: Contrary to what you may think from the above description, the build also stacks quite a lot of defense which actually makes it very tanky on top of the ridiculous damage levels.
You can also check our other Torchlight Infinite builds at The Best Torchlight Infinite Character Builds
 Pros Pros |
| Insane AoE Damage |
| High Mobility |
| Good Survivability |
 Cons Cons |
| You deal mostly one type of Damage (Fire) |
| Requires you to have 4 minimum Channeled Energy to show its full potential |
Talents
|
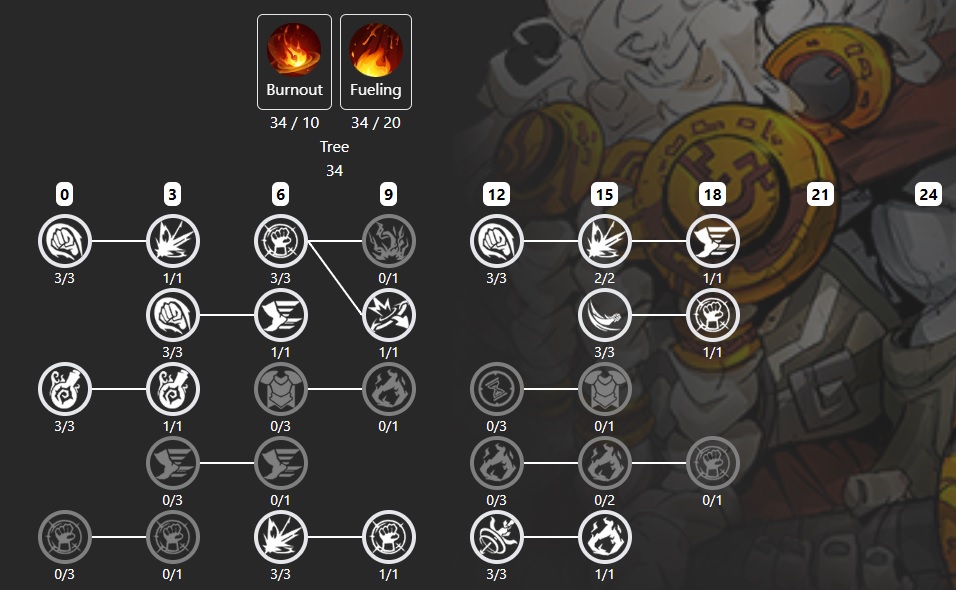
GOD OF MIGHT |
|
You should focus on getting as many offensive stats as you can get from this Passive Tree, but you shouldn't neglect your defense too much. God of Might Tree offers a solid mix of Melee and Fire Damage increases as well as some solid defensive utility - by selecting the highlighted Talents, we try to take full advantage of that. Core Passives: The 3% Strength and 1% chance to deal Double Damage per 100 Strength (15-point bottom Talent) is the most noteworthy node of the God of Might Passive Tree. With our levels of strength, it offers an unbelievable DPS increase. Other than that, we focus our Talents on Strength (+45 flat bonus and the above-mentioned +3% on top of that), Skill Area (+20%), Attack Damage (+96% total), Attack Critical Rating (+45%), and Maximum Life (+47% total) as well as Life Regain (+24%) for some extra defenses. Main Talents: Burnout: +30% Extra Fire Damage at the cost of giving +25% Fire Resistance to enemies that suffer from Severe Injury for 1 second. This offers an unbelievable DPS increase as a large percentage of this build's damage comes in the form of fire. In some situations, Elimination might be a solid pick as well, however, you can get a similar effect from other sources which makes it less appealing in our eyes. Fueling: Your Damage ignores enemy Fire Resistance. This nullifies the downside of Burnout, solidifying it as a top Talent pick. Other choices are also quite decent, but we find this one just a notch above them, in terms of offered power gains. |
|
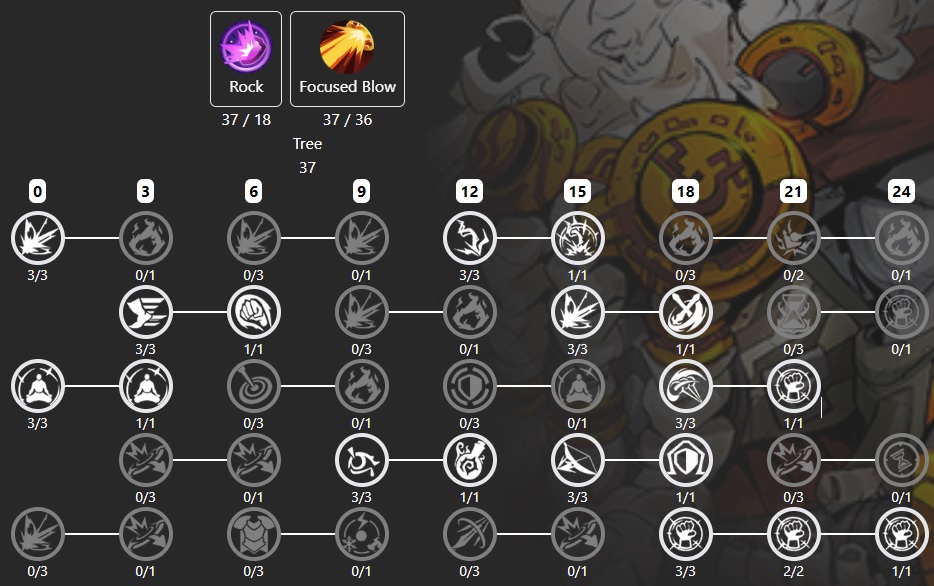
WARLORD |
|
Warlord Skill Tree offers us a set of bonuses that are extremely beneficial. We use them to take our overall DPS to a whole new level. Core Passives: The 18-Point second-row Talent (50% Physical Damage converted to Fire Damage) is the most important Passive in this entire build as it allows us to scale our Fire Damage much better and increases our Damage potential by a large margin as a result. Other than that, we try to focus on the same general modifiers as we've chosen from the God of Might Tree: We take as much Strength as we can (45 total), secure a lot of Fire Damage (+72%) and Critical Strike Rating (+90%), improve our AoE Damage (+36% - amazing for Whirlwind), and increase our defenses by improving our Life (+48%) and Maximum Energy Shield (+25%). Main Talents: Rock: +2 to Maximum Tenacity Blessing Stacks, +15% Fire Damage per stack of Tenacity Blessing Owned. This handy Talent allows us to scale our Fire Damage even better and it offers the most universal benefits, thus, we pick it over the other two. Sweep is also a good choice as it works extremely well with Whirlwind and increases the build's overall AoE damage by a lot. Wildfire is a solid choice if you like soft execute effects. Focused Blow: Area Skills deal up to 40% Extra AoE Damage to enemies at the Center. This effectively increases our Single Target DPS - all you need to do to benefit from this fully is stand on top of tougher enemies as they will take 40% more damage then. |
|
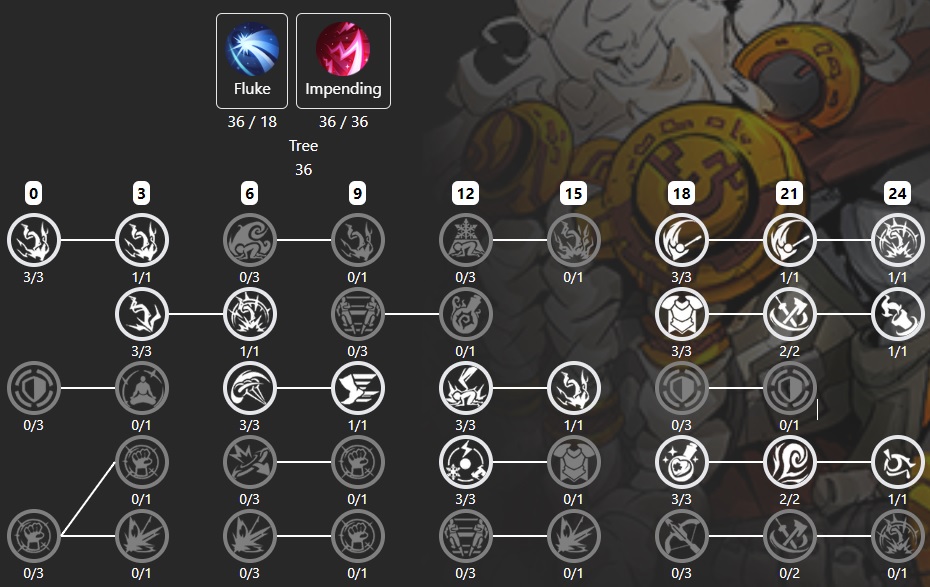
RANGER |
|
Ranger Passive Tree allows us to improve our Crit Chance and Crit Damage by a lot. It also gives us the ability to Eliminate Enemies under 8% Life with Critical Strikes (24-point, second-row Talent), which makes the build even more reliable in terms of AoE clearing. Core Passives: The above-mentioned Critical Strike Can Eliminate Enemies Under 8% Life is a great addition to the build (it also makes Elimination Talent from God of Might Tree less appealing). Passives that offer Fervor Effect are great as well. The best thing about the Ranger Tree is that it offers a lot of Critical Strike Rating (we take +160% from it) and Critical Strike Damage (we take 90%) as well as Critical Strike Rating per Nearby Enemy (20% per Nearby Enemy in total). It also allows us to increase our Melee Damage (+36%), Maximum Life (21%), and Armor (36%). Main Talents: Fluke: Critical Strikes have the Lucky effect while having at least 50 Fervor Rating. This is a great effect provided that we can stack Fervor reliably (and we can, thanks to Ranger Talents). After we've secured enough Crit, we might change it for Gravity as it offers a nice Melee Damage Bonus and a handy pull-in effect. Impending: Enemies within 10 meters take 6% more damage per 0.25 seconds. This effect stacks up to 5 times for a total of +30% Damage after 1.25 seconds. This effect matters the most against the tougher enemies, so mainly Bosses. |
|
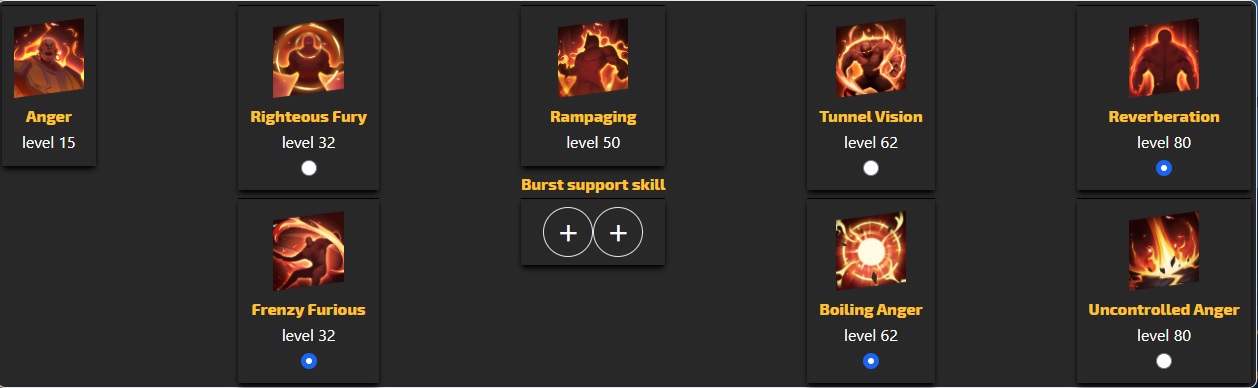
HERO TRAITS |
|
SKILLS
| ACTIVE SKILLS |
|
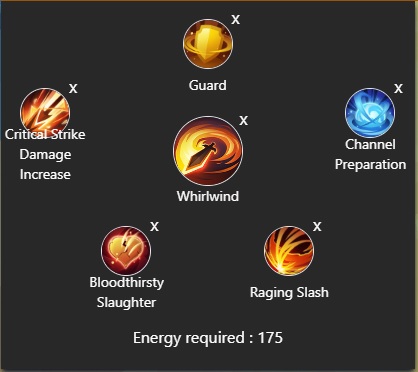
Channel this skill to build up channeled stacks and attack enemies. When max stacks are reached, consume all stacks and form a rapidly expanding hurricane of blades that damages all enemies in a large area around you. Blades are considered as Steep Strike. This is the signature offensive ability of this build. It offers amazing AoE coverage and deals surprisingly high single-target damage as well. With good enough gear, you can start Whirlwind with 4 minimum channel energy, which makes it even stronger. Support Skills:
|
|
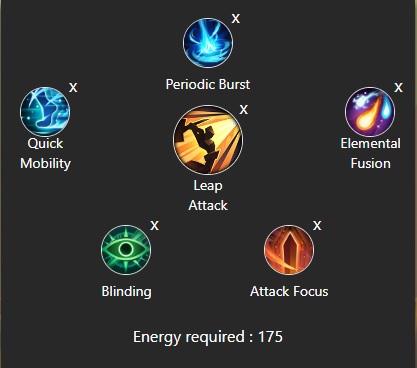
Leap towards the Target and Slam the ground upon Landing. If Leap has Demolisher Charge, it is consumed and converted into a buff that makes every enemy hit by Leap increase its Damage and Skill Radius. This is a CRAZY mobility skill that allows you to move unbelievably quickly while obliterating everything in your way. Support Skills:
|
|
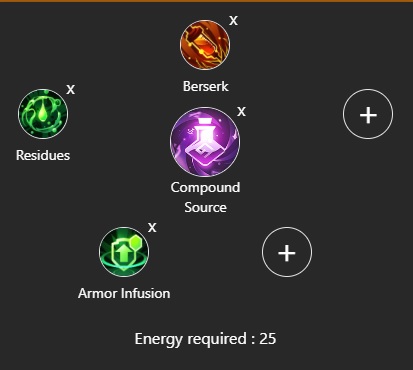
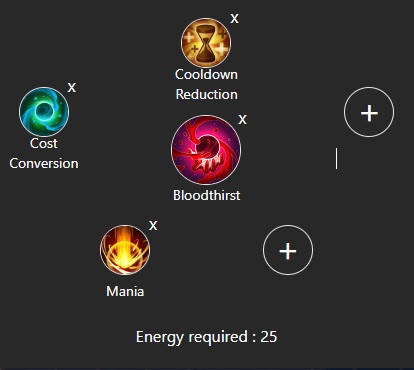
Restores Life and Mana over Time. The Restoration stops once your Life is full. Compound Source is Charged Up by defeating enemies. This is a solid sustain/support skill that not only replenishes our resources but also provides us with a solid DPS boost when it's recovering (thanks to the Berserk Support Skill). It's not as good against bosses as it requires you to defeat enemies to work properly, however. Support Skills:
|
|
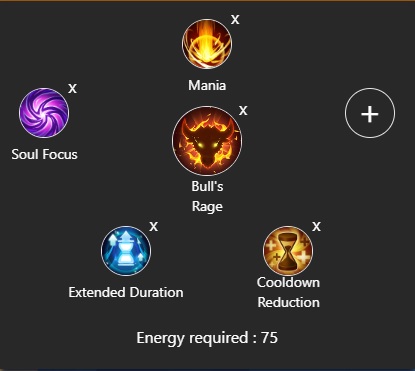
Increases Melee Skill Attack Speed and Skill Radius when Active. Bull's Rage costs Life instead of Mana. This is highly synergistic as losing some of our life is actually beneficial as we have effects that convert % of missing Life into Damage. Other than that, it's just a solid DPS increase overall. With the chosen Support Skills we try to bring its uptime as close to 100% as possible. Support Skills:
|
|
Increases Attack and Movement Speed, and provides Enlarged Physique effect at the cost of taking Damage over Time for its Duration. Eliminating or Hitting an Elite enemy has a chance to refresh Bloodthirst's Duration. This Ability's main purpose is to give us as much Increased Attack Speed as possible. Support Skills:
|
| AURAS & PASSIVE SKILLS |
|
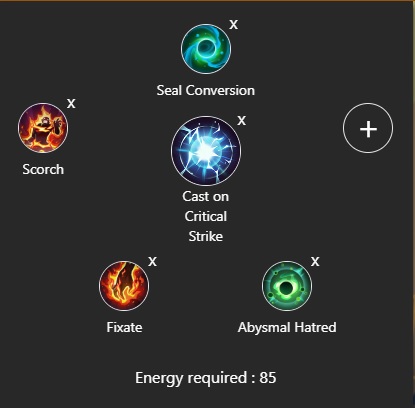
Makes Main Attack Skills Trigger 1 linked Spell on a Critical Strike. The Triggered Skill is granted an increased Skill Radius and Duration. This effect cannot be applied to Channeled Skills. With our levels of Crit Chance, this is unbelievably powerful, especially when combined with the following Support Skills: Support Skills:
|
|
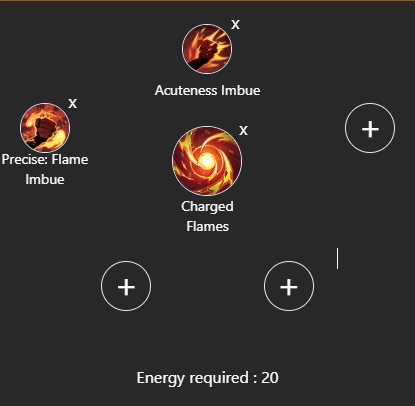
Additionally increases the Fire Damage of your and your nearby allies' Attack Skills. Also adds Fire Damage to Spell Skills and Increases Ignite Damage. This is a great fire-centered Passive and we are a fire-damage build, thus we take it without hesitation. It increases our overall DPS fairly significantly. With the selected Support Skills, it works great with Ignite and we have plenty of that. Support Skills:
|
|
Increases your and Your nearby Allies' Movement Speed. This is a nice and cheap boost to the build's already great mobility. Support Skills:
|
EQUIPMENT
| STAT PRIORITY | ||||
|
With this build, you want to stack as much Strength as you possibly can to maximize your damage output (both flat and percentage Strength increases are great). Increasing AoE Damage is also a great idea as it works well with Whirlwind. Effects that convert Physical Damage to Fire damage are also of very high value to you. As for defenses, increasing your Life will certainly help. Taking care of Resistances is also extremely important in terms of increasing survivability.
|
||||
| CORE MODS | ||||
|
||||
| LEGENDARY ITEMS | ||||
Infinity with Quick Ritual is the best-in-slot item that provides you with +1 to minimum Channeled Energy which makes Whirlwind deal Steep Strikes much more consistently, resulting in higher damage numbers.
End of Confusion with a 20% chance to gain a stack of Tenacity on Taking Damage and +2 maximum Tenacity Stacks is a great pick as it actually works with Bloodthirsty which means that you can easily keep the stacks up. |


|
END NOTE This is the beta version of our Fire Whirlwind Berserker Build for Torchlight Infinite. We had a lot of fun testing this build, as it's extremely powerful right from the start and gets simply ridiculous when fitted with optimal gear in the end game. If you're looking for a highly capable beginner-friendly build, you simply won't find anything better. As the game gets new content updates, we will be updating this guide regularly, though it may be impossible to be done after each Patch. |
Pictures used in this article are the intellectual property of XD Inc.