Ember Fusillade Gemling Legionnaire POE 2 Build
A hyper‑fast Cast on Dodge Gemling Legionnaire that triggers Ember Fusillade on every roll, turning speed into raw destructive power.Cast on Dodge Ember Fusillade
Gemling Legionnaire Build
Updated for Path of Exile 2 Early Access
The Best Crafty Guides by Odealo
| Guide notes |
| June 26, 2026 - Created for Early Access Patch 0.5.0 |
| Build Overview | |||
| Tags: [CRIT] [CHAOS] [ENERGY SHIELD] [PROJECTILE] | |||
|
Budget: Defenses: |
|
Boss DPS: AoE: |
|
This version of the Cast on Dodge Gemling Legionnaire is designed as a high‑end setup for players who want extreme speed, premium gear scaling, and a unique playstyle where movement itself becomes your main offensive and defensive layer. The build triggers Ember Fusillade every time you dodge roll, letting you deal powerful bursts of damage without ever stopping to cast.
At the center of the build is the interaction between Cast on Dodge and Ember Fusillade. Cast on Dodge generates Energy as you roll, and once you reach maximum Energy, it instantly triggers socketed spells. With high movement speed, extended dodge distance, and cooldown recovery, you hit maximum Energy constantly, firing Fusillade multiple times per second.
The gameplay is fast, fluid, and highly reactive. You never stop to cast - you move, dodge, reposition, and the build handles the damage for you. As you roll through packs, Ember Fusillade fires in rapid bursts, chaining screens while you stay in constant motion. Thanks to the incredible scaling potential provided by the Gemling Legionnaire ascendancy, the build reaches one of the highest ceilings available in the game.
This is also an incredibly expensive build, with key items often reaching dozens or even hundreds of Divines. However, the return on investment is visible in every single aspect of the setup - from its unique, fluid gameplay, to its unmatched speed, and even its surprisingly strong defensive layering through mobility. It’s the perfect choice once you have a larger budget and want to invest in something truly exceptional that keeps scaling higher the more you put into it.
You can also check our other Path of Exile 2 builds right over here Odealo's Crafty Guides - Full List
1. Gameplay
The gameplay is extremely fast, simple, and fully movement‑driven. Once you enter a map, all you really need to do is roll toward enemies. Every dodge roll instantly builds Energy and triggers Ember Fusillade the moment you reach maximum Energy, causing your projectiles to chain across packs and clear the entire screen without any manual casting. You move, you dodge, and the build does the rest - the faster you go, the faster everything around you disappears.
For single‑target encounters, you can add a bit of manual control: cast Entangle under the boss to debuff him, then manually cast Ember Fusillade. Bosses melt almost instantly, often disappearing before they can even begin their mechanics.
|
|

2. Build's PROS & CONS
| PROS |
|
| CONS |
|
3. Leveling tips
This is not a build you can level with. Cast on Dodge Gemling Legionnaire is a fully endgame‑oriented setup that only starts functioning once you acquire several mandatory items and ascendancy bonuses. During the campaign and early maps, you should use any comfortable leveling build you prefer such as Grenades or Twister, because the core mechanics of this setup simply do not exist before the required gear is online. The moment the build becomes playable is when you can equip Decree of Flight, Palm of the Dreamer, and Split Personality with the Shadow's starting point. These items unlock the mobility scaling, cooldown flow, and stat stacking that the build relies on. Once you reach this point - typically deep into endgame - you can safely transition into the full Cast on Dodge setup and experience the build as intended.
4. Final Skill Tree, Ascendancy Points, and Pantheon
Final Skill Tree:
 |
|
Click on the image to open the Passive Tree preview in a new window, or use the Path of Building (PoB) tool, |
Ascendancy points:
Preferably in this order:
- Essence of Virtue
- Advanced Thaumaturgy
- Implanted Gems
- Gem Studded
5. Final Gems links
| [DPS] Cast on Dodge Ember Fussilade amulet setup | |
 |
Cast on Dodge - meta trigger skill that stores Energy per metre travelled while dodge rolling. Once you reach maximum Energy, it releases socketed spell. This turns your dodge roll into you primary offensive skill. Because this version comes directly from your amulet, it costs no Spirit. |
 |
Ember Fussilade - is a rapid‑fire projectile spell that unleashes multiple fiery shots in a tight spread. In this build, thanks to heavy reduction of skill effect duration, Fusillade becomes instant, firing all its projectiles immediately instead of over time. We support it with Wildshards for extra projectiles, Boundless Energy to increase Energy generation, Efficiency to reduce mana costs, and Energy Retention for a chance to refund Energy cost. |
 |
Wildshards II |
 |
Boundless Energy II |
 |
Efficiency II |
 |
Energy Retention |
| [DPS] Cast on Dodge Ember Fussilade setup | |
|
Cast on Dodge - an additional DPS setup we run alongside the amulet version, giving us a second independent trigger source and dramatically increasing the density of Ember Fusillade bursts during dodging. |
|
Ember Fussilade - we support it with Dialla’s Desire for +1 gem level and extra quality, Dominus’ Grasp to make our projectiles chain more times, Efficiency to help with mana costs, and Sione’s Temper for more projectiles. |
 |
Dialla's Desire |
 |
Dominus' Grasp |
|
Efficiency II |
 |
Sione's Temper |
| [DPS] Cast on Critical Ember Fussilade setup | |
 |
Cast on Critical - this is simply another source of Ember Fusillade, activating whenever you crit after your dodge‑roll projectiles have already been fired, working analogously to Cast on Dodge and adding a second wave of instant Fusillade bursts for even higher damage density. |
|
Ember Fussilade - we support it with Wildshards II to add extra projectiles , Fluke to give our triggered Fusillades a chance to roll much higher damage while occasionally refunding part of their cost, Efficiency II to lower mana costs, and Blindside to greatly increase our crit chance and crit damage against blinded enemies, giving Cast on Critical far more consistency. |
|
Wildshards II |
 |
Fluke |
|
Efficiency II |
 |
Blindside |
| [Utility] Entangle setup | |
 |
Entangle - your single‑target plant skill, used only against bosses. It provides helpful debuffs and strengthens our single-target damage. Use the level 1 version to save mana. We support it with Poison Spores to poison enemies, Slow Potency, to increase slow effect, Poison to boost our poison, Blind to reliably blind enemies on hit, Branching Fissures to create additional fissures. |
 |
Poison Spores |
 |
Slow Potency |
 |
Poison III |
 |
Blind II |
 |
Branching Fissures II |
| [DPS] Ember Fussialde setup | |
|
Ember Fussilade - our single-target cast setup. We support it with Wildshards for extra projectiles, Blindside to boost our crit chance and crit damage against blinded enemies, Extraction to sacrifice a bit of life for extra chaos damage, Efficiency to lower costs, and Execute II to deal significantly more damage once the target drops to low life. |
|
Wildshards II |
|
Blindside |
 |
Extraction |
|
Efficiency II |
 |
Execute II |
| [Utility] Despair setup | |
 |
Despair - curses enemies in an area after a short delay, lowering their Chaos Resistance. We support it with Mobility to suffer less from movement speed penalty while casting, Heightened Curse to significantly increase effect of Despair, Prolonged Duration to extend the curse uptime, Efficiency to keep the cost low and smooth, and Slow Potency just for green support gem for our assendency point Gem Studded. |
 |
Mobility |
 |
Heightened Curse |
 |
Prologned Duration II |
|
Efficiency II |
|
Slow Potency |
| [Utility] Blasphemy curse setup | |
 |
Blasphemy - turns your linked Curse into a permanent aura, letting you apply it automatically to all nearby enemies without manual casting We support it with Ritualistic Curse and Magnified Area II to expand the aura radius so it consistently tags entire packs, Deliberation just for Gem Studded and Slow Potency to further amplify all slowing effects, making Temporal Chains even more oppressive. |
 |
Temporal Chains - applies a strong slow to enemies, reducing their action speed and giving you more time to position and dodge |
 |
Ritualistic Curse |
 |
Deliberation |
 |
Magnified Area II |
|
Slow Potency |
| [Utility] Impurity setup | |
 |
Impurity - is a chaos resistance aura. The key strength of this setup is that, because Impurity comes directly from your sceptre, both the aura itself and all of its support gems cost absolutely no Spirit, letting you run a fully supported aura for free without affecting your resource economy. We support it with Seraph’s Heart to gain a chance for incoming hits to treat our Resistances as if they were 90%, Her Declaration to apply Intimidate to nearby enemies, Clarity for increased mana regeneration and Mysticism for a strong Spell Damage bonus while we’re on full Energy Shield. |
 |
Seraph's Heart |
 |
Her Declaration |
 |
Clarity II |
 |
Mysticism II |
| [Utility] Mana Remnants setup | |
 |
Mana Remnants - simply gives us massive mana sustain, constantly generating remnants on crits and kills against ailmented enemies, and each remnant restores a large burst of Mana that can even overflow We support it with Harmonic Remnants to make collecting the Mana Remnants significantly easier, Remnant Potency to greatly amplify the amount of Mana each remnant restores, and Armour Demolisher is included only because of Gem Studded. |
 |
Harmonic Remnants II |
 |
Remnant Potency III |
 |
Armour Demolisher |
| [Utility] Ghost Dance setup | |
 |
Ghost Dance - defensive aura that gives you Ghost Shrouds which absorb hits and restore Energy Shield based on your Evasion - an absolute must‑have for any Evasion/ES build. We support it with Cooldown Recovery to increase cooldown recovery rate and Armour Demolisher for Gem Studded. |
 |
Cooldown Recovery II |
|
Armour Demolisher |
| [Utility] Withering Pressence setup | |
 |
Withering Pressence - automatically applies Withered to enemies around you, a powerful stacking debuff that increases chaos damage taken. Thanks to its alternate quality, the aura applies Withered much faster. We support it with Prolonged Duration for increased duration of Withered effect and Armour Demolisher for Gem Studded |
|
Prolonged Duration II |
|
Armour Demolisher |
| [Utility] Virtuous Barrier setup | |
|
Virtuous Barrier - gives us a massive amount of Mana regeneration in this build. We support it with Armour Demolisher for Gem Studded. |
|
Armour Demolisher |
| [Utility] The Stars Answer setup | |
|
The Stars Answer - skill that comes from Runeseeker’s Call is never actually used, but we socket it with the correct support colors to gain full benefits from Gem Studded. |
|
Deliberation |
 |
Corrosion |
|
Efficiency II |
|
Slow Potency |
|
|
6. Gear Setup
Because we use several unique items, our rare gear mainly needs to provide high Energy Shield, capped Elemental Resistances, and - whenever possible - extra item rarity. Everything else is secondary, since the uniques handle most of our offensive scaling and utility.
|
Stat priorities on items:
|
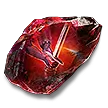
 (Weapon) Runeseeker's Call - simply the strongest and best wand in the entire game, even compared to fully mirrored rares. You can socket many different runes here, but the best are: +2 to all Spell Skills, chance for 2 additional Projectiles, Critical Strike Chance for Spells, Extra Chaos Damage, Spell Damage, Increased Withered Magnitude. (Weapon) Runeseeker's Call - simply the strongest and best wand in the entire game, even compared to fully mirrored rares. You can socket many different runes here, but the best are: +2 to all Spell Skills, chance for 2 additional Projectiles, Critical Strike Chance for Spells, Extra Chaos Damage, Spell Damage, Increased Withered Magnitude. |
|
| Only Runes can be Socketed in this item 200% increased effect of Socketed Runes Has 5 Augment Sockets (Hidden) |
|
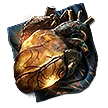
 (Weapon) Palm of the Dreamer - is a powerhouse sceptre that grants Gloom Shrine, causing killed enemies to trigger chaos explosions around them — a huge boost to clear and incidental damage. The roll on Skill Effect Duration doesn’t matter for this build, but having it reduced is slightly better. (Weapon) Palm of the Dreamer - is a powerhouse sceptre that grants Gloom Shrine, causing killed enemies to trigger chaos explosions around them — a huge boost to clear and incidental damage. The roll on Skill Effect Duration doesn’t matter for this build, but having it reduced is slightly better. |
|
|
Grants Skill: Impurity |
|
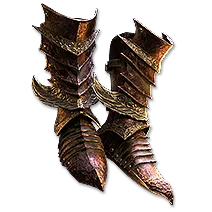 (Boots) Decree of Flight - absolutely essential for our build. Guard gained on every Dodge Roll and faster Dodge Rolls. Ideally, you want them corrupted with a faster Dodge Roll value above 30%, because that single modifier dramatically improves every aspect of the build: smoother movement, better survivability, and faster trigger cycling. (Boots) Decree of Flight - absolutely essential for our build. Guard gained on every Dodge Roll and faster Dodge Rolls. Ideally, you want them corrupted with a faster Dodge Roll value above 30%, because that single modifier dramatically improves every aspect of the build: smoother movement, better survivability, and faster trigger cycling. |
|
| 30% increased Movement Speed (150—200)% increased Armour and Energy Shield (20—30)% faster Dodge Roll Gain Guard equal to (10—20)% of missing Energy Shield for 4 seconds when you Dodge Roll Maximum amount of Guard is based on maximum Energy Shield instead Divine Flight |
|
 (Focus) Effigy of Cruelty - applies Critical Weakness on spell crits, and we apply it through Entangle, letting us stack the debuff instantly and consistently. We run this on our second weapon set, purely for the Critical Weakness utility. (Focus) Effigy of Cruelty - applies Critical Weakness on spell crits, and we apply it through Entangle, letting us stack the debuff instantly and consistently. We run this on our second weapon set, purely for the Critical Weakness utility. |
|
| +(20—30) to maximum Energy Shield (40—50)% increased Spell Damage +10 to Intelligence +(7—13)% to Chaos Resistance Critical Hits with Spells apply (1—3) Stacks of Critical Weakness |
|
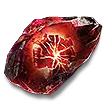
 (Amulet) Rare Amulet - a special Breach base, and we absolutely need it to have “grants skill: Cast on Dodge” - this is HUGE for the build. On top of that, we want high Spirit, +levels to all spell skills, and the Desecrated mod that gives Fire Spell Critical Hit Chance, since all three stats scale our damage extremely well. (Amulet) Rare Amulet - a special Breach base, and we absolutely need it to have “grants skill: Cast on Dodge” - this is HUGE for the build. On top of that, we want high Spirit, +levels to all spell skills, and the Desecrated mod that gives Fire Spell Critical Hit Chance, since all three stats scale our damage extremely well. |
|
|
Min. requirements: |
|
 (Right Ring) Snakepit - we use it on our right ring slot to gain +1 chain and to further increase our damage. (Right Ring) Snakepit - we use it on our right ring slot to gain +1 chain and to further increase our damage. |
|
| (20—30)% increased Spell Damage (10—15)% increased Cast Speed Left ring slot: Projectiles from Spells cannot Chain Left ring slot: Projectiles from Spells Fork Right ring slot: Projectiles from Spells Chain +1 times Right ring slot: Projectiles from Spells cannot Fork Projectiles from Spells cannot Pierce |
|
 (Left Ring) Rare Ring - we need a lot of resistances from this ring, other than that you can just go with whatever prefixes as they are mainly increasing our damage. (Left Ring) Rare Ring - we need a lot of resistances from this ring, other than that you can just go with whatever prefixes as they are mainly increasing our damage. |
|
|
Min. requirements: |
|
 (Belt) Headhunter - the build is already extremely high‑budget and endgame‑oriented, so we also use an endgame‑tier belt: either Headhunter or Mageblood. Both options push the build far beyond what any rare belt could offer. (Belt) Headhunter - the build is already extremely high‑budget and endgame‑oriented, so we also use an endgame‑tier belt: either Headhunter or Mageblood. Both options push the build far beyond what any rare belt could offer. |
|
|
+(40—60) to maximum Life |
|
 (Belt) Mageblood - can easily fix problems with resistances or speed up your build. Simply the best belt in the game. (Belt) Mageblood - can easily fix problems with resistances or speed up your build. Simply the best belt in the game. |
|
| All Mage's Legacies have (25—50)% increased effect per duplicate Mage's Legacy you have Legacy of Mages Legacy Legacy of Mages Legacy Legacy of Mages Legacy Legacy of Mages Legacy |
|
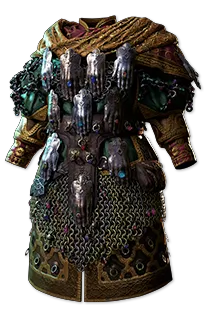 (Body Armour) Loreweave - powerful body armour that, on top of its fixed stats, also rolls three random mods taken from unique rings. For our build, the only truly important one is +1 Chain - this is the core reason we use the item. The other two ring mods can be anything, as long as they provide some benefit to the build. (Body Armour) Loreweave - powerful body armour that, on top of its fixed stats, also rolls three random mods taken from unique rings. For our build, the only truly important one is +1 Chain - this is the core reason we use the item. The other two ring mods can be anything, as long as they provide some benefit to the build. |
|
|
Adds (1—4) to (8—12) Physical Damage to Attacks |
|
|
|
|
| Min. requirements: 30% increased Critical damage Bonus +200 to Energy Shield +10% chance to gain Arcane Surge when you deal a Critical Hit Optional affixes: % increased Rarity of Items found +#% total Elemental Resistances |
|
 (Gloves) Rare Helmet - big source of resistances and ES. If you can afford it resistance wise you can look for Crit Chance. (Gloves) Rare Helmet - big source of resistances and ES. If you can afford it resistance wise you can look for Crit Chance. |
|
| Min. requirements: +300 to Energy Shield 100% total Elemental Resistance Optional affixes: % increased Rarity of Items found % increased Critical Hit Chance |
|
 (Jewel) Split Personality - mandatory unique jewel for this build - it’s the piece that lets us start from the stronger, more efficient side of the passive tree, completely changing our pathing and enabling the entire layout to function. (Jewel) Split Personality - mandatory unique jewel for this build - it’s the piece that lets us start from the stronger, more efficient side of the passive tree, completely changing our pathing and enabling the entire layout to function. |
|
| Can Allocate Passive Skills from the Shadow's starting point | |
 (Jewel) From Nothing - lets us allocate strong passives inside its radius without connecting them to the tree, giving us access to high‑impact nodes for a very small point investment (Jewel) From Nothing - lets us allocate strong passives inside its radius without connecting them to the tree, giving us access to high‑impact nodes for a very small point investment |
|
| Passives in Radius of Resonance can be Allocated without being connected to your tree | |
 (Jewel) Prism of Belief - very strong jewel because +3 levels to all Ember Fusillade skills translates directly into a huge damage increase (Jewel) Prism of Belief - very strong jewel because +3 levels to all Ember Fusillade skills translates directly into a huge damage increase |
|
| +3 to Level of all Ember Fussilade Skills | |
 (Jewel) Heart of the Well - as in almost every build, a fantastic jewel choice. Whether you hit extra Chaos, Crit, Movement Speed, or ES, it always delivers value. (Jewel) Heart of the Well - as in almost every build, a fantastic jewel choice. Whether you hit extra Chaos, Crit, Movement Speed, or ES, it always delivers value. |
|
|
Recomended Modifiers: |
 (Gloves) Rare Gloves - major offensive slot, though if you’re missing Elemental Resistances, you should always prioritize fixing them first.
|
|
If you have any other build requests please leave that in the comments below. We are always open to suggestions and constructive feedback.
Pictures used in this article are the intellectual property of Grinding Gear Games.