Conflagration Elementalist Build
Conflagration and Blast Rain of Trarthus build for the Elementalist which relies on Fire Damage over Time mechanicsConflagration/Blast Rain of Trarthus
Elementalist Build
Updated for Patch 3.27
The Best Crafty Guides by Odealo
| Guide notes | |||
| February 21, 2026 -Build created |
|||
| Build overview | |||
| Tags: [RANGED] [ELEMENTAL] [LIFE] | |||
|
Budget: Defenses: |
|
Boss DPS: AoE: |
|
The build takes advantage of Skills with a built-in Fire Damage over Time component and expands on them. Conflagration and Blast Rain of Trarthus are both Bow Attacks that inflict such damage-dealing debuff, which is distinctly not Ignite (much like the Righteous Fire Burning effect). They both scale with Projectile Damage, so including them both makes a lot of sense. By themselves, they're not very good, since they're either bad at bossing or bad at clearing maps, but combined, you can do all the content in the game reasonably fast and safely. Moreover, by virtue of not being an Ignite, the Burning Damage from both sources can amplify one another (similarly to Chaos DoT builds). You can accommodate two six-link setups for maximum damage, but one of them is linked to Manaforged Arrows to automate the process. It is optional, recommended nonetheless.
Elementalist is our pick for this build. It follows the usual drill of picking Mastermind of Discord and Heart of Destruction for potent Fire Exposure, Eye of Malice, and using two Curses. Damage over Time cannot penetrate, so this roundabout way of crippling the enemy is actually the best for extracting the most Fire Damage from the DoT skills. Liege of Primordial is the must-have passive to benefit from quasi-permanent Golem buffs, which do a lot of work in the background to make this build function. The last point can be spent on Shaper of Storms to Shock enemies and deal increased Damage. Defensively, the build relies on Maximum Life, but ES, Armour, or Evasion should be added too, especially with Stone Golem; it improves their effect. The build is quite similar to Fire Trap Elementalist; it just follows a more strict dresscode. It requires many Unique Items, most of them being neither cheap nor expensive, making it a good pick for players that don't like managing their items.
1. Gameplay
The only buttons here are Blast Rain and Arcanist Brand (for Curses). Conflagration and Frenzy are linked to Manaforged Arrows. Golems are re-summoned on death. Your Mana-Reserving Skills are Malevolence with Flesh and Stone. Try to stay close to the enemy to benefit from the Eye of Malice Helmet and Flesh and Stone Aura.
|
|

2. Build's PROS & CONS
| PROS |
|
| CONS |
|
3. Leveling tips
Follow our Fire Trap Elementalist Build guide. This one needs Widowhail and a very good Quiver to work, so it is much less approachable. You're better off just casting a Spell with your Wand instead.
Bandits:
An additional Passive Skill Point seems like the best option for this build
4. Final Skill Tree, Ascendancy Points, and Pantheon
Final Skill Tree:
92 Points Final Skill Tree (doesn't include Cluster or Unique Jewels)
123 Points Path of Building (PoB) link
Ascendancy points:
Preferably in that order:
- Liege of Primordial
- Mastermind of Discord
- Heart of Destruction
- Shaper of Storms
Pantheon:
Major God: Soul of the Brine King: You cannot be Stunned if you've been Stunned or Blocked a Stunning Hit in the past 2 seconds
Minor God: Soul of Abberath: 60% less Duration of Ignite on You; 10% increased Movement Speed while on Burning Ground, Unaffected by Burning Ground
5. Final Gems links
| [DPS] Conflagration setup | |
 |
Conflagration - Fire several Arrows into the air. Upon landing, they can be activated by you approaching them, which will result in heavy Fire DoT (not Ignite). Projectile Damage affects its DoT. You care not about Hit Damage and Ailment Damage. |
 |
Manaforged Arrows Support - Automatically fires the Arrows for you, once you spend enough Mana on other Bow Attacks. Fire Rate is not important anyway. |
 |
Swift Affliction Support - More DoT Damage, but less Duration for the Skill. |
 |
Burning Damage Support - More Fire Damage over Time. Aim for the Awakened variant. |
 |
Elemental Damage with Attacks Support - A simple boost to Elemental Damage with Attacks. |
 |
Elemental Focus Support - Elemental Focus makes you unable to inflict any Ailment, but grants more Damage. |
| [DPS] Blast Rain of Trarthus setup | |
 |
Blast Rain of Trarthus - Fires one Arrow, which releases an expanding wave of fire, dealing high base Fire Damage. More importantly, it burns enemies with a Debuff, so again, it's not Hit Damage nor Ignite that matters. |
 |
Efficacy Support - increased Skill Effect Duration and Damage over Time. |
|
Swift Affliction Support |
|
Burning Damage Support |
|
Elemental Damage with Attacks Support |
 |
Empower Support - Skill Level translates well into more damage. |
| [UTILITY] Golem setup | |
 |
Summon Flame Golem - Increased Damage and Area of Effect. |
 |
Summon Stone Golem - Flat Life Regeneration and increased Defences, such as ES or Evasion. |
 |
Summon Lightning Golem - Flat Mana Regeneration and Attack, plus Cast Speed. |
 |
Summon Chaos Golem - Additional Damage over Time Multiplier with Chaos Resistance. |
| [UTILITY] Frenzy setup | |
 |
Frenzy - Grants you one Frenzy Charge on Hit. They're good. |
| Combustion Support - With a bit of added Fire Damage (you have to get it from items), Frenzy will ignite and cripple the enemy big time. | |
|
Manaforged Arrows Support |
| [UTILITY] Curse setup | |
 |
Flammability - A Curse that lowers Fire Resistance of the enemy. |
 |
Elemental Weakness - Another Curse that does the same thing. You have to allocate Whispers of Doom to make it work. |
 |
Arcanist Brand - Allows you to cast two of these Curses with but a single press of a button. |
| [UTILITY] Other Gems | |
 |
Malevolence - More Damage over Time and increased Skill Effect Duration. |
 |
Flesh and Stone - Stay in the Sand Stance and nearby enemies to take much less Physical Damage from them. |
|
|
5. Gear Setup
The build is very accommodating towards many Uniques. Widowhail and Eye of Malice are your top choices that form the build. Legacy of Fury are the best-in-slot Boots. Other Uniques should improve the Skill Gem Level of your most important Skills (Blast Rain and Conflagration), and enhance your damage in some straightforward way. Rares are not that important, since the Uniques will provide you with more than enough Fire and Cold Resistance. Chaos and lightning Resistance are hard to come by. It's important to note that you need only one source of Flat Fire Damage (for the Combustion on Frenzy), while the Ailment Damage and Ignite Damage are irrelevant, as is the case in a RF build. The Damage is delivered via a Debuff that's already built into the Skill Gem. Your defensive stats to look for are Maximum Life with a bit of extra Energy Shield and maybe some Evasion of Armour. You need no Accuracy with the Resolute Technique.
|
Stat priorities on items:
|
 (Helmet) Eye of Malice - Once you get into negative Resistances with two Curses, Exposure, and Combustion, you will benefit from the downside this Helmet imposes, which results in even lower Resistance for nearby enemies. (Helmet) Eye of Malice - Once you get into negative Resistances with two Curses, Exposure, and Combustion, you will benefit from the downside this Helmet imposes, which results in even lower Resistance for nearby enemies. |
|
| (400-500)% increased Evasion and Energy Shield +(20-40)% to Fire Resistance +(20-40)% to Cold Resistance 25% chance to inflict Cold Exposure on Hit 25% chance to inflict Fire Exposure on Hit Nearby Enemies have 50% increased Fire and Cold Resistances |
|
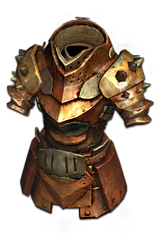 (Body Armour) The Brass Dome - The reason for wearing a Unique Body Armour is that you can Corrupt it for a +2 for socketed Projectile Gems or +2 for socketed AoE Gems, maybe even both. Brass Dome's Armour is improved by Stone Golem. (Body Armour) The Brass Dome - The reason for wearing a Unique Body Armour is that you can Corrupt it for a +2 for socketed Projectile Gems or +2 for socketed AoE Gems, maybe even both. Brass Dome's Armour is improved by Stone Golem. |
|
| (350-400)% increased Armour +(1-5)% to all maximum Elemental Resistances Strength provides no bonus to Maximum Life Take no Extra Damage from Critical Strikes |
|
 (Body Armour) Skin of the Lords - Skin of the Lords increases Global Defences, like ES, Armour, and Evasion, so it's only good if you pair it up with Items and Auras that provide this stat. (Body Armour) Skin of the Lords - Skin of the Lords increases Global Defences, like ES, Armour, and Evasion, so it's only good if you pair it up with Items and Auras that provide this stat. |
|
| Has no Attribute Requirements or Energy Shield (Hidden) Sockets cannot be modified +2 to Level of Socketed Gems 100% increased Global Defences You can only Socket Corrupted Gems in this item Has 6 Linked Sockets (Hidden) <Random Keystone> |
|
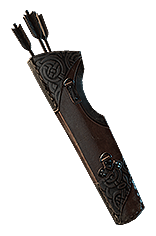
 (Weapon) Widowhail - Quivers can roll some great modifiers for this build in particular, making Widowhail the best choice. (Weapon) Widowhail - Quivers can roll some great modifiers for this build in particular, making Widowhail the best choice. |
|
| (150-250)% increased bonuses gained from Equipped Quiver | |
 (Off-hand) Rare Quiver - A Hunter's Quiver with Fire DoT Multiplier, regular DoT Multiplier, and Projectile Damage with Bow Skills will all enhance your damage. You can craft it with Essence of Woe. It should be plentiful in Maximum Life. (Off-hand) Rare Quiver - A Hunter's Quiver with Fire DoT Multiplier, regular DoT Multiplier, and Projectile Damage with Bow Skills will all enhance your damage. You can craft it with Essence of Woe. It should be plentiful in Maximum Life. |
|
| Min. requirements: +#% to Damage over Time Multiplier with Attack Skills +#% to Fire Damage over Time Multiplier with Attack Skills (Hunter Suffix) increased Damage with Bow Skills (can be found as Essence Prefix too) Optional affixes: Maximum Life increased Movement Speed |
|
 (Gloves) Rare Gloves - On Gloves, you will find Dexterity, Maximum Life, Resistances, and it's also the best place to get the required Added Fire Damage (it is available either as a Prefix or Exarch Implicit). For the Eldritch mods, get Fire Exposure on Hit, and maybe Fire Damage over Time Multiplier. (Gloves) Rare Gloves - On Gloves, you will find Dexterity, Maximum Life, Resistances, and it's also the best place to get the required Added Fire Damage (it is available either as a Prefix or Exarch Implicit). For the Eldritch mods, get Fire Exposure on Hit, and maybe Fire Damage over Time Multiplier. |
|
| Min. requirements: +100 to Maximum Life 40% total Resistance Dexterity Optional affixes: Added Fire Damage to Attacks increased Life Regeneration Rate |
|
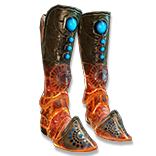 (Boots) Legacy of Fury - These Boots apply a powerful Scorch, which causes enemies to take increased Elemental Damage. They also improve your clear speed with explosions on kill. (Boots) Legacy of Fury - These Boots apply a powerful Scorch, which causes enemies to take increased Elemental Damage. They also improve your clear speed with explosions on kill. |
|
| (200-300)% increased Armour and Evasion 30% increased Movement Speed Nearby Enemies are Scorched (30-50)% increased Effect of Scorch (30-40)% chance when you Kill a Scorched Enemy to Burn Each surrounding Enemy for 4 seconds, dealing 8% of the Killed Enemy's Life as Fire Damage per second |
|
 (Belt) Rare Belt - Here, try to get Strength, Resistances, Maximum Life, and Elemental Damage with Attacks. We also heavily recommend Life Regeneration. (Belt) Rare Belt - Here, try to get Strength, Resistances, Maximum Life, and Elemental Damage with Attacks. We also heavily recommend Life Regeneration. |
|
| Min. requirements: Strength +100 to Maximum Life 40% total Resistance increased Elemental Damage with Attack Skills Optional affixes: increased maximum Life (Hunter Prefix) Regenerate # Life per second |
|
 (Amulet) Replica Dragonfang's Flight - The best amulet that's reasonably priced is Replica Dragonfang's Flight, the Blast Rain variant. Conflagration variant is slightly worse, but still better than most Rares. Rare Amulet can get you additional DoT Multiplier, but that's not nearly as good. (Amulet) Replica Dragonfang's Flight - The best amulet that's reasonably priced is Replica Dragonfang's Flight, the Blast Rain variant. Conflagration variant is slightly worse, but still better than most Rares. Rare Amulet can get you additional DoT Multiplier, but that's not nearly as good. |
|
| +(10-16) to all Attributes +3 to Level of all <Random Skill> Gems +(5-10)% to all Elemental Resistances (5-10)% increased Reservation Efficiency of Skills Items and Gems have (10-5)% reduced Attribute Requirements |
|
| Recommended Anointments: Ash, Forst and Fire |
|
 (Ring) Rare Rings - Unique Rings are better than Rare ones, so the only reason to wear such a Ring is when you lack Attributes or Resistances. (Ring) Rare Rings - Unique Rings are better than Rare ones, so the only reason to wear such a Ring is when you lack Attributes or Resistances. |
|
| Min. requirements: +100 to Maximum Life 40% total Resistance Attributes Optional affixes: Adds Fire Damage to Attacks Regenerate # Life per second increased Fire Damage Non-Channelling Skills have -7 to Total Mana Cost (crafted) |
|
 (Ring) Pyre - One of the best ways to increase your Burning Damage. It's also rich in Cold and Fire Resistances. (Ring) Pyre - One of the best ways to increase your Burning Damage. It's also rich in Cold and Fire Resistances. |
|
| +(20-30)% to Cold Resistance +(25-35)% to Fire Resistance (60-80)% increased Burning Damage 40% of Cold Damage Converted to Fire Damage 10% increased Light Radius Ignited Enemies Killed by your Hits are destroyed |
|
 (Ring) Polaric Devastation - You can use it to cover enemies in Ash, so that they take increased Fire Damage. It also has high Resistances. (Ring) Polaric Devastation - You can use it to cover enemies in Ash, so that they take increased Fire Damage. It also has high Resistances. |
|
| (15-25)% increased Elemental Damage (15-25)% increased Global Critical Strike Chance +(20-40)% to Fire Resistance +(20-40)% to Cold Resistance (10-20)% increased Duration of Ailments on Enemies Left Ring slot: Cover Enemies in Ash for 5 seconds when you Ignite them Right Ring slot: Cover Enemies in Frost for 5 seconds when you Freeze them |
|
 (Jewel) Rational Doctrine - Consecrated Ground Regenerates Life and reduces the effect of Curses on you. Profane Ground increases the effect of your Curses on the enemy. We heavily recommend making it work; use Tattoos to equalize your Intelligence and Strength. (Jewel) Rational Doctrine - Consecrated Ground Regenerates Life and reduces the effect of Curses on you. Profane Ground increases the effect of your Curses on the enemy. We heavily recommend making it work; use Tattoos to equalize your Intelligence and Strength. |
|
| You have Consecrated Ground around you while stationary if Strength is your highest Attribute 25% chance to create Profane Ground on Critical Strike if Intelligence is your highest Attribute Effects of Consecrated Ground you create Linger for 4 seconds Effects of Profane Ground you create Linger for 4 seconds |
|
 (Jewel) Sublime Vision - Malevolence's Sublime Vision saves you four Skill Points that you would spend on Whispers of Doom, which is the cost of reaching the next empty Jewel Socket, so we doubt it'll be that useful. (Jewel) Sublime Vision - Malevolence's Sublime Vision saves you four Skill Points that you would spend on Whispers of Doom, which is the cost of reaching the next empty Jewel Socket, so we doubt it'll be that useful. |
|
| You can apply an additional Curse while affected by Malevolence | |
 (Jewel) The Light of Meaning - Fire Damage Light of Meaning is usually very cheap. You can socket it near Endurance. (Jewel) The Light of Meaning - Fire Damage Light of Meaning is usually very cheap. You can socket it near Endurance. |
|
| Passive Skills in Radius also grant 6% increased Fire Damage | |
 (Jewel) Rare Jewels - On Jewels, mix Maximum Life with Suffixes that improve your Damage, namely Burning Damage and Fire DoT Multiplier. (Jewel) Rare Jewels - On Jewels, mix Maximum Life with Suffixes that improve your Damage, namely Burning Damage and Fire DoT Multiplier. |
|
| Recommended affixes: increased Maximum Life increased Burning Damage Fire Damage over Time Multiplier Attributes Resistances |
|
 (Jewel) Watcher's Eye - Malevolence modifier on a Watcher's Eye may improve your DoT Multiplier, or render you immune to a DoT Ailment like Bleed or Poison. (Jewel) Watcher's Eye - Malevolence modifier on a Watcher's Eye may improve your DoT Multiplier, or render you immune to a DoT Ailment like Bleed or Poison. |
|
| (4-6)% increased maximum Energy Shield (4-6)% increased maximum Life (4-6)% increased maximum Mana <Two or Three random aura modifiers> |
|
 (Jewel) Large Cluster Jewel - Fire Damage Large Cluster Jewel offers some great DoT options. You can buy them from RF players, since you seek exactly the same things on them. (Jewel) Large Cluster Jewel - Fire Damage Large Cluster Jewel offers some great DoT options. You can buy them from RF players, since you seek exactly the same things on them. |
|
| Recommended affixes: 1 Added Passive Skill is Widespread Destruction 1 Added Passive Skill is Cremator 1 Added Passive Skill is Smoking Remains 1 Added Passive Skill is Burning Bright |
|
 (Jewel) Medium Cluster Jewel - The most valuable notable here is probably Cooked Alive. One Brush with Death will result in much improved recovery when mapping. (Jewel) Medium Cluster Jewel - The most valuable notable here is probably Cooked Alive. One Brush with Death will result in much improved recovery when mapping. |
|
| Recommended affixes: 1 Added Passive Skill is Burning Bright 1 Added Passive Skill is Student of Decay 1 Added Passive Skill is Flow of Life 1 Added Passive Skill is Cooked Alive |
|
 (Flask) Cinderswallow Urn - Grants Recovery when mapping and increases Damage against bosses, that is against the target you Ignite. (Flask) Cinderswallow Urn - Grants Recovery when mapping and increases Damage against bosses, that is against the target you Ignite. |
|
| Onslaught Requires Level 48 +(10-20) to Maximum Charges Recharges 5 Charges when you Consume an Ignited corpse Enemies Ignited by you during Effect take (7-10)% increased Damage Catarina's Veiled (prefix) <Random recovery on kill modifier> |
|
|
Other suggested Flasks and Tinctures:
|
|
     |
|
|
If you have any other build requests, please leave that in the comments below.
Pictures used in this article are the intellectual property of Grinding Gear Games.
