"Rushing Bloodletter"
Shield Rush Paladin Build
Updated for Patch 0.8.5f
| Build notes: |
July 29, 2022
-Build created |
Build Overview
Paladin might be a warrior of light, but He doesn't shy away from unfair tactics. After all, the ends justify means, right? This is why the Paladin is one of the best candidates to create a bleed-based build with. The skill that fits Bleed Paladin archetype the best is the Shield Rush, so it will be the centerpiece of our build.
This Shield Rush Paladin is a bleed-oriented AoE damage dealer that boasts very solid defenses and achieves great clear speeds while running through some of the most difficult content Last Epoch has to offer. To make it as effective as it can be, we have focussed on minimizing the downsides of Flayer's Pride (which is a low-level Shield, but also a must-have for the build). To achieve this, we've stacked a lot of Block Chance and Block Effectiveness. To increase survivability, we've also stacked quite a lot of Health and Armor. Lastly, to ensure that our Bleeds will shred our enemies, we've secured a lot of Bleed Duration, Bleed Chance, and Bleed Effectiveness. To avoid mana-related problems, we've avoided adding any Attack Speed (mana issue can be somewhat fixed by stacking mana regen as well).
You can view the full build on the Last Epoch planner here: "Rushing Bloodletter" Paladin Build
You can also check our other Last Epoch builds and character guides
 Pros Pros |
 Cons Cons |
| Viable for T4 Soul bastion and T4 Arena Champions |
Might experience some mana-related problems if you have too much Attack Speed |
| Can Clear 400 Corruption very easily |
Requires some very specific Uniques |
Passive Skill Trees

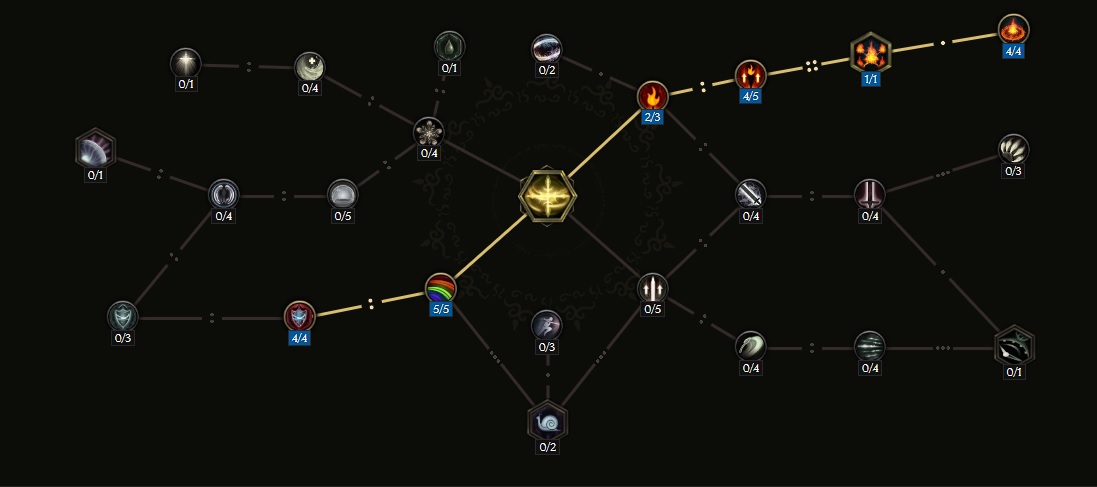
Sentinel Skill Tree (21 Points) |
|
Notable Passives:
- Juggernaut [4/8] - +4 Strength, +12% Fire Resistance, +12% Void Resistance. Some extra Str for damage scaling and some resistances for survivability. If your Void Resistance is capped, you can allocate these points into Sanctuary Guardian or Prayer Aegis instead.
- Fearless [8/8] - +8 Vitality and 80% increased Health Regen. Every build needs some extra HP and this passive covers that nicely (we take a bit more from the Paladin Tree as well). This increases our overall survivability quite significantly.
- Armour Clad [5/5] - +75 Armour, -10% Damage Taken From Nearby Enemies. This makes the build much tankier and allows us to stay in melee without worrying for our life too much.
- Gladiator [4/5] - Increases your Block Effectiveness by +90 and Block Chance by 3% (Block Chance does not scale with points allocated). Normally, you'd want just a single point here, but we spend more to make up for our shield's low Block Effectiveness. You can leave this at 1 if you're lacking Points.
|
|
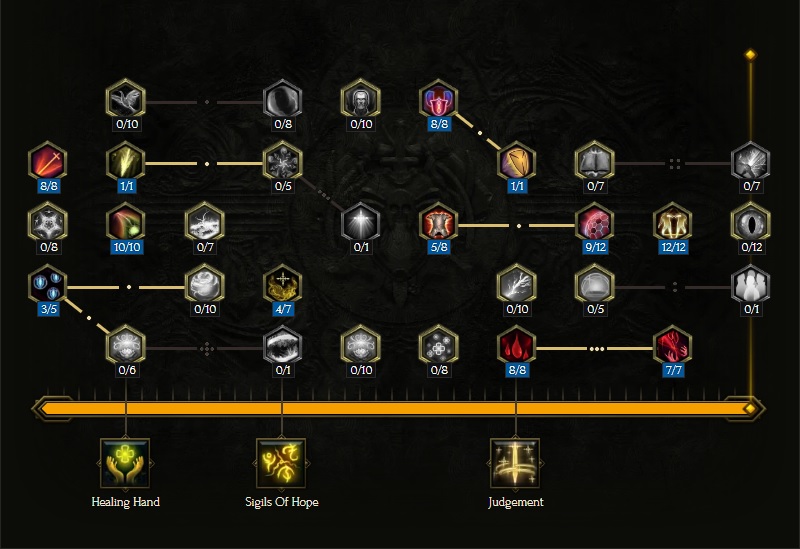
Paladin Skill Tree (76 Points)
|
|
Notable Passives:
- Conviction [8/8] - Increases Physical, Fire, and Lightning Damage by 32%, and Physical, Fire, and Lightning Penetration by 16%. We are mainly interested in Physical Penetration from this one as it allows us to cap it easier.
- Honour [3/5] - Increases Block Effectiveness by 120, Stun Avoidance by 45, and Block Chance by 2% (Block Chance does not scale with points allocated). As mentioned before, we need some Block Effectiveness and this gives us just that.
- Divine Bolt [1/1] - 20% Chance to Cast Divine Bolt on Melee Hit. This offers a noticeable DPS increase at a price of just 1 Point. It's simply too good to skip.
- Sanctuary Guardian [8/8] - +400 Armour While Shielded with a Shield, +16 Adaptive Spell Damage With a Shield. This offers a great +Armour/Point Spend ratio and we want as much Armour as possible.
- Faith Armour 5/8] - 25% Increased Armor, +25% Critical Strike Avoidance. We use this one to cap out our Critical Strike Avoidance. If you're capped on that from items, you can allocate these points elsewhere (Prayer Aegis and Gladiator, for example).
- Shield Wall [1/1] - Increases Block Chance by 5%, 10 Health Gained on Block, Prevents you from Dodging Attacks. This makes us regain some health each time we block an attack with our Shield, which is a very powerful effect.
- Penance [8/8] - +120% Melee Bleed Chance, +120% Throwing Bleed Chance, 24% Chance to Bleed When Hit. This gives us Melee Bleed Chance, so we max it out.
- Prayer Aegis [9/12] - +108 Health, +54 Endurance Threshold, Haste on Heal When Below Endurance Threshold. Increasing Endurance Threshold makes this build feel much sturdier.
- Reverence of Duality [12/12] - 24% Increased Health, 24% Increased Damage, 24% Increased Healing Effectiveness, 24% Increased Mana. This stacks with flat Health increases very nicely - we'll take full advantage of that.
- Redemption [7/7] - 49% Increased Bleed Effectiveness, 49% Chance to be Granted Damage, 49% Increased Damage Granted. This is a very powerful node that will increase our Bleed damage significantly.
|
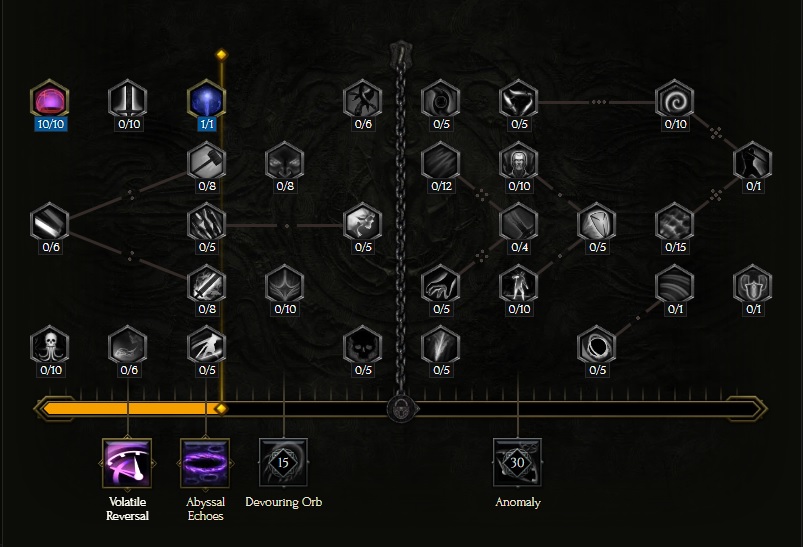
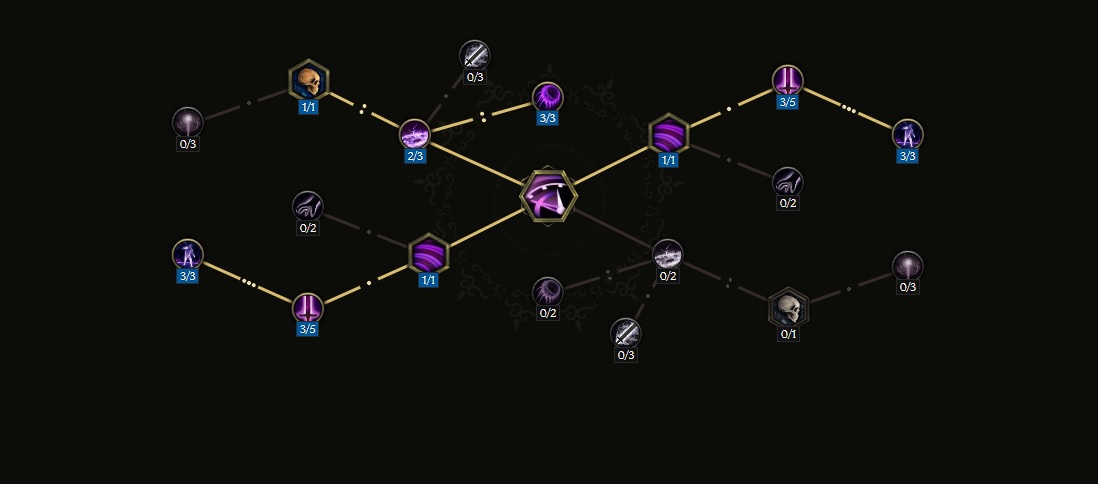
Void Knight Skill Tree (11 Points) |
- Abyssal Endurance [10/10] - Increases Health by 80, increases Void Resistance by +40%, and increases Physical Resistance by +40%. This is a very powerful defensive Passive - we take it to greatly improve our staying power against both physical and void damage.
- Void Corruption [1/1] - Increases Critical Multiplier By 1% Per each Point Spent In Void Knight Passive tree. We want as much Crit Multiplier as possible and this gives us some at a price of 1 Point.
|
|
Forge Guard Skill Tree (5 Points)
|
- Steel Aegis [5/5] - Increases Block Effectiveness by 250 and Block Chance by +2% (Block Chance does not scale with points allocated). Same deal as with Gladiator Passive - we are starved for Block Effectiveness, so we take this to increase it.
|
|
As you can see, this build focuses on increasing Health, Block Chance, and Block Effectiveness to take care of its defenses and make the Shield as reliable as possible. It also takes nodes that provide Bleed Chance and Bleed Effectiveness to ensure that bleeding hurts enemies as much as possible.
|
Skills
Note: Left-Clicking on any of the ability trees below will open the full-size version in a new window.
|

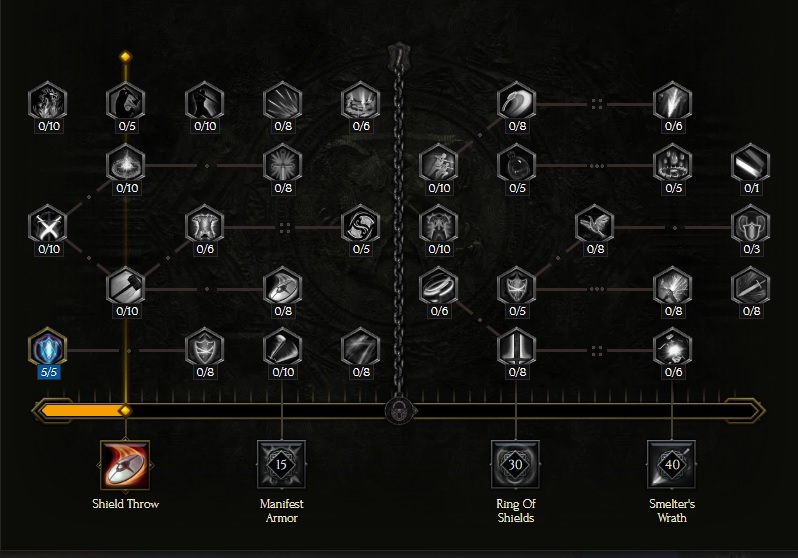
Shield Rush - When you have a Shield equipped, this skill allows you to Charge through enemies in the target direction. You will hit enemies in your path and release a shockwave, that covers a wider area, at the end of your movement. While rushing, your Mana does not regenerate. With the chosen modifiers, Shield Rush becomes a potent AoE offensive tool that doesn't have a Cooldown and can be spammed for as long as you dare (because it drains a portion of your HP each time). Be aware that with Desynchronous Charge you'll be teleported back each time you stop Rushing, so the skill can't be used for traveling.
- Desynchronous Charge [1/1] - When Shield Rush ends, you return to the position you used it from. This changes the dynamics of Shield Rush and allows us to use it in a more aggressive way.
- Protective Speed [2/2] - -20% Damage Taken while Rushing. This offers a nice boost to our Defenses when we're using Shield Rush.
- Mana Memory [1/1] - Restores Mana when Shield Rush Ends but adds a 10-second Cooldown to it. This is great for sustainability but the Cooldown is a problem.
- The Rush of Sacrifice [1/1] - This fixes the Cooldown problem created by Mana Recovery by replacing it with a Health Cost (15% of our Current Health will be drained each time we use Shield Rush). This won't ever kill you, but it can make you an easy target so look out.
- Consuming Path [4/5] - 80% increased Damage.
- Warrior's Entrance [3/4] - Increases Final Hit* Area by 105%. We're mainly interested in nodes located after this one but the Final Hit Area increase is great in its own way.
- Splintering Impact [4/8] - Increases Final Hit Damage by 80%.
- Echoes of the Charge [1/1] - Makes Final Hit Strike Twice but reduces Hit Damage by 20%.
*Final Hit is the circular shockwave released when you stop charging.
|
 |
|

Holy Aura - Increases Damage by 30% and Elemental Resistance by 15% for you and your allies. Activating Holy Aura doubles the stat bonuses for 4 seconds. This is a potent utility spell that offers tremendous defensive and offensive benefits to you as well as your teammates. With the featured setup, it will improve your shielding capabilities, restore your HP every time you block an attack, improve your Endurance and Elemental Resistance... and burn your enemies to a crisp, effectively giving you another source of AoE damage after you hit an enemy 3 times (and this build deals a lot of hits very quickly).
- Shelter from the Storm [5/5] - Increases Elemental Resistance granted by the Aura by 25% and Endurance granted by the Aura by 25%. It also increases Elemental Resistance and Endurance Thresholds by the same amount.
- Mighty Shield [4/4] - Grants you and your allies +120 Block Effectiveness and mages you regain 8 Health every time you Block an attack. This goes extremely well with the build as it not only gives us Block Effectiveness but also makes us Heal Up when we use our Shield.
- Rahyeh's Devotion [2/3] - Holy Aura grants you and your teammates an 8% chance to ignite enemies.
- Burning Blows [1/1] - Increases Global Fire Damage by 40%. This is required to get to Flame Burst, but that's ok as it increases its Damage by quite a lot.
- Flame Burst [1/1] - This allows you to unleash a Flame Burst each time an enemy takes 6 hits (3 when the Holy Aura is active). Flame Burst deals AoE Fire Damage to every enemy around you. This effect can be triggered with all kinds of attacks, including your Shield Rush hits!
- Improved Flame Burst [4/4] - This offers +200% Flame Burst Damage, which is insane if we take our ability to generate Flame Bursts into account.
|
 |
|

Volatile Reversal - When used, this ability returns you to a spot where you were 2 seconds ago, reverting any changes to your current health and mana that have happened since then. For the purposes of this build, we've set up this skill in a way that maximizes its Damage and reduces Cooldown. We'll also benefit from increased movement speed after using it, but we don't regain HP anymore.
- Time Sap [2/3] - Restores 6% of Volatile Reversal's Cooldown each time you Kill an Enemy with it.
- Catching Up [3/3] - Increases your Movespeed by 36% after casting the Volatile Reversal. Speed Boost's duration is equal to the length of time you traveled back.
- Timelost Vitality [1/1] - Removes the Health Restoration from the Skill but increases its Cooldown Recovery Speed by 200%. We have other Healing sources, so the drawback of this one is negligible while the benefits are immense.
- Terminal Void Rift [1/1] - Makes you create a Void Rift at the location where Volatile Reversal returns you to. Void Rifts deal Void Damage.
- Dark Expanse [3/5] - Increases Void Rift's AoE by 120%, which makes them much more reliable.
- Harbinger of Dust [3/3] - Increases Damage Taken by Enemies, from Void Rifts, by 30%.
- Incipient Void Rift [1/1] - This makes you create a Void Rift at the place where you use Volatile Reversal. If you didn't move much for the past 2 seconds, you'll make 2 Rifts in one place now!
- Disintegration [3/5] - Increases Void Rift Damage by +66%.
- Time Rifts [3/3] - Increases Damage over Time taken by enemies affected by Void Rifts.
|
 |
|

Lunge - This is a Dash ability that can be used to close the distance to the chosen enemy, but not only that. With the featured setup, it also gives us a ton of Armor Penetration, it kills all enemies that are below 15% HP instantly (which makes it great as a finisher), and restores a portion of our Health whenever it's used. Thanks to the Double Strike, we can also use it two times in a row before it goes on Cooldown.
- Dawn Charge [5/5] - Restores 40% of your Missing Health when you use Lunge. This works extremely well with Double Strike.
- Blade Stream [1/1] - This makes Lunge deal Melee Damage along the path to its target. This can deal a lot of damage if you Lunge at the last enemy in a line, for example.
- Broadside [1/3] - Increases the range at which Lunge deals damage along its path by 15%.
- Crusader's Fury [4/5] - +4% Physical Penetration per Enemy Hit along Lunge's path for 4 seconds. You can stack A LOT of Physical penetration with this if you aim the Lunge well.
- Initiate's Onslaught [2/5] - Increases the Damage by up to 100% and AoE by up to 40% of the Lunge's final Hit, based on the distance traveled with Lunge. You must travel at least 10 meters for the maximum benefit.
- Cull the Weak [3/3] - Lunge instantly kills enemies that are below 15% HP. This effect doesn't;t stack - if you have more similar effects, the higher one is always chosen.
- Ambuscade [2/5] - Lunge deals 60% more Damage to enemies above 65% of max Health.
- Double Strike [1/1] - Adds an additional charge of Lunge at the cost of 15% increased Cooldown.
|
 |
|

Sigils of Hope - Summon a Sigil that will orbit you, increasing your and your HP regeneration by 25% and causing you to deal additional Fire Damage with attacks and spells. This is a solid defensive ability that will increase our Block Chance and Block Effectiveness (these are great for this build), Armor, and Health Regen. Because of Meditation, this ability won't affect your allies.
- Empowering Sigils [5/5] - Grants +30% Damage per Active Sigil to you and your allies. This is a solid offensive boost, definitely worth taking.
- Last Wish [1/1] - Killing an enemy gives you a 6% chance to summon a Sigil. This is a great source of additional Sigils (and each additional Sigil improves the effects of Sigils of Hope).
- Iron Sigils [4/5] - Increases your and your Armor by 160 per active Sigil. This can and will improve your survivability quite significantly.
- Enduring Hope [5/5] - Makes your Sigils last 10 seconds longer. With this, Sigils of Hope's effects will remain more powerful for significantly longer.
- Tetragram [1/1] - Increases the maximum number of Sigils by 1. Sigils of Hope's effects scale with the number of active Sigils, so this is a must-have.
- Meditation [1/1] - Doubles your HP regen from Sigils but your Sigils don't affect your allies anymore. For solo play, this doesn't have a drawback.
- Sign of the Guardian [3/3] - Increases your Block Chance by 3% and your Block Effectiveness by +45 per active Sigil. This is a massive boost to our defenses as we're in need of both Block Chance and Block Effectiveness.
|
 |
Items
|
Stat priority:
For this build, you want to get as much Block Chance and Block Effectiveness as possible to make up for the lackluster stats of the Flayer's Pride. Idols that provide Bleed Duration are nice to have (if they increase Block Effectiveness as well, they are even nicer to have). Strength is very important as it will improve your character both offensively and defensively. You will also want to stack Endurance, Endurance Threshold, Health, Armor, some Life Leech, and Resistances.
In your Items, look for:
- Strength
- Damage over Time and Increased Damage
- Block Chance and Block Effectiveness
- Life Leech
- Endurance % and Endurance Threshold
- Mana Regen
- Resistances
Note: Attack Speed should be avoided!
|
|
Recommended Unique Items:

Flayer's Pride - This Unique Shield is the centerpiece of this build. It increases Bleeding Effects by 26 to 39%, Gives up to 91% chance to apply Bleed on Hit, and reduces HP Cost of Spells (which comes into play when you use Shield Rush).
|
|

Valdyr's Chalice - one of the most important parts of this build, which not only greatly increases the effectiveness of your Bleed, but also allows you to Leech Health from your Bleeding DoT effect and recover tons of Life after killing bleeding enemies
|
|

Bleeding Heart - this is the Best in Slot amulet for this build. It will provide you with A LOT of Life Leech which is extremely important (without it, your survivability will take a significant dive)
|
|

Salt the Wound - these Gloves convert a portion (45-60%) of your Added Critical Strike Multiplier to Bleed Effectiveness which is amazing for this build.
|
|

Taste of Blood - this synergizes extremely well with Bleeding effects (it doubles the speed of all bleed stacks on a hit enemy). Try not to get extra Attack Speed when turning it into Legendary to preserve your Mana
|
|
Idols:
- Large Rahyeh Idols (1x3) - These increase Bleed Duration, which is very strong for the build. You should try to get ones that also give you Block Effectiveness
- Throne of Ambition - This is a Best in Slot idol that will greatly increase your power level in fights against Bosses
|
|
END NOTE
This is the beta version of our "Rushing Bloodletter" Shield Rush Paladin build for Last Epoch. We didn't have much time for testing, but this build shows a lot of promise, scales quite well, and outperforms many other End Game setups. Obviously, as the game gets new content updates, we will be updating this guide regularly, though it may be impossible to be done after each Patch.
|
Pictures used in this article are the intellectual property of Eleventh Hour Games