Buy/Sell
 Log in

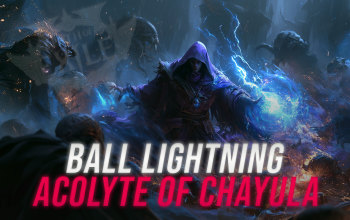
Ball Lightning Acolyte of Chayula POE 2 Build
A very efficient Setup for the Ball Lightning that stacks tons of Life to get an insane amount of Damage and Ailment Magnitude.Ball Lightning
Acolyte of Chayula Build
Updated for Path of Exile 2 Early Access
The Best Crafty Guides by Odealo
| Guide notes |
| September 14 2026 - Created the Build |
| Build Overview | |||
| Tags: [SPELL] [IGNITE] [LIFE] | |||
|
Budget: Defenses: |
|
Boss DPS: AoE: |
|



Ball Lightning is a Lightning Spell that can be empowered with Fire Infusion to create a trail of powerful Ignited Ground, which is the main focus of this Setup. This Ground does not hit enemies directly; it only applies Ignite based on its theoretical Hit, including Critical Hits. To generate the first Infusion, you will have to use Living Bomb or Powered by Verisium manually, but after that, the Cast on Ailment will automate it for you, leading to very smooth and effortless gameplay.
There are many ways you could choose to scale its Damage, but the Rathpith Globe approach is easily the strongest and cheapest of them all. A Vaal Cultivated variant of this Focus can improve your Spell Damage, Crit Chance, and Ailment Magnitude based on your maximum Life, which covers most scaling avenues at the same time. You can Obviously, you will also need bonuses to Spell or Projectile Skill Levels to raise the base Damage, but it's not all. You will also convert your Fire Damage to Chaos with the Blackflame Covenant Keystone. Most Enemies have lower Chaos Resistance than Elemental, and you can utilise Wither to make them take even more Damage. With the Unique Blackflame Ring, your Wither will not expire, ensuring maximum potency. This Ring also massively improves your Ignite Damage at the cost of Ignite Duration, but it is not really a problem since your Ignited Ground inflicts Ignite continuously. The finishing touch comes from Critical Hits and Damage bonuses.
You can quite easily reach 10 000 maximum Life, but it comes with a hefty cost. The Kaom's Heart provides 1500 flat Life, but disables your Spirit. On the other hand, the Veil of the Night increases your Life by 50%, but disables your Elemental Resistances. This means you will have a massive Health pool against Physical and Chaos Damage, but very poor against Elemental Damage, since you will be taking roughly 4 times as much Damage from Elements. It also frees up tons of Suffixes on your Gear, allowing you to stack more Life, Rarity, or Crit Bonuses. Since your Spirit is disabled anyway, you can pick the special Acolyte's Darkness Skill, which provides a protective barrier that absorbs up to 2000 incoming Damage and rapidly regenerates. You can still access the Cast on Ailment Skill by using the Absent Amulet.
The drawback of the Rathpith Glove is that you have to solve the Life Recovery, since each Spell you Cast will additionally cost 6% of your maximum Life. Currently, the regular Hit-based Leech is not very efficient. However, the Acolyte of Chayula can passively create special Remnants that Leech a flat 20% of your maximum Life upon picking them up. They can also grant you Extra Chaos Damage and Leech Mana, which is overall better for your DPS, but worse for consistency. We recommend picking up the Blood Magic Keystone via Flesh Crucible or Warrior's Split Personality Jewels, and opting for the Choice of Life Notable that limits spawned Remnants to only Leech Life. At first, you can simply use Lifetap Support or rely on Remnants to Leech Mana. There is no room to include Armour or Evasion investments, but most Enemies will melt before reaching you anyway.
You can also check our other Path of Exile 2 builds right over here Odealo's Crafty Guides - Full List
1. Gameplay
At the beginning of a new instance, use Animus Exchange to gain Ward, and spend it on Powered by Verisium to gain universal Infusions. After that, you can simply use Ball Lightning to melt Enemies, while Living Bomb provides Fire Infusions passively. Against bosses, use Despair (remember that you convert Fire Damage to Chaos!) and optionally use Entangle to make them Critically Weak.
|
|
|
|


2. Build's PROS & CONS
| PROS |
|
| CONS |
|
3. Leveling tips
Leveling with Ball Lightning is possible, but it won't be very good. We recommend using our Hollow Palm Technique Monk Build to progress through the campaign easily, and respec once you reach Maps and acquire the core Unique Items.
4. Final Skill Tree, Ascendancy Points, and Pantheon
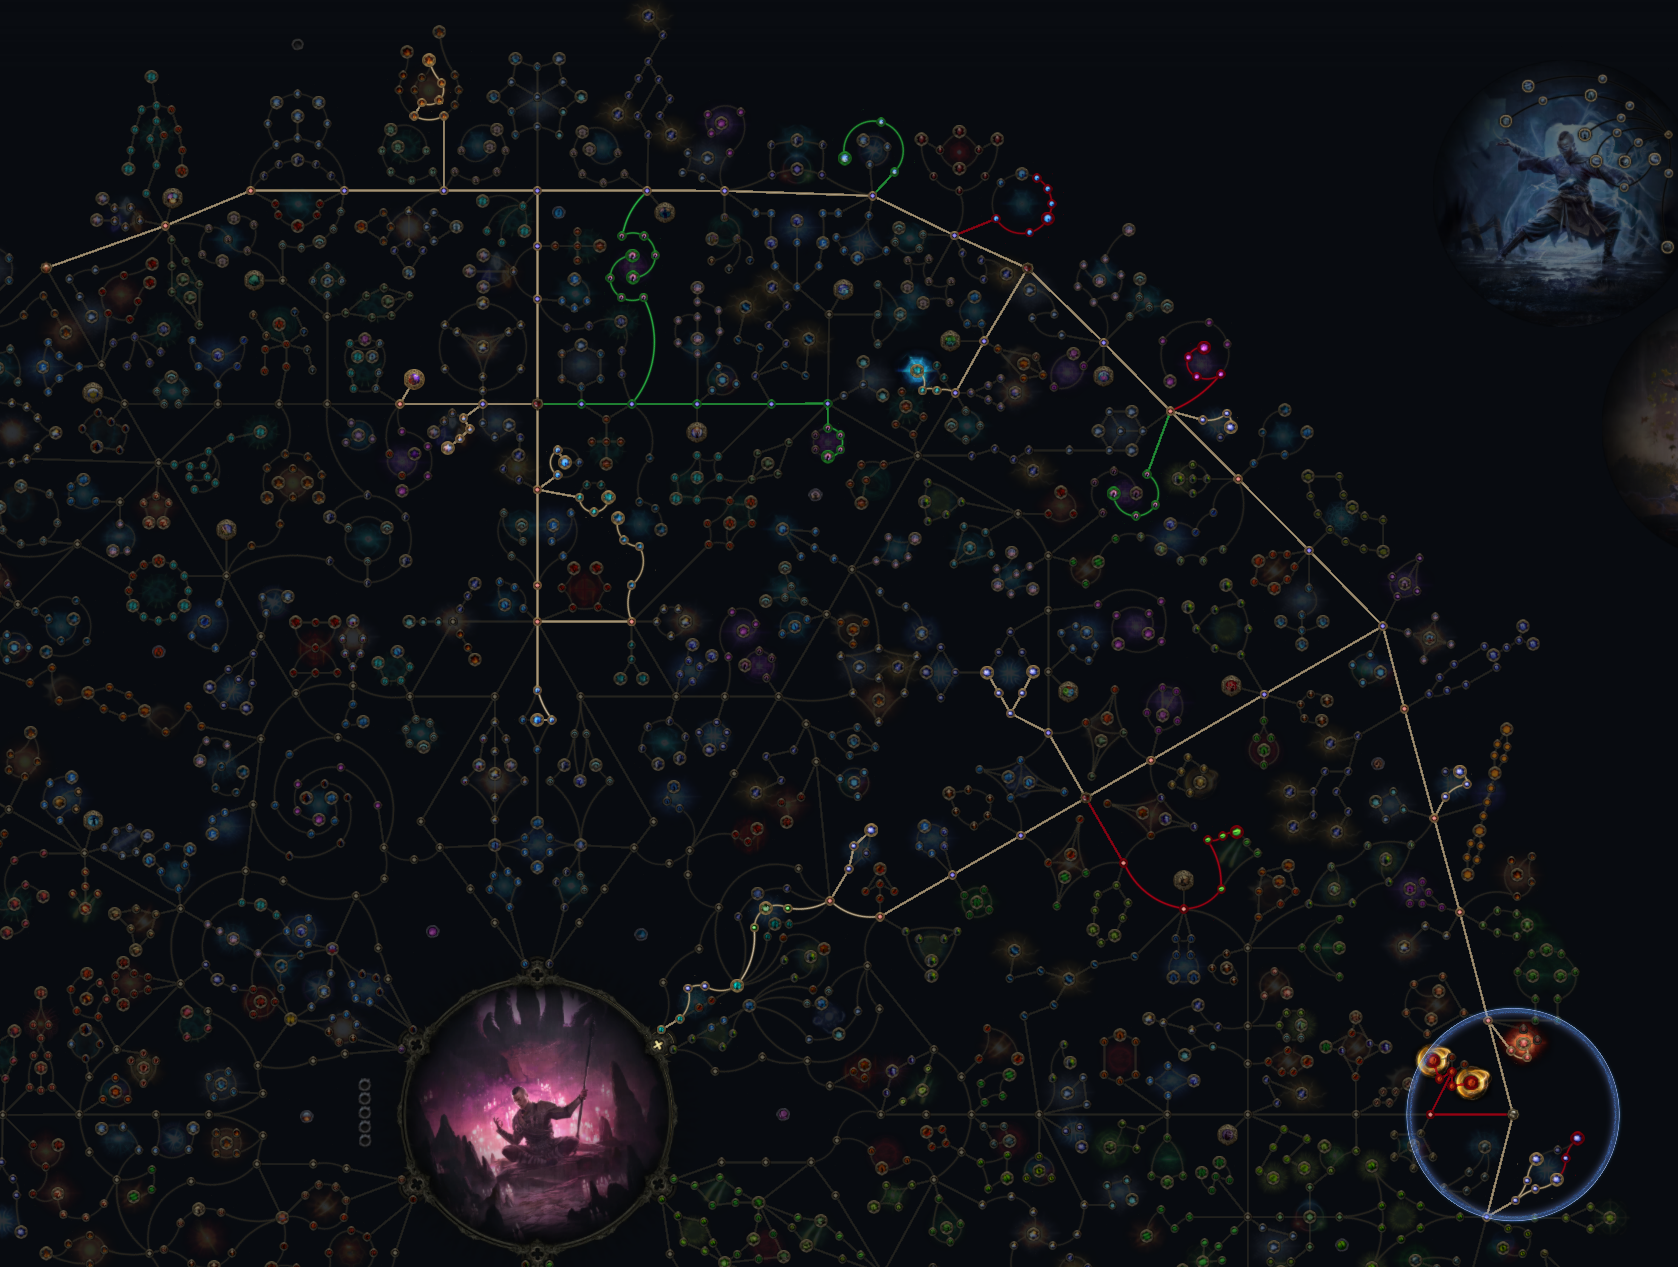
Final Skill Tree:
 |
|
Click on the image to open the Passive Tree preview in a new window, or use the Path of Building (PoB) tool, |
Ascendancy points:
Preferably in this order:
- Waking Dream
- Lucid Dreaming/Choice of Life
- Embrace the Darkness
- Deepening Shadows
5. Final Gems links
| [DPS] Ball Lightning setup Weapon Set 1 |
|
 |
Ball Lightning - fires a Lightning Projectile. It consumes a Fire Infusion to create an Ignited Ground in its wake, and explodes upon reaching maximum distance. |
 |
Xoph's Pyre |
 |
Searing Flame II |
 |
Considered Casting/Sione's Temper |
 |
Concentrated Area/Projectile Acceleration III |
 |
Deliberation/Mobility |
| [Utility] Cast on Elemental Ailment setup Granted by Absent Amulet |
|
 |
Cast on Elemental Ailment - inflicting Ailments generates Energy used to trigger linked Spells. Your Ignited Ground applies Ignite continuously, leading to very fast Energy generation. You will have disabled Spirit, but Items bypass this problem. |
 |
Living Bomb - plants a detonating bomb that grants Fire Infusion upon explosion. |
 |
Withering Touch |
 |
Overabundance II |
 |
Esh's Radiance |
 |
Efficiency II |
| [UTILITY] Entangle setup Weapon Set 2 |
|
 |
Entangle - You can use the secondary Weapon Set to apply the Critical Weakness Debuff, improving your consistency. |
 |
Pinpoint Critical |
 |
Prolonged Duration II |
 |
Magnified Area II |
 |
Branching Fissures II |
 |
Slow Potency |
| [UTILITY] Despair setup Weapon Set 2 |
|
 |
Despair - an offensive Curse that lowers Chaos Resistance of affected foes. Your Ignite will deal Chaos Damage thanks to the Blackflame covenant Keystone. |
 |
Ritualistic Curse |
|
Magnified Area II |
 |
Cursed Ground |
|
Efficiency II |
 |
Heightened Curse |
| [UTILITY] Powered by Verisium setup Weapon Set 2 |
|
 |
Powered by Verisium - consumes Ward to grant you 3 universal Infusions. You only need to use it at the start of the new instance. Try to get a low Skill Level to minimise the Ward Costs. |
|
Efficiency II |
 |
Cooldown Recovery II |
 |
Rapid Casting II |
| [UTILITY] Animus Exchange setup | |
 |
Animus Exchange - sacrifices your Life to gain Ward, which can Overflow for 50% extra value. |
|
Efficiency II |
|
Cooldown Recovery II |
|
Rapid Casting II |
 |
Mobility |
| [UTILITY] Into the Breach setup | |
 |
Into the Breach - an iconic Acolyte's Ascendancy trait that spawns Flame Remnants around you. We recommend empowering the Red Flames to get better and more consistent Life Leech, but you can also get Extra Chaos Damage and Leech Mana this way. |
 |
Remnant Potency III |
 |
Harmonic Remnants II |
|
|
6. Gear Setup
The Rathpith Glove can provide over 500% increased Damage, and 250% Crit Chance and Ailment Magnitude. To reach those values, you will need a lot of Life, leading to the Kaom's Heart and Veil of the Night for their massive Life bonuses. Life is also sourced from Strength and Rare Gear pieces with Body Runes and increased Effect of Augments, ideally on Exceptional bases and Corrupted for extra Rune Sockets. You also need Skill Levels and Crit Damage bonus. You can't benefit from Elemental Resistance, but you can at least cap your Chaos Resistance and get plenty of Item Rarity. Remember that you can use Void Flux to convert Elemental modifiers to Chaos Resistance.
|
Stat priorities on items:
|
 (Focus) Rathpith Globe - the core Unique and cornerstone of the entire Setup. It grants copious amounts of Damage, Ailment Magnitude, and Crit Chance for your Spells, but also causes them to cost extra Life. The Ailment Magnitude comes from a special Foulborn modifier, but it is quite cheap due to the popularity of the Mana Builds. You can also aim for Corrupted outcome that raises those bonuses higher. (Focus) Rathpith Globe - the core Unique and cornerstone of the entire Setup. It grants copious amounts of Damage, Ailment Magnitude, and Crit Chance for your Spells, but also causes them to cost extra Life. The Ailment Magnitude comes from a special Foulborn modifier, but it is quite cheap due to the popularity of the Mana Builds. You can also aim for Corrupted outcome that raises those bonuses higher. |
|
| (60-100)% increased Energy Shield +(60-100) to maximum Life Non-Channelling Spells cost an additional 6% of your maximum Life Non-Channelling Spells have 3% increased Critical Hit Chance per 100 maximum Life Non-Channelling Spells deal 6% increased Damage per 100 maximum Life Foulborn modifiers: Non-Channelling Spells have 3% increased Magnitude of Ailments per 100 maximum Life |
|
 (Weapon) Rare Wand - the primary focus of your Wand is Spell Levels. Keep in mind that Ball Lightning is still a Lightning Spell only, despite converting Damage to other types. It should also grant you Extra Fire or Chaos Damage, or boost your Spell Damage and Crit Chance. (Weapon) Rare Wand - the primary focus of your Wand is Spell Levels. Keep in mind that Ball Lightning is still a Lightning Spell only, despite converting Damage to other types. It should also grant you Extra Fire or Chaos Damage, or boost your Spell Damage and Crit Chance. |
|
| Min. requirements: +5 to Level of all Lightning Spell Skills Optional affixes: Gain #% of Damage as Extra Fire Damage #% increased Critical Hit Chance for Spells #% increased Spell Damage #% increased Cast Speed |
|
 (Weapon) Effigy of Cruelty - Critical Weakness Debuff raises the base Crit Chance of your Spells by up to 10%. There is no official confirmation if Ignited Ground interacts with this Debuff, but it definitely helps with Shocks and Living Bomb. (Weapon) Effigy of Cruelty - Critical Weakness Debuff raises the base Crit Chance of your Spells by up to 10%. There is no official confirmation if Ignited Ground interacts with this Debuff, but it definitely helps with Shocks and Living Bomb. |
|
| +(20-30) to maximum Energy Shield (40-50)% increased Spell Damage +10 to Intelligence +(7-13)% to Chaos Resistance Critical Hits with Spells apply (1-3) Stacks of Critical Weakness |
|
| (Weapon) Rare Wand - if you don't have Crit Chance on your main Wand, you can use a basic Rare Wand with just the Crit Chance and Cast Speed to cast your Debuffs. |
|
| Optional affixes: #% increased Critical Hit Chance for Spells #% increased Cast Speed |
|
 (Amulet) Rare Absent Amulet - you will need an Absent Amulet that grants the Cast on Elemental Ailment Skill as its Implicit. Getting additional Skill Levels on it will be expensive, but definitely worth the price. You can also get a bit of Life here. (Amulet) Rare Absent Amulet - you will need an Absent Amulet that grants the Cast on Elemental Ailment Skill as its Implicit. Getting additional Skill Levels on it will be expensive, but definitely worth the price. You can also get a bit of Life here. |
|
| Min. requirements: Grants Skill: Level (1-20) Cast on Elemental Ailment Optional affixes: +1#to maximum Life +# to Level of all Spell Skills +# to Attributes #% increased maximum Life Allocates Gem Enthusiast |
|
 (Ring) Blackflame - you will pick Blackflame Covenant Keystone to convert Ignite to Chaos anyway, but this Ring provides large amounts of Ignite Magnitude and makes Wither Debuff easy to upkeep on Ignited enemies. Keep in mind reducing the Ignite Duration too much will stop your DPS altogether. (Ring) Blackflame - you will pick Blackflame Covenant Keystone to convert Ignite to Chaos anyway, but this Ring provides large amounts of Ignite Magnitude and makes Wither Debuff easy to upkeep on Ignited enemies. Keep in mind reducing the Ignite Duration too much will stop your DPS altogether. |
|
| +(7-13)% to Chaos Resistance (15-30)% increased Mana Regeneration Rate Ignite you inflict deals Chaos Damage instead of Fire Damage (80-100)% increased Ignite Magnitude (75-60)% reduced Ignite Duration on Enemies Withered you inflict also increases Fire Damage taken Withered does not expire on Enemies Ignited by you |
|
 (Ring) Rare Ring - you should use Vitalic Ring to raise your maximum Life further. It should also include special Breach modifiers to boost your Spells. You will have a mix of Fire and Chaos Damage, so specific Damage bonuses are not very effective. (Ring) Rare Ring - you should use Vitalic Ring to raise your maximum Life further. It should also include special Breach modifiers to boost your Spells. You will have a mix of Fire and Chaos Damage, so specific Damage bonuses are not very effective. |
|
| Min. requirements: +100 to maximum Life 5% increased maximum Life Optional affixes: #% increased Critical Spell Damage Bonus #% increased Spell Damage +# to Attributes 17% increased Rarity of Items found |
|
 (Belt) Rare Belt - the Belt provides simple defensive bonuses and lots of maximum Life. You can hunt for the special Breach modifiers that grant Spell Damage during any Flask Effect. (Belt) Rare Belt - the Belt provides simple defensive bonuses and lots of maximum Life. You can hunt for the special Breach modifiers that grant Spell Damage during any Flask Effect. |
|
| Min. requirements: +150 to maximum Life +2 Charm slots +40% to Chaos Resistance Optional affixes: +# to Strength #% increased Spell Damage during any Flask Effect |
|
 (Helmet) Veil of the Night - this Helmet is terrible for your survivability against Elemental Damage, but massively boosts your Damage and lowers the budget requirements significantly. Try to get a Corrupted version that boosts your Life further. (Helmet) Veil of the Night - this Helmet is terrible for your survivability against Elemental Damage, but massively boosts your Damage and lowers the budget requirements significantly. Try to get a Corrupted version that boosts your Life further. |
|
| 50% increased maximum Life +(10-20) to all Attributes 40% reduced Light Radius You have no Elemental Resistances |
|
 (Body Armour) Kaom's Heart - another important gear piece that provides a large amount of Life but comes with a significant downside. You can Corrupt it to raise the Life bonus or get an additional Rune Socket. Whether you should use Body Rune or Soul Core of Jiquani depends on your other Gear pieces. (Body Armour) Kaom's Heart - another important gear piece that provides a large amount of Life but comes with a significant downside. You can Corrupt it to raise the Life bonus or get an additional Rune Socket. Whether you should use Body Rune or Soul Core of Jiquani depends on your other Gear pieces. |
|
| (30-40)% increased Stun Threshold +1500 to maximum Life You have no Spirit |
|
 (Gloves) Rare Gloves - a perfect pair of Gloves can provide over 500 maximum Life, mostly via Body Runes. You can also get Crit Damage Bonus here. You will need one Gear piece with Ward on it to use Powered by Veisium, usually Gloves or Boots, since your Uniques will be mass-corrupted. (Gloves) Rare Gloves - a perfect pair of Gloves can provide over 500 maximum Life, mostly via Body Runes. You can also get Crit Damage Bonus here. You will need one Gear piece with Ward on it to use Powered by Veisium, usually Gloves or Boots, since your Uniques will be mass-corrupted. |
|
| Min. requirements: +150 to maximum Life Optional affixes: +# to Ward #% increased Rarity of Items found #% increased effect of Socketed Augment Items +#% to Chaos Resistance #% increased Critical Damage Bonus +# to Attributes |
|
 (Boots) Rare Boots - your Boots are very similar to your Gloves, but you shouldn't chase maximum Life blindly and pick some Movement Speed instead. Use Strength bases to minimise Dex and Int Requirements. (Boots) Rare Boots - your Boots are very similar to your Gloves, but you shouldn't chase maximum Life blindly and pick some Movement Speed instead. Use Strength bases to minimise Dex and Int Requirements. |
|
| Min. requirements: +150 to maximum Life +30% increased Movement Speed Optional affixes: +# to Ward #% increased Rarity of Items found #% increased effect of Socketed Augment Items +#% to Chaos Resistance +# to Attributes |
|
 (Jewel) Heart of the Well - it is a great source of gaining Extra Fire and Chaos Damage, but you should also try to get Life Recovery on Kill since you have no space for Rare Jewels. (Jewel) Heart of the Well - it is a great source of gaining Extra Fire and Chaos Damage, but you should also try to get Life Recovery on Kill since you have no space for Rare Jewels. |
|
| Recommended modifiers: Gain #% of Damage as Extra Chaos/Fire Damage Recover #% of maximum Life/Mana on Kill Damaging Ailments deal damage #% faster |
|
 (Jewel) Against the Darkness - another great source of Extra Damage. When socketed near the Heartbreaking Notable, it will cover up to 6 Notables. (Jewel) Against the Darkness - another great source of Extra Damage. When socketed near the Heartbreaking Notable, it will cover up to 6 Notables. |
|
| Gain (2-4)% of Damage as Extra Chaos Damage Gain (2-4)% of Damage as Extra Fire Damage |
|
 (Jewel) Grand Spectrum - you can get a lot of maximum Life from those Jewels, but only if you have all 3 at once, which puts a heavy strain on your Jewel Sockets. (Jewel) Grand Spectrum - you can get a lot of maximum Life from those Jewels, but only if you have all 3 at once, which puts a heavy strain on your Jewel Sockets. |
|
| 2% increased Maximum Life per socketed Grand Spectrum | |
 (Jewel) Flesh Crucible - at first you won't have that many problems with sustain, but once you raise the Skill Level over 30, it will become problematic. The Blood Magic Keystone solves it completely, but it is quite far on the Passive Tree. You can use this Jewel to gain its effect. Try to get a penalty that doesn't hurt your character, such as less Mana or Spirit. (Jewel) Flesh Crucible - at first you won't have that many problems with sustain, but once you raise the Skill Level over 30, it will become problematic. The Blood Magic Keystone solves it completely, but it is quite far on the Passive Tree. You can use this Jewel to gain its effect. Try to get a penalty that doesn't hurt your character, such as less Mana or Spirit. |
|
| <Random Keystone Passive Skill> Recommended Stat penalty: (20-10)% less Armour, Evasion and Energy Shield (20-10)% less maximum Mana (20-10)% less Spirit |
|
 (Jewel) Split Personality - you could also reach the Blood Magic Keystone with the use of Split Personality for Warrior or Templar. It is not a complete waste of points since you can find plenty of Crit and Ailment bonuses on your way there, but it is not optimal. (Jewel) Split Personality - you could also reach the Blood Magic Keystone with the use of Split Personality for Warrior or Templar. It is not a complete waste of points since you can find plenty of Crit and Ailment bonuses on your way there, but it is not optimal. |
|
| Can Allocate Passive Skills from the <Random class> starting point | |
 (Flask) Lavianga's Spirits - this Flask provides very minor Mana Recovery, which won't be useful at all once you get the Blood Magic Keystone. It can still be used to enable the bonuses that require an active Flask. (Flask) Lavianga's Spirits - this Flask provides very minor Mana Recovery, which won't be useful at all once you get the Blood Magic Keystone. It can still be used to enable the bonuses that require an active Flask. |
|
| This Flask cannot be Used but applies its Effect constantly (80-70)% reduced Amount Recovered |
|
 (Flask) Life Flask - with so much maximum Life, the Life Flask is barely noticeable, although it can still save you in a tight situation. Aim for the highest Amount Recovered possible. (Flask) Life Flask - with so much maximum Life, the Life Flask is barely noticeable, although it can still save you in a tight situation. Aim for the highest Amount Recovered possible. |
|
| Recommended modifiers: 70% increased Amount Recovered 60% increased Charges |
|
|
If you have any other build requests please leave that in the comments below. We are always open to suggestions and constructive feedback.
Pictures used in this article are the intellectual property of Grinding Gear Games.