
Autobomber Void Knight Last Epoch Build
One of the smoothest Void Knight builds out there that allows you to progress while monsters die automatically along the wayAutobomber
Void Knight/Sentinel Build
Updated for Patch 0.8.5f
| Build notes: |
| November 27, 2022 -Build updated |
Build Overview
Autobomber Void Knight is one of the most powerful, and most popular, Last Epoch Builds. For a good reason - it allows you to simply run through pretty much any type of content and obliterate everything on your path with auto-casting Anomaly and Devouring Orb. If you come by a stronger enemy, you simply nuke it with Smite and continue running... Sounds overpowered? Well, it might be slightly overpowered but that shouldn't stop you from trying it out!
The featured build uses Devouring Orb that constantly orbits around you, dealing heavy damage to everyone who comes close enough with it and creating multiple Abyssal Orbs that seek enemies to detonate them, dealing AoE Void Damage. The build also uses Anomaly to create a Time Bubble on you, which offers a high increase to Life Leech and Crit Rate, to take care of both defense and offense. As a result, it's able to auto-kill monster packs without ever stopping. When it needs additional Health or Mana, or where there's a Boss to kill, it uses Smite to deal high single-target damage and restore valuable resources in the process. For most Rare enemies, you won't even need to cast it manually, as properly modified Lunge will do it for you! To bump up the build's survivability and Void Damage even more we utilize the void-themed Sigils of Hope.
You can also view the full build on the Last Epoch planner here: Autobomber Sentinel Build
You can also check our other Last Epoch builds and character guides
|
|
 Pros Pros |
| It's one of the best builds to quickly farm Monoliths thanks to the high mobility and ability to kill monsters just by standing close to them. |
| The build is also very durable. It has very high Health, a decent chance to Block incoming attacks, and amazing sustain from Health Leech. |
| You don't need any particular Uniques to make it work, and it scales very well with just your levels and passives. This gives you a lot of freedom in gear customization. |
| You won't have any problems with Mana management. In fact, the main skill you will be using in single-target scenarios restores your Mana instead of spending it! |
 Cons Cons |
| While Bossing is in fact comfortable, it's not necessarily fast. Pushing for very high DPS is quite hard. |
| Many players find the playstyle of walking around quite boring in the long term. |
Passive Skill Trees
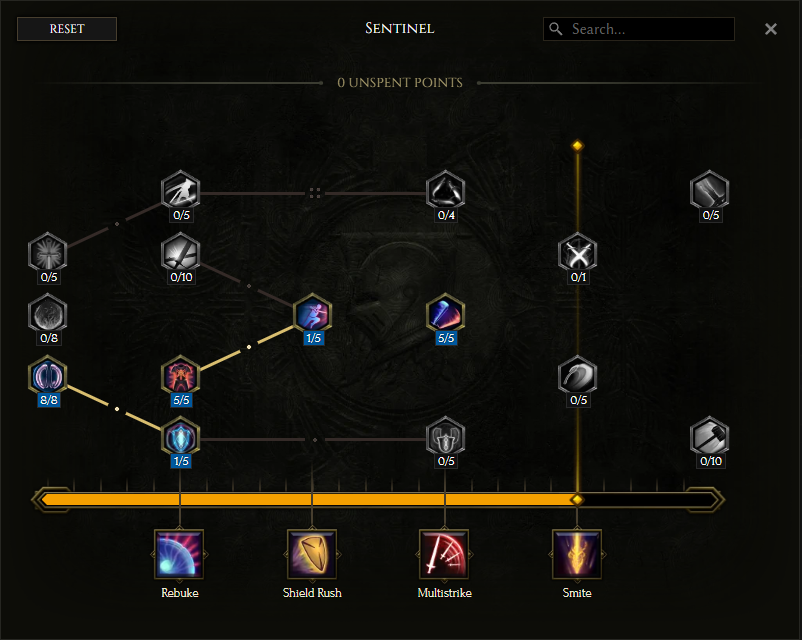 Sentinel Skill Tree (20 Points) |
|
You will need to spend at least 20 Points in the base Sentinel Passive Tree in order to unlock more advanced options. The best passives to take here are Fearless and Armour Clad as they greatly improve your durability. Time and Faith will restore some of your Health and Mana when you use Smite, which is a great deal as you will use that Skill quite often. Gladiator and Valiant Charge are great passives to spend your remaining points on. |
|
|
|
Temporal Corruption greatly affects your Smite as it converts its damage type to Void and removes the baseline heal. But worry not, as the World Eater grants you a lot of Health Leech, so you will be healing yourself with every Smite anyway! Renouncement makes Vitality Attribute even more valuable, as it improves the Smite's damage scaling with it even further. Echoing Strikes, and the nodes connected to them, grant you the unique ability to Echo your Skills, which basically doubles your Damage output. The remaining Passives in this Tree offer you a lot of useful stats that make you tankier or deal more Damage. |
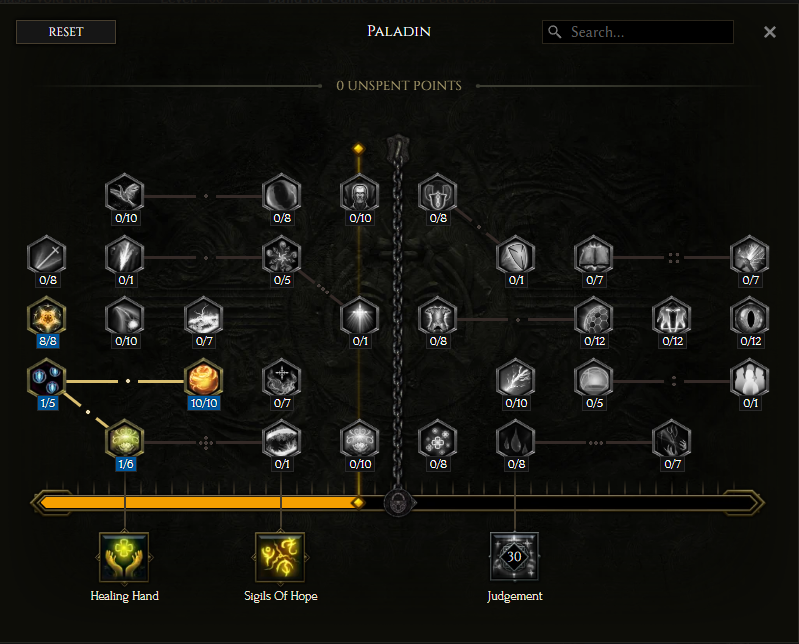 Paladin Skill Tree (20 Points) |
|
Defiance Passive grants you a lot of Elemental Resistances, which makes your gearing a bit easier. Your goal in this Passive Tree is the Heavenfire Notable that adds a lot of flat Spell Damage as long as you hold a Shield. To unlock it, put one point into Holy Symbol, which will heal you from time to time. |
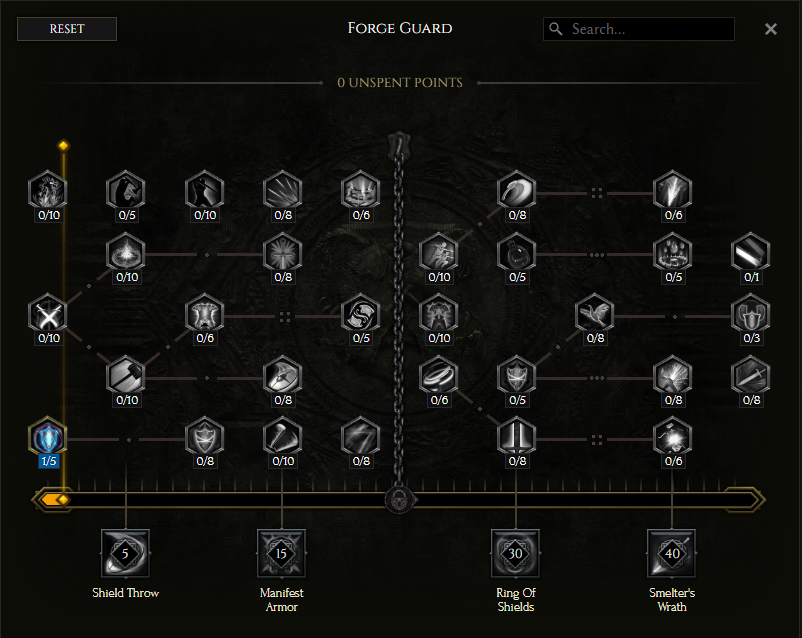 Forge Guard Skill Tree (1 Point) Forge Guard Skill Tree (1 Point) |
|
You will be taking only one passive here. The Steel Aegis provides a bit of block chance but doesn't scale with investment, so there is no reason to do so. |

Skills
Note: Left-Clicking on any of the ability trees below will open the full-size version in a new window.
|
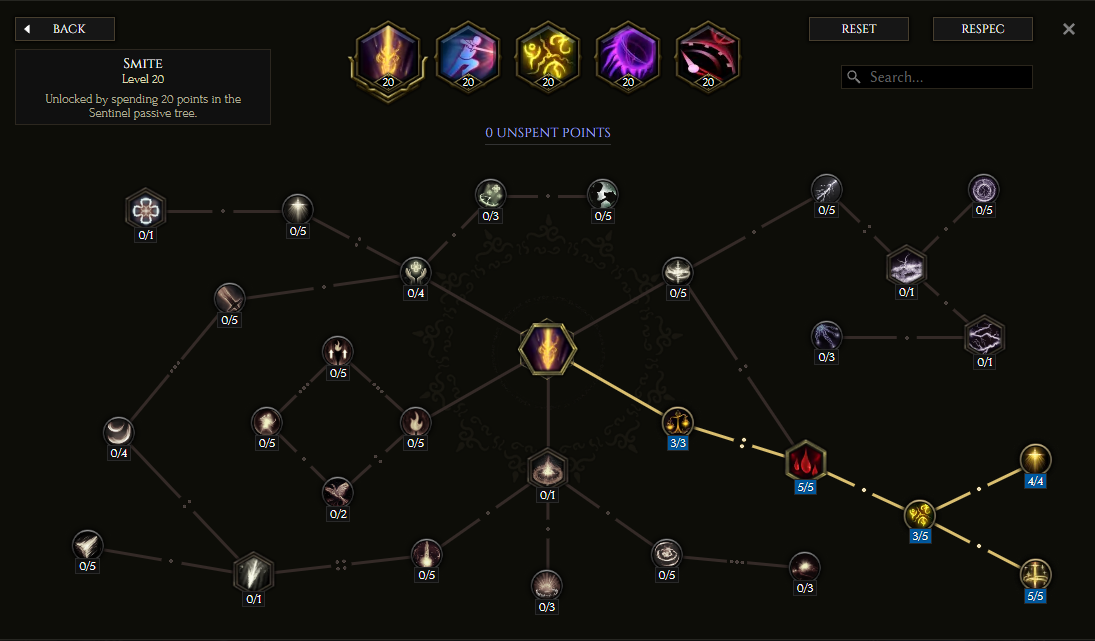
Smite - sends a holy bolt at the targeted enemy to deal damage and heal nearby allies, including yourself. The Void version of this Skill deals more Damage but doesn't provide healing. This Skill Tree turns Smite into a powerful single-target ability. It deals a ton of Damage, Crits often, and when it Drits, it just deletes enemies from existence. Thanks to Pillars of Light, it will also double cast over 1/3 of the time! Conviction puts a heavy penalty on the Cast Speed, but the Crit Chance it provides definitely make up for that. |
 |
|
Devouring Orb - This is the signature Skill of this build. By default, it creates a stationary orb that deals Damage to enemies every time something nearby dies. |
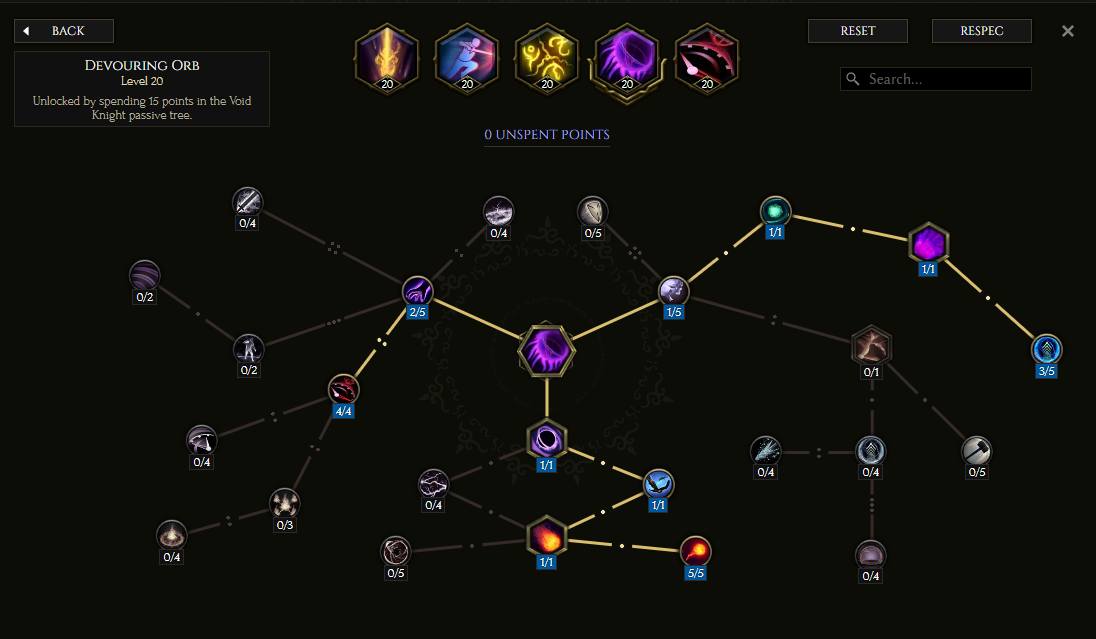 |
|
Anomaly - this Skill comes with its own combo. The first cast throws enemies into the future, while recasting causes the to come back to you. |
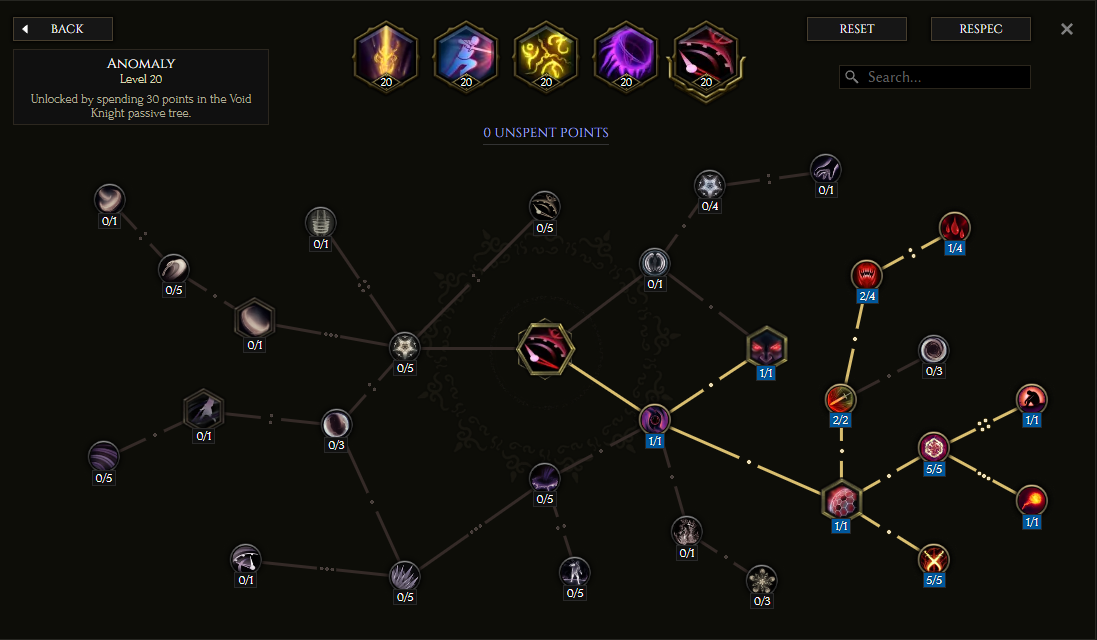 |
|
Lunge - is one of the two movement abilities Sentinel has access to. It causes you to dash to your enemy and quickly strike it with your weapon. Holy Incursion is an amazing passive that triggers Smite on nearby enemies based on the distance traveled with the Lunge, which will kill most Rare monsters on your way. Double Strike gives you an additional charge of this ability so you can use it twice in a row but slightly increases the cooldown in return. Thanks to the Cull of the Weak, you can instantly kill any enemy that has less than 15% Health. It helps with proccing Reckless Skirmish, which gives you a Haste buff every time you kill an enemy with this Skill. |
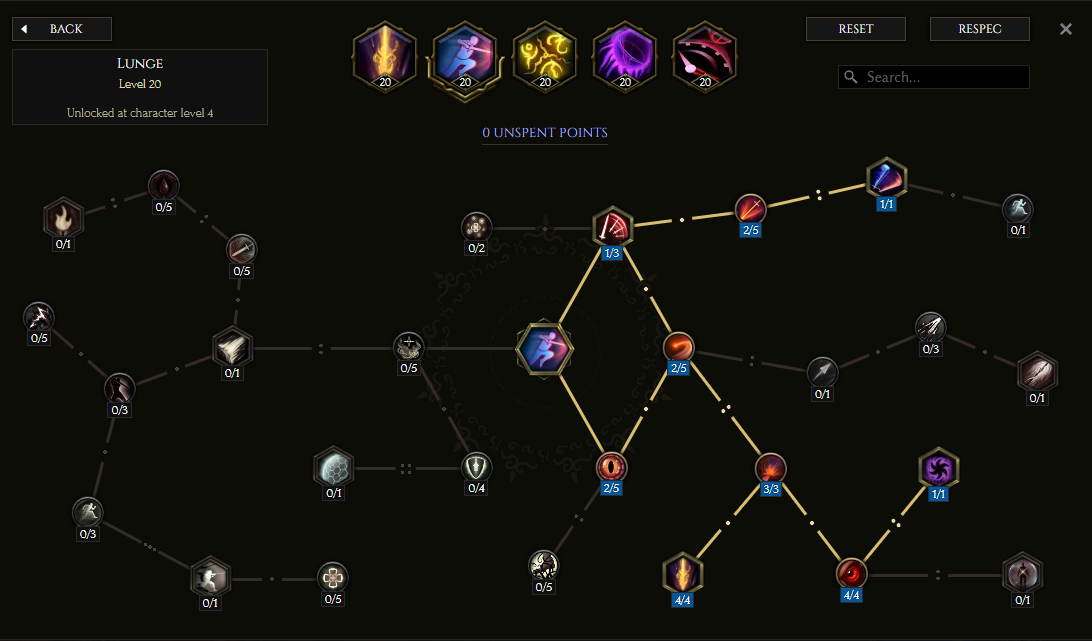 |
|
Sigils of Hope - is a buff ability that gives you additional Fire Damage and Health Regeneration for every Sigil you have summoned. Sigils of Despair converts the Fire Damage bonus into Void type. It also trades Health Regeneration into a pure Damage bonus. Last Wish gives you a chance to automatically cast this Skill when you kill an enemy. Tetragram raises the limit of summoned Sigils by 1, thus increasing your Damage even further. The remaining points are taken to increase your overall durability. |
 |


Auto Casting
The possibility of Auto Casting an Ability is something not entirely supported by the game itself, but also not forbidden in any way. The idea is to automatically Cast the ability as soon as the Cooldown ends. Manually holding down the specific key all the time, or pressing it every few seconds, is very tiresome and takes away the fun from the build quickly. There are a few ways to do it automatically, but the most popular and accessible one is to use the Numpad Keyboard. You simply bind the specific Skill Slots to the Numpad number keys, for example, Numpad 1 or Numpad 2, press those buttons, and while still holding them down, you press the NumLock Key to turn off the Numpad. Now you can release the Numpad keys, but the game still considers them to be held down.
Using this technology with Devouring Orb and Anomaly Skills makes the Autobomber truly Automatic.
Items
|
Stat priority: This Build is devoted to the Void, so obviously it's the only Damage type you want to increase with your Gear. To improve your single-target damage you should focus on the Cast Speed and Critical Strike, be it Chance or Multiplier. Sources of Adaptive or Void Spell Damage are also very useful. One of the best aspects of this build is the Vitality synergy, as it will increase your base Health and improve your Damage significantly, so you should stack that Attribute as high as you can. The build reaches the peak of its Damage capabilities with Rare/Exalted Items, but there are a few Uniques that could be used to improve your defenses to make you truly unkillable. Movement Speed is a universally good Stat for every build, including this one.
|
||||||
|
Recommended Unique Items:
Siphon of Anguish - This great Unique Ring offers Void Damage Leech and increased Leech Rate, which is very much appreciated in this build. Moreover, it provides a 27% chance to apply Doom on hit, which increases your Damage output by a solid bit.
Ravenous Void - These amazing Unique Gloves give us Void Barrier, a stacking buff that reduces damage taken by 5% per stack (up to 3 stacks). Stacks are doubled when we are taken below our Endurance threshold, but it comes at a cost of receiving Void Damage over time for 15 seconds after the effect ends. This is a BiS when it comes to increasing Survivability.
Bastion of Honour - A very powerful Unique Shield that will greatly increase our survivability and sustain thanks to the 100% Block Chance modifier. It synergizes extremely well with block chance as it restores Health on each Block. This Shield is one of the rarest Items in the game, so don't worry if you haven't got one yet. |
||||||
|
Idols: You can make great use of Large Rahyeh Idols as they can grant you a lot of increased Damage with your Smite ability. Pair it with Resistances or Health. You can also get one with the modifier that heals you a bit every time you use a Lunge. To fill remaining Idol slots, use Stout Idols, ideally with both Health modifiers, but you can also use a few Resistance modifiers there. |
||||||
|
Recommended Blessings:
|


|
END NOTE This is the beta version of our Earthquake Werebear Druid Build for Last Epoch, which makes great use of Bhuldar's Wrath Unique Weapon. We had amazing results with the final form of this Build, and we can attest you won't be disappointed with it. If you enjoy high bursts of damage and don't like to worry about mana management, you have to try out this Build! Future Patches can change the performance of this Build, we will keep our eyes on it and update this guide accordingly to the game's growth. |
Pictures used in this article are the intellectual property of Eleventh Hour Games