Auto-Bomber Anger Rehan Build for Torchlight Infinite
One of the smoothest Rehan builds which automatically triggers powerful Attacks via Exquisite Box AmuletExquisite-Bomber
Anger Rehan Build
Last Updated: 16 March 2023
Build Overview
Anger Rehan is a pure Melee class that focuses on raw strength to deal massive damage with various attacks. Normally, you would consider this to be a straightforward archetype, with very limited flexibility when it comes to your character customization and playstyle. And you couldn't be more wrong... solely because of the Exquisite Box Legendary Trinket. After equipping this Item, your Skills from the 3rd, 4th, and 5th slots, will be triggered automatically under specified conditions. And this works with Attacks too, and for some reason, weapon restrictions don't apply here. So you can even use Bow attacks while wielding a high DPS Two-hander... That's what we decided to do with Rain of Arrows. This Attack appears to be targeted directly at your enemies, while other abilities tend to hit in the wrong direction, missing their target and lowering your damage.
Rain of Arrows will be socketed in the 5th slot, and Exquisite Box will trigger it whenever you deal damage, which is basically all the time. All you need to do is press one button to channel Savage Charge and rush through Maps, while everything around you dies quickly from the Burst and Rain of Arrows cast automatically and with insane frequency. The other two slots are triggered when you take damage, which limits the frequency significantly, so those will be used for utility abilities with a set duration like Bull's Rage and Delayed Pain, increasing your DPS and survivability. In your last free Slot, you can either use Leap Attack for better mobility, or Life Source for better survivability against Bosses.
You can also check our other Torchlight Infinite builds at The Best Torchlight Infinite character Builds
 Pros Pros |
| One of the smoothest and most enjoyable playstyles with just one button pressed |
| Solid damage allows this build to farm Tier 8 Maps and most of the Bosses |
| Good Defenses based on Life, massive Life Regen, and a strong Barrier |
| Mobile devices friendly |
 Cons Cons |
| Requires Exquisite Box which starts at around 500 FE and other also quite expensive Legendaries |
| Your Maximum DPS is capped at around a few hundred million |
Talents
|
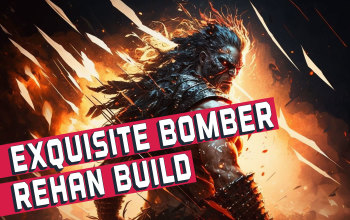
GOD OF WAR |
|
This is purely a Physical DPS build so the Brutality Passive offers the highest possible DPS multiplier for this build. Also, Fervor is one of the core mechanics used in this build, and the corresponding Talent here gives you the ability to generate it nearly instantly making this Tree a mandatory selection. On the Tree itself you will find mainly generic stats like Global Damage, Critical Damage related nodes, and Maximum Life. The last Tier node that allows you to instantly recover 30% of your Life when taking a big hit greatly supplements this build that is oriented on high Life "consumption" and recovery. Main Talents: Brutality: +35% additional Physical Damage, Cannot Deal Elemental Damage. This Talent provides the best damage multiplier for this build-out of all T1 Talents in the game. There are some variations of this build that can utilize different damage types, and only then you should take Determined - however, this is option is not described in the following guide Endless Fervor: Have Fervor, +30% Fervor effet Another critical Talent for this build. Fervor increases your Movement Speed, Critical Strike Rating, and grants a very high chance to deal Double damage via other Item and Passive Skill synergies |
|
SHADOWDANCER |
|
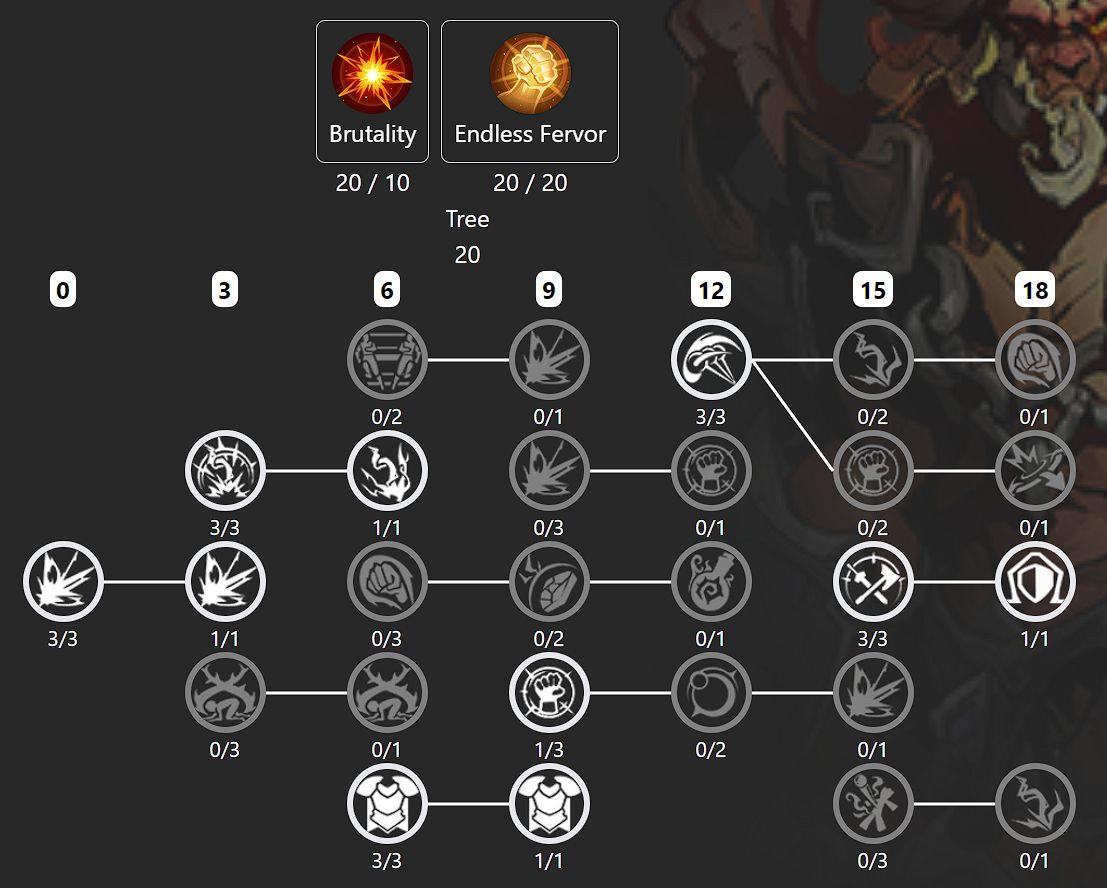
Shadowdancer Tree directly affects both Physical and Triggered Skills, making it the best choice for this Tier. You should allocate basically all the nodes that amplify these types of damage, and also the nodes to reduce Mana Sealed by Triggered Skills and your Auras. You will find three extremely powerful nodes in the last Tier, so allocating over 45 Points in here shouldn't surprise you. Obviously, if you end up using a different Attack than Rain of Arrows (or Projectile Skill for that matter), you should skip the nodes that boost Projectile Radius and Speed in the bottom right part of this Tree. Main Talents: Blunt: Damage/Minion Damage Ignores Armor, +15% Chance for Physical Damage to Inflict Paralysis on HIt. Not only this increases your DPS significantly but it is also the only Talent here that actually benefits your character. If you were for some reason using Spells, possibly Continuum could be considered (but in the current state of the game it appears to be a complete waste of potential) Hair Trigger: +1% chance for Triggered Skills to deal Double Damage per 3 Fervor Rating. The best Talent which basically grants you 33% to deal double damage as you will be running permanently at a 100 stacks |
|
WARLOCK |
|
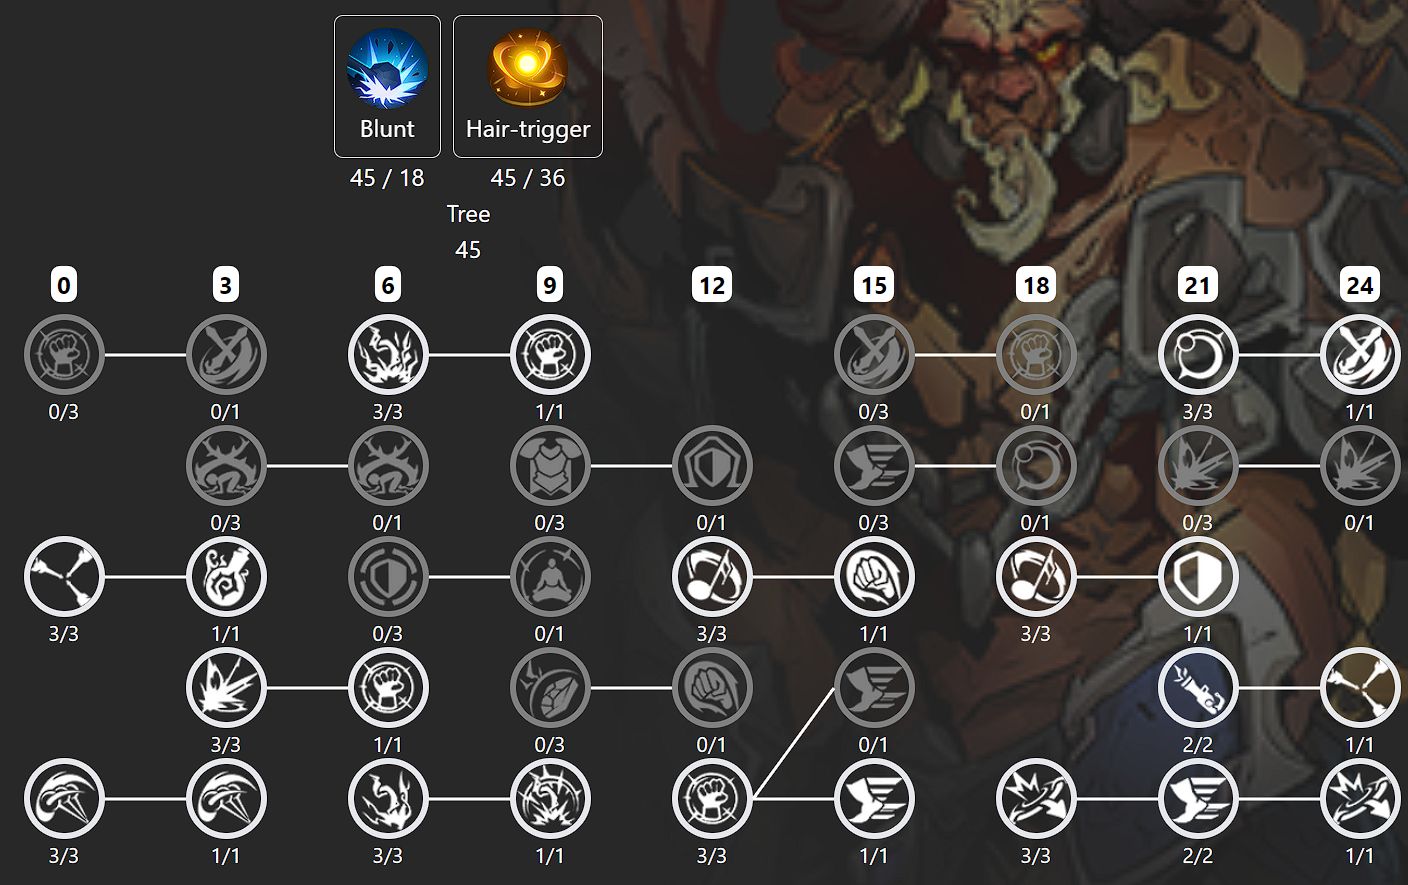
Warlock Tree focuses heavily on Cooldown Reduction, which is one of the best ways to scale your damage for basically, all Trigger builds in Torchlight Infinite. You should also get the Blur nodes from higher Tiers which improve your Movement Speed and Survivability Main Talents: Merciless: 15% of bonuses or reductions to Attack Speed also apply to Cooldown Recovery Speed, 15% of bonuses or reductions to Cast Speed also apply to Cooldown Recovery Speed. This Talent is the main reason the Warlock Tree was selected in the first place. It offers potentially massive Cooldown Reduction and DPS boost by increasing the frequency at which all your triggered Skills are used. Off the Beaten Track: +3 Support Skill Level, Man Multiplier is set to 105% increases the level of all your Support Skills, offering additional bonuses from them |
|
HERO TRAITS |
|
|
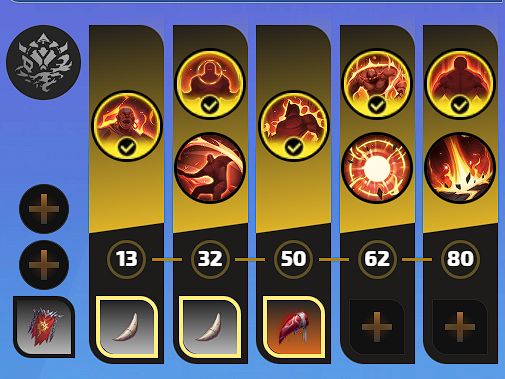
HERO RELIC On your Hero Relic, you should prioritize Cooldown Recovery Speed, and possibly get the unique affix that increases your Critical Strike Damage for every 30 Points of Rage obtained recently. This shouldn't be too expensive, but if so, you can always look for more generic stats like Attack and Cast Speed (that will both reduce your Cooldowns thanks to the Talents recommended earlier) HERO MEMORIES You definitely should get one Hero Memory that unlocks the Frenzy Furious Hero Trait. It increases your Critical Strike Rating and Damage based on your Rage level. Other than that you can either get Cooldown Recovery Speed for extra DPS, extra Movement Speed or % Life Restoration whenever you take damage for extra self-sustain. |
SKILLS
| "ACTIVE" SKILLS |
|
SAVAGE CHARGE This is the only Skill that you are required to use. And you can basically press it permanently to charge through Maps while pretty much everything else is cast for you. This deals low damage because of mainly Utility Supports allocated here, but also due to the use of Tunnel Vision Trait. Still, in the endgame, you may adjust it for slightly better damage output and try to use it accordingly. Support Skills:
|
|
The only other Skill that you should use manually. Life Source offers extra healing against tougher Bosses or deadly degen effects. Can be replaced with Leak Attack for extra mobility too Support Skills:
|
|
Delayed Pain should be allocated in your 3rd slot, and will be triggered automatically when you take damage. It is used to mitigate a portion of incoming damage Support Skills:
|
|
BULL'S RAGE Bull's Rage, just like Delayed Pain, should be triggered by Exquisite Box when you take damage, which is achieved by allocating it in the 4th slot. Bull's Rage increases Melee Attack Speed and Skill Radius, increasing your DPS output. Support Skills:
|
|
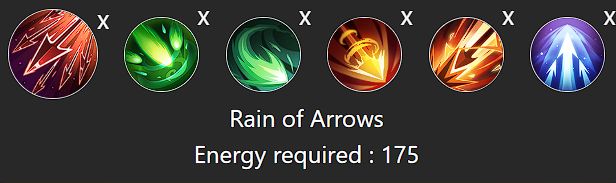
Rain of Arrows is your primary DPS source. Surprisingly enough, Exquisite Box can trigger it ignoring the weapon requirements completely. We have tested this build with a bunch of Attacks, and even if some could get close to the DPS output, they lacked AoE or consistency. Right now, this is the best one to use in this setup, but we do encourage you to try out different Skills Support Skills:
|
| AURAS & PASSIVE SKILLS |
|
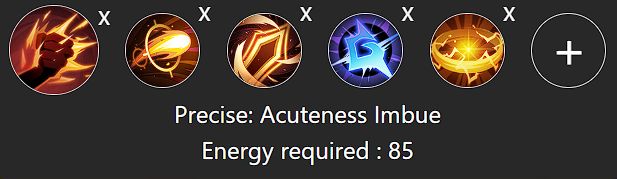
For your DPS Auras, you should use Acuteness Imbue, Precise Projectiles, and Weapon Amplification. All three have Precise variants, which are recommended. All those Auras directly increase the Physical Damage you deal with Attacks. If for some reason you are not using Rain of Arrows (or another Projectile Skill) make sure to replace Precise Projectiles with another Aura (presumably Fearless for Melee Skills) Support Skills:
|
|
The second setup consists of less important Auras that will have to Seal a small portion of your Life. Swiftness is heavily recommended, as moving fast is all this build is about, while Steadfast is optional, and should be used if you feel like the extra Armor makes you tankier even with a slightly lower base Life Support Skills:
|
|
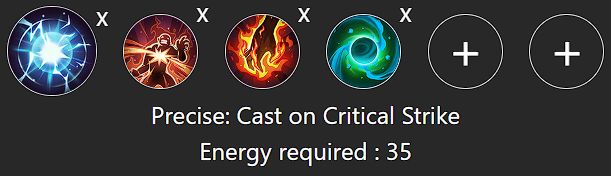
You should also use a Cast on Crit setup to automatically trigger your Curse and Fixate, for an extra chance to deal double damage. Vulnerability is the best Curse for pure Physical DPS builds, so it's kind of an obvious choice here. Again, you will have to support those Skills with Seal Conversion, because of the low Mana pool. Support Skills:
|


EQUIPMENT
| STAT PRIORITY | ||||||||||
|
This build relies heavily on expensive and specific Legendary equipment, leaving not much choice in your other slots. You will have to Cap your Resistances, including Erosion if you are looking to face end-game Bosses conveniently, and you will need high Life Regeneration on both your Rings and Chest to cover up the degen from Ghost Slaughter. It would help if you also got the highest Physical DPS weapon you can afford, possibly with a high Area Damage multiplier and built-in Focused Strike.
|
||||||||||
| LEGENDARY ITEMS | ||||||||||
Infinity with Versatile Talent and additional Cooldown Reduction will be one of the best Items for this slot. Other than that, just look for all the previously mentioned affixes, or possibly bonuses to Fervor Effect
A must-have Helmet, which adds a lot of Physical Damage to your Attacks, Crit Rating, Life, and instant Life Recovery. It also makes you unable to regenerate Mana, which is why you need to convert the Cost of all your active Skills with the corresponding Support Skills. It can also be corroded, offering lower but more consistent Life Recovery which instead happens every second with less Life Recovered with each tick
Exquisite Box is the build-defining Item that will cause three of your Active abilities to be triggered under set conditions. The 5th slot is the most important and should host your main DPS dealing ability, which in our case is Rain of Arrows. The internal cooldowns are reduced by global modifiers to Increased Cooldown Recovery Speed, which is why it's such an important stat
Another extremely important (and expensive) part of this build. This pair of Gloves grants massive damage bonuses based on your Fervor and requires you to invest into extra Life Regeneration (approx. 400) to mitigate the Life "consumption" it brings to the table
The best-in-slot pair for this build. Since you will be running around with 100 Fervor stacks basically permanently, getting an additional 33% Movement Speed, and up to 160% increased Fervor Effect is basically impossible to replace. |


|
END NOTE This is our initial version of Anger Rehan Auto-bomber setup for Torchlight Infinite's Season 2. It is one of the most powerful and smoothest "free to play" builds in the game which can reach several hundred Millions of damage with literally one button used. Remember to check this Guide regularly. as we constantly update our content to match the newest trends and have our builds compliant with the newest Patches. |
Pictures used in this article are the intellectual property of XD Inc.