Poison Strike Necromancer Project Diablo 2 Build
A Top Tier Map farming build for the Necromancer class which utilizes the Poison Strike Attack to inflict massive damage over timePoison Strike Necromancer Build
Last Update: April 20, 2026
Introduction
Poison Strike Necromancer is a top-tier Map-farming build currently. It offers simply massive damage and clear speed, allowing you to jump between packs applying your powerful DoTs. It's a very simple setup where you teleport between packs, hitting them with Poison Strike and progressing forward at an unparalleled pace. The only downside to that is that you leave a lot of Poison enemies behind, and you will need to backtrack a lot for the loot.
This setup can do most of the content with ease, and it can be considered very tanky too. We tried to make our recommended setup as smooth as possible, making this build viable for various scenarios. The recommended setup involves maxing your Energy to increase the absorption from Bone Armor. You can also increase your Block Chance with items like Steel Shade and Martyrdom, and possibly spend some extra points on Dexterity depending on your preferred setup.
Recommended Breakpoints (Quick Overview)
To make the build feel smooth and responsive, you should aim for the following breakpoints:
- Increased Attack Speed (IAS): 99% (core target for optimal Poison Strike speed)
- Faster Cast Rate (FCR): 48% (minimum) → 75% (ideal for smooth Blood Warp)
- Faster Hit Recovery (FHR): 39% (starter) → 56%+ (recommended)
- Life After Each Kill (LAEK): 9+ (very important for sustaining aggressive Blood Warp playstyle)
These values ensure fluid mobility, consistent damage application, and strong sustain while chaining packs together.
Stat Allocation (Baseline Setup)
- Strength: Just enough to equip your gear
- Dexterity: Just enough for gear (optionally slightly higher if going for Block)
- Vitality: Enough to reach around ~1000 Life before Battle Orders for comfort
- Energy: Dump all remaining points here to scale Bone Armor absorption, which becomes your primary defensive layer in endgame setups
Pros
- Insane clear speed
- Amazing mobility even without Enigma
- Possibly the best Map farming setup in the game currently
- Solid defenses - in some setups, allowing you to face tank some of the tough Bosses too
Cons
- Requires expensive gear to function properly on higher Tiers
You can also visit this page to check our other Project Diablo 2 Builds
Skill Trees


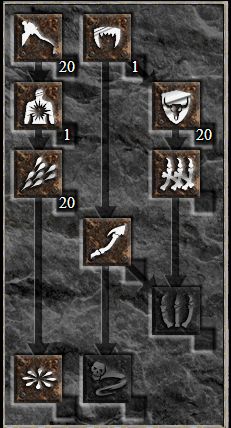
The core of this build revolves around the Poison and Bone tree, which is completely straightforward and leaves no room for variation. Your main ability is Poison Strike, and it should always be maxed, alongside its two synergy skills: Bone Armor and Desecrate. This setup provides both your primary source of damage and your main defensive layer. Bone Armor, in particular, scales with your Energy investment, making it extremely powerful in endgame setups. There are no alternative versions of this build that deviate from this core — these three Skills are always fully maxed.
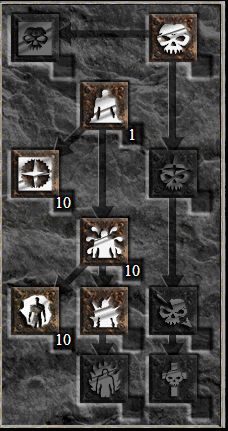
For the Summoning tree, your focus is on utility, survivability, and mobility rather than damage. You should invest in Blood Warp and Blood Golems, along with Golem Mastery to improve their effectiveness. The general goal is to optimize Blood Warp to reach a 0-second cooldown, allowing you to move freely between packs and maintain a very fast clearing pace. Blood Golems serve primarily as a defensive layer — they tank damage and provide Life Steal, which synergizes well with your aggressive playstyle.
In most optimized versions of this build, Golems are treated as support rather than a primary focus, and once your Blood Warp is fully optimized, remaining points are typically allocated between Golem Mastery and Blood Golem. However, some variations — especially in earlier stages of progression — invest more heavily into Golems, as they can significantly improve survivability and make the build more forgiving before you acquire stronger gear and sufficient sustain (such as Life After Each Kill).
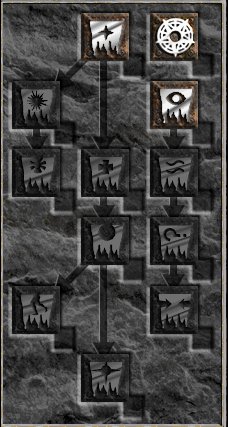
The Curse tree is not used in this build, and no points are allocated there.
Gear
The Poison Strike Necromancer has a flexible gearing path, but most setups revolve around a few key items and clear upgrade routes. Your goal is to scale Poison damage, reach important attack speed breakpoints, and maintain strong survivability through Bone Armor and sustain effects.
In the early and mid game, the most reliable option is to use the Trang-Oul's Avatar set combined with a Poison-focused weapon like Blackbog's Sharp. This setup provides solid Skill Levels, Resistances, and Poison Damage, making it ideal for campaign progression and early farming. It’s also relatively easy to acquire, which makes it the default starting point for most players.
As you move into more optimized setups, your weapon choice shifts toward the Plague Runeword, which is considered the best-in-slot option for this build. It offers -Enemy Poison Resistance, strong utility through procs like Lower Resist, and additional Skill bonuses. This is the point where the build transitions into a true endgame mapper, with significantly improved clear speed and damage output.
For the rest of your gear, you typically combine high-end Uniques and Runewords depending on your preferred balance between damage and survivability. Offensive setups often include items like Andariel's Visage for Attack Speed and Skill bonuses, alongside Arachnid Mesh for additional Skills and Faster Cast Rate. These choices help you reach key breakpoints and maximize your damage output.
On the defensive side, items like Martyrdom and the Innocence Runeword are commonly used together to automate Bone Armor uptime and significantly improve survivability. This combination is especially effective in higher-tier maps, where consistent defenses and sustain are more valuable than raw damage. Alternatively, you can opt for Bramble Runeword if you want to maximize Poison damage, although it offers less utility and survivability compared to Innocence-based setups.
Mobility and utility can also be further enhanced with Enigma Runeword, although it is not required, as Blood Warp already provides excellent movement. Enigma becomes more relevant in highly optimized setups where you aim to maximize speed and efficiency.
Ultimately, your gearing choices should aim to balance Poison damage scaling, Attack Speed breakpoints, and defensive layers. Whether you lean more toward damage with Bramble or survivability with Innocence and Martyrdom, both approaches are viable and depend on your progression stage and the type of content you are focusing on.
Charms
For Charms, there are a few core pieces that every version of this build should aim to include. Annihilus and Hellfire Torch are essential, providing valuable bonuses to Skills, Attributes, and Resistances.
For the rest of your inventory, you should prioritize Grand Charms with bonuses to Poison and Bone Skills, ideally combined with additional Life for better survivability. In more optimized setups, you may also want to include Grand Charms with Faster Hit Recovery to help reach important breakpoints.
Your Small Charms should primarily be used to fill gaps in your build — most commonly Resistances, Life, or Faster Hit Recovery — depending on what your current gear is lacking.
Mercenary
The Poison Strike Necromancer has several strong Mercenary options, each suited for different stages of progression and playstyles. While none of them are strictly mandatory for the build to function, choosing the right one can significantly improve your clear speed, survivability, or overall comfort.
For early progression and general farming, the best and most commonly recommended option is the Act 1 Fire Mercenary with Vigor Aura. This setup greatly improves your mobility, allowing you to move faster between packs and maps, which directly translates into better farming efficiency. It’s especially valuable early on, when your gear and mobility options are still limited.
As you transition into stronger setups, the Act 5 Mercenary becomes a very powerful offensive choice. When equipped with Rapture Runeword, it provides consistent Lower Resist procs, which significantly increase your Poison damage output. This option is ideal for players who want to push higher-tier maps or maximize their damage against tougher enemies and bosses.
For more defensive or high-tier content (especially T3 maps), the Act 3 Prayer Mercenary is a strong alternative. With access to powerful aura-based gear like Beast Runeword, Exile Runeword, and Innocence Runeword, this setup offers additional sustain, defensive layers, and utility. It is particularly useful if you find yourself too squishy, as it helps stabilize your gameplay and reduces incoming damage pressure.
Overall, the choice of Mercenary comes down to your priorities:
- Act 1 (Vigor) → best for speed and smooth farming
- Act 5 (Rapture) → best for maximizing damage
- Act 3 (Prayer + Auras) → best for survivability in harder content
Each option is fully viable, and you can swap between them depending on your current gear level and the type of content you are focusing on.
Final Thoughts
Poison Strike Necromancer is a powerful and versatile build, offering great clear speed, solid defenses, and smooth progression from early game into endgame mapping. It works well both as a starter and a fully optimized farming character.
We aim to keep this and other Project Diablo 2 guides up to date with each Season, improving them as the meta evolves and adding more builds and useful content over time. If you feel something is missing or have suggestions for future guides, feel free to share your feedback — it helps us improve and create better content.
Images used in this article are the intellectual property of Blizzard Entertainment or its corresponding owners.