
Hydra Sorceress PD2 Build
An uprising best Build for the Sorceress that commands multiple fiery Hydras to burn hordes of monsters with powerful flamesHydra Sorceress Build
Last Update: April 23, 2026
Introduction
The Hydra is an iconic Sorceress ability that offers a unique playstyle that blends minion and manual casting like no one else. You will move around and create stationary Hydras that shoot Fire Balls at nearby enemies. By default, you can summon up to 6 Hydras at once, but you can increase this limit with certain Items such as the Dragon Runeword. Season 13 greatly enhances this ability by making those projectiles automatically Pierce enemies, which is a massive buff for Clear Speed and farming potential.
To unlock the Hydras, you will first need to use the Lesser Hydra. It uses non-piercing Fire Bolt instead of Fire Ball, so it severely lacks AoE potential. It deals less base Damage, but scales better with synergies, so its DPS during early progression will be higher and should be used to deal with campaign Bosses and other tougher enemies you might encounter. You should also keep in mind that your summons do not benefit from Resistance Penetration, although you can still reduce Enemy Resistance with Conviction Aura or other similar effects.
The Teleport is a popular Skill used to speed up your journey, but it massively lowers your Damage for 1 second after using it, which affects your Hydras as well. It can be used when traveling through empty zones and picking up loot, but while fighting enemies, you will want to move around by simply walking to avoid losing DPS. It will be, of course, enhanced by the recently fixed Blaze Skill, which massively improves your Movement Speed for a few seconds, which will be naturally improved by your Fire Skill modifiers.
The Sorceress has access to a unique method of defending your Life with Mana in the form of Energy Shield. You will redirect a large portion (up to 95%!) of the incoming Damage to your Mana at a favourable rate. At the top end, you will reduce the redirected Damage by 50%. Keep in mind the redirected portion won't be reduced by your Elemental Resistances, which saves you the trouble of getting Resistances on your Gear, but also is not as good as reducing it by 75%. The big advantage is that you can amass a vastly higher amount of maximum Mana than Life, and your Mana automatically regenerates over time. This setup is not useful during the campaign progression, as at first, Energy Shield burns your Mana at an increased rate.
Recommended Breakpoints
You only need the bare basics to ensure smooth gameplay:
- Faster Cast Rate (FCR): 37% (low budget) → 63% (high investments)
- Faster Hit Recovery (FHR): 42% (good enough for most content)
The DPS of your Hydras does not scale with your Cast Rate, but getting a bit of FCR helps with faster summoning and teleports. It is useful to have, but it is not worth wasting your entire budget on getting to the next breakpoint. The FHR is highly subjective and depends on your gameplay style.
Stat Allocation
- Strength: Enough to meet gear attribute requirements
- Dexterity: Enough to meet gear attribute requirements
- Vitality: Base (Dump in early progression)
- Energy: Put everything else here once you switch to Energy Shield style
The Sorceress gains only 2 Life for each point in Vitality. Later on, it is better to invest all into Energy to gain Mana, which can be increased by your Items more efficiently. You might also need to put plenty of points into Strength and Dexterity, depending on your final Setup.
Pros
- Great DPS potential
- Effortless yet engaging playstyle
- Very good sustain
- Simple gearing options
Cons
- Lacks upfront damage
- Expensive to optimise due to the high demand for specific Corruptions
You can also visit this page to check our other Project Diablo 2 Builds
Skill Trees
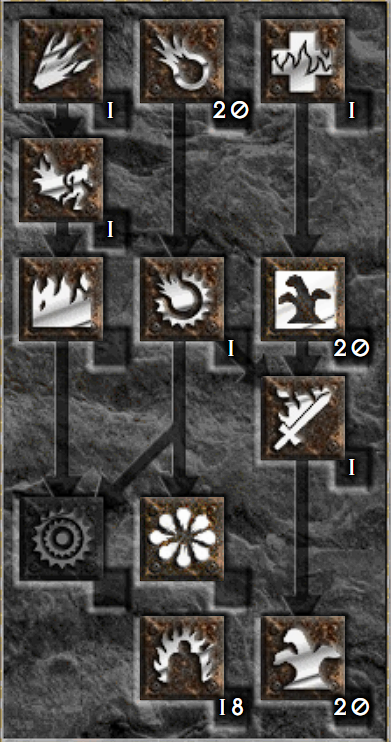
You will obviously pick the Hydra and all its prerequisites. You should also max out the synergies to greatly boost your Damage. At this point, you will notice the Lesser Hydra has similar synergies, but gains twice the bonuses, which is why it will be slightly stronger during the campaign against Bosses.
The Fire Mastery simply improves your Fire Damage, but remember that Fire Pierce does not affect your Hydras. The first level provides insane value, while each next level is only 4% increased Damage. Dump all your free points here once you have nothing else to max out.
Optionally, you can invest in Meteor to deal with Fire Immune Enemies during the early progression, but it is not really worth it in the long term. Later on, you should either break their Immunities with certain Items or skip them for the sake of efficiency.
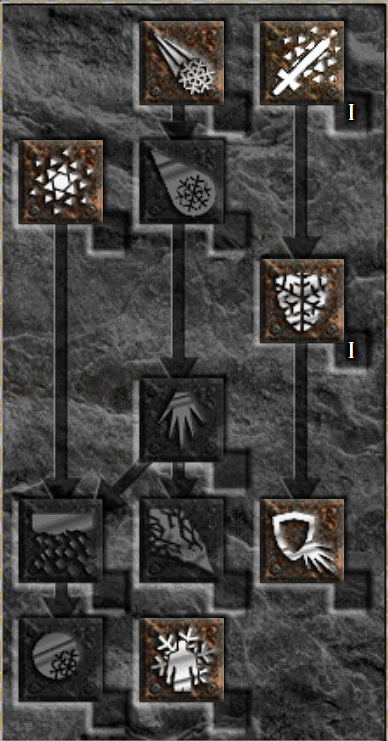
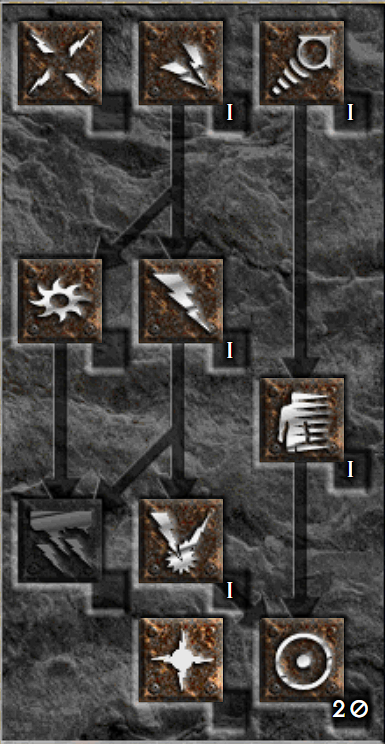
Your mobility comes from two Skills: Blaze and Teleport. Leave them at level 1 just to unlock their functionality. In the Lightning Tree, you will also want to fully invest in Energy Shield. This Skill is not worth using if you can't commit all points there, as each hard level drastically improves its effectiveness. In Project Diablo 2, it no longer scales with Telekinesis.
The Shiver Armour provides a decent survivability boost for a mere investment of 2 Skill Points. It improves your Defense and freezes your Attackers.
Gear
It is a fairly standard Spell-caster Build, although you don't need to focus on Faster Cast Rate at all. You will only need bonuses to Skill Levels, Fire Damage, and lowering Enemy Fire Resistance. The defensive aspect is fairly unique, as you will rely on Energy Shield, which means any bonuses to your Mana are very valuable. You can ignore Elemental Resistances, as they do not affect the Damage dealt to your Mana. Although Poison bypasses Energy Shield, you can simply drink Antidote Potion instead. A bit of extra Life and Resistances are still useful to have to avoid becoming defenseless once you run out of Mana.
You should aim to use Eschuta's Temper or the new Embersworn paired with Phoenix Shield. This Runeword Shield greatly lowers enemy Fire Resistance and provides amazing sustain through Redemption Aura. You can also use Dragon Shield instead for a massive boost to your Damage. This Runeword should be used on your Body Armour instead, as there are not that many useful options otherwise. If you lack defense, you should boost your Energy Shield with the Memory Runeword, which grants 6 Levels for that Skill. In your Weapon swap, you will be running the standard Call to Arms and Lidless Wall combo to get beneficial Warcries.
There are no better Gloves to wear other than Magefist. Similarly, anything other than Arachnid Mesh as your Belt is suboptimal. For Rings, the Stone of Jordan is ideal due to Skill level and hefty amount of Mana, although you can also opt for Wisp Projector, Kadala's Heirloom, or Bul-Kathos' Wedding Band if you happen to find them first. The Raven Frost can be used if you lack protection against Freeze.
The most common choice for Amulet is the Mara’s Kaleidoscope, although you might also get a cheaper Tal Rasha's Adjudication for +2 Skills, or a Magic Amulet with +3 Skills and something useful on top of that.
For the Helmet, you should ideally strive for the Shako, but if that's still unobtainable, you might choose the Kira's Guardian instead.
The Boots offer some flexibility. The Silkweave offers a decent boost to your Mana, although the Merman's Sprocket offers better sustain and much higher Movement Speed. The War Traveler is also a good option if you lack Magic Find.
Charms
The Charms are very simple and straightforward, as they follow the logic of your previous items. The most important Charms are Fire Skillers, ideally with something extra on top of that.
The Small Charms are used to fill the gaps: you will want Life, Resistances, Faster Hit Recovery, or Magic Find there.
You will obviously want all 3 Unique Charms: Gheed's Fortune, Hellfire Torch, and Annihilus. All provide very valuable bonuses, which reflect on their price.
Base Damage: 18 to 50
Base Durability: 60
Base Speed Modifier: -10
One-Hand Damage: 18 to 50, Avg 34
Base Damage: 23 to 55
Base Durability: 70
Base Speed Modifier: -10
One-Hand Damage: 23 to 55, Avg 39
12% Chance to Cast Level 40 Hydra on Striking
20% Chance to Cast Level 18 Venom when Struck
Level 12 Holy Fire Aura when Equipped
+[4-5] to Hydra (Sorceress Only)
+[400-550] Defense
+[0-37] to Strength (+0.375 per Character Level)
+75 to Mana
+4% to Maximum Lightning Resist
Physical Damage Taken Reduced by 9
Lum • Io • Sol • Eth
+33% Faster Cast Rate
+9 to Minimum Damage
-25% Target Defense
+2 to Energy Shield (Sorceress Only)
+2 to Static Field (Sorceress Only)
+50% Enhanced Defense
+10 to Vitality
+10 to Energy
Increase Maximum Mana [25-40]%
Magic Damage Taken Reduced by 7
Minimum Item Level: 80
Occurrence Rate: 5/75
Base Durability: 25
Defense: 90-170
-[10-15]% to Enemy Fire/Cold/Lightning Resistance
[50-120] Defense
All Resistances +[25-40]
Half Freeze Duration
Base Durability: 12
Base Defense: 54-62
Base Kick Damage: 75 to 100, Avg 87.5
Defense: 104-162
Adds 40-80 Cold Damage
+[50-100] Defense
Regenerate Mana [10-20]%
+[50-100] Maximum Stamina
50% Slower Stamina Drain
Mercenary
During the campaign, there are many viable options you can pick for your Mercenary depending on your luck with drops, but for the endgame, there is only one optimal choice, which is an Act 2 Mercenary with the Defiance Aura. The main reason for this pick is the Infinity Runeword in the Weapon, which lowers Enemy Resistances via Conviction Aura. No other Setup can grant you as much Damage as this one. The remaining items should be focused on the survival of your Mercenary, or lowering the Fire Resistance of your Enemies even more. Such Items include:
- Flickering Flame (Helmet)
- String of Ears or Nosferatu’s Coil (belt)
- Shaftstop (Armour)
- Lava Gout's or Dracul Grasp (gloves)
- Rare Boots with Life, Movement Speed, and Resistance
Final Thoughts
The Hydra Sorceress is shaping up to be the best Build you can pick for Season 13. It is strong, fast, and surprisingly durable. The hybrid playstyle is vastly different from any other Build, making it unique and engaging. It excels at fighting Uber Bosses without compromising too much on the Clear Speed, which is very important for smooth and enjoyable progression.
We will continue updating this guide with future Project Diablo 2 changes and expand our PD2 content with more builds and strategies.
If you have suggestions or would like to see other builds covered, feel free to share your feedback—it helps us improve and deliver better guides.
Images used in this article are the intellectual property of Blizzard Entertainment or its corresponding owners.